
Just as it is difficult to live your life without talking with people, your applications also need to communicate, perhaps with other programs or perhaps with hardware devices. As you have seen throughout this book, you can use a variety of techniques to have your program communicate, including .NET Remoting, Web Services, and Enterprise Services. This chapter looks at yet another way to communicate: using the basic protocols on which the Internet and many networks have been built. You will learn how the classes in System.Net can provide a variety of techniques for communicating with existing applications such as web or FTP servers, or how you can use them to create your own network applications.
Before getting started on writing applications using these classes, however, it would be good to get some background on how networks are bolted together, and how machines and applications are identified.
No discussion of a network is complete without a huge number of acronyms, seemingly random numbers, and the idea of a protocol. For example, the World Wide Web runs using a protocol called HTTP or Hypertext Transfer Protocol. Similarly, there are File Transfer Protocol (FTP), Network News Transfer Protocol (NNTP), and Gopher, also a protocol. Each application you run on a network communicates with another program using a defined protocol. The protocol is simply the expected messages each program will send the other, in the order they should be sent. For a real-world example, consider a scenario in which you want to go see a movie with a friend. A simplified conversation could look like this:
You: Dials phone
Friend: Hears phone ringing, answers phone. "Hello?"
You: "Hello. Want to go see 'Freddie and Jason Escape from New York, Part 6'?"
Friend: "No, I saw that one already. What about 'Star Warthogs'?"
You: "OK, 9:30 showing downtown?"
Friend: "Yes."
You: "Later."
Friend: "See you," hangs up
Apart from a bad taste in movies, you can see a basic protocol here. Someone initiates a communication channel. The recipient accepts the channel and signals the start of the communication. The initial caller then sends a series of messages to which the recipient replies, either to signify they have been received or as either a positive or a negative response. Finally, one of the messages indicates the end of the communication channel, and the two disconnect.
Similarly, network applications have their own protocols, defined by the application writer. For example, sending an e-mail using SMTP (Simple Mail Transfer Protocol) could look like this:
220 schroedinger Microsoft ESMTP MAIL Service, Version: 6.0.2600.2180 ready at Wed,
6 Oct 2004 15:58:28 −0700
HELLO
250 schroedinger Hello [127.0.0.1]
FOO
500 5.3.3 Unrecognized command
MAIL FROM: me
250 2.1.0 [email protected] OK
RCPT TO: him
250 2.1.5 him@schroedinger
DATA
354 Start mail input; end with <CRLF>.<CRLF>
subject: Testing SMTP

Hello World, via mail.
.
250 2.6.0 <SCHROEDINGERKaq65r500000001@schroedinger> Queued mail for delivery
QUIT
221 2.0.0 schroedinger Service closing transmission channel


Connection to host lost.
In this case, lines beginning with numbers are coming from the server, while the items in uppercase (and the message itself) were sent from the client. If the client sends an invalid message (such as the FOO message in the preceding example), then it receives a gentle rebuff from the server, while correct messages receive the equivalent of an "OK" or "Go on" reply. Traditionally, for SMTP and many other protocols (including HTTP), the reply is a three-digit number (see the following table) identifying the result of the request. The text after the number, such as 2.1.0 me@schroedinger . . . Sender OK, isn't really needed, and many servers attempt to be overly cute or clever here, so it isn't a good idea to assume anything about this text. The return values for the services generally fall into one of five ranges. Each range identifies a certain family of responses.
Range | Description |
|---|---|
100–199 | Message is good, but the server is still working on the request |
200–299 | Message is good, and the server has completed acting on the request |
300–399 | Message is good, but the server needs more information to work on the request |
Message is good, but the server could not act on the request. You may try the request again to see whether it works in the future. | |
500–599 | The server could not act on the request. Either the message was bad or an error occurred. It likely won't work next time. |
Other protocols use this technique as well (leading to the infamous HTTP 404 error for "Page not found"), but they don't have to. Having a good reference is key to your success, and the best reference for existing protocols is the Request for Comments (RFC) for the protocol. These are the definitions that are used by protocol authors to create their implementation of the standard. Many of these RFCs are available at the IETF (www.ietf.org) and the World Wide Web Consortium (www.w3.org) websites.
The next important topic necessary to a thorough understanding of network programming is the relationship between the names and addresses of each of the computers involved. Each form of network communication (such as TCP/IP networks such as the Internet) has its own way of mapping the name of a computer (or host) to an address. The reason for this is simple: computers deal with numbers better than text, and humans can remember text better than numbers (generally). Therefore, while you may have named your computer something clever like "l33t_#4x0R," applications and other computers know it by its IP (Internet Protocol) address. This address is a 32-bit value, usually written in four parts (each one a byte that is a number from 0 to 255), such as 192.168.1.39. This is the standard the Internet has operated on for many years. However, as only about four billion unique addresses are possible using this method, another standard, IPv6, has been proposed. It is called IPv6 because it is the sixth recommendation in the series (the older 32-bit addresses are often called IPv4 to differentiate them from this new standard). With IPv6, a 128-bit address is used, leading to a maximum number of about 3 × 1028 unique addresses, which would be more than enough for every Internet-enabled toaster.
This IP address (whether IPv4 or IPv6) must uniquely identify each host on a network (actually subnetwork, but I'm getting ahead of myself). If not, then messages will not be routed to their destination properly, and chaos ensues. The matter gets more complicated when another 32-bit number, the subnet mask, enters the picture. This is a value that is masked (using a Boolean AND operation) over the address to identify the subnetwork of the network on which the computer resides. All addresses on the same subnetwork must be unique. Two subnetworks may have the same address, however, as long as their subnet masks are different.
Many common subnetworks use the value 255.255.255.0 for the subnet mask. When this is applied to the network address, as shown in the following example, only the last address is considered significant. Therefore, the subnetwork can include only 254 unique addresses (0 and 255 are used for other purposes).
Network address:        192.168.  1.107
Subnet Mask:            255.255.255.  0
Result:                 192.168.  1.  0
Because computers and humans use two different means of identifying computers, there must be some way to relate the two. The term for this process is name resolution. In the case of the Internet, a common means of name resolution is yet another protocol, the Domain Naming System (DNS). A computer, when faced with an unknown text-based name, will send a message to the closest DNS server. It then determines whether it knows the IP address of that host. If it does, it passes this back to the requester. If not, it asks another DNS server it knows. This process continues until either the IP address is found or you run out of DNS servers. After the IP address is found, all of the servers (and the original computer) store that number for a while in case they are asked again.
Keeping in mind the problems that can ensue during name resolution can often solve many development problems. For example, if you are having difficulty communicating with a computer that should be responding, then it may be that your computer simply can't resolve the name of the remote computer. Try using the IP address instead. This removes any name-resolution problems from the equation, and may allow you to continue developing while someone else fixes the name-resolution problem.
As described earlier, each computer or host on a network is uniquely identified by an address. How does your computer realize which of possibly many applications running are meant to receive a given message arriving on the network? This is determined by the port at which the message is targeted. The port is another number, in this case an integer value from 1 to 32,767. The unique combination of address and port identifies the target application.
For example, assume you currently have a web server (IIS) running, as well as an SMTP server, and a few browser windows open. When a network message comes in, how does the operating system "know" which of these applications should receive the packet? Each of the applications (either client or server) that may receive a message is assigned a unique port number. In the case of servers, this is typically a fixed number, whereas client applications, such as your Web browser, are assigned a random available port.
To make communication with servers easier, they typically use a well-known assigned port. In the case of web servers, this is port 80, while SMTP servers use port 25. You can see a list of common servers and their ports in the file %windows%sudhasystem32sudhadriverssudhaetcsudhaservices.
If you're writing a server application, then you can either use these common port numbers (and you should if you're attempting to write a common type of server) or choose your own. If you're writing a new type of server, then you should choose a port that has not been assigned to another server; choosing a port higher than 1024 should prevent any conflicts, as these are not assigned. When writing a client application, there is typically no need to assign a port, as a dynamic port is assigned to the client for communication with a server.
Ports below 1024 should be considered secure ports, and applications that use them should have administrative access.
Many people have a love-hate relationship with firewalls. While they are invaluable in today's network, sometimes it would be nice if they got out of the way. A firewall is a piece of hardware or software that monitors network traffic, either incoming, outgoing, or both. It can be configured to allow only particular ports or applications to transmit information beyond the firewall. Firewalls protect against hackers or viruses that may attempt to connect to open ports, leveraging them to their own ends. They protect against spyware applications that may attempt to communicate out from your machine. However, they also "protect" against any network programming you may attempt to do. You must invariably cooperate with your network administrators, working within their guidelines for network access. If they make only certain ports available, then your applications should use only those ports. Alternately, you may be able to get them to configure the firewalls involved to permit the ports needed by your applications.
Thankfully, creating network messages is a bit easier with Visual Basic 2008. The following sections demonstrate how.
Most of the functionality used when writing network applications is contained within the System.Net and System.Net.Sockets namespaces. This chapter covers the following main classes in these namespaces:
WebRequestandWebResponse, and their subclasses, includingFtpWebRequestHttpListener, which enables you to create your own web serverAdditional classes, methods, properties, and events were added to the
System.NetandSystem.Net.Socketsnamespaces in the .NET Framework 2.0. You can locate the updated reference for these namespaces athttp://msdn2.microsoft.com/library/system.net.aspxas of this writing.
When most people think of network programming these days, they're really thinking of communication via a web server or client. Therefore, it shouldn't be surprising that there is a set of classes for this communication need. In this case, it is the abstract WebRequest class and the associated WebResponse. These two classes represent the concept of a request/response communication with a web server, or similar server. As these are abstract classes — that is, MustInherit classes — they cannot be created by themselves. Instead, you create the subclasses of WebRequest that are optimized for specific types of communication.
The most important properties and methods of the WebRequest class are shown in the following table:
Each subclass of WebRequest supports these methods, providing a very consistent programming model for communication with a variety of server types. The basic model for working with any of the subclasses of WebRequest can be written in the following pseudo-code:
Declare variables as either WebRequest and WebResponse, or the specific child classes
Create the variable based on the URL
Make any changes to the Request object you may need
Use the GetResponse method to retrieve the response from the server
Get the Stream from the WebResponse
Do something with the Stream
If you decide to change the protocol (e.g., from HTTP to a file-based protocol), then you only need to change the URL used to retrieve the object.
The first two types of WebRequest that became available were FileWebRequest and HttpWebRequest. FileWebRequest is used less frequently; it represents a request to a local file, using the "file://" URL format. You have likely seen this type of request if you attempted to open a local file using your Web browser, such as Internet Explorer, Firefox, or Navigator. Generally, however, the subclass most developers will use is HttpWebRequest. This class enables you to make HTTP requests to a web server without requiring a browser. This could enable you to communicate with a web server, or, using the time-honored tradition of "screen scraping," to retrieve data available on the Web.
One hurdle many developers encounter when first working with HttpWebRequest is that there is no available constructor. Instead, you must use the WebRequest.Create method (or the Create method of your desired subclass) to create new instances of any of the subclasses. This method uses the URL requested to create the appropriate subtype of WebRequest. For example, this would create a new HttpWebRequest:
Dim req As HttpWebRequest = WebRequest.Create("http://msdn.microsoft.com")Note that if you have Option Strict turned on (and you should), the preceding code will produce an error. Instead, you should explicitly cast the return value of Create to the desired type:
Dim req As HttpWebRequest = _
  DirectCast(WebRequest.Create("http://msdn.microsoft.com"), _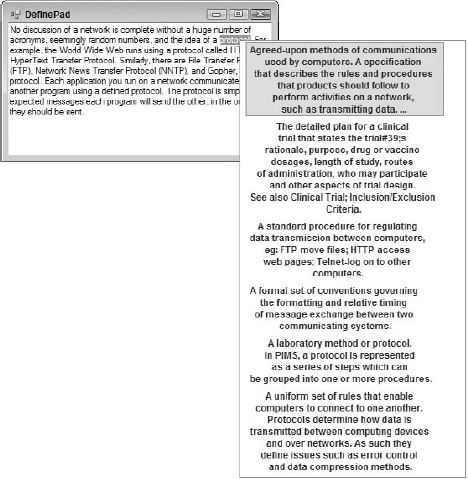
System.Net.HttpWebRequest)In order to demonstrate how to use WebRequest/WebResponse, the following example shows how to wrap a Web call into a Visual Basic class. In this case, we'll wrap Google's define: keyword, which enables you to retrieve a set of definitions for a word (e.g., www.google.com/search?q=define%3A+protocol), and then use that in a sample application (see Figure 31-1.)
Create a new Windows application named "DefinePad."
Add a new class to the project. This will hold the actual
WebRequestcode. Call itGoogleClient.Add a reference to the
System.WebDLL, as you will need access to some of its functionality later.In the
GoogleClient.vbfile, addImportsstatements to make the coding a little briefer:Imports System.IO Imports System.Net Imports System.Web Imports System.Collections.Generic
The main function in
GoogleClientwill be aDefinefunction that returns an array of strings. Each string will be one definition returned by Google:Public Function Define(ByVal word As String) As String() Dim req As HttpWebRequest = Nothing Dim resp As HttpWebResponse Dim query As String Dim result As New List(Of String) query = "http://www.google.com/search?q=define%3A" & _ HttpUtility.UrlEncode(word) Try req = DirectCast(WebRequest.Create(query), HttpWebRequest) With req .Method = "GET" resp = req.GetResponse If resp.StatusCode = HttpStatusCode.OK Then ParseResponse(resp.GetResponseStream, result) Else MessageBox.Show("Error calling definition service") End If End With Catch ex As Exception End Try Return result.ToArray() End FunctionThe first task is to guarantee that no invalid characters appear in the query string when you send the request, such as a space, an accented character, or other non-ASCII characters. The
System.Web.HttpUtilityclass has a number of handy shared methods for encoding strings, including theUrlEncodemethod. This replaces characters with a safe representation of the character that looks like%value, where the value is the Unicode code for the character. For example, in the definition of the query variable above, the%3Ais actually the colon character (":"), which has been encoded. Any time you retrieve a URL based on user input, encode it because there is no guarantee the resulting URL is safe to send.Once the query is ready, you create the
WebRequest. As the URL is for an HTTP resource, anHttpWebRequestis created. While the default method forWebRequestis aGET, it's still good practice to set it. You'll create theParseResponsemethod shortly to process the stream returned from the server.One other piece of code worth mentioning is the return value for this method, and how it is created. In order to return arrays of a specific type (rather than return actual collections from a method), you must either know the actual size to initialize the array or use the
Listgeneric type or the olderArrayList. These classes behave like the Visual Basic 6.0Collectionclass, which enables you to add items, and grows as needed. They also have a handy method that enables you to convert the array into an array of any type; you can see this in the return statement. TheArrayListrequires you to do a bit more work. If you want to use anArrayListfor this method, then you must identify the type of array you'd like to return. The resulting return statement would look like this using anArrayList:Return result.ToArray(GetType(String))
The
ProcessRequestmethod parses the stream returned from the server and converts it into an array of items. Note that this is slightly simplified; in a real application, you would likely want to return an array of objects, where each object provides access to the definition and the URL of the site providing it:Private Sub ParseResponse (ByVal input As System.IO.Stream, _ ByRef output As List(Of String)) 'definitions are in a block beginning with <p>Definitions for... 'then are marked with <li> tags 'yes, I should use Regular Expressions for this 'this format will also likely change in the future. Dim reader As New StreamReader(input) Dim work As String = reader.ReadToEnd Dim blockStart As String = "<p>Definitions of" Dim pos As Integer = work.IndexOf(blockStart) Dim posEnd As Integer Dim temp As String Do pos = work.IndexOf("<li>", pos + 1) If pos > 0 Then posEnd = work.IndexOf("<br>", pos) temp = work.Substring(pos + 4, posEnd - pos - 4) output.Add(ParseDefinition(temp)) pos = posEnd + 1 End If Loop While pos > 0 End SubThe code is fairly simple, using the time-honored tradition of screen scraping — processing the HTML of a page to find the section you need and then removing the HTML to produce the result.
The last part of the
GoogleClientclass is theParseDefinitionmethod that cleans up the definition, removing the link and other HTML tags:Private Function ParseDefinition(ByVal input As String) As String Dim result As String = "" Dim lineBreak As Integer lineBreak = input.IndexOf("<br>") If lineBreak > 0 Then result = input.Substring(0, input.IndexOf("<br>")) Elseresult = input End If Return result.Trim End FunctionNow, with the class in hand, you can create a client to use it. In this case, you'll create a simple text editor that adds the capability to retrieve definitions for words. Go back to the
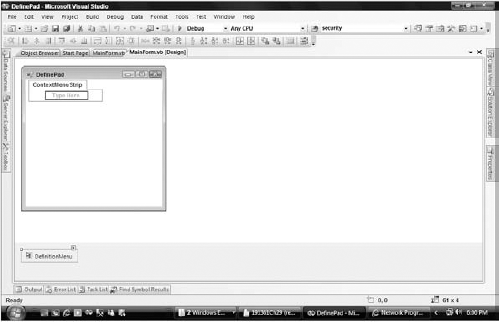
Formcreated for the application and add controls as shown in Figure 31-2.The user interface for
DefinePadis simple: aTextBoxand aContextMenuStrip.Control
Property
Value
TextBoxNameTextFieldMultilineTrueDockFillContextMenuStripDefinitionMenuContextMenuStripNameDefinitionMenuThe only code in the
Formis for theOpeningevent of theContextMenuStrip. Here, you add the definitions to the menu. Add the following code to the handler for theOpeningevent:Private Sub DefinitionMenu_Opening(ByVal sender As Object, _ ByVal e As System.ComponentModel.CancelEventArgs) _ Handles DefinitionMenu.Opening Dim svc As New GoogleClientDim definitions() As String Dim definitionCount As Integer DefinitionMenu.Items.Clear() Try 'define the currently selected word If TextField.SelectionLength > 0 Then definitions = svc.Define(TextField.SelectedText) 'build context menu of returned definitions definitionCount = definitions.Length If definitionCount > 6 Then definitionCount = 6 ElseIf definitionCount = 0 Then 'we can't do any more, so exit Dim item As New ToolStripButton item.Text = "Sorry, no definitions available" DefinitionMenu.Items.Add(item) Exit Sub End If For i As Integer = 1 To definitionCount Dim item As New ToolStripButton item.Text = definitions(i) DefinitionMenu.Items.Add(item) Next End If Catch ex As Exception MessageBox.Show(ex.Message, "Error getting definitions", _ MessageBoxButtons.OK, MessageBoxIcon.Error) End Try End SubThe bulk of the code in this event is to limit the number of items displayed in the menu. The actual functional part of the routine is the call to the
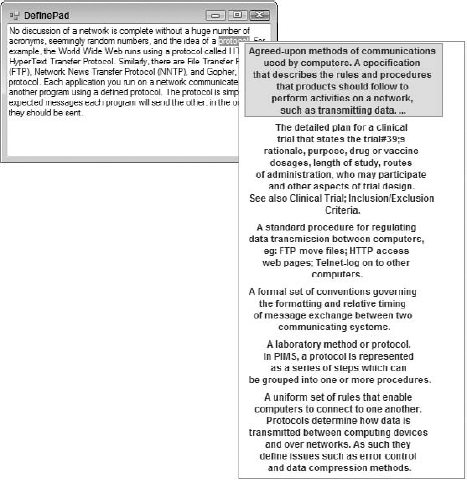
Definemethod of theGoogleClient. If you trace through the code as you run, you'll see theWebRequestgenerated, the call made, and the resulting response stream parsed into the individual items as desired. Finally, you can use the returned list to create a set of menu items (that don't actually do anything), and display the "menu." Clicking on any definition closes the menu.To test the application, run it. Type or copy some text into the text box, select a word, and right-click on it. After a brief pause, you should see the definitions for the word (Figure 31-3 shows definitions of "protocol").
While it isn't as sexy as Web services, using this technique (WebRequest, screen scraping of the resulting HTML) can provide access to a great deal of the functionality of the Internet for your applications.
The .NET Framework includes another useful version of WebRequest — the FtpWebRequest. This class, and the related FtpWebResponse, is used to communicate with FTP servers. While the HttpWebRequest/Response can be used for simple file uploading and retrieving, the FtpWebRequest adds the capability to browse or create directories, delete files, and more. The following table describes some of the added functionality of the FtpWebRequest:
As described above, the actual request made by the FtpWebRequest is identified by the Method property. This is a string property that can be set to any value recognized by your FTP server, but you will often want to set it to one of the values in the WebRequestMethods.Ftp structure.
Field | Description |
|---|---|
Adds content to an existing file | |
Deletes a file from the server (if you have permission) | |
Retrieves a file from the FTP server | |
Gets the date and time the file was last modified | |
Gets the size of the file on the FTP server | |
Gets the file and directory names for a directory on the FTP server. The data returned is a list of the files, each on a line (that is, separated by CRLF characters). This method doesn't provide an easy way to determine which of the items returned are directories or files. | |
Gets the file and directory information for a directory on the FTP server. This method returns a good deal of information about each item, including attributes, permissions, date of last modification, and size. Like the | |
Creates a directory on the server | |
Gets the current path on the FTP server | |
Removes a directory from the server (if you have permission) | |
Uploads a file to the FTP server | |
Similar to |
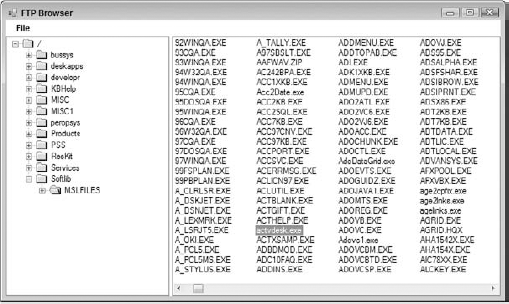
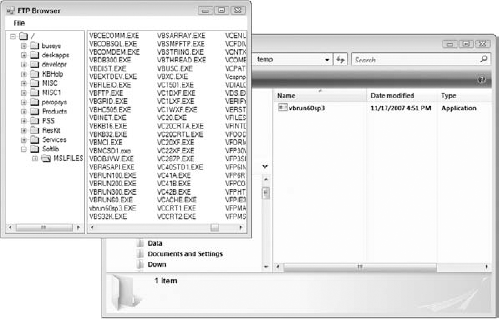
In order to demonstrate using the FtpWebRequest, this section covers how to create a simple FTP server browser. The application will enable you to connect to a server, browse the available files, and download files (see Figure 31-4).
Even though this application is a Windows Forms application, we separate the FTP handling to a class for use in other applications:
Create a new Windows application called "FTP Browser."
Before creating the user interface, define the class that will provide the functionality. Add a new class to the project, called
FtpClient.vb. This class will be used to create wrapper functionality to make working withFtpWebRequesteasier. First, add theImportsstatements for later use:Imports System.IO Imports System.Net Imports System.Text Imports System.Collections.Generic
Add two properties to the class. This is for the user ID and password that will be used by the
FtpClient:Private _user As String Private _pwd As String Public Property UserId() As String Get Return _user End Get Set(ByVal value As String) _user = value End Set End Property Public Property Password() As String Get Return _pwd End Get Set(ByVal value As String) _pwd = value End Set End PropertyThe form will use two methods:
GetDirectoriesandGetFiles. These two methods are basically identical:Public Function GetDirectories(ByVal url As String) As String() 'line should look like: '[DIRECTORY] developr . . [Feb 1 2006] Return GetDirectoryEntries(url, "[DIRECTORY]") End Function Public Function GetFiles(ByVal url As String) As String() 'line should look like: '[BINARY] 211SP2EI.EXE . . [Feb 26 1997] 5M Return GetDirectoryEntries(url, "[BINARY]") End FunctionObviously, both
GetDirectoriesandGetFilessimply return the result of another helper routine,GetDirectoryEntries. The only difference between the information returned for a file and a directory is that directories have the directory attribute set to "d," whereas files have a blank ("-") in that position:Private Function GetDirectoryEntries(ByVal url As String, _ ByVal directoryAttribute As String) As String() Dim result As New List(Of String) Dim str As Stream = Nothing Dim temp As String Dim words() As String Dim splitChars() As Char = {"<"c, ">"c} DoFtpRequest(url, _ WebRequestMethods.Ftp.ListDirectoryDetails, _ False, str) Try Using reader As StreamReader = New StreamReader(str) Do temp = reader.ReadLine If Not String.IsNullOrEmpty(temp) Then 'split into component parts If temp.StartsWith(directoryAttribute) Then words = temp.Split(splitChars, _ StringSplitOptions.RemoveEmptyEntries) If String.Compare(words(2), _ "Parent Directory", True) <> 0 Then result.Add(words(2)) End If End If End If Loop While temp <> Nothing End Using Catch ex As ExceptionMessageBox.Show(ex.Message, "Error getting files from " & url) End Try Return result.ToArray() End FunctionThe
GetDirectoryEntriesmethod uses another helper method you'll create shortly to execute theWebRequestMethods.Ftp.ListDirectoryDetailsmethod on the FTP server. This method returns the resulting response stream in thestrparameter. The code then loops through the returned content. Each of the directory entries appears on a separate line, soReadLineis perfect here. The line is split on spaces, and then added to the return value if it has the desired value for the first character (which represents it if it's a directory or a file).The
GetDirectoryEntriesmethod calls a helper method that does the actualFtpWebRequest. This method returns the resulting stream by way of aByRefparameter:Private Function DoFtpRequest(ByVal url As String, _ ByVal method As String, ByVal useBinary As Boolean, _ ByRef data As Stream) As FtpStatusCode Dim result As FtpStatusCode Dim req As FtpWebRequest Dim resp As FtpWebResponse Dim creds As New NetworkCredential(UserId, Password) req = DirectCast(WebRequest.Create(url), FtpWebRequest) With req .Credentials = creds .UseBinary = useBinary .UsePassive = True .KeepAlive = True 'make initial connection .Method = method Try resp = .GetResponse() Catch ex As Exception MessageBox.Show(ex.Message) End Try If resp IsNot Nothing Then data = resp.GetResponseStream result = resp.StatusCode End If End With Return result End FunctionThe appropriate type of
WebRequestis created, the properties are set, and the final request is sent.With the class created, we can move our attention back to the user interface. Return to the form and add
MenuStripandSplitContainercontrols. Leave the names and other properties of these controls at their defaults. Create three items under the File menu: Connect, Download, and Exit. You may also want to add anImageListcontrol and populate it with appropriate graphics for open and closed folders. The following table lists the properties set on theImageListin the sample project:Add a
TreeViewcontrol to the left side of theSplitContainer, and aListViewto the right side. Set the properties as shown in the following tables:Open the Code view for the form. First, add a few private variables to the
Formclass.Private ftp As New FtpClient Private baseUrl As String Private downloadPath As String
Add a handler for the
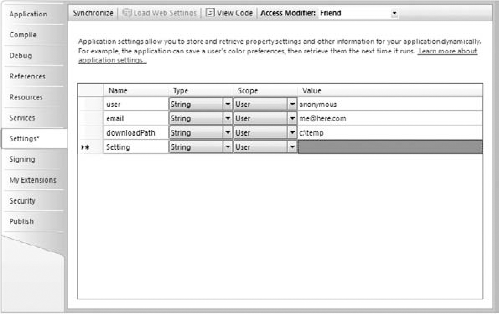
Form Loadevent. This will initialize theTreeViewandFtpClientobjects:Private Sub MainForm_Load(ByVal sender As Object, _ ByVal e As System.EventArgs) Handles Me.Load 'initialize form With Me.DirectoryTree .Nodes.Add("/") End With 'initialize ftp client With ftp .UserId = My.Settings.user .Password = My.Settings.email End With downloadPath = My.Settings.downloadPath End SubNotice the calls to
My.Settingswhen initializing theFtpClient. The Settings collection is available to theMyobject when you have created settings values in the My Project dialog. Open the Solution Explorer and double-click on the My Project item. Select the Settings tab and add the three values there (see Figure 31-5).You can now return to adding the code to the form. The next step is to enable connecting to the FTP server and retrieving the initial list of directories to add to the
TreeView. Add this to the Connect menu item:Private Sub ConnectToolStripMenuItem_Click(ByVal sender As System.Object, _ ByVal e As System.EventArgs) Handles ConnectToolStripMenuItem.Click 'makes a new connection to an FTP server baseUrl = InputBox("Enter FTP site to open", "FTP Browser", __ "ftp://ftp.microsoft.com") Me.DirectoryTree.Nodes.Clear() 'add the base node Me.DirectoryTree.Nodes.Add("/") AddNodes(Me.DirectoryTree.Nodes(0), baseUrl) End SubThe event prompts the user for the address of the FTP server to connect with, and then adds it to the
TreeViewvia a helper subroutine,AddNodes:Private Sub AddNodes(ByVal parent As TreeNode, ByVal url As String) Dim dirs() As String Me.Cursor = Cursors.WaitCursor dirs = ftp.GetDirectories(url) For Each dir As String In dirs With parent.Nodes.Add(dir) .Nodes.Add("NoNodeHere", "empty") End With Next Me.Cursor = Cursors.Default End SubThe
AddNodesmethod retrieves the list of directories for the selected URL. In this, the first call for an FTP server, it retrieves the root directory. Later, the same method is used to retrieve subdirectories by requesting a URL containing the full path. Notice the addition of a fake node to each of the directories (the"NoNodeHere"item). This ensures that each of the directories added has the plus symbol next to it in theTreeView, implying that there is content below it. We will remove the empty node later when we request the actual subdirectories.Initially, each of the directories is empty except for the
"NoNodeHere"item. You can use the presence of this node to determine whether you need to request subdirectories. If it still exists, then you need to callAddNodeswhen the user attempts to expand theTreeViewnode:Private Sub DirectoryTree_BeforeExpand(ByVal sender As Object, _ ByVal e As System.Windows.Forms.TreeViewCancelEventArgs) _ Handles DirectoryTree.BeforeExpand Dim thisNode As TreeNode thisNode = e.Node If thisNode.Nodes.ContainsKey("NoNodeHere") Then 'we haven't retrieved this nodes children yet 'remove the empty node thisNode.Nodes("NoNodeHere").Remove()'get the real children now AddNodes(thisNode, baseUrl + thisNode.FullPath) End If End SubIf
"NoNodeHere"still exists, then you remove it and call theAddNodesmethod again, passing this node and its path. This calls the FTP server again, retrieving the child directories of the selected directory. You perform this before the node is expanded, so before the user can see the"NoNodeHere"node. If the subdirectories have already been requested, then the"NoNodeHere"node won't be in theTreeViewanymore, and so the code to call the FTP server won't be called again.After the node has been expanded, it is selected. At this time, retrieve the list of files in that directory to display in the
ListViewcontrol:Private Sub DirectoryTree_AfterSelect(ByVal sender As System.Object, _ ByVal e As System.Windows.Forms.TreeViewEventArgs) _ Handles DirectoryTree.AfterSelect Dim thisNode As TreeNode Dim files() As String thisNode = e.Node 'we don't want to do this for the root node If thisNode.Text <> "/" Then 'get files for this directory Me.Cursor = Cursors.WaitCursor 'clear the current list Me.FileList.Items.Clear() files = ftp.GetFiles(baseUrl + thisNode.FullPath) For Each fil As String In files Me.FileList.Items.Add(fil) Next Me.Cursor = Cursors.Default End If End SubThis code is fairly simple. First, the
ListViewis cleared of existing files. Then theFtpClientis called, retrieving the list of files in the selected directory. These are then added to theListView.You should now be able to run the application and browse an FTP server (see Figure 31-6). Note that because we haven't added any credentials, only anonymous FTP servers can be browsed. If you want to connect to FTP servers that require authentication, then set the UserId and Password as appropriate, or query them from the user.
For a few finishing touches, set the Download menu item to be usable only if a file is selected, and add the code for the Exit menu item. Set the initial value for Enabled to
Falsefor the download menu item, and add the following code to the handler for theListView'sSelectedIndexChangedevent:Private Sub FileList_SelectedIndexChanged(ByVal sender As System.Object, _
ByVal e As System.EventArgs) Handles FileList.SelectedIndexChanged Me.DownloadToolStripMenuItem.Enabled = _ CBool(Me.FileList.SelectedItems.Count) End SubWhen an item is selected, the Count will be > 0, which converts to
True. If 0 items are selected, then this will beFalse.The code for the Exit menu item is simple enough:
Private Sub ExitToolStripMenuItem_Click(ByVal sender As System.Object, _ ByVal e As System.EventArgs) Handles ExitToolStripMenuItem.Click Me.Close() End SubFinally, add the code for the Download menu item:
Private Sub DownloadToolStripMenuItem_Click(ByVal sender As Object, _ ByVal e As System.EventArgs) Handles DownloadToolStripMenuItem.Click 'download currently selected file (but only if something is selected) ftp.DownloadFile(baseUrl & _ Me.DirectoryTree.SelectedNode.FullPath & _ "/" & Me.FileList.SelectedItems(0).Text, _ downloadPath & Me.FileList.SelectedItems(0).Text) End SubObviously, we need to add the
DownloadFilemethod to theFtpClientclass:Public Sub DownloadFile(ByVal url As String, _ ByVal destination As String) Dim str As Stream = Nothing DoFtpRequest(url, _WebRequestMethods.Ftp.DownloadFile, _ True, _ str) Using reader As StreamReader = New StreamReader(str) Using writer As StreamWriter = _ New StreamWriter(File.OpenWrite(destination)) writer.Write(reader.ReadToEnd) End Using End Using End Sub

Note the repeat use of the DoFtpRequest method. However, this time, we pass True for the binary, just in case the file we're transferring is not a text-based file. Using the Using block, we create a new StreamReader around the output stream of the response, and a new StreamWriter to a local output file. By adding the Using block, we guarantee that the associated readers, writers, and streams will all be closed when we're done using them. The Using block is functionally identical to the following .NET Framework 1.1 code:
Dim reader As StreamReader
Try
reader = New StreamReader(str)
...
Finally
reader.Flush()
reader.Close()
reader = Nothing
End TryNow you can test out the new download code. Run the application again, connect to an FTP server, select a file, and then select Download from the File menu. You should see the newly created file appear in your download directory (see Figure 31-7).
While creating a full-blown FTP client would still be a fair bit more work, it is hoped that you can see that the functionality of the FtpWebRequest and FtpWebResponse classes makes communicating with an FTP server much easier than before, let alone writing the core functionality yourself using sockets.
When I first saw a demo of WebRequest in early 2000, I was delighted. Here was the capability to easily access Internet resources. However, one of the other attendees of the demo asked, "Why is that so difficult? You need to do so much to get it to work." The next time I saw the same WebRequest demo, the presenter concluded with, "For those of you doing the common scenarios, we have an even easier way." He then went on to show us how to use System.Net.WebClient.
For those times when you just want to send a GET or POST request and download a file or the resulting data, you can forget about WebRequest/WebResponse. WebClient abstracts away all of the little details of making Web requests, and makes it amazingly easy to grab data from the Web. The important methods and properties of the WebClient class are described in the following table:
All of the DownloadX and UploadX methods also support an asynchronous version of the method, called DownloadXAsync, such as DownloadFileAsync or UploadValuesAsync. These methods perform the actual request on a background thread, and fire an event when the task is completed. If your application has some form of user interface, such as a form, then you should generally use these methods to keep your application responsive.
As WebClient uses the WebRequest classes to actually perform its magic, it can greatly simplify network coding. For example, just replace the code used in the WebRequest sample created earlier.
Before:
Public Function Define(ByVal word As String) As String()
    Dim req As HttpWebRequest = Nothing
    Dim resp As HttpWebResponse
    Dim query As String
    Dim result As New List(Of String)

    query = "http://www.google.com/search?q=define%3A" & _
      HttpUtility.UrlEncode(word)

    Try
        req = DirectCast(WebRequest.Create(query), HttpWebRequest)
        With req
            .Method = "GET"
            resp = req.GetResponse
            If resp.StatusCode = HttpStatusCode.OK Then
                ParseResponse(resp.GetResponseStream, result)
            Else
                MessageBox.Show("Error calling definition service")
            End If
        End With
    Catch ex As Exception

    End Try

    Return result.ToArray()

End FunctionPublic Function Define(ByVal word As String) As String()
Dim client As New WebClient
Dim query As String
Dim result As New List(Of String)
query = "http://www.google.com/search?q=define%3A" & _
HttpUtility.UrlEncode(word)
Try
result = ParseResponse(client.DownloadString(query))
Catch ex As Exception
End Try
Return result.ToArray()
End FunctionWebClient avoids all of the stream handling required for WebRequest. However, you should still know how WebRequest operates, as this knowledge is directly relatable to WebClient.
One exciting feature of the .NET Framework 2.0 was the new HttpListener class (and related classes). This class enables you to very easily create your own web server. While it likely wouldn't be a replacement for IIS, it enables you to add web server functionality to other applications. For example, rather than use remoting or MSMQ to create a communication channel between two applications, why not use HTTP? Each instance could host its own little web server, and then you could use HttpWebRequest or WebClient to communicate between them. Alternately, many applications and hardware devices now provide a built-in Web application, enabling you to configure the device or application via a Web browser.
The fine print: The
HttpListenerclass relies on the newHttp.sysfunctionality built into IIS 6.0, so you must be using an operating system that includeshttp.sysas a systemwide HTTP service. Only Windows Vista, Windows Server 2003, and Windows XP SP2 (and future versions of the operating system) include this functionality. This is yet another reason to upgrade and install Service Packs. Future operating systems should all provide this functionality.
HttpListener works by registering one or more "prefixes" with http.sys. Once this is done, any requests intercepted by the HTTP subsystem will be passed on to the registered listener. An HttpListenerContext object is created and passed to your listener. This context contains properties for the Request and Response objects, just as the Context object in ASP.NET does. Again, similar to Web applications, you read the request from the Request property, and write the response to the Response property. Closing the Response sends the resulting page to the user's browser. The following table describes the important members of HttpListener:
Description | |
|---|---|
| Shuts down the server, without finishing any existing requests |
| Shuts down the server, after finishing handling any existing requests |
Starts the listener receiving requests | |
| Stops the listener from receiving requests |
| Property that determines whether the listener is currently receiving requests |
Collection of the types of requests that this listener will respond to. These are the "left-hand side" of the URL, such as |
To demonstrate using HttpListener, this section describes how to create a Windows Service to host its functionality. This could simulate a management or monitoring interface to a Windows Service that would enable authenticated individuals to use the Windows Service remotely or get other information out of it.
Create a new Windows Service application called "MiniServer." The server won't do much on its own, but it will host an
HttpListener.From the Components section of the toolbox, add a
BackgroundWorkercomponent and call itBackgroundWork. The other properties can remain at their defaults. ThisBackgroundWorkerwill be used to process HTTP requests on a background thread, simplifying the handling of the threads.Switch to Code view for the service. Add the
Importsstatements you need to the top of the file. In addition, add a reference to theSystem.WebDLL:Imports System.Net Imports System.IO Imports System.Web Imports System.Text
Add the private members to the class. In addition, add a constant to identify the port number the service will use for listening. Select a port that currently isn't in use. The example uses 9090:
Private listener As New HttpListener()
Private theService As String

Private Const PORT As Integer = 9090
In the
OnStartmethod, set up the list of prefixes to which the server will respond. This can be as simple as adding a port address to the URL, or it can include specific vroots. The sample provides examples of each:Protected Overrides Sub OnStart(ByVal args() As String) Dim machineName As String machineName = System.Environment.MachineName theService = HttpUtility.UrlEncode(Me.ServiceName) Me.EventLog.WriteEntry("Service Name: " & Me.ServiceName) With listener .Prefixes.Add(String.Format("http://{0}:{1}/", _ "localhost", PORT.ToString)) .Prefixes.Add(String.Format("http://{0}:{1}/", _ machineName, PORT.ToString)) .Prefixes.Add(String.Format("http://{0}/{1}/", _ "localhost", theService)) .Prefixes.Add(String.Format("http://{0}/{1}/", _ machineName, theService)) .Start() End With 'start up the background thread Me.BackgroundWork.RunWorkerAsync() End SubIn this case, the server will respond to a prefix in any of the formats (the sample computer is called Tantalus):
http://localhost:9090/
http://tantalus:9090/
http://localhost/sampleservice/
http://tantalus/sampleservice/
Note
Keep one important point in mind as you add prefixes: They must end in a slash ("/") character. Otherwise, you will get a runtime error when the listener attempts to add that prefix.
If you already have a web server listening on port 80, such as IIS, then you shouldn't include the last two prefixes. As only a single application can listen to each port, this service will not be able to start if the other service is already monitoring port 80.
After initializing the
Prefixescollection, calling theStartmethod binds the listener to the appropriate ports and vroots and starts it accepting requests. However, we don't want to actually receive the requests in theOnStarthandler. Remember that the service doesn't actually start until after this method has completed, so having a lot of processing in theOnStartwill actually prevent the service from completing. Therefore, we use another feature of Visual Basic 2008, theBackgroundWorkercomponent, to handle the requests. Call itsRunWorkerAsyncto start the background task (in our case, theHttpListener).The
OnStopmethod serves to shut down theHttpListener:Protected Overrides Sub OnStop() With listener .Stop() .Close() End With End SubThe background task performed by the
BackgroundWorkercomponent can be any process that you don't want to interfere with the normal application's processing. If this were a Windows Forms application, having a long-running loop or other process running might prevent the application from drawing, or responding to, the user's requests. Beyond that, we can do anything we want in the background task, with one exception: because a Windows Forms application works in a single foreground task, one can't directly access the controls on the form from the background task. Instead, if the background task must change properties on the controls, then it should fire events. The controls can then subscribe to those events, where you can access the properties. This Windows Service has no such user interface, so that problem is avoided.The actual work you want the
BackgroundWorkerto perform is in theDoWorkevent handler:Private Sub BackgroundWork_DoWork(ByVal sender As System.Object, _ ByVal e As System.ComponentModel.DoWorkEventArgs) Handles BackgroundWork.DoWork Dim context As HttpListenerContext Dim path As String Dim defaultPage As String 'this is where we actually process requests While listener.IsListening context = listener.GetContext path = context.Request.Url.AbsolutePath.ToLower 'strip out the serviceName if you're using the URL format: 'http://server/servicename/path If path.StartsWith("/" & theService.ToLower) Then path = path.Substring(theService.Length + 1) End If Me.EventLog.WriteEntry("Received request for " & path) Select Case path Case "/" 'this would probably be a resource defaultPage = "Available pages<ul>" & _ "<li><a href='/time'>Current server time</a></li>" & _ "<li><a href='/date'>Current date</a></li>" & _ "<li><a href='/random'>Random number</a></li></ul>" SendPage(context.Response, defaultPage) Case "/time" SendPage(context.Response, DateTime.Now.ToLongTimeString) Case "/date" SendPage(context.Response, DateTime.Now.ToLongDateString)Case "/random" SendPage(context.Response, New Random().Next.ToString) Case Else 'if we don't understand the request, send a 404 context.Response.StatusCode = 404 End Select End While End SubThe background task performs its work in a loop as long as the
HttpListeneris actively listening. Every developer knows that performing a set of tasks in a (relatively) tight loop is dangerous, possibly leading to computer or application lockup. However, theBackgroundWorkerperforms this on another thread, leaving our application responsive.For this application, we first get access to the context for the listener. The context groups together one client's set of communication with our listener. Similar to the
HttpContextin ASP.NET, theHttpListenerContextprovides access to theHttpListenerRequestandHttpListenerResponseobjects, so the first step in handling a request should always be to get this context. Next, the code uses a very simple means of determining the request URL. In a more full-featured implementation, this could be more complex, separating any query values from the path requested, etc. For this sample, the listener only responds to three main paths,'/time', '/date', and'/random', to receive the current (server) time or date, or a randomIntegervalue. If the user requests anything else, then we return a 404.The
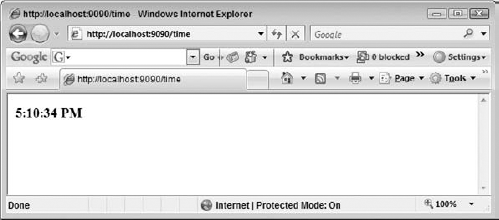
SendPagesubroutine simply writes out a basic HTML page and the value determined:Private Sub SendPage(ByVal response As HttpListenerResponse, _ ByVal message As String) Dim sb As New StringBuilder 'build string With sb .Append("<html><body>") .AppendFormat("<h3>{0}</h3>", message) .Append("</body></html>") End With Me.EventLog.WriteEntry(sb.ToString) 'set up content headers With response .ContentType = "text/html" .ContentEncoding = Encoding.UTF8 .ContentLength64 = sb.ToString.Length Me.EventLog.WriteEntry(sb.ToString.Length.ToString) Try Using writer As New StreamWriter(.OutputStream) With writer .Write(sb.ToString) .Flush() End With End UsingCatch ex As Exception Me.EventLog.WriteEntry(ex.Message, EventLogEntryType.Error) Finally 'close the response to end .Close() End Try End With End SubIt is hoped that there aren't any surprises in this code. Using a
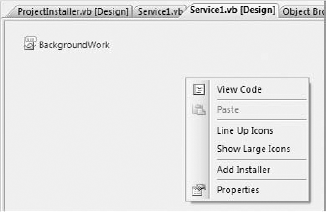
StringBuilder, a response is built. Then the content is written back to the browser (see Figure 31-8) using aStreamWriterthat is created on top of theResponse.OutputStream. Remember to close theResponse, or the request will never close until it times out.Before you can test your Windows Service, however, it must be installed. Right-click on the designer and select Add Installer (see Figure 31-9). This adds a new file to the project called
ProjectInstaller.vb, and adds two components to the file:ServiceInstaller1andServiceProcessInstaller1. You can either keep these names or change them. In addition, set the properties as shown in the following table:Component
Property
Value
ServiceInstaller1Sample Service from Wrox Professional Visual Basic 2008
Sample Service
SampleService
ServiceProcessInstaller1LocalSystem
Most of these properties only affect the display values for the Windows Service. However, the
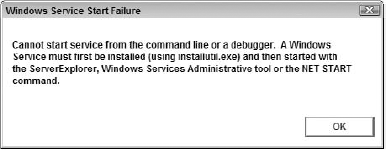
Accountproperty of theServiceProcessInstallerdeserves special mention. Windows Services run on behalf of the user. Therefore, they can actually run under another user account. By setting theAccountproperty toLocalSystem, you are setting the resulting Windows Service to run under the local system account. This account has a lot of access to the system, so you may want to instead use an account with more limited system rights; however, you would have to create this account separately.Build the Windows service. Unfortunately, if you attempt to run the service directly from Visual Basic, you will get an error message (see Figure 31-10).
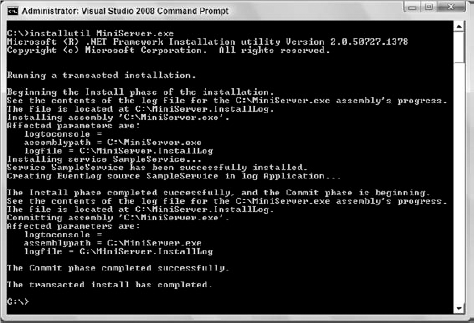
A Windows Service can only run if it has been installed into the system, and this task is performed using a command-line utility,
InstallUtil.exe. Open the Visual Studio command prompt and navigate to the directory where you have builtMiniServer.exe. Runinstallutil miniserver.exe. It is hoped that you'll be greeted with a success message (see Figure 31-11).If you are running Windows Vista, then you need to run the Visual Studio command prompt as an administrator. To do so, right-click on the Visual Studio 2008 Command Prompt icon and select Run As Administrator.
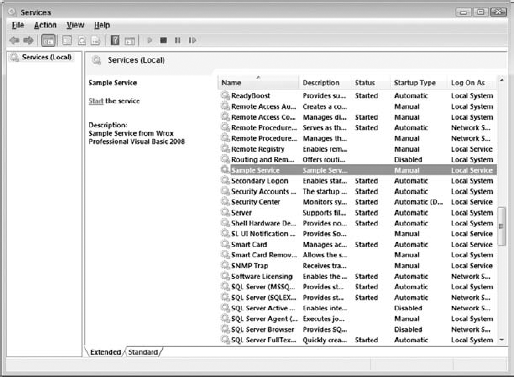
Finally, you can start your new service. Open the Services application from Start

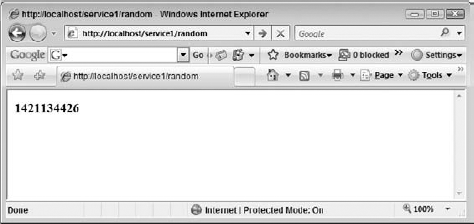
Just to confirm that all of the prefixes work, you can also request one of the values using the vroot, rather than using the port (see Figure 31-14).
The
HttpListeneradds yet another powerful way for your applications to communicate. It gives you the ability to extend the reach of your applications out to Web browser clients, without requiring the additional administrative and management overhead of IIS to your deployment.

Programming directly to the network provides a great deal of power and flexibility. Of course, all of that power and flexibility comes at a cost. Many of the services provided by higher-level technologies, such as Web services or remoting, aren't available, and must often be recreated. However, in those situations where you must communicate with an existing application, or when you need the ultimate in control and speed, using the classes in System.Net makes life easier than it would be otherwise.
This chapter looked at many of the classes that expose network programming. You've learned how to make Web requests without a browser so you could use the data on the Internet in your applications; you've seen how you can leverage the bare sockets layer to write your own communication protocols, and you've been introduced to some of the classes in Visual Basic 2008 for creating FTP clients and web servers.