
This chapter covers the basics of security and cryptography. It begins with a brief discussion of the .NET Framework's security architecture, because this affects all the solutions you may choose to implement.
The .NET Framework provides you with additional tools and functionality with regard to security. You now have the System.Security.Permissions namespace, which enables you to control code access permissions along with role-based and identity permissions. Through your code, you can control access to objects programmatically, as well as receive information on the current permissions of objects. This security framework will assist you in determining whether you have permissions to run your code, instead of getting halfway through execution and having to deal with permission-based exceptions. This chapter covers the following:
Concepts and definitions
Permissions
Roles
Principals
Code access permissions
Role-based permissions
Identity permissions
Managing permissions and policies
Cryptography
Cryptography is the cornerstone of the .NET Web Services security model, so the second half of this chapter discusses the basis of cryptography and how to implement it. Specifically, it covers the following:
Let's begin by looking at some security concepts and definitions.
Note
As always, the code for this chapter is available for download from www.wrox.com, which you may want in order to follow along.
The following table describes the different types of security presented in this chapter and how they relate to real-world scenarios:
There are many approaches to providing security on your machines where your shared code is hosted. If multiple shared code applications are on one machine, each piece of shared code can be called from many front-end applications. Each piece of shared code will have its own security requirements for accessing environment variables — such as the registry, the file system, and other items — on the machine that it is running on. From an NTFS perspective, the administrator of your server can only lock down those items on the machine that are not required to be accessed from any piece of shared code running on it. Therefore, some applications need additional security built in to prevent any calling code from doing things it is not supposed to do.
The machine administrator can further assist programmers by using the utilities provided with .NET to establish additional machine and/or user policies that programs can implement. Toward that end, the .NET environment provides programmatic security through code access security, role-based security, and identity security. As a final security measure, you can use the cryptographic methods provided to require the use of certificates in order to execute your code.
Security in the .NET infrastructure uses some basic concepts, which are discussed here. Code security is managed and accessed in the .NET environment using security policies. Security policies have a relationship that is fundamentally tied either to the machine that the code is running on or to particular users under whose context the code is running. To this end, any modifications to the policy are done either at the machine level or at the user level.
You establish the security policy on a given set of code by associating it with an entity called a group. A group is created and managed within each of the machine- and user-based policies. These group classifications are set up so that you can place code into categories. You want to establish new code groups when you are ready to categorize the pieces of code that would run on a machine, and assign the permissions that users will have to access the code. For instance, if you wanted to group all Internet applications and then group all non-Internet applications, you would establish two groups and associate each of your applications with its respective group.
Once you have the code separated into groups, you can define different permission sets for each group. If you wanted to limit your Internet applications' access to the local file system, you could create a permission set that limits that access and associates the Internet application group with the new permission set. By default, the .NET environment provides one code group named All Code that is associated with the FullTrust permission set.
Permission sets are unique combinations of security configurations that determine what each user with access to a machine can do on that machine. Each set determines what a user has access to — for instance, whether the user can read environment variables, the file system, or execute other portions of code. Permission sets are maintained at the machine and user levels through the utility Caspol.exe. Through this utility, you can create your own permission sets, though the following seven permission sets that ship with the .NET infrastructure are also useful:
Permission Set | Explanation |
|---|---|
| Allows full access to all resources; adds the assembly to a special list that has |
Allows full access to everything covered by default named permission sets, but differs from | |
Denies all access including | |
Allows execution-only access | |
Allows objects to bypass all security verification | |
Grants default rights that are normal for Internet applications | |
Grants rights that are not as restricted as Internet, but not full trust |
Security that is used within the programming environment also makes use of permission sets. Through code you can control access to files in a file system, environment variables, file dialogs, isolated storage, reflections, registry, sockets, and UI. Isolated storage and virtual file systems are new operating system-level storage locations that can be used by programs and are governed by the machine security policies. These file systems keep a machine safe from file system intrusion by designating a regulated area for file storage. The main access to these items is controlled through code access permissions.
Although many methods that we use in Visual Basic 2008 provide an identifiable return value, the only time we get a return value from security methods is when the method fails. When a security method succeeds, it does not provide a return value. If it fails, then it returns an exception object reflecting the specific error that occurred.
The System.Security.Permissions namespace is the namespace used in the code to establish and use permissions to access many things, such as the file system, environment variables, and the registry within your programs. The namespace controls access to both operating system-level objects as well as code objects. In order to use the namespace in your project, you need to include the Imports System.Security.Permissions line with any of your other Imports statements in your project. Using this namespace gives you access to the CodeAccessPermission and PrincipalPermission classes for using role-based permissions and utilizing information supplied by Identity permissions. CodeAccessPermission is the main class that we will use, as it controls access to the operating system-level objects our code needs in order to function. Role-based permissions and Identity permissions grant access to objects based on the identity of the user of the program that is running (the user context).
In the following table, classes that end with Attribute, such as EnvironmentPermissionAttribute, are classes that enable you to modify the security level at which your code is allowed to interact with each respective object. The attributes that you can specify reflect Assert, Deny, or PermitOnly permissions.
If permissions carry the Assert attribute, you have full access to the object, whereas if you have specified Deny permissions, you are not allowed to access the object through your code. If you have PermitOnly access, only objects within your program's already determined scope can be accessed, and you cannot add any more resources beyond that scope. The table also deals with security in regard to software publishers. A software publisher is a specific entity that is using a digital signature to identify itself in a Web-based application. The following table describes the namespace members that apply to Windows Forms programming, with an explanation of each:
Code access permissions are controlled through the CodeAccessPermission class within the System.Security namespace, and its members make up the majority of the permissions we'll use in our attempt to secure our code and operating environment. The following table describes the class methods available:
Description | |
|---|---|
Sets the permission to full access so that the specific resource can be accessed even if the caller hasn't been granted permission to access the resource | |
Copies a permission object | |
Returns whether or not all callers in the call chain have been granted the permission to access the resource in a given manner | |
Denies all callers access to the resource | |
Determines whether a given object is the same instance of the current object | |
Establishes a permission set given a specific XML encoding. This parameter is an XML encoding | |
Returns a hash code associated with a given object | |
Returns the type of a given object | |
Returns the permissions that two permission objects have in common | |
Returns a result indicating whether the current permission object is a subset of a specified permission | |
Specifies that only those resources within this permission object can be accessed even if code has been granted permission to other objects | |
Reverses all previous | |
Reverses all previous | |
Reverses all previous | |
Reverses all previous | |
Returns a string representation of the current permission object | |
Creates an XML representation of the current permission object | |
Creates a permission that is the union of two permission objects |
Role-based permissions are permissions granted based on the user and the role that code is being called with. Users are generally authenticated within the operating system platform and hold a Security Identifier (SID) that is associated within a security context. The SID can further be associated with a role or a group membership that is established within a security context. The .NET role functionality supports those users and roles associated within a security context and has support for generic and custom users and roles through the concept of principals.
A principal is an object that holds the current caller credentials, which is termed the identity of the user. Principals come in two types: Windows principals and non-Windows principals. Windows-based principal objects are objects that store the Windows SID information regarding the current user context associated with the code that is calling into the module role-based permissions that are being used. Non-Windows principals are principal objects that are created programmatically via a custom login methodology and which are made available to the current thread.
Role-based permissions are not set against objects within your environment like code access permissions. They are instead a permission that is checked within the context of the current user and role that a user is part of. Within the System.Security.Permissions namespace, the concepts of principals and the PrincipalPermission class of objects are used to establish and check permissions. If a programmer passes the user and role information during a call as captured from a custom login, then the PrincipalPermission class can be used to verify this information as well. During the verification, if the user and role information is Null, then permission is granted, regardless of the user and role. The PrincipalPermission class does not grant access to objects, but has methods that determine whether a caller has been given permissions according to the current permission object through the Demand method. If a security exception is generated, then the user does not have sufficient permission.
The following table describes the methods in the PrincipalPermission class:
Method | Description |
|---|---|
Copies a permission object | |
| Returns whether or not all callers in the call chain have been granted the permission to access the resource in a given manner |
Determines whether a given object is the same instance of the current object | |
Establishes a permission set given a specific XML encoding | |
Returns a hash code associated with a given object | |
Returns the type of a given object | |
Returns the permissions that two permission objects have in common specified in the parameter | |
Returns a result indicating whether the current permission object is a subset of a specified permission | |
Returns a result indicating whether the current permission object is unrestricted | |
Returns a string representation of the current permission object | |
Creates an XML representation of the current permission object | |
Creates a permission that is the union of two permission objects |
As an example of how you might use these methods, the following code snippet captures the current Windows principal information and displays it on the screen in the form of message box output. Each element of the principal information could be used in a program to validate against, and thus restrict, code execution based on the values in the principal information. This example inserts an Imports System.Security.Principal line at the top of the module so you can use the identity and principal objects:
Imports System.Security.Principal
Imports System.Security.Permissions

Private Sub RoleBasedPermissions_Click(ByVal sender As System.Object, _
   ByVal e As System.EventArgs) Handles RoleBasedPermissions.Click

   Dim objIdentity As WindowsIdentity = WindowsIdentity.GetCurrent
   Dim objPrincipal As New WindowsPrincipal(objIdentity)
   MessageBox.Show(objPrincipal.Identity.IsAuthenticated.ToString())
   MessageBox.Show(objIdentity.IsGuest.ToString())
   MessageBox.Show(objIdentity.ToString())
   objIdentity = Nothing
   objPrincipal = Nothing

End Sub
This code illustrates a few of the properties that could be used to validate against when a caller wants to run your code. Sometimes you want to ensure that the caller is an authenticated user, and not someone who bypassed the security of your machine with custom login information. You can achieve that through the following line of code:
MessageBox.Show(objPrincipal.Identity.IsAuthenticated.ToString())
It outputs in the MessageBox as either True or False depending on whether the user is authenticated or not. Another way to ensure that your caller is not bypassing system security would be to check whether the account is operating as a guest. The following line of code accomplishes that:
MessageBox.Show(objIdentity.IsGuest.ToString())
IsGuest returns either True or False, depending on whether the caller is authenticated as a guest. The final MessageBox in the example displays the ToString value for the identity object. This value tells you what type of identity it is, either a Windows identity or a non-Windows identity. The line of code that executes it is as follows:
MessageBox.Show(objIdentity.ToString())
The output from the IsString method is shown in Figure 12-1.

Again, the principal and identity objects are used in verifying the identity or aspects of the identity of the caller attempting to execute your code. Based on this information, you can lock down or release certain system resources. You will learn how to lock down and release system resources through the code access permissions examples that follow.
Identity permissions are pieces of information, also called evidence, by which a piece of code can be identified. Examples of the evidence would be the strong name of the assembly or the digital signature associated with the assembly.
A strong name is a combination of the name of a program, its version number, and its associated cryptographic key and digital signature files.
Identity permissions are granted by the runtime based on information received from the trusted host, or someone who has permission to provide the information. Therefore, they are permissions that you don't specifically request. Identity permissions provide additional information to be used by the runtime when you configure items in the Caspol.exe utility. The additional information that the trusted host can supply includes the digital signature, the application directory, or the strong name of the assembly.
This section looks at the most common type of permissions — programmatic access — and how they are used. This example uses a Windows Form with four buttons on it. This Windows Form illustrates the concept previously mentioned — namely, that when a method fails, an exception object containing your feedback is generated. Note that in the case of a real-world example, you would be setting up permissions for a calling application. In many instances, you don't want a calling application to be able to access the registry, or you want a calling application to be able to read memory variables, but not change them.
However, in order to demonstrate the syntax of the commands, in the examples that follow we have placed the attempts against the objects we have secured in the same module. We first set up the permission that we want and grant the code the appropriate access level we wish it to be able to utilize. Then we use code that accesses our security object to illustrate the effect that our permissions have on the code that accesses the objects. We'll also be tying together many of the concepts discussed so far by way of these examples.
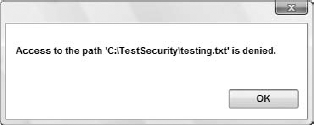
To begin, let's look at an example of trying to access a file in the file system, which illustrates the use of the FileIOPermission class in our Permissions namespace. In the first example, the file C: estsecurity esting.txt has been secured at the operating system level so that no one can access it. In order to do this, the system administrator sets the operating system security on the file to no access:
Imports System.Security.Principal
Imports System.Security.Permissions
Imports System.IO

Private Sub FileIO_Click(ByVal sender As System.Object, _
    ByVal e As System.EventArgs) Handles FileIO.Click

   Dim oFp As FileIOPermission = New _
      FileIOPermission(FileIOPermissionAccess.Write, _
"C: estsecurity esting.txt")
oFp.Assert()
Try
Dim objWriter As New IO.StreamWriter _
(File.Open("C: estsecurity esting.txt", IO.FileMode.Open))
objWriter.WriteLine("Hi there!")
objWriter.Flush()
objWriter.Close()
objWriter = Nothing
Catch objA As System.Exception
MessageBox.Show(objA.Message)
End Try
End SubLet's walk through the code. In this example, we are going to attempt to open a file in the C: estsecurity directory called testing.txt. We set the file access permissions within our code so that the method, irrespective of who called it, should be able to get to it with the following lines:
Dim oFp As FileIOPermission = New _
  FileIOPermission(FileIOPermissionAccess.Write, _
  "C:	estsecurity	esting.txt")

oFp.Assert()
This example used the Assert method, which declares that the resource should be accessible even if the caller has not been granted permission to access the resource. However, in this case, because the file is secured at the operating system level (by the system administrator), we get the error shown in Figure 12-2, which was caught by exception handling.
Now let's look at that example again with full operating system rights, but the code permissions set to Deny:
Protected Sub btnFileIO_Click(ByVal sender As Object, ByVal e As System.EventArgs)

    Dim oFp As FileIOPermission = New _
       FileIOPermission(FileIOPermissionAccess.Write, _
          "C:	estsecurity	esting.txt")

   oFp.Deny()
Try
Dim objWriter As New IO.StreamWriter _
(File.Open("C: estsecurity esting.txt", _
IO.FileMode.Open))
objwriter.WriteLine("Hi There!")
objWriter.Flush()
objWriter.Close()
objWriter = Nothing
Catch objA As System.Exception
messagebox.Show(objA.Message)
End Try
End SubThe Deny method denies all callers access to the object, regardless of whether the operating system granted them permission. This is usually a good thing to put into place, as not every method you implement needs full and unfettered access to system resources. This helps prevent accidental security vulnerabilities that your method may expose. With the Deny method, we catch the error shown in Figure 12-3 in the exception handler.
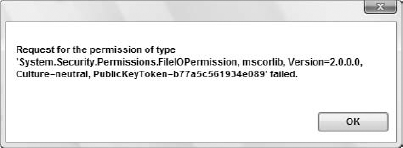
As you can see, this error differs from the first by reflecting a System.Security.Permissions.FileIOPermission failure, as opposed to an OS-level exception.
The following example shows how you would use the EnvironmentPermission class of the namespace to look at EnvironmentVariables:
Protected Sub TestEnvironmentPermissions_Click _
   (ByVal sender As Object, ByVal e As System.EventArgs) _
    Handles TestEnvironmentPermissions.Click

   Dim oEp As EnvironmentPermission = New EnvironmentPermission _
      (EnvironmentPermissionAccess.Read, "Temp")

   Dim sEv As String
   oEp.Assert()

   Try
       sEv = Environment.GetEnvironmentVariable("Temp")
MessageBox.Show("Assert was a success")
Catch objA As System.Exception
MessageBox.Show("Assert failed")
End Try
System.Security.CodeAccessPermission.RevertAssert()
oEp.Deny()
Try
sEv = Environment.GetEnvironmentVariable("Temp")
MessageBox.Show("Deny was a success")
Catch objA As System.Exception
MessageBox.Show("Deny failed")
End Try
MessageBox.Show(oEp.ToString)
End SubThere is a lot going on in this example, so consider it carefully. We first establish an environment variable permission and use the Assert method to ensure access to the code that follows:
Dim oEp As EnvironmentPermission = New EnvironmentPermission _
   (EnvironmentPermissionAccess.Read, "Temp")

Dim sEv As String
oEp.Assert()
We then try to read the environment variable into a string. If the string read succeeds, then we pop up a message box to reflect the success. If the read fails, then a message box reflects the failure:
Try
    sEv = Environment.GetEnvironmentVariable("Temp")
    MessageBox.Show("Assert was a success")
Catch objA As System.Exception
    MessageBox.Show("Assert failed")
End Try
Next, we revoke the assert we previously issued by using the RevertAssert method, and establish Deny permissions:
System.Security.CodeAccessPermission.RevertAssert()
oEp.Deny()
We then try again to read the variable, and write the appropriate result to a message box:
Try
    sEv = Environment.GetEnvironmentVariable("Temp")
    MessageBox.Show("Deny failed")
Catch objA As System.Exception
    MessageBox.Show("Deny was a success")
End Try
Finally, we write the ToString of the method to another message box. Following is the output of all three message boxes as a result of running this subroutine. The first two message box messages give us the feedback from our Assert and Deny code, followed by the output of our ToString method:
Assert was a success

Deny failed

<IPermission class="System.Security.Permissions.EnvironmentPermission, mscorlib,
 Version=2.0.0.0, Culture=neutral, PublicKeyToken=b77a5c561934e089"
 version="1" Read="Temp" />
The ToString method is an XML representation of the permission object currently in effect. The first and second message boxes that are output reflect the system version information of the Visual Basic security environment that was running at the time the button was clicked. The third message box is the environment variable name surrounded by the Read tags, which was the permission in effect when the ToString method was executed.
Look at one more example of where the permissions would affect you in your program functionality, that of accessing the registry. You would generally access the registry on the computer that was the central server for a component in your Windows Forms application.
When you use the EventLog methods to create entries in the machine Event Logs, you access the registry. To illustrate this concept, the following code example denies permissions to the registry:
Protected Sub TestRegistryPermissions_Click(ByVal sender As Object, _
                                       ByVal e As System.EventArgs) _
                                       Handles TestRegistryPermissions.Click

   Dim oRp As New _
      RegistryPermission(Security.Permissions.PermissionState.Unrestricted)
   oRp.Deny()

   Dim objLog As New EventLog
   Dim objLogEntryType As EventLogEntryType

   Try
      Throw (New EntryPointNotFoundException)
   Catch objA As System.EntryPointNotFoundException
      Try
         If Not System.Diagnostics.EventLog.SourceExists("Example") Then
            System.Diagnostics.EventLog.CreateEventSource("Example", "System")
         End If

         objLog.Source = "Example"
         objLog.Log = "System"
         objLogEntryType = EventLogEntryType.Information
         objLog.WriteEntry("Error: " & objA.message, objLogEntryType)
      Catch objB As System.Exception
         MessageBox.Show(objB.Message)
End Try End Try End Sub
Walking through the code, you begin by specifying the registry permission, setting it to Deny access:
Dim oRp As New _
    RegistryPermission(Security.Permissions.PermissionState.Unrestricted)
oRp.Deny()
Next, you Throw an exception on purpose in order to set up writing to an Event Log:
Throw (New EntryPointNotFoundException)
When the exception is caught, it checks the registry to ensure that a specific type of registry entry source already exists:
If Not System.Diagnostics.EventLog.SourceExists("Example") Then
   System.Diagnostics.EventLog.CreateEventSource("Example", "System")
End If
At this point, the code fails with the error message shown in Figure 12-4.

These examples can serve as a good basis for use in developing classes that access the other objects within the scope of the Permissions namespace, such as reflections and UI permissions.
As stated in the introduction to the chapter, two command-line utilities (Caspol.exe and Permview.exe) help in configuring and viewing security policy at both machine and user levels. When you manage security policy at these levels, you are doing so as an administrator of a machine or user policy for a machine that is hosting code that will be called from other front-end applications. Caspol.exe is a command-line utility with many options for configuring your security policies (Caspol stands for Code Access Security Policy). User and machine policy are associated with groups and permission sets. One group is automatically provided, the AllCode group.
The Caspol utility has two categories of commands. The first category listed in the following table is the set of commands that provide feedback about the current security policy:
Command | Short Command | Parameters | Effect |
|---|---|---|---|
| |||
None | This lists the combination of available groups and permission sets. |
| |
None | This lists only groups. |
| |
None | This lists only permission sets. |
| |
None | This lists only assemblies that have full trust privileges. |
| |
None | This lists code group names and descriptions. |
| |
None | This resets the machine and user policies to the default for .NET. This is handy if a policy creates a condition that is not recoverable. Use this command carefully, as you will lose all changes made to the current policies. | ||
|
| This lists which groups are associated with a given assembly file. | |
|
| This lists what permission sets are associated with a given assembly file. |
This is not the list in its entirety, but some of the more important commands. Now let's look at some examples of output from these commands. If you wanted to list the groups active on your local machine at the Visual Studio command prompt, you would type the following:
Caspol -Machine -ListGroups
The output looks similar to what is shown in Figure 12-5 (it varies slightly depending on the machine you are working on).
Looking at the output in a bit more detail, you can see some things in addition to what was specifically requested. The fourth line shows that code access security checking is ON. On the following line, the machine is checking for the user's right to execute the Caspol utility, as execution checking is ON. The policy change prompt is also ON, so if the user executes a Caspol command that changes system policy, then a confirmation prompt appears to verify that this is really intentional.
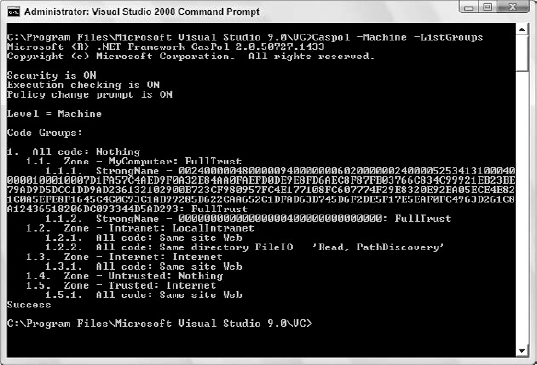
The level is also listed on the screen prior to the requested output, which is detailed at the bottom, listing the groups present on the machine. The policies pertain to two levels: the machine and the user. When changing policy, if the user is not an administrator, then the user policy is affected unless the user specifically applies the policy to the machine through use of the -machine switch, as illustrated in the screen shot. If the user is an administrator, then the machine policy is affected unless the user specifically applies the policy to the user level through the use of the -user switch.
Let's now look at another request result example. This time we ask for a listing of all of the permission sets on the machine. At the command prompt, you would type the following:
Caspol -machine -listpset
This would result in output similar to what is shown in Figure 12-6. The following output has been shortened for space considerations, but it contains a listing of all the code explicitly set to execute against the seven permission sets mentioned in the definitions section. In addition, note that the output is an XML representation of a permission object. The listing details the named permission sets and what each one has as active rights. For instance, the fifth permission set is named LocalIntranet, while the next lines detail the Permission class, an environment permission with read access to the environment variable - USERNAME. The next class detail is regarding FileDialogpermissions, and it lists those as being unrestricted. The output then goes on to detail the effective settings for IsolatedStorage and others.

Now consider the second category of commands that go with the Caspol utility, shown in the following table. These are the commands that we will use to actually modify policy:
Command | Short Command | Parameters | Effect |
|---|---|---|---|
| Adds a given | ||
| Adds a code group to the code group hierarchy | ||
| Adds a new named permission set to the policy; the permission set should be an XML file | ||
| Changes a code group's information | ||
| Changes a named permission set's information | ||
| This option is not recommended. It forces | ||
| Recovers policy information from a backup file controlled by the utility | ||
|
| Removes a given | |
|
| Removes a code group | |
|
| Removes a permission set. The seven default sets cannot be removed. |
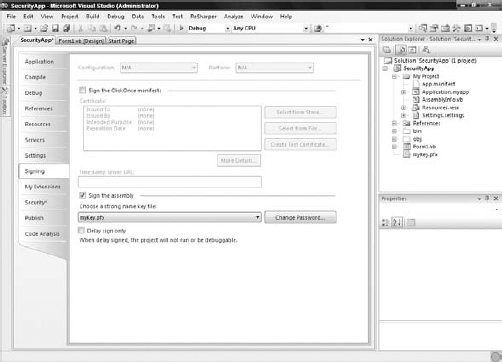
As before, this is not a comprehensive list of all the available commands, so consult the MSDN documentation for the complete listing if needed. Let's begin our discussion of these commands with a few more definitions that help clarify the parameters associated with them. An assembly file is created within Visual Basic each time you do a build whereby your version is a release version. An assembly needs to have a strong name associated with it in order to be used in your permissions groupings. It gets a strong name from being associated with a digital signature uniquely identifying the assembly. You carry out this association by right-clicking on your solution within Visual Studio 2008 and selecting Properties from the provided menu. From the available tabs in the Properties dialog, select Signing. Within this page of the Properties dialog, check the "Sign the assembly" check box. You will then need to either choose an already created strong name key file or create a new one. For this example, create a new one (by selecting the New option from the drop-down list). You will then be provided with the dialog shown in Figure 12-7. You will also want to fill out the Create Strong Name Key dialog as shown (though with your own password).

After selecting OK in this dialog, you will see a new file in your Solution Explorer called myKey.pfx, as shown in Figure 12-8.
During the build, Visual Studio generates the strong name, after which you can add your assembly to your security configuration. Place the executable, SecurityApp.exe (your executable will be the name of your project), which was created from the build, into the C: estsecurity directory on the local machine for use with the policy method illustrations.
If you wanted to add your assembly to the fulltrust permission set, you would type Caspol -addfulltrust C: estsecuritySecurityApp.exe.
Figure 12-9 shows the outcome of the command.
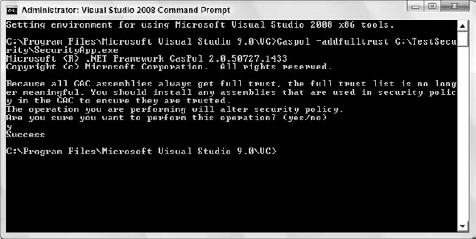
Before your command alters your security policy, you are notified that your DLLs can just be placed within the GAC as well to get full trust for them. By typing "y" and then pressing Enter, the new application will then be added to the fulltrust assembly list. You can confirm it was added by issuing the following command:
Caspol -listfulltrust
An excerpt of output from the command that includes the new assembly would look like what is shown in Figure 12-10.
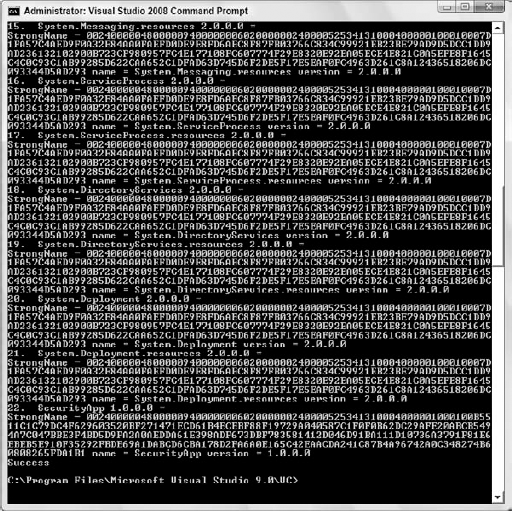
This shows the application name, version, and key information associated with the .exe file when the build was performed. Now let's look at the creation and addition of a permission set to the permission sets in the security policy. Permission sets can be created by hand in any text editor, in an XML format and saved as an .xml file (this example saves it as SecurityExample.xml). Following is a listing from one such file that was created for this example:
<PermissionSet class="System.Security.NamedPermissionSet" version="1">
   <Permission class="System.Security.Permissions.FileIOPermission, mscorlib,
            SN=03689116d3a4ae33" version="1">
      <Read> C:TestSecurity </Read>
</Permission>
<Permission class="System.Security.Permissions.EnvironmentPermission,
mscorlib, SN=03689116d3a4ae33" version="1">
<Read> [TEMP] </Read>
</Permission>
<Name>SecurityExample</Name>
<Description>Gives Full File Access</Description>
</PermissionSet>The listing has multiple permissions within the permission set. The listing sets up read file permissions within one set of tags:
<Permission class="System.Security.Permissions.FileIOPermission, mscorlib,
            SN=03689116d3a4ae33" version="1">
   <Read> C:TestSecurity </Read>
</Permission>
You then set up read access to the Temp environment variable in the second set of permission tags:
<Permission class="System.Security.Permissions.EnvironmentPermission,
            mscorlib, SN=03689116d3a4ae33" version="1">
   <Read> [TEMP] </Read>
</Permission>
The listing also gives the custom permission set the name of SecurityExample, with a description:
<Name>SecurityExample</Name>
<Description>Gives Full File Access</Description>
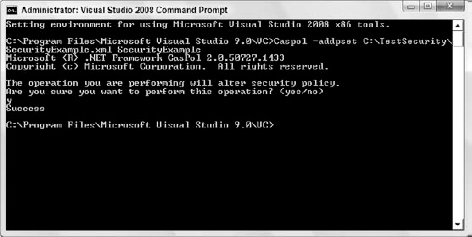
When you want to add your permission set to your policy, you would type the following command:
Caspol -addpset C: estsecuritysecurityexample.xml securityexample
The last command issues the -addpset flag to indicate that you want to add a permission set, followed by the XML file containing the permission set, followed finally by the name of the permission set. Figure 12-11 shows the outcome of your command.
You can then list your security permission sets by typing Caspol -listpset. Figure 12-12 shows the excerpt of the new security permission set.
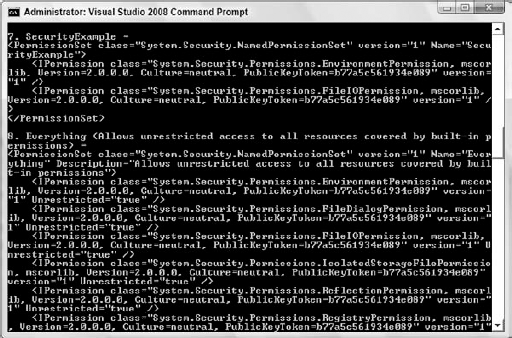
This lists just the permission sets within your policy. The named permission set SecurityExample shows up under the Named Permission Sets heading, and its description is listed just after its name.
Once you have a permission set, you can add a group that your assembly object fits into and which enforces the new permission set. You add this group by using the AddGroup switch in Caspol. The AddGroup switch has a couple of parameters that need more explanation. The first parameter is parent_label. As shown in Figure 12-13, the All code group has a "1" before it. The labels within code groups have a hierarchy that is established when you add groups, so you need to specify what your parent label would be. In this case, because the only one that exists is "1," that is what you designate.
Because you designate 1, the new group becomes a child of 1. The second parameter is membership. The membership parameter has a certain list of options that you can add based on the following table. Each option designates a piece of information you are providing about the code you will add to your group. For instance, you might state that you will only be adding code that has a specific signature with the -Pub option, or only code in a certain application directory with the -AppDir option.
Option | Description |
|---|---|
All code | |
| Code that has a specific signature on a certificate file |
Code that has a specific strong name, as designated by a filename, code name, and version | |
Code that fits into the following zones: MyComputer, Intranet, Trusted, Internet, or Untrusted | |
Originating on a website | |
Code that has a specific assembly hash | |
| A specific application directory |
Code that requests the | |
Originating at a specific URL | |
Code that requires a custom membership condition |
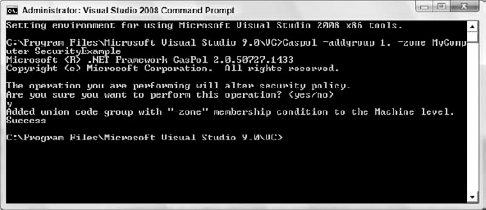
The third parameter to the AddGroup command is the permission set name that you want to be associated with your group. The group that we will create will be under parent label 1, and we will designate the -Zone parameter as MyComputer because the code lives on a local drive. We will also associate the new group with our SecurityExample permission set by typing the following command:
Caspol -addgroup 1. -Zone MyComputer SecurityExample
Output from the command was successful, as shown in Figure 12-13.
Figure 12-14 shows the -listgroups command used for listing the new group. You can see that a 1.6 level was added, with the SecurityExample permission set attached to all code that fits into the MyComputer Zone. You can verify that the assembly object fits into the MyComputer Zone by using the resolveperm command, as shown in Figure 12-15.
The bottom of the figure lists which ZoneIdentityPermission the assembly object has been associated with — MyComputer. In addition, each assembly gets a URLIdentityPermission specifying the location of the executable.
Not only do you have a utility that helps with managing security permission sets and groups, you also have a utility that views the security information regarding an assembly, Permview.exe. (Permview stands for Permissions Viewer.)
Permview is not as complex as Caspol because its main purpose is to provide a certain type of feedback regarding the security requests of assemblies. In fact, the Permview utility only has two switches: one for the output location, and one for declarative security to be included in the output. In order to specify an output location, the switch is /Output, and then a file path is appended to the command line after the switch. The Permview utility brings up another concept not covered yet: declarative security.


Declarative security is displayed in the Permview utility with the /Decl switch; it is security that a piece of code requests at an assembly level. Because it is at the assembly level, the line that requests the security is at the top of the Visual Basic module, even before your Imports statements. You can request one of three levels of security, as described in the following table:
Level | Description |
|---|---|
Permissions the code must have in order to run | |
Permissions that code may use, but could run without | |
Permissions that you want to ensure are never granted to the code |
Requesting permissions at the assembly level helps ensure that the code will be able to run, and won't get permission-based security exceptions. Because you have users calling your code, the declarative security ensures that the callers have proper security to do all that your code requires; otherwise, a security exception is thrown. The following example shows the syntax for requesting minimum permissions; the code would be placed at the top of the procedure. This example also illustrates the syntax described in the table at the beginning of the chapter regarding permissions in the Security.Permissions namespace. Moreover, it illustrates the use of a security constant, SecurityAction.RequestMinimum, for the type of security you are requesting:
<Assembly: SecurityPermissionAttribute(SecurityAction.RequestMinimum)>
Once this line is added to the assembly by means of the AssemblyInfo.vb file, Permview will report on what the assembly requested by listing minimal, optional, and refused permission sets, including the security permission set under the minimal set listing.
Before the .NET Framework 2.0, a common request from developers who were building and deploying applications was the need for clarification regarding which permissions were required for the application to run. This was sometimes a difficult task, as developers would build their applications under Full Trust and then the applications would be deployed to a machine that didn't have those privileges.
The .NET Framework 2.0 introduced a new tool that can be used to fully understand which permissions your application will need in order to run on another machine. This command-line tool, PermCalc.exe, does this by emulating the complete path of your assembly and all the permissions that it would require.
To use PermCalc.exe, open the Visual Studio command prompt and navigate to the location of the assembly you want to check. PermCalc.exe takes the following command structure:
PermCalc.exe [Options] <assembly>
You can also have PermCalc.exe evaluate more than a single assembly:
PermCalc.exe [Options] <assembly> <assembly>
For example, running the PermCalc.exe tool on the SecurityApp.exe resulted in the following:
<?xml version="1.0"?>
<Assembly>
  <Namespace Name="SecurityApp">
    <Type Name="Form1">
      <Method Sig="void .cctor()" />
      <Method Sig="instance void .ctor()">
        <Demand>
          <PermissionSet version="1" class="System.Security.PermissionSet">
            <IPermission version="1"
             class="System.Security.Permissions.ReflectionPermission,
               mscorlib, Version=2.0.0.0, Culture=neutral,
               PublicKeyToken=b77a5c561934e089" Unrestricted="true" />
            <IPermission version="1"
             class="System.Security.Permissions.SecurityPermission, mscorlib,
               Version=2.0.0.0, Culture=neutral,
               PublicKeyToken=b77a5c561934e089" Flags="UnmanagedCode,
               ControlEvidence" />
            <IPermission Window="AllWindows" version="1"
             class="System.Security.Permissions.UIPermission, mscorlib,
               Version=2.0.0.0, Culture=neutral,
               PublicKeyToken=b77a5c561934e089" />
            <IPermission version="1"
             class="System.Security.Permissions.KeyContainerPermission,
               mscorlib, Version=2.0.0.0, Culture=neutral,
               PublicKeyToken=b77a5c561934e089" Unrestricted="true" />
          </PermissionSet>
        </Demand>
        <Sandbox>
          <PermissionSet version="1" class="System.Security.PermissionSet">
            <IPermission version="1"
             class="System.Security.Permissions.ReflectionPermission,
               mscorlib, Version=2.0.0.0, Culture=neutral,
               PublicKeyToken=b77a5c561934e089" Unrestricted="true" />
            <IPermission version="1"
             class="System.Security.Permissions.SecurityPermission, mscorlib,
               Version=2.0.0.0, Culture=neutral,
               PublicKeyToken=b77a5c561934e089" Flags="UnmanagedCode,
               ControlEvidence" />
            <IPermission Window="AllWindows" version="1"
             class="System.Security.Permissions.UIPermission, mscorlib,
               Version=2.0.0.0, Culture=neutral,
               PublicKeyToken=b77a5c561934e089" />
            <IPermission version="1"
             class="System.Security.Permissions.KeyContainerPermission,
               mscorlib, Version=2.0.0.0, Culture=neutral,
               PublicKeyToken=b77a5c561934e089" Unrestricted="true" />
          </PermissionSet>
        </Sandbox>
      </Method>
    </Type>
  </Namespace>
</Assembly>
From this output, you can see the permissions that would be required for the application to run on someone's machine. These results were generated using the following command:
PermCalc.exe -under SecurityApp.exe
The option -under should be used when you are unsure of the exact permissions, as PermCalc.exe actually overestimates the permissions by default. Using -under forces PermCalc.exe to underestimate the permissions instead.
Looking at the properties of your solution in Visual Studio, note the new Security tab. In the past, one of the problems in testing your application's security and permissioning was that as a developer, you were always forced to develop your programs under Full Trust. This means that you have access to the system's resources in a very open and free manner. This was an issue because typically the programs that you build cannot run under Full Trust and you still have to test the application's abilities to tap into the system's resources where the program is being run.
The Security tab, shown in Figure 12-16, is a GUI to the PermCalc.exe tool that enables you to run your applications under different types of zones.

After checking the Enable ClickOnce Security Settings check box, you can specify whether the application will run on the client machine under Full Trust or partial trust status. You can also select the zone in which your application will run. The options include the following:
Local Intranet
Internet
Custom
After selecting the zone type, you can examine all the various permissions that are required by the application in order to run.
Clicking the Calculate Permissions button on the form enables you to do just that. Visual Studio examines the assembly (see Figure 12-17) and provides you with information about which permissions for which assemblies would be required to run the application in the zone specified.
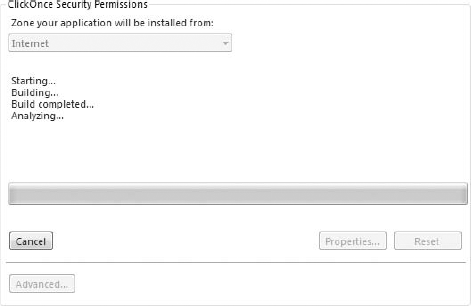
After analysis, Visual Studio presents information about what is needed from each of the assemblies in order for the application to function, as shown in Figure 12-18.

What makes this section of the application's property pages even better is that from the text box of assemblies listed, you can highlight selected assemblies and fine-tune their permissions even further — granularizing the permissions the assemblies are allowed to work with. For instance, highlighting the FileIOPermission line and changing the drop-down list to Include in the text box and clicking the Properties button enables you to fine-tune the permissioning for this assembly. The Permission Settings dialog that appears is shown in Figure 12-19.
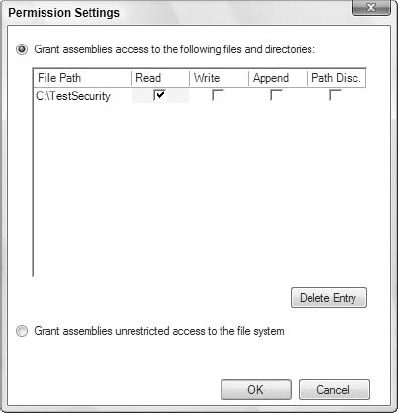
The FileIOPermission part of the permission settings enables you to specify the file path that the assembly is allowed to access, as well as the actions that the assembly is allowed to take in the path defined.
The capability to examine assemblies is provided not only through the command-line tool, PermCalc.exe; even Visual Studio joins in and enables easy management and understanding of your applications.
Microsoft provides many security tools in its .NET SDK. Most of these tools are console-based utility applications. These tools can be used to help implement the security processes outlined earlier. They are not described in great detail, though they do deserve a review. Basically, two groups of tools are provided with the SDK:
Permissions and assembly management tools
Certificate management tools
Function | |
|---|---|
Stands for Code Access Security Policy tool. This tool enables you to view and modify security settings. | |
A file signing tool that enables you to digitally sign your executable files | |
An administrative tool for isolated storage management. It restricts code access to the filing system. | |
Emulates the complete path of your assembly and all the permissions that it requires. It can also evaluate assemblies and provide information on the permissions an end user would require to run the program. | |
Displays an assembly's requested access permissions | |
Checks whether the executable file will pass the runtime test for type-safe coding | |
Extracts a public key from a certificate and puts it in a format that is usable in your source code | |
Creates assemblies with strong names — that is, a digitally signed namespace and version information |
In this latest release of the .NET Framework, the SecurityException class has been greatly expanded to provide considerably more detailed information on the types of exceptions that are encountered in a security context.
In the past, using the .NET Framework versions 1.0/1.1, the SecurityException class provided very little information in terms of actually telling you what was wrong and why the exception was thrown. Due to this limitation, the .NET Framework 2.0 added a number of new properties to the SecurityException class. The following table details the properties of the SecurityException class:
Properties | Description |
|---|---|
Retrieves the security action that caused the exception to occur | |
Returns the permissions, permission sets, or permission set collections that caused the error to occur | |
Returns the denied permissions, permissions sets, or permission set collections that caused the security actions to fail | |
| Returns information about the failed assembly |
| Returns the first permission contained in the permissions set or permission set collection that failed |
Returns the set of permissions that caused the security actions to fail | |
Returns information about the method connected to the exception | |
Returns the state of the permission that threw the exception | |
Returns the type of the permission that threw the exception | |
Returns a permissions set or permission set collection that is part of the permit-only stack frame if a security action has failed | |
Returns the permissions that were refused by the assembly | |
| Returns the URL of the assembly that caused the exception |
Returns the zone of the assembly that caused the exception |
Clearly, you can get your hands on a lot of information if a security exception is thrown in your application. For instance, you can use something similar to the following Catch section of code to check for security errors:
Dim myFile as FileInfo
Try
myFile = _
My.Computer.FileSystem.GetFileInfo("C: estingsecurity esting.txt")
Catch ex As Security.SecurityException
MessageBox.Show(ex.Method.Name.ToString())
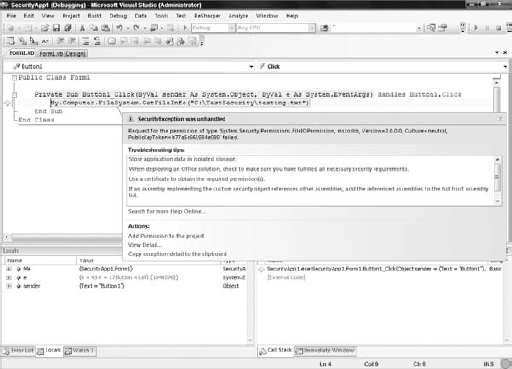
End TryOne nice addition to the SecurityException class is how Visual Studio so easily works with it. When you encounter a SecurityException error while working in the Debug mode of your solution, you will get a warning directly in the IDE, similar to the warning shown in Figure 12-20.
You can also have Visual Studio provide a detailed view of the error by breaking down the SecurityException object in the Locals window of Visual Studio when you catch the error using a Try-Catch statement.
Rather than present a general exposition of cryptography, this section is meant to familiarize you with basic techniques required to deal with .NET security and protect your Web services through encryption. The three building blocks you need are hashing algorithms, secret key encryption, and an understanding of the Public Key Cryptographic System (PKCS).
Hashing algorithms digest long sequences of data into short footprints, the most popular being 64-bit hash keys. The two most popular hashing algorithms are SHA (Secure Hash Algorithm) and MD5 (Message-Digest algorithm 5). These hash keys are used for signing digital documents; in other words, the hash is generated and encrypted using a private key.
Secret key encryption is commonly used to protect data through passwords and pass phrases (long phrases that would be difficult to guess). Secret key encryption is suitable for situations where the encrypted data needs to be accessed by the same person who protected it.
Public Key Cryptography is most widely used in protecting the data through encryption. It is also used for digital signatures. Public Key Cryptography is based on asymmetric keys, which means you always have a pair of keys. One is known to all and is called the public key. The other key of the pair is kept secret and is known only to the owner. This is called the private key. If you use the public key to encrypt data, it can only be decrypted using the corresponding private key of the key pair, and vice versa.
Because the public key is known to all, anyone can decrypt the information. However, the private key is known only to the owner, so this process acts as a digital signature. In other words, if the public key decrypts the message, then you know that the sender was the owner of the private key. As suggested earlier, rather than encrypt the whole document using the private key, a hash algorithm is used to digest the data into a compact form, which is then encrypted using the private key. The result of this process is called the digital signature of the digital document.
If the data is encrypted using the public key, then it can only be decrypted by the corresponding private key, which means that only the owner of the private key will be able to read the unencrypted data. This can be used for encryption purposes. The cryptographic namespace of the .NET Framework is System.Security.Cryptography.
Hash algorithms are also called one-way functions because of their mathematical property of nonreversibility. The hash algorithms reduce large binary strings into a fixed-length binary byte array. This fixed-length binary array is used for computing digital signatures, as explained earlier.
To verify a piece of information, the hash is recomputed and compared against a previously computed hash value. If both values match, then the data has not been altered. Cryptographic hashing algorithms map a large stream of binary data to a much shorter fixed length, so it is theoretically possible for two different documents to have the same hash key.
Although it is theoretically possible for two documents to have the same MD5 hash key and a different checksum, it is computationally impossible to create a forged document having the same hash key as the original hash value. Consider the case of a virus attack on an executable code. In the late 1980s, as a protective measure against accidental or malicious damage to the code's integrity, the most sophisticated technique available was to create a checksum or a CRC (cyclic redundancy check).
Virus makers drew cunning designs to create viruses that added padding code to the victim's files so that the checksum and CRC remained unchanged in spite of the infection. However, using MD5 hash values, this kind of stealth attack is rendered unfeasible.
Windows Meta Files (WMF) still use checksums in the file header. For example, the .NET Framework class System.Drawing.Imaging.WmfPlaceableFileHeader has a read/write property of type short called Checksum. However, due to ease of computation, this checksum is used only as a cheap mode of protection against accidental damage, rather than against malicious attacks.
Here is a simple program to calculate a checksum:
' Cryptography/Checksum.vb

Imports System
Imports System.IO

Module Module1
This is the entry point for the program. Here, you check to see whether you've received the correct argument from the command line to run the program, and stop the program if you haven't:
Public Sub Main(ByVal CmdArgs() As String)
   If (CmdArgs.Length <> 1) Then
       Console.WriteLine("Usage: Checksum <filename>")
       End
   End If
First, you open the file for which the checksum is to be computed:
Dim fs As FileStream = File.OpenRead(CmdArgs(0))
You then compute the checksum, close the file, and then output the result to the screen:
Dim sum As Short = compute(fs)
   fs.Close()

   Console.WriteLine(sum)
End Sub
The following method computes the checksum:
Function compute(ByVal strm As Stream)
        Dim sum As Long = 0
        Dim by As Integer

        strm.Position = 0
        by = strm.ReadByte

        While (by <> −1)
            sum = (((by Mod &HFF) + sum) Mod &HFFFF)
            by = strm.ReadByte
        End While

        Return CType((sum Mod &HFFFF), Short)
    End Function
End Module
Compile this program with the following in the VB compiler (or build and run your application if you are using Visual Studio):
vbc Checksum.vb
Run it with the following:
Checksum <filename>
Due to their unsafe nature, checksums and CRCs are sometimes deemed poor cousins of cryptographic hash algorithms. The next section describes classes provided by the .NET Framework to cater to cryptographic-grade algorithms.
The abstract class System.Security.Cryptography.HashAlgorithm represents the concept of cryptographic hash algorithms within the .NET Framework. The framework provides eight classes that extend the HashAlgorithm abstract class:
MD5CryptoServiceProvider(extends abstract classMD5)RIPEMD160Managed(extends abstract classRIPEMD160)SHA1CryptoServiceProvider(extends abstract classSHA1)SHA256Managed(extends abstract classSHA256)SHA384Managed(extends abstract classSHA384)SHA512Managed(extends abstract classSHA512)MACTripleDES(extends abstract classKeyedHashAlgorithm)
The last two classes belong to a class of algorithm called keyed hash algorithms. The keyed hashes extend the concept of the cryptographic hash with the use of a shared secret key. This is used for computing the hash of data transported over an unsecured channel.
The following is an example of computing a hash value of a file:
' Cryptography/TestKeyHash.vb

Imports System
Imports System.IO
Imports System.Security.Cryptography
Imports System.Text
Imports System.Runtime.Serialization.Formatters

Module Module1
    Public Sub Main(ByVal CmdArgs() As String)
        If (CmdArgs.Length <> 1) Then
            Console.WriteLine("Usage: TestKeyHash <filename>")
            End
        End If
The next snippet creates the object instance of the .NET SDK Framework class with a salt (a random secret to confuse a snooper):
Dim key() As Byte = Encoding.ASCII.GetBytes("My Secret Key".ToCharArray())
Dim hmac As HMACSHA1 = New HMACSHA1(key)
Dim fs As FileStream = File.OpenRead(CmdArgs(0))
The next four lines compute the hash, convert the binary hash into a printable Base64 format, close the file, and then print the Base64 encoded string as the result of hashing to the screen:
Dim hash() As Byte = hmac.ComputeHash(fs)
        Dim b64 As String = Convert.ToBase64String(hash)
        fs.Close()

        Console.WriteLine(b64)
    End Sub
End Module
The code can be compiled at the command line using the following:
vbc TestKeyHash.vb
To execute the code, use the following command at the console prompt:
TestKeyHash TestKeyHash.vb
This should produce a hashed output:
IOEj/D0rOxjEqCD8qHoYm+yWw6I=
The previous example uses an instance of the HMACSHA1 class. The output displayed is a Base64 encoding of the binary hash result value. Base64 encoding is widely used in MIME and XML file formats to represent binary data. To recover the binary data from a Base64-encoded string, you could use the following code fragment:
Dim orig() As Byte = Convert.FromBase64String(b64)
The XML parser, however, does this automatically, as shown in later examples.
Secure Hash Algorithm (SHA) is a block cipher that operates on a block size of 64 bits. However, the subsequent enhancements of this algorithm have bigger key values, thus increasing the value range and therefore enhancing the cryptographic utility. Note that the bigger the key value sizes, the longer it takes to compute the hash. Moreover, for relatively smaller data files, smaller hash values are more secure. To put it another way, the hash algorithm's block size should be less than or equal to the size of the data itself.
The hash size for the SHA1 algorithm is 160 bits. Similar to the HMACSHA1 code discussed previously, the following code shows how to use it:
' Cryptography/TestSHA1.vb

Imports System
Imports System.IO
Imports System.Security.Cryptography
Imports System.Text
Imports System.Runtime.Serialization.Formatters

Module Module1
    Public Sub Main(ByVal CmdArgs() As String)
        If (CmdArgs.Length <> 1) Then
             Console.WriteLine("Usage: TestSHA1 <filename>")
            End
        End If
        Dim fs As FileStream = File.OpenRead(CmdArgs(0))

        Dim sha As SHA1 = New SHA1CryptoServiceProvider()
        Dim hash() As Byte = sha.ComputeHash(fs)
        Dim b64 As String = Convert.ToBase64String(hash)
        fs.Close()

        Console.WriteLine(b64)
    End Sub
End Module
The .NET Framework provides bigger key size algorithms as well — namely, SHA256, SHA384, and SHA512. The numbers at the end of the name indicate the block size.
The class SHA256Managed extends the abstract class SHA256, which in turn extends the abstract class HashAlgorithm. The Forms Authentication module of ASP.NET security (System.Web.Security.FormsAuthenticationModule) uses SHA1 as one of its valid formats to store and compare user passwords.
MD5 stands for Message-Digest algorithm 5. It is a cryptographic, one-way hash algorithm. The MD5 algorithm competes well with SHA. MD5 is an improved version of MD4, devised by Ronald Rivest of RSA fame. In fact, FIPS PUB 180-1 states that SHA-1 is based on principles similar to MD4. The salient features of this class of algorithms are as follows:
It is computationally unfeasible to forge an MD5 hash digest.
MD5 is not based on any mathematical assumption such as the difficulty of factoring large binary integers.
MD5 is computationally cheap, and therefore suitable for low latency requirements.
It is relatively simple to implement.
MD5 is the de facto standard for hash digest computation, due to the popularity of RSA. The .NET Framework provides an implementation of this algorithm through the class MD5CryptoServiceProvider in the System.Security.Cryptography namespace. This class extends the MD5 abstract class, which in turn extends the abstract class HashAlgorithm. This class shares a common base class with SHA1, so the examples previously discussed can be modified easily to accommodate it:
Dim fs As FileStream = File.OpenRead(CmdArgs(0))

Dim md5 As MD5 = New MD5CryptoServiceProvider()
Dim hash() As Byte = md5.ComputeHash(fs)

Dim b64 As String = Convert.ToBase64String(hash)
fs.Close()

Console.WriteLine(b64)
Based on MD5, RIPEMD-160 started as a project in Europe called RIPE (RACE Integrity Primitives Evaluation Message Digest) in 1996. By 1997, the design of RIPEMD-160 was finalized. RIPEMD-160 is a 160-bit hash algorithm that is meant to be a replacement for MD4 and MD5.
The .NET Framework 2.0 introduced the RIPEMD160 class to work with this iteration of encryption techniques. The following code demonstrates the use of this class:
Dim fs As FileStream = File.OpenRead(CmdArgs(0))


Dim myRIPEMD As New RIPEMD160Managed()
Dim hash() As Byte = myRIPEMD.ComputeHash(fs)

Dim b64 As String = Convert.ToBase64String(hash)

fs.Close()
Console.WriteLine(b64)
Secret key encryption is widely used to encrypt data files using passwords. The simplest technique is to seed a random number using a password, and then encrypt the files with an XOR operation using this random number generator.
The .NET Framework represents the secret key by an abstract base class SymmetricAlgorithm. Four concrete implementations of different secret key algorithms are provided by default:
Let's explore the SymmetricAlgorithm design. As indicated by the following example code, two separate methods are provided to access encryption and decryption. Here is a console application program that encrypts and decrypts a file, given a secret key:
' Cryptography/SymEnc.vb

Imports System.Security.Cryptography
Imports System.IO
Imports System

 Module Module1
    Public Sub Main(ByVal CmdArgs() As String)
        If (CmdArgs.Length <> 4) Then
            UsageAndExit()
        End If
The following computes the index of the algorithm that we'll use:
Dim algoIndex As Integer = CmdArgs(0)

If (algoIndex < 0 Or algoIndex >= algo.Length) Then
   UsageAndExit()
End If
The following opens the input and output files (the filename represented by CmdArgs(3) is the output file, and CmdArgs(2) is the input file):
Dim fin As FileStream = File.OpenRead(CmdArgs(2))
Dim fout As FileStream = File.OpenWrite(CmdArgs(3))
We create the symmetric algorithm instance using the .NET Framework class SymmetricAlgorithm. This uses the algorithm name indexed by the CmdArgs(0) parameter. After this, we set the key parameters and display them onscreen for information:
Dim sa As SymmetricAlgorithm = _
   SymmetricAlgorithm.Create(algo(algoIndex))
sa.IV = Convert.FromBase64String(b64IVs(algoIndex))
sa.Key = Convert.FromBase64String(b64Keys(algoIndex))

Console.WriteLine("Key " + CType(sa.Key.Length, String))
Console.WriteLine("IV " + CType(sa.IV.Length, String))
Console.WriteLine("KeySize: " + CType(sa.KeySize, String))
Console.WriteLine("BlockSize: " + CType(sa.BlockSize, String))
Console.WriteLine("Padding: " + CType(sa.Padding, String))
At this point, we check which operation is required, and execute the appropriate static method:
If (CmdArgs(1).ToUpper().StartsWith("E")) Then
        Encrypt(sa, fin, fout)
     Else
        Decrypt(sa, fin, fout)
     End If
End Sub
Here is where the encryption itself takes place:
Public Sub Encrypt(ByVal sa As SymmetricAlgorithm, _
                   ByVal fin As Stream, _
                   ByVal fout As Stream)
    Dim trans As ICryptoTransform = sa.CreateEncryptor()
    Dim buf() As Byte = New Byte(2048) {}
    Dim cs As CryptoStream = _
        New CryptoStream(fout, trans, CryptoStreamMode.Write)
    Dim Len As Integer

    fin.Position = 0
    Len = fin.Read(buf, 0, buf.Length)

    While (Len > 0)
        cs.Write(buf, 0, Len)
        Len = fin.Read(buf, 0, buf.Length)
    End While

    cs.Close()
    fin.Close()
End Sub
Here's the decryption method:
Public Sub Decrypt(ByVal sa As SymmetricAlgorithm, _
                   ByVal fin As Stream, _
                   ByVal fout As Stream)
    Dim trans As ICryptoTransform = sa.CreateDecryptor()
Dim buf() As Byte = New Byte(2048) {}
Dim cs As CryptoStream = _
New CryptoStream(fin, trans, CryptoStreamMode.Read)
Dim Len As Integer
Len = cs.Read(buf, 0, buf.Length)
While (Len > 0)
fout.Write(buf, 0, Len)
Len = cs.Read(buf, 0, buf.Length)
End While
fin.Close()
fout.Close()
End SubThis next method prints usage information:
Public Sub UsageAndExit()
    Console.Write("Usage SymEnc <algo index> <D|E> <in> <out> ")
    Console.WriteLine("D =decrypt, E=Encrypt")

    For i As Integer = 0 To (algo.Length - 1)
        Console.WriteLine("Algo index: {0} {1}", i, algo(i))
    Next i
    End
End Sub
The static parameters used for object creation are indexed by CmdArgs(0). How you arrive at these magic numbers is explained shortly:
Dim algo() As String = {"DES", "RC2", "Rijndael", "TripleDES"}
    Dim b64Keys() As String = {"YE32PGCJ/g0=", _
        "vct+rJ09WuUcR61yfxniTQ==", _
        "PHDPqfwE3z25f2UYjwwfwg4XSqxvl8WYmy+2h8t6AUg=", _
        "Q1/lWoraddTH3IXAQUJGDSYDQcYYuOpm"}
    Dim b64IVs() As String = {"onQX8hdHeWQ=", _
        "jgetiyz+pIc=", _
        "pd5mgMMfDI2Gxm/SKl5I8A==", _
        "6jpFrUh8FF4="}
End Module
After compilation, this program can encrypt and decrypt using all four of the symmetric key implementations provided by the .NET Framework. The secret keys and their initialization vectors (IVs) have been generated by a simple source code generator, examined shortly.
The following commands encrypt and decrypt files using the DES algorithm. The first command takes a text file, 1.txt, and uses the DES algorithm to create an encrypted file called 2.bin. The next command decrypts this file and stores it in 3.bin:
SymEnc 0 E 1.txt 2.bin
SymEnc 0 D 2.bin 3.bin
The first parameter of the SymEnc program is an index to the string array, which determines the algorithm to be used:
Dim algo() As String = {"DES", "RC2", "Rijndael", "TripleDES"}The string defining the algorithm is passed as a parameter to the static Create method of the abstract class SymmetricAlgorithm. This class has an abstract factory design pattern:
Dim sa As SymmetricAlgorithm = SymmetricAlgorithm.Create(algo(algoIndex))
To encrypt, you get an instance of the ICryptoTransform interface by calling the CreateEncryptor method of the SymmetricAlgorithm class extender:
Dim trans As ICryptoTransform = sa.CreateEncryptor()
Similarly, for decryption, you get an instance of the ICryptoTransform interface by calling the CreateDecryptor method of the SymmetricAlgorithm class instance:
Dim trans As ICryptoTransform = sa.CreateDecryptor()
You use the class CryptoStream for both encryption and decryption, but the parameters to the constructor differ. Encryption uses the following code:
Dim cs As CryptoStream = New CryptoStream(fout, trans, CryptoStreamMode.Write)
Similarly, decryption uses this code:
Dim cs As CryptoStream = New CryptoStream(fin, trans, CryptoStreamMode.Read)
You call the Read and Write methods of the CryptoStream for decryption and encryption, respectively. For generating the keys, you use a simple code generator, as follows:
' Cryptography/SymKey.vb

Imports System.IO
Imports System.Security.Cryptography
Imports System.Text

Module Module1
    Public Sub Main(ByVal CmdArgs() As String)
        Dim keyz As StringBuilder = New StringBuilder
        Dim ivz As StringBuilder = New StringBuilder

        keyz.Append("Dim b64Keys() As String = { _" + VbCrLf)
        ivz.Append(VbCrLf + "Dim b64IVs() As String = { _" + VbCrLf )
The algorithm names for symmetric keys used by .NET SDK are given the correct index values here:
Dim algo() As String = {"DES", "RC2", "Rijndael", "TripleDES"}For each of the algorithms, you generate the keys and IV:
Dim comma As String = ", _" + VbCrLf

For i As Integer = 0 To 3
   Dim sa As SymmetricAlgorithm = SymmetricAlgorithm.Create(algo(i))

   sa.GenerateIV()
   sa.GenerateKey()

   Dim Key As String
   Dim IV As String

   Key = Convert.ToBase64String(sa.Key)
   IV = Convert.ToBase64String(sa.IV)

   keyz.AppendFormat(vbTab + """" + Key + """" + comma)
   ivz.AppendFormat(vbTab + """" + IV + """" + comma)

   If i = 2 Then comma = " "
Next i
Here, you print or emit the source code:
keyz.Append("}")
        ivz.Append("}")

        Console.WriteLine(keyz.ToString())
        Console.WriteLine(ivz.ToString())
    End Sub
End Module
The preceding program creates a random key and an initializing vector for each algorithm. This output can be inserted directly into the SymEnc.vb program. The simplest way to do this is to type the following:
SymKey > keys.txt
This redirects the information into a file called keys.txt, which you can then use to cut and paste the values into your program. You use the StringBuilder class along with the control character crlf (carriage return and line feed) to format the text so that it can be inserted directly into your program. You then convert the binary data into Base64 encoding using the public instance method ToBase64String of the class Convert. Kerberos, the popular network authentication protocol supported by Windows Server 2003, Windows 2000, and all of the UNIX flavors, uses secret key encryption to implement security.
The Public Key Cryptographic System is a type of asymmetric key encryption. This system uses two keys, one private and the other public. The public key is widely distributed, whereas the private key is kept secret. One cannot derive or deduce the private key by knowing the public key, so the public key can be safely distributed.
The keys are different, yet complementary. That is, if you encrypt data using the public key, then only the owner of the private key can decipher it, and vice versa. This forms the basis of PKCS encryption.
If the private key holder encrypts a piece of data using his or her private key, any person with access to the public key can decrypt it. The public key, as the name suggests, is available publicly. This property of the PKCS is exploited along with a hashing algorithm, such as SHA or MD5, to provide a verifiable digital signature process.
The abstract class System.Security.Cryptography.AsymmetricAlgorithm represents this concept in the .NET Framework. Two concrete implementations of this class are provided by default:
DSA (Digital Signature Algorithm) was specified by NIST (National Institute of Standards and Technology) in January 2000. The original DSA standard, however, was issued by NIST much earlier, in August 1991. DSA cannot be used for encryption and is good only for digital signature. Digital signature is discussed in more detail in the next subsection.
RSA algorithms can also be used for encryption as well as digital signatures. RSA is the de facto standard and has much wider acceptance than DSA. RSA is a tiny bit faster than DSA as well.
The RSA algorithm is named after its three inventors: Rivest, Shamir, and Adleman. It was patented in the United States, but the patent expired in September 2000. RSA can be used for both digital signature and data encryption. It is based on the assumption that large numbers are extremely difficult to factor. The use of RSA for digital signatures is approved within the FIPS PUB 186-2 and is defined in the ANSI X9.31 standard document.
To gain some practical insights into RSA implementation of the .NET Framework, consider the following code (for this to compile, you also have to make a reference to the System.Security DLL in your project):
' Cryptography/TestRSAKey.vb

Imports System.Security.Cryptography.Xml

Module Module1
    Sub Main()
        Dim RSA As RSAKeyValue = New RSAKeyValue
        Dim str As String = RSA.Key.ToXmlString(True)
        System.Console.WriteLine(str)
    End Sub
End Module
This code creates a pair of private and public keys and prints it out at the command line in XML format. To compile the preceding code, simply open a console session, run corvar.bat (if necessary), set the .NET SDK paths, and compile the program by typing the following command:
TestRSAKey.vb
This should produce a file called TestRSAKey.exe. Execute this program and redirect the output to a file such as key.xml:
TestRSAKey > key.xml
The file key.xml contains all the private and public members of the generated RSA key object. You can open this XML file in Internet Explorer 5.5 or later. If you do so, you will notice that the private member variables are also stored in this file. The binary data representing the large integers is encoded in Base64 format.
The preceding program uses an RSAKeyValue instance to generate a new key pair. The class RSAKeyValue is contained in the System.Security.Cryptography.Xml namespace. This namespace can be thought of as the XML face of the .NET cryptographic framework. It contains a specialized, lightweight implementation of XML for the purpose of cryptography, and the model allows XML objects to be signed with a digital signature.
The System.Security.Cryptography.Xml namespace classes depend upon the classes contained in the System.Security.Cryptography namespace for the actual implementation of cryptographic algorithms.
The key.xml file, generated by redirecting the output of the Visual Basic test program TestRSAKey, contains both private and public keys. However, you need to keep the private key secret while making the public key widely available. Therefore, you need to separate the public key from the key pair. Here is the program to do that:
' Cryptography/TestGetPubKey.vb

Imports System.IO
Imports System.Text
Imports System.Security.Cryptography

Module Module1
    Public Sub Main(ByVal CmdArgs() As String)
        If (CmdArgs.Length <> 1) Then
            Console.WriteLine("Usage: TestGetPubKey <key pair xml>")
            End
        End If

        Dim xstr As String = File2String(CmdArgs(0))
The following code creates an instance of the RSA implementation and reinitializes the internal variables through the XML-formatted string:
Dim rsa As RSACryptoServiceProvider = New RSACryptoServiceProvider()
        rsa.FromXmlString(xstr)

        Dim x As String = rsa.ToXmlString(False)
        Console.WriteLine(x)
    End Sub

    Public Function File2String(ByVal fname As String)
        Dim finfo As FileInfo = New FileInfo(fname)
        Dim buf() As Byte = New Byte(finfo.Length) {}
Dim fs As FileStream = File.OpenRead(fname)
fs.Read(buf, 0, buf.Length)
Return (New ASCIIEncoding).GetString(buf)
End Function
End ModuleThis program is logically similar to TestRSAKey.vb except that it has to read the key file and pass a different parameter in the ToXmlString method.
The cryptography classes use a lightweight XML implementation, thus avoiding the elaborate ritual of parsing the fully formed generic XML data containing serialized objects. This has another advantage, speed, because it bypasses the DOM parsers. To compile the previous code, type the following:
vbc /r:System.Security.dll TestGetPubKey.vb
This should produce the file TestGetPubKey.exe. Run this file, giving key.xml as the name of the input file, and redirect the program's output to pub.xml. This file contains an XML-formatted public key. The binary data, basically binary large integers, are Base64 encoded. You may recall that key.xml contains both the public and private key pairs, and was generated by redirecting the output of TestRSAKey.exe. The following line redirects key.xml's public key to pub.xml:
TestGetPubKey key.xml > pub.xml
The following program tests the encrypt and decrypt feature of the RSA algorithm:
' Cryptography/TestCrypt.vb

Imports System
Imports System.IO
Imports System.Security.Cryptography
Imports System.Text

Module Module1
    Public Sub Main(ByVal CmdArgs() As String)
        If (CmdArgs.Length <> 4) Then
            Console.WriteLine("Usage: TestCrypt <key xml> <E|D> <in> <out>")
            Console.WriteLine(" E= Encrypt, D= Decrypt (needs private key)")
            End
        End If
Here, you read the public or private key into memory:
Dim xstr As String = File2String(CmdArgs(0))
You create an instance of an RSA cryptography service provider and initialize the parameters based on the XML lightweight filename passed in CmdArgs(0):
Dim RSA As New RSACryptoServiceProvider()
RSA.FromXmlString(xstr)
Display the key filename:
Console.WriteLine("Key File: " + CmdArgs(0))
Dim op As String= "Encrypted"
Read the input file and store it into a byte array:
Dim info As FileInfo = New FileInfo(CmdArgs(2))
Dim inbuflen As Integer = CType(info.Length, Integer)
Dim inbuf() As Byte = New Byte(inbuflen-1) {}
Dim outbuf() As Byte
Dim fs As FileStream = File.OpenRead(CmdArgs(2))

fs.Read(inbuf, 0, inbuf.Length)
fs.Close()
Either encrypt or decrypt depending on the CmdArgs(1) option:
If (CmdArgs(1).ToUpper().StartsWith("D")) Then
   op = "Decrypted"
   outbuf = rsa.Decrypt(inbuf, False)
Else
   outbuf = rsa.Encrypt(inbuf, False)
End If
Now write the result in the output buffer into the file and display the result:
fs = File.OpenWrite(CmdArgs(3))
        fs.Write(outbuf, 0, outbuf.Length)
        fs.Close()

        Console.WriteLine(op + " input [" + CmdArgs(2) + "] to output [" _
                      + CmdArgs(3) + "]")
End Sub
Here's a helper method to read the filename passed as an argument and convert the content to a string:
Public Function File2String(ByVal fname As String)
        Dim finfo As FileInfo = New FileInfo(fname)
        Dim buf() As Byte = New Byte(finfo.Length) {}
        Dim fs As FileStream = File.OpenRead(fname)

        fs.Read(buf, 0, buf.Length)
        fs.Close()

        Return (New ASCIIEncoding).GetString(buf)
    End Function
End Module
This test program encrypts or decrypts a short file depending on the parameters supplied to it. It takes four parameters: the XML-formatted private or public key file, option E or D, representing the encrypt or decrypt options, respectively, and input and output filenames.
This program can be compiled with the following command:
vbc /r:System.Security.dll TestCrypt.vb
The preceding command produces a PE file, TestCrypt.exe. To test the encrypt and decrypt functions, create a small plain-text file called 1.txt. Recall that we also created two other files: key.xml and pub.xml. The file key.xml contains a key pair, and pub.xml contains the public key extracted from the file key.xml.
To encrypt the plain-text file plain.txt, use the following command:
TestCrypt pub.xml E 1.txt rsa.bin
Note that you have used the public key file to encrypt it. You can type the output on the console, but this won't make any sense because it contains binary data. You could use a binary dump utility to dump out the file's content. If you do this, then note that the total number of bytes is 128, compared to the input of 13 bytes. This is because the RSA is a block cipher algorithm and the block size equals the key size, so the output is always in multiples of the block size. You may wish to rerun the preceding examples with larger files to see the resulting encrypted file length.
Now decrypt the file to get back the original text:
TestCrypt key.xml D rsa.bin decr.txt
The key.xml file, which also contains the private key, is used to decrypt because you use the public key to encrypt, and the private key to decrypt. In other words, anyone may send encrypted documents to you if they know your public key, but only you can decrypt such messages. The reverse is true for digital signatures, covered in the next section.
Digital signature is the encryption of a hash digest (for example, MD5 or SHA-1) of data using a public key. The digital signature can be verified by decrypting the hash digest and comparing it against a hash digest computed from the data by the verifier.
As noted earlier, the private key is known only to the owner, so the owner can sign a digital document by encrypting the hash computed from the document. The public key is known to all, so anyone can verify the signature by recomputing the hash and comparing it against the decrypted value, using the public key of the signer.
The .NET Framework provides DSA and RSA digital signature implementations by default. This section considers only DSA, as RSA was covered in the preceding section. Both of the implementations extend the same base class, so all programs for DSA discussed here work for RSA as well.
First, go through the same motions of producing a key pair and a public key file and then sign and verify the signature:
' Cryptography/GenDSAKeys.vb

Imports System
Imports System.Security.Cryptography
Imports VB_Security.FileUtil

Module Module1
    Public Sub Main(ByVal CmdArgs() As String)
        Dim dsa As DSACryptoServiceProvider = New DSACryptoServiceProvider()
        Dim prv As String = dsa.ToXmlString(True)
        Dim pub As String = dsa.ToXmlString(False)
        Dim fileutil As FileUtil = New FileUtil()

        fileutil.SaveString("dsa-key.xml", prv)
        fileutil.SaveString("dsa-pub.xml", pub)

        Console.WriteLine("Created dsa-key.xml and dsa-pub.xml")
    End Sub
End Module
This code generates two XML-formatted files, dsa-key.xml and dsa-pub.xml, containing private and public keys, respectively. Before you can run this, however, you need to create the FileUtil class used to output the two files:
' Cryptography/FileUtil.vb

Imports System.IO
Imports System.Text

Public Class FileUtil
    Public Sub SaveString(ByVal fname As String, ByVal data As String)
        SaveBytes(fname, (New ASCIIEncoding).GetBytes(data))
    End Sub

    Public Function LoadString(ByVal fname As String)
        Dim buf() As Byte = LoadBytes(fname)
        Return (New ASCIIEncoding).GetString(buf)
    End Function

    Public Function LoadBytes(ByVal fname As String)
        Dim finfo As FileInfo = New FileInfo(fname)
        Dim length As String = CType(finfo.Length, String)
        Dim buf() As Byte = New Byte(length) {}
        Dim fs As FileStream = File.OpenRead(fname)

        fs.Read(buf, 0, buf.Length)
        fs.Close()

        Return buf
    End Function

    Public Sub SaveBytes(ByVal fname As String, ByVal data() As Byte)
        Dim fs As FileStream = File.OpenWrite(fname)

        fs.SetLength(0)
        fs.Write(data, 0, data.Length)
        fs.Close()
    End Sub
End Class
The following code signs the data:
' Cryptography/DSASign.vb

Imports System
Imports System.IO
Imports System.Security.Cryptography
Imports System.Text
Imports VB_Security.FileUtil

Module Module1
    Public Sub Main(ByVal CmdArgs() As String)
        If CmdArgs.Length <> 3 Then
            Console.WriteLine("Usage: DSASign <key xml> <data> <sign>")
            End
        End If

        Dim fileutil As FileUtil = New FileUtil()
        Dim xkey As String = fileutil.LoadString(CmdArgs(0))
        Dim fs As FileStream = File.OpenRead(CmdArgs(1))
The following two lines of code create the DSA provider instance and reconstruct the private key from the XML format:
Dim dsa As DSACryptoServiceProvider = New DSACryptoServiceProvider()
dsa.FromXmlString(xkey)
The next line signs the file:
Dim sig() As Byte = dsa.SignData(fs)
        fs.Close()
        fileutil.SaveString(CmdArgs(2), Convert.ToString(sig))
        Console.WriteLine("Signature in {0}} file", CmdArgs(2))
    End Sub
End Module
To verify the signature, you can use the following sample code:
' Cryptography/DSAVerify.vb

Imports System
Imports System.IO
Imports System.Security.Cryptography
Imports System.Text
Imports VB_Security.FileUtil

Module Module1
    Public Sub Main(ByVal CmdArgs() As String)
        If CmdArgs.Length <> 3 Then
            Console.WriteLine("Usage: DSAVerify <key xml> <data> <sign>")
            End
End If
Dim fileutil As FileUtil = New FileUtil()
Dim xkey As String = fileutil.LoadString(CmdArgs(0))
Dim data() As Byte = fileutil.LoadBytes(CmdArgs(1))
Dim xsig As String = fileutil.LoadString(CmdArgs(2))
Dim dsa As DSACryptoServiceProvider = New DSACryptoServiceProvider()
dsa.FromXmlString(xkey)
Dim xsigAsByte() As Byte = New Byte(xsig) {}
Dim verify As Boolean
verify = dsa.VerifyData(data, xsigAsByte)
Console.WriteLine("Signature Verification is {0}", verify)
End Sub
End ModuleThe actual verification is done using the highlighted code fragment. The next four commands compile the source files:
vbc /target:library FileUtil.vb
vbc /r:FileUtil.dll GenDSAKeys.vb
vbc /r:FileUtil.dll DSASign.vb
vbc /r:FileUtil.dll DSAVerify.vb
There are many helper classes within the System.Security.Cryptography and the System.Security.Cryptography.Xml namespaces, and they provide numerous features to help deal with digital signatures and encryption. They also provide overlapping functionality, so there is more than one way of doing the same thing.
X.509 is a public key certificate exchange framework. A public key certificate is a digitally signed statement by the owner of a private key, trusted by the verifier (usually a certifying authority), that certifies the validity of the public key of another entity. This creates a trust relationship between two unknown entities. This is an ISO standard specified by the document ISO/IEC 9594-8. X.509 certificates are also used in SSL (Secure Sockets Layer), which is covered in the next section.
Many certifying authority services are available over the Internet. VeriSign (www.verisign.com) is the most popular, and was founded by the RSA trio themselves. You can run your own Certificate Authority (CA) service over an intranet using Microsoft Certificate Server.
The Microsoft .NET Framework SDK also provides tools for generating certificates for testing purposes. The following command generates a test certificate:
makecert -n CN=Test test.cer
You can view it by double-clicking the test.cer file from Windows Explorer. The certificate is shown in Figure 12-21. From the same dialog box, you can also install this certificate on your computer by clicking the Install Certificate button.
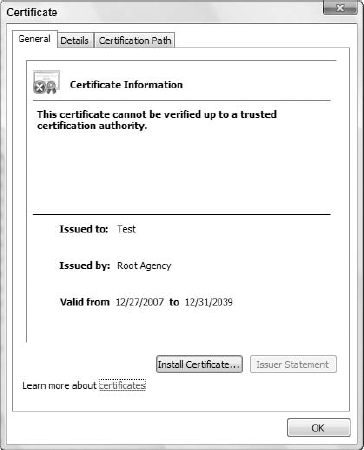
Three classes dealing with X.509 certificates are provided in the .NET Framework in the namespace System.Security.Cryptography.X509Certificates. The following program loads and manipulates the certificate created earlier:
' Cryptography/LoadCert.vb

Imports System
Imports System.Security.Cryptography.X509Certificates

Module Module1
    Public Sub Main(ByVal CmdArgs() As String)
        If CmdArgs.Length <> 1 Then
            Console.Write("Usage loadCert <cert file>")
            End
        End If

        Dim cert As X509Certificate = _
            X509Certificate.CreateFromCertFile(CmdArgs(0))

        Console.WriteLine("Hash= {0}", cert.GetCertHashString())
        Console.WriteLine("Effective Date= {0}", _
                          cert.GetEffectiveDateString())
        Console.WriteLine("Expire Date= {0}", _
                          cert.GetExpirationDateString())
        Console.WriteLine("Issued By= {0}", cert.Issuer.ToString())
Console.WriteLine("Issued To= {0}", cert.Subject.ToString())
Console.WriteLine("Algo= {0}", cert.GetKeyAlgorithm())
Console.WriteLine("Pub Key= {0}", cert.GetPublicKeyString())
End Sub
End ModuleThe static method loads CreateFromCertFile (the certificate file) and creates a new instance of the class X509Certificate. The next section deals with SSL, which uses X.509 certificates to establish the trust relationship.
The SSL (Secure Sockets Layer) protocol provides privacy and reliability between two communicating applications over the Internet. SSL is built over the TCP layer. In January 1999, the IETF (Internet Engineering Task Force) adopted an enhanced version of SSL 3.0 called Transport Layer Security (TLS). TLS is backwardly compatible with SSL, and is defined in RFC 2246. However, the name SSL was retained due to wide acceptance of this Netscape protocol name. This section provides a simplified overview of the SSL algorithm sequence. SSL provides connection-oriented security via the following four properties:
Connection is private and encryption is valid for the current session only.
Symmetric key cryptography, like DES, is used for encryption. However, the session secret key is exchanged using public key encryption.
Digital certificates are used to verify the identities of the communicating entities.
Secure hash functions, such as SHA and MD5, are used for message authentication code (MAC).
The SSL protocol sets the following goals for itself:
Cryptographic security — Uses symmetric key for session, and public key for authentication
Interoperability — Interpolates OS and programming languages
Extensibility — Adds new protocols for encrypting data that are allowed within the SSL framework
Relative efficiency — Reduces computation and network activity by using caching techniques
Two entities communicating using SSL protocols must have a public-private key pair, optionally with digital certificates validating their respective public keys.
At the beginning of a session, the client and server exchange information to authenticate each other. This ritual of authentication is called the handshake protocol. During this handshake, a session ID, the compression method, and the cipher suite to be used are negotiated. If the certificates exist, then they are exchanged. Although certificates are optional, either the client or the server may refuse to continue with the connection and end the session in the absence of a certificate.
After receiving each other's public keys, a set of secret keys based on a randomly generated number is exchanged by encrypting them with each other's public keys. After this, the application data exchange can commence. The application data is encrypted using a secret key, and a signed hash of the data is sent to verify data integrity.
Microsoft implements the SSL client in the .NET Framework classes. However, the server-side SSL can be used by deploying your service through the IIS Web server. The following code fragment can be used to access SSL-protected Web servers from the .NET platform:
Dim req As WebRequest = WebRequest.Create("https://www.reuters.com")
Dim result As WebResponse = req.GetResponse()
Note that the preceding URL starts with https, which signals the WebRequest class (part of System.Net) to use the SSL protocol. Interestingly, the same code is useful for accessing unsecured URLs as well.
The following code is a program for accessing a secured URL. It takes care of minor details, such as encoding:
' Cryptography/GetWeb.vb

Imports System
Imports System.IO
Imports System.Net
Imports System.Text

Module Module1
    Public Sub Main(ByVal CmdArgs() As String)
        If CmdArgs.Length <> 1 Then
            Console.WriteLine("Usage: GetWeb URL")
            Console.WriteLine("Example: GetWeb https://www.reuters.com")
            End
        End If
        Dim ms As String
You call the Create method (shown next) with a URL and an encoding format:
Try
        ms = Create(CmdArgs(0), "utf-8")
        Console.WriteLine(ms)
    Catch x As Exception
        Console.WriteLine(x.StackTrace)
        Console.WriteLine("Bad URL: {0}", CmdArgs(0))
    End Try
End Sub
Next is the Create method. Using the .NET Framework WebRequest object, you create an HTTP-secured request object and get its response stream:
Function Create(ByVal url As String, ByVal encod As String) As String
    Dim req As WebRequest = WebRequest.Create(url)
    Dim result As WebResponse = req.GetResponse()
    Dim ReceiveStream As Stream = result.GetResponseStream()
Create an encoding instance from the .NET Framework object, Encoding:
Dim enc As Encoding = System.Text.Encoding.GetEncoding(encod)
The following creates the stream reader:
Dim sr As StreamReader = New StreamReader(ReceiveStream, enc)
You read the stream fully. The entire Web page or serialized object is read into the responseString:
Dim response As String = sr.ReadToEnd()
        Return response
    End Function

    Dim MaxContentLength As Integer = 16384 ' 16k
End Module
The preceding console application gets a secured (SSL), protected URL and displays the content on the console. To compile the code, use the following command:
vbc /r:System.dll GetWeb.vb
This chapter covered the basics of security and cryptography. It began with an overview of the security architecture of the .NET Framework and looked at four types of security: NTFS, security policies, cryptographic, and programmatic.
It went on to examine the security tools and functionality that the .NET Framework provides. You examined the System.Security.Permissions namespace and learned how you can control code access permissions, role-based permissions, and identity permissions. You also learned how you can manage code access permissions and security policies for your code. Two tools were used — Caspol.exe and Permview.exe — to help configure and view security at both the machine and user levels.
The second half of the chapter looked at cryptography, both the underlying theory and how it can be applied within your applications. You looked at the different types of cryptographic hash algorithms, including SHA, MD5, Secret Key Encryption, and PKCS. You should also understand how you can use digital certificates (specifically, X.509 certificates) and Secure Socket Layers (SSL).