By now, you've probably developed some programs in .NET, so you've seen the modules produced by the .NET compilers, which have file extensions of .dll or .exe. Most .NET modules are DLLs, including class libraries and those that serve as code-behind for ASP.NET. Windows applications, console applications, and Windows Services are examples of .NET modules that are executables and thus have an extension of .exe.
These .NET-compiled modules, both DLLs and EXEs, are referred to as assemblies. Assemblies are the unit of deployment in .NET, containing both compiled code and metadata that is needed by the .NET common language runtime (CLR) to run the code. Metadata includes information such as the code's identity and version, dependencies on other assemblies, and a list of types and resources exposed by the assembly.
Basic development in .NET doesn't require you to know any more than that. However, as your applications become more complex, and as you begin considering such issues as deployment and maintenance of your code, you need to understand more about assemblies. This chapter addresses that need, including the following:
What assemblies are and how they are used
The general structure of an assembly
How assemblies can be versioned
The global application cache (GAC), including how and when to use it
How assemblies are located and loaded by the CLR
After you are familiar with these essentials, chapter 24 uses this information to discuss deployment in depth.
The assembly is used by the CLR as the smallest unit for the following:
Deployment
Version control
Security
Type grouping
Code reuse
An assembly must contain a manifest, which tells the CLR what else is in the assembly. The other elements can be any of the following three categories:
Type metadata
Microsoft Intermediate Language (MSIL) code
Resources
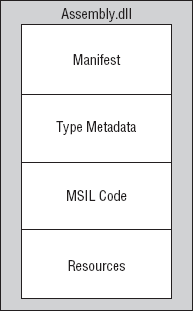
An assembly can be just one file. Figure 23-1 details the contents of a single-file assembly.
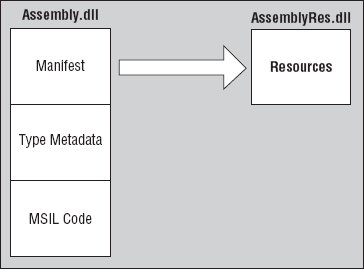
Alternatively, the structure can be split across multiple files, as shown in Figure 23-2. This is just one example of a multiple-file assembly configuration.
An assembly can only have one manifest section across all the files that make up the assembly. There is nothing stopping you, however, from having a resource section (or any of the other sections of type Metadata and MSIL code) in each of the files that make up an assembly.
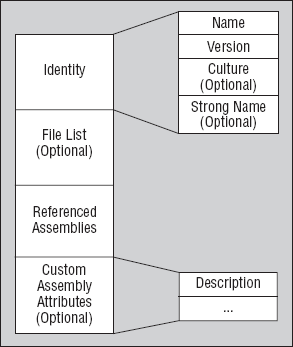
The manifest is the part of the assembly that contains a list of the other elements contained in the assembly and basic identification information for the assembly. The manifest contains the largest part of the information that enables the assembly to be self-describing. Elements listed in the manifest are placed in appropriate sections. The manifest includes the sections displayed in Figure 23-3. These sections are covered later in the chapter.
To look at the manifest for a particular assembly, you can use the IL Disassembler (Ildasm.exe), which is included with Visual Studio 2008. There is no shortcut on the Programs menu for ildasm.exe, but you can run it by going to Start
The version of Ildasm.exe in the SDK for .NET Framework 3.5 can examine assemblies created with earlier versions of the .NET Framework.
When Ildasm.exe loads, you can browse for an assembly to view by selecting File

The full path of the assembly you are viewing represents the root node. The first node below the root is called MANIFEST, and as you've probably guessed, it contains all the information about the assembly's manifest. If you double-click this node, a new window is displayed with the information contained within the manifest. The manifest for a complex assembly can be rather long. For our example, three sections of a manifest are shown in Figures 23-5, 23-6 and 23-7. Figure 23-5 shows the top of the manifest, which contains the external references needed by this assembly, such as other .NET assemblies on which this assembly depends. If the assembly depends on COM libraries, those will be shown as external modules and listed before the external assemblies.
Figure 23-6 shows a portion of the manifest further down, containing the beginning of the section for the actual assembly. The first items listed in the manifest for the assembly itself are the attributes that apply to the assembly.
Further down are items such as resources that reside in the assembly. Figure 23-7 shows a bitmap named checkmark8.bmp that is used by this particular assembly.


The section of the manifest for an assembly also contains information used to uniquely identify the assembly. This section contains some standard information, such as the version number, and may also contain some optional elements, such as a strong name for the assembly. Assemblies come in two types: application-private and shared (differences between the two types are covered shortly), and they have slightly different identity information.
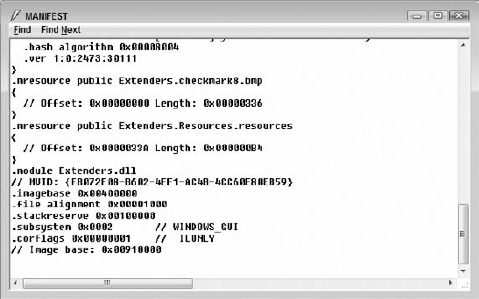
The section of the manifest for an assembly contains a version number, which is indicated by the .ver directive in Ildasm.exe. Figure 23-7, shown earlier, includes a .ver directive on the following line in the .assembly section:
.ver 1.0.2473.30111
A version number contains four parts:
Major : Minor : Build : Revision
Assemblies that have the same name but different version numbers are treated as completely different assemblies. If you have an assembly on your machine that has a version number of 1.5.2.3 and another version of the same assembly with a version number of 1.6.0.1, then the CLR treats them as different assemblies. The version number of an assembly is part of what is used to define dependencies between assemblies.
The manifest can also contain an optional strong name for an assembly. The strong name is not a name per se, but a public key that has been generated by the author of the assembly to uniquely identify it. A strong name is used to ensure that your assembly has a unique signature compared to other assemblies that may have the same name. Strong names were introduced to combat DLL hell by providing an unambiguous way to differentiate among assemblies.
A strong name is based on public-private key encryption and creates a unique identity for your assembly. The public key is stored in the identity section of the manifest. A signature of the file containing the assembly's manifest is created and stored in the resulting PE file. The .NET Framework uses these two signatures when resolving type references to ensure that the correct assembly is loaded at runtime. A strong name is indicated in the manifest by the .publickey directive in the .assembly section.
As mentioned above, applying a strong name to an assembly is based on public-private key encryption. The public and private keys are related, and a set is called a public-private key pair. Applying a strong name to an assembly is usually called signing the assembly with the strong name.
You can create a key pair with the sn.exe utility. At the Visual Studio command prompt, enter the following command:
sn -k pairname.snkYou should replace pairname with an appropriate name, often the name of your product or system. The same key pair can be used to apply a strong name to all the assemblies in your system.
Once you have a key pair, you need to add it to any projects in Visual Studio that need to generate a strong-named assembly. To do that, just select Project
The final step is to change the module AssemblyInfo.vb to apply the strong name. AssemblyInfo.vb was automatically created when your project was created, and is under the My Project area in the Solution Explorer. If you can't see a plus sign to expand My Project, press the Show All Files button at the top of the Solution Explorer.
In AssemblyInfo.vb, insert a line that looks like this:
<Assembly: AssemblyKeyFile("pairname.snk")>Again, you should replace pairname with the name you actually used for the key pair file earlier. The next time your project is built, the resulting assembly will have a strong name, generated by using the key pair you have indicated.
You can also sign an assembly with a strong name by compiling at the command line. This might be the case if you want to sign the assembly outside of Visual Studio. A typical command line to compile and sign a Visual Basic assembly looks like this:
vbc /reference:Microsoft.VisualBasic.dll /reference:System.Windows.Forms.dll
/target:library /keyfile:c:mykeyskeypair.snk /out:MyAssembly.dll
/rootnamespace:MyAssembly *.vb
The separate elements of the command line have been placed on different lines for ease of reading, but they should all be on the same line in actual use. The preceding is just a template. You would need to change the /reference options to include any references needed by your assembly. You would also need to specify the correct file path for your own key pair file (.snk file) and apply your assembly and root namespace names.
Finally, strong names can be applied with a technique called delay signing. That's beyond the scope of this chapter, but the Visual Studio help files include step-by-step instructions. Delayed signing is helpful when assemblies need to be properly strong-named during development (so that any problems with strong names are detected at that point), but it is undesirable for all the developers to have a copy of the key pair that will be used for signing the final compiled version of the assembly.
The final part of an assembly's identity is its culture, which is optional. Cultures are used to define the country/language for which the assembly is targeted.
The combination of name, strong name, version number, and culture is used by the CLR to enforce version dependencies. For example, you could create one version of your assembly targeted at English users, another for German users, another for Finnish users, and so on.
Cultures can be general, as in the case of English, or more specific, as in the case of US-English. Cultures are represented by a string that can contain two parts: primary and secondary (optional). The culture for English is en, and the culture for US-English is en-us. See Chapter 5 for more about cultures in .NET.
If a culture is not indicated in the assembly, then it is assumed that the assembly can be used for any culture. Such an assembly is said to be culture neutral. You can assign a culture to an assembly by including the attribute AssemblyCulture from the System.Reflection namespace in your assembly's code (usually within the AssemblyInfo.vb file):
<Assembly: AssemblyCulture("en")>The culture of an assembly is represented in the manifest by the .locale directive in the .assembly section.
It was mentioned earlier that the first section of the manifest contains referenced assemblies. An assembly reference is indicated in the manifest with the .assembly extern directive (refer to Figure 23-5).
The first piece of information included is the name of the referenced assembly. Figure 23-5 shows a reference to the mscorlib assembly. This name is used to determine the name of the file that contains the actual assembly. The CLR takes the name of the assembly reference and appends .dll. For instance, in the last example, the CLR will look for a file called mscorlib.dll. The assembly mscorlib is a special assembly in .NET that contains all the definitions of the base types used in .NET, and is referenced by all assemblies.
If the assembly being referenced contains a strong name, then a hash of the public key of the referenced assembly is stored as part of the record to the external reference. This hash is stored in the manifest using the .publickeytoken directive as part of the .assembly extern section. The assembly reference shown in Figure 23-5 contains a hash of the strong name of the mscorlib assembly. The stored hash of the strong name is compared at runtime to a hash of the strong name (.publickey) contained within the referenced assembly to help ensure that the correct assembly is loaded. The value of the .publickeytoken is computed by taking the lower 8 bytes of a hash (SHA1) of the strong name of the referenced assemblies.
The version of the assembly being referenced is also stored in the manifest. This version information is used with the rest of the information stored about a reference to ensure that the correct assembly is loaded (this is discussed later). If an application references version 1.1.0.0 of an assembly, it will not load version 2.1.0.0 of the assembly unless a version policy (also discussed later) exists to indicate otherwise. The version of the referenced assembly is stored in the manifest using the .ver directive as part of an .assembly extern section.
If an assembly that is being referenced has a culture, then the culture information is also stored in the external assembly reference section, using the .locale directive. The combination of name, strong name (if it exists), version number, and culture are what make up a unique version of an assembly.
The information in the manifest enables the reliable determination of the identity and version of an assembly. This is the basis for the deployment options available in .NET, and for the side-by-side execution of assemblies that helps .NET overcome DLL hell. This section looks at these issues in detail.
It was mentioned earlier that assemblies can be of two types. The first is an application-private assembly. As the name implies, this type of assembly is used by one application only and is not shared. This is the default style of assembly in .NET and is the main mechanism by which an application can be independent of changes to the system.
Application-private assemblies are deployed into the application's own directory. Because application-private assemblies are not shared, they do not need a strong name. This means that, at a minimum, they only need to have a name and version number in the identity section of the manifest. Because the assemblies are private to the application, the application does not perform version checks on the assemblies, as the application developer has control over the assemblies that are deployed to the application directory. If strong names exist, however, the CLR will verify that they match.
If all the assemblies that an application uses are application-private and the CLR is already installed on the target machine, then deployment is quite simple. chapter 24 discusses this implication in more detail.
The second type of assembly is the shared assembly. As the name suggests, this type of assembly can be shared among several different applications that reside on the same server. This type of assembly should only be used when it is important to share assemblies among many applications. For example, a Windows Forms control purchased as part of a package may be used in many of your applications, and thus it is better to install a shared version of the assembly, rather than copies of it, for each application. The .NET Framework assemblies themselves are also examples of shared assemblies.
Certain requirements are placed upon shared assemblies. The assembly needs to have a globally unique name, which is not a requirement of application-private assemblies. As mentioned earlier, a strong name is used to create a globally unique name for an assembly. As the assembly is shared, all references to the shared assembly are checked to ensure that the correct version is being used by an application.
Shared assemblies are stored in the global assembly cache (GAC), which is usually located in the assembly folder in the Windows directory (in a typical Windows XP or Vista installation, C:Windowsassembly). However, it's not enough to just copy an assembly into that directory. In fact, if you browse to that directory using Windows Explorer, you'll find that you can't just drag files in and out of it. The process for placing an assembly in the GAC is similar in concept to registering a COM DLL. That process is discussed in detail later in this chapter.
No other changes to the code of the assembly are necessary to differentiate it from that of an application-private assembly. In fact, just because an assembly has a strong name does not mean that it has to be deployed as a shared assembly; it could just as easily be deployed in the application directory as an application-private assembly.
Installing a shared assembly into the GAC requires administrator rights on the machine. This is another factor complicating deployment of shared assemblies. Because of the extra effort involved in the creation and deployment of shared assemblies, you should avoid this type of assembly unless you really need it.
Each computer that has the .NET runtime installed has a global assembly cache (GAC). However, assemblies in the GAC are always stored in the same folder, no matter which version of .NET you have. The folder is a subfolder of your main Windows folder, and it is named Assembly. If you have multiple versions of the .NET Framework, assemblies in the GAC for all of them are stored in this directory.
As previously noted, a strong name is required for an assembly placed in that GAC. That strong name is used to identify a particular assembly. However, another piece of metadata is also used for verification of an assembly. When an assembly is created, a hash of the assembly is placed in the metadata. If an assembly is changed (with a binary editor, for example), the hash of the assembly will no longer match the hash in the metadata. The metadata hash is checked against the actual hash when an assembly is placed in the GAC with the gacutil.exe utility (described later). If the two hash codes do not match, the installation cannot be completed.
The strong name is also used when an application resolves a reference to an external assembly. It checks whether the public key stored in the assembly is equal to the hash of the public key stored as part of the reference in the application. If the two do not match, then the application knows that the external assembly has not been created by the original author of the assembly.
You can view the assemblies contained within the GAC by navigating to the directory using the Windows Explorer.
The gacutil.exe utility that ships with .NET is used to add and remove assemblies from the GAC. To add an assembly into the GAC using the gacutil.exe tool, use the following command line:
gacutil.exe /i myassembly.dll
Recall that the assembly being loaded must have a strong name.
To remove an assembly, use the /u option, like this:
gacutil.exe /u myassembly.dll
gacutil.exe has a number of other options. You can examine them and see examples of their usage by typing in the following command:
gacutil.exe /?
In COM, the versioning of DLLs had some significant limitations. For example, a different DLL with the same nominal version number could be indistinguishable from the one desired.
.NET's versioning scheme was specifically designed to alleviate the problems of COM. The major capabilities of .NET that solve versioning issues are as follows:
Application isolation
Side-by-side execution
Self-describing components
For an application to be isolated, it should be self-contained and independent. This means that the application should rely on its own dependencies for ActiveX controls, components, or files, and not have those files shared with other applications. The option of having application isolation is essential for a good solution to versioning problems.
If an application is isolated, components are owned, managed, and used by the parent application alone. If a component is used by another application, even if it is the same version, the other application must have its own copy. This ensures that each application can install and uninstall dependencies and not interfere with other applications.
Note
Does this sound familiar? This is what most early Windows and DOS applications did until COM required registration of DLLs in the registry and placement of shared DLLs in the system directory. The wheel surely does turn!
The .NET Framework enables application isolation by allowing developers to create application-private assemblies. These are in the application's own directory, and if another application needs the same assembly, it can be duplicated in that application's directory.
This means that each application is independent from the others. This isolation works best for many scenarios. It is sometimes referred to as a zero-impact deployment because when you either install or uninstall such an application, you are in no danger of causing problems for any other application.
Side-by-side execution occurs when multiple versions of the same assembly can run at the same time. Side-by-side execution is performed by the CLR. Components that are to execute side by side must be installed within the application directory or a subdirectory of it.
With application assemblies, versioning is not much of an issue. The interfaces are dynamically resolved by the CLR. If you replace an application assembly with a different version, the CLR will load it and make it work with the other assemblies in the application as long as the new version doesn't have any interface incompatibilities. The new version may even have elements of the interface that are new and that don't exist in the old version (new properties or methods). As long as the existing class interface elements used by the other application assemblies are unchanged, the new version will work fine. In the following discussion of exactly how the CLR locates a referenced assembly, you'll learn more about how this works.
In the earlier section on the manifest, the self-describing nature of .NET assemblies was mentioned. The term "self-describing" means that all the information the CLR needs to know to load and execute an assembly is inside the assembly itself.
Self-describing components are essential to .NET's side-by-side execution. Once the extra version is known by the CLR to be needed, everything else about the assembly needed to run side by side is in the assembly itself. Each application can get its own version of an assembly, and all the work to coordinate the versions in memory is performed transparently by the CLR.
Versioning becomes more important with shared assemblies. Without good coordination of versions, .NET applications with shared assemblies are subject to some of the same problems as COM applications. In particular, if a new version of a shared assembly is placed in the GAC, then there must be a means to control which applications get which version of a shared assembly. This is accomplished with a versioning policy.
As discussed earlier, a version number includes four parts: major, minor, build, and revision. The version number is part of the identity of the assembly. When a new version of a shared assembly is created and placed in the GAC, any of these parts can change. Which ones change affects how the CLR views compatibility for the new assembly.
When the version number of a component only changes according to its build and revision parts, it is compatible. This is often referred to as Quick Fix Engineering (QFE). It's only necessary to place the new assembly in the GAC, and it will automatically be considered compatible with applications that were created to use the older version that had different numbers for the build and revision.
If either the major or minor build number changes, however, compatibility is not assumed by the CLR. In that case, there are manual ways to indicate compatibility if necessary, and these are covered later in this section.
When an application comes across a type that is implemented in an external reference, the CLR has to determine what version of the referenced assembly to load. What steps does the CLR go through to ensure that the correct version of an assembly is loaded? To answer this question, you need to look at version policies and how they affect which version of an assembly is loaded.
Let's start by looking at the default versioning policy. This policy is followed in the absence of any configuration files that would modify the versioning policy. The runtime default behavior is to consult the manifest for the name of the referenced assembly and the version of the assembly to use.
If the referenced assembly does not contain a strong name, then it is assumed that the referenced assembly is application-private and is located in the application's directory. The CLR takes the name of the referenced assembly and appends .dll to create the filename that contains the referenced assembly's manifest. The CLR then searches in the application's directory for the filename; if it's found, it uses the version indicated, even if the version number is different from the one specified in the manifest. Therefore, the version numbers of application-private assemblies are not checked, because the application developer, in theory, has control over which assemblies are deployed to the application's directory. If the file cannot be found, the CLR raises a System.IO.FileNotFoundException.
If the referenced assembly contains a strong name, then the process by which an assembly is loaded is different:
The three different types of assembly configuration files (discussed later) are consulted, if they exist, to see whether they contain any settings that will modify which version of the assembly the CLR should load.
The CLR then checks whether the assembly has been requested and loaded in a previous call. If it has, it uses the loaded assembly.
If the assembly is not already loaded, then the GAC is queried for a match. If a match is found, it is used by the application.
If any of the configuration files contains a
codebase(discussed later) entry for the assembly, then the assembly is looked for in the location specified. If the assembly cannot be found in the location specified in thecodebase, then aTypeLoadExceptionis raised to the application.If there are no configuration files or if there are no
codebaseentries for the assembly, then the CLR probes for the assembly starting in the application's base directory.If the assembly still isn't found, then the CLR asks the Windows Installer service if it has the assembly in question. If it does, then the assembly is installed and the application uses it. This is a feature called on-demand installation.
If the assembly hasn't been found by the end of this entire process, then a TypeLoadException is raised.
Although a referenced assembly contains a strong name, this does not mean that it has to be deployed into the GAC. This enables application developers to install a version with the application that is known to work. The GAC is consulted to see whether it contains a version of an assembly with a higher build.revision number to enable administrators to deploy an updated assembly without having to reinstall or rebuild the application. This is known as the Automatic Quick Fix Engineering Policy.
The default versioning policy described earlier may not be the most appropriate policy for your requirements. Fortunately, you can modify this policy through the use of XML configuration files to meet your specific needs. Two types of configuration files can hold versioning information:
The first is an application configuration file, and it is created in the application directory. As the name implies, this configuration file applies to a single application only. You need to create the application configuration file in the application directory with the same name as the application filename and append .
config. For example, suppose that you have a Windows Forms application calledHelloWorld.exeinstalled in theC:HelloWorlddirectory. The application configuration file would beC:HelloWorldHelloWorld.exe.config.The second type of configuration file is called the machine configuration file. It is named machine.config and can be found in the
C:WindowsMicrosoft.NETFrameworkv2.0.xxxx CONFIGdirectory. The machine.config file overrides any other configuration files on a machine and can be thought of as containing global settings.
The main purpose of the configuration file is to provide binding-related information to the developer or administrator who wishes to override the default policy handling of the CLR.
Specifically, the configuration file, as it's written in XML, has a root node named <configuration>, and it must have the end node of </configuration> present to be syntactically correct. The configuration file is divided into specific types of nodes that represent different areas of control. These areas are as follows:
Although all of these areas are important, this chapter covers only the first two. All of the settings discussed can be added to the application configuration file. Some of the settings (these are pointed out) can also be added to the machine configuration file. If a setting in the application configuration file conflicts with one in the machine configuration file, then the setting in the machine configuration file is used. When we talk about assembly references in the following discussion of configuration settings, we are talking exclusively about shared assemblies (which implies that the assemblies have a strong name, as assemblies in the GAC are required to have one).
The <startup> node of the application and machine configuration files has a <requiredRuntime> node that specifies the runtime version required by the application. This is because different versions of the CLR can run on a machine side by side. The following example shows how you would specify the version of the .NET runtime inside the configuration file:
<configuration>
  <startup>
<requiredRuntime version ="2.0.xxxx" safemode ="true"/>
  </startup>
</configuration>
The runtime node, which is written as <runtime> (not to be confused with <requiredRuntime>), specifies the settings that manage how the CLR handles garbage collection and versions of assemblies. With these settings, you can specify which version of an assembly the application requires, or redirect it to another version entirely.
The application and machine configuration files can be used to ensure that a particular version of an assembly is loaded. You can indicate whether this version should be loaded all the time or should only replace a specific version of the assembly. This functionality is supported through the use of the <assemblyIdentity> and <bindingRedirect> elements in the configuration file, as shown in the following example:
<configuration>
  <runtime>
    <assemblyBinding xmlns="urn:schemas-microsoft-com:asm.v1">
      <dependentAssembly>
        <assemblyIdentity name="AssemblyName"
                          publickeytoken="b77a5c561934e089"
                          culture="en-us"/>
          <bindingRedirect oldVersion="*"
                           newVersion="2.0.50.0"/>
      </dependentAssembly>
    </assemblyBindings>
  </runtime>
</configuration>
The <assemblyBinding> node is used to declare settings for the locations of assemblies and redirections via the <dependentAssembly> node and the <probing> node (which you will look at shortly).
In the last example, when the CLR resolves the reference to the assembly named AssemblyName, it loads version 2.0.50.0 instead of the version that appears in the manifest. If you want to load only version 2.0.50.0 of the assembly when a specific version is referenced, then you can replace the value of the oldVersion attribute with the version number that you would like to replace (for example, 1.5.0.0). The publickeytoken attribute is used to store the hash of the strong name of the assembly to replace. This ensures that the correct assembly is identified. The same is true of the culture attribute.
The location of an assembly can also be defined in both the application and machine configuration files. You can use the <codeBase> element to inform the CLR of the location of an assembly. This enables you to distribute an application and have the externally referenced assemblies downloaded the first time they are used (on-demand downloading):
<configuration>
  <runtime>
    <assemblyBinding xmlns="urn:schemas-microsoft-com:asm.v1">
<dependentAssembly>
<assemblyIdentity name="AssemblyName"
publickeytoken="b77a5c561934e089"
culture="en-us"/>
<codeBase version="2.0.50.0"
href="http://www.wrox.com/AssemblyName.dll/>
</dependentAssembly>
</assemblyBindings>
</runtime>
</configuration>You can see from this example that whenever a reference to version 2.0.50.0 of the assembly AssemblyName is resolved (and the assembly isn't already on the user's computer), the CLR will try to load the assembly from the location defined in the href attribute. The location defined in the href attribute is a standard URL and can be used to locate a file across the Internet or locally.
If the assembly cannot be found or the details in the manifest of the assembly defined in the href attribute do not match those defined in the configuration file, then the loading of the assembly will fail and you will receive a TypeLoadException. If the version of the assembly in the preceding example were actually 2.0.60.0, then the assembly would load because the version number is only different by build and revision number.
The final use of configuration files to consider is that of providing the search path to use when locating assemblies in the application's directory. This setting only applies to the application configuration file. By default, the CLR searches for an assembly only in the application's base directory — it will not look in any subdirectories. You can modify this behavior by using the <probing> element in an application configuration file, as shown in the following example:
<configuration>
  <runtime>
    <assemblyBinding xmlns="urn:schemas-microsoft-com:asm.v1">
      <probing privatePath="regional"/>
    </assemblyBinding>
  </runtime>
</configuration>
The privatePath attribute can contain a list of directories relative to the application's directory (separated by a semicolon) that you would like the CLR to search in when trying to locate an assembly. The privatePath attribute cannot contain an absolute pathname.
As part of resolving an assembly reference, the CLR checks in the application's base directory for it. If it cannot find it, then it looks through, in order, all the subdirectories specified in the privatePath variable, as well as looking for a subdirectory with the same name as the assembly. If the assembly being resolved is called AssemblyName, then the CLR also checks for the assembly in a subdirectory called AssemblyName, if it exists.
This isn't the end of the story, though. If the referenced assembly being resolved contains a culture setting, then the CLR also checks for culture-specific subdirectories in each of the directories it searches in. For example, if the CLR is trying to resolve a reference to an assembly named AssemblyName with a culture of en and a privatePath equal to that in the last example, and the application being run has a home directory of C:ExampleApp, then the CLR will look in the following directories (in the order shown):
C:ExampleApp
C:ExampleAppen
C:ExampleAppenAssemblyName
C:ExampleApp egionalen
C:ExampleApp egionalenAssemblyName
As you can see, the CLR can probe quite a number of directories to locate an assembly. When an external assembly is resolved by the CLR, it consults the configuration files first to determine whether it needs to modify the process by which it resolves an assembly. As discussed, you can modify the resolution process to suit your needs.
The preceding discussion about locating and loading assemblies refers to assemblies that are known at compile time through the application's references. There is an alternative method of locating and loading an assembly that is useful for certain scenarios.
In this technique, the location of the assembly is supplied by the application, using a URL or filename. The normal rules for locating the assembly do not apply — only the location specified by the application is used.
The location is just a string variable, so it may come from a configuration file or a database. In fact, the assembly to be loaded may be newly created, and perhaps did not even exist when the original application was compiled. Because the information to load the assembly can be passed into the application on-the-fly at runtime, this type of assembly loading is called dynamic loading.
References to assemblies, and operations to be performed on assemblies in code, are mostly contained in a .NET Framework class called the Assembly class. It is part of the System.Reflection namespace. In the code examples that follow, assume that the following Imports statement is at the top of the code module:
Imports System.Reflection
The Assembly class has a shared method called LoadFrom, which takes a URL or filename and returns a reference to the assembly at that location. Here's a code example of LoadFrom in action, getting an assembly reference from a URL:
Dim asmDynamic As [Assembly]
asmDynamic = [Assembly].LoadFrom("http://www.dotnetmasters.com/loancalc2.dll")
The brackets around Assembly are needed because it is a reserved keyword in Visual Basic. The brackets indicate that the word applies to the Assembly class, and the keyword is not being used.
After these lines are executed, the code contains a reference to the assembly at the given location. That enables other operations on the assembly to take place. One such operation is getting a reference to a particular type (which could be a class, structure, or enumeration) in the assembly. The reference to a type is needed to instantiate the type when an assembly is loaded dynamically. The GetType method of the Assembly class is used to get the reference, using a string that represents the identification of the type. The identification consists of the full namespace path that uniquely identifies the type within the current application.
For example, suppose that you wanted to get an instance of a certain form in the assembly, with a namespace path of MyProject.Form1. The following line of code would get a reference to the type for that form:
Dim typMyForm As Type = formAsm.GetType("MyProject.Form1")The type reference can then be used to generate an instance of the type. To do this, you need another class in System.Reflection called the Activator class. This class has a shared method called CreateInstance, which takes a type reference and returns an instance of that type. (If you are familiar with Active Server Pages and older versions of Visual Basic, CreateInstance is functionally similar to the CreateObject function in those environments.) You could, therefore, get an instance of the form with these lines:
Dim objForm As Object
objForm = Activator.CreateInstance(typeMyForm)
CreateInstance always returns a generic object. That means it may be necessary to coerce the returned reference to a particular type to gain access to the type's interface. For example, assuming that you knew the object was actually a Windows Form, you could coerce the preceding instance into the type of System.Windows.Forms.Form and then do normal operations that are available on a form:
Dim FormToShow As Form = CType(objForm, System.Windows.Forms.Form)
FormToShow.MdiParent = Me
FormToShow.Show()
At this point, the form will operate normally. It will behave no differently from a form that was in a referenced assembly (except for potential code access security limitations, as discussed in Chapter 12).
If the newly loaded form needs to load other classes in the dynamic assembly, nothing special needs to be done. For example, suppose that the form just shown needs to load an instance of another form, named Form2, that resides in the same dynamically loaded assembly. The standard code to instantiate a form will work fine. The CLR will automatically load the Form2 type because it already has a reference to the assembly containing Form2.
Furthermore, suppose that the dynamically loaded form needs to instantiate a class from another DLL that is not referenced by the application. For example, suppose that the form needs to create an instance of a Customer object, and the Customer class is in a different DLL. As long as that DLL is in the same folder as the dynamically loaded DLL, the CLR will automatically locate and load the second DLL.
To see dynamic loading in action, try the following step-by-step example:
Open a new Windows Application in Visual Studio and name it DynamicLoading. On the blank
Form1that appears, drag aButtonfrom the Toolbox, and set itsTextproperty toLoad.Double-click the Load button to get to its
Clickevent in the code editor. Then go to the top of the code module and insert the followingImportsstatement:Imports System.Reflection
Insert the following code into the button's
Clickevent:Dim sLocation As String = "C:DeployDynamicForms.dll" If My.Computer.FileSystem.FileExists(sLocation) Then Dim sType As String = "DynamicForms.Form1" Dim DynamicAssembly As [Assembly] = _ [Assembly].LoadFrom(sLocation) Dim DynamicType As Type = DynamicAssembly.GetType(sType) Dim DynamicObject As Object DynamicObject = Activator.CreateInstance(DynamicType) ' We know it's a form - cast to form type Dim FormToShow As Form = CType(DynamicObject, Form) FormToShow.Show() Else MsgBox("Unable to load assembly " & sLocation & _ " because the file does not exist") End IfRun the program and click the Load button. You should get a message box with the message "Unable to load assembly C:DeployDynamicForms.dll because the form does not exist." Leave this program running while you carry out the next few steps.
Start another, separate Visual Studio instance, and create a new Windows Application project named DynamicForms. On the blank
Form1that appears, drag over a few controls. It doesn't really matter what controls you drag ontoForm1. The version that can be downloaded for the book includes some labels, buttons, and text boxes.In the properties for DynamicForms, change the application type to Class Library.
Build the DynamicForms project by selecting Build

Create a directory named C:Deploy and copy the DynamicForms.dll file to that directory.
Return to the running program DynamicLoading. Click the Load button again. This time, it should load the assembly from the DLL you just copied and launch an instance of
Form1from the DynamicForms project.
Notice that the DynamicForms.dll was created and compiled after the DynamicLoading.exe project that loaded it. It is not necessary to recompile or even restart DynamicLoading.exe to load a new assembly dynamically, as long as DynamicLoading.exe knows the location of the assembly and the type to be loaded from it.
The previous code examples include hard-coded strings for the location of the assembly and the identification of the type. There are uses for such a technique, such as certain types of Internet deployment of an application. However, when using dynamic loading, it is common for these values to be obtained from outside the code. For example, a database table or an XML-based configuration file can be used to store the information.
This enables you to add new capabilities to an application on-the-fly. A new assembly with new functionality can be written, and then the location of the assembly and the identity of the type to load from the assembly can be added to the configuration file or database table.
Unlike application assemblies automatically located by the CLR, which must be in the application's directory or a subdirectory of it, dynamically loaded assemblies can be anywhere the application knows how to access. Possibilities include the following:
A website
A directory on the local machine
A directory on a shared network machine
The security privileges available to code vary, depending on where the assembly was loaded from. Code loaded from a URL via HTTP, as shown earlier, has a very restricted set of privileges by default compared to code loaded from a local directory. Chapter 12 has details on code access security, default security policies, and how default policies can be changed.
Assemblies are the basic unit of deployment and versioning in .NET. Simple applications can be written and installed without knowing much about assemblies. More complex applications require an in-depth understanding of the structure of assemblies, the metadata they contain, and how assemblies are located and loaded by the CLR.
You have learned how the identity of an assembly is used to allow multiple versions of an assembly to be installed on a machine and run side by side. This chapter explained how an assembly is versioned, the process by which the CLR resolves an external assembly reference, and how you can modify this process through the use of configuration files.
You also learned about how an assembly stores information, such as version number, strong name, and culture, about any external assemblies that it references, information checked at runtime to ensure that the correct version of the assembly is referenced. You saw how you can use versioning policies to override this in the case of a buggy assembly. The assembly is the single biggest aid in reducing the errors that can occur due to DLL hell, and in helping with deployment.
The chapter also discussed the capability to load an assembly dynamically, based on a location that is derived at runtime. This capability is useful for some special deployment scenarios, such as simple Internet deployment. Understanding all these elements helps you understand how to structure an application, when and how to use shared assemblies, and the deployment implications of your choices for assemblies.
Simple applications are usually created with no strong names or shared assemblies, and all assemblies for the application are deployed to the application directory. Versioning issues are rare as long as class interfaces are consistent.
Complex applications may require shared assemblies to be placed in the GAC, which means that those assemblies must have strong names, and you must control your version numbers. You also need to understand your options for allowing an application to load a version of an assembly other than the one it would load by default, or for loading assemblies dynamically using an application-specific technique to determine the assembly's location. This chapter has covered the basics for all of these needs.