Even if you did not realize it, you have been using namespaces since the beginning of this book. For example, System, System.Diagnostics, and System.Windows.Forms are all namespaces contained within the .NET Framework. Namespaces are an easy concept to understand, but this chapter puts the ideas behind them on a firm footing — and clears up any misconceptions you might have about how they are used and organized.
If you are familiar with COM, you will find that the concept of namespaces is the logical extension of programmatic identifier (ProgID) values. For example, the functionality of Visual Basic 6's FileSystemObject is now mostly encompassed in .NET's System.IO namespace, though this is not a one-to-one mapping. However, namespaces reflect more than a change in name; they represent the logical extension of the COM naming structure, expanding its ease of use and extensibility.
In addition to the traditional System and Microsoft namespaces (for example, used in things such as Microsoft's Web Services Enhancements), the .NET Framework 3.5 includes a way to access some tough-to-find namespaces using the My namespace. The My namespace is a powerful way of "speed-dialing" specific functionalities in the base.
This chapter about namespaces covers the following:
What namespaces are
Which namespaces are used in Visual Studio 2008 projects by default
How to reference namespaces and use the
ImportsstatementHow the compiler searches for class references
How to alias namespaces and create your own namespaces
How to use the
Mynamespace
Namespaces are a way of organizing the vast number of classes, structures, enumerations, delegates, and interfaces that the .NET Framework class library provides. They are a hierarchically structured index into a class library, which is available to all of the .NET languages, not only the Visual Basic 2008 language (with the exception of the My namespace). The namespaces, or object references, are typically organized by function. For example, the System.IO namespace contains classes, structures, and interfaces for working with input/output streams and files. The classes in this namespace do not necessarily inherit from the same base classes (apart from Object, of course).
A namespace is a combination of a naming convention and an assembly, which organizes collections of objects and prevents ambiguity about object references. A namespace can be, and often is, implemented across several physical assemblies, but from the reference side, it is the namespace that ties these assemblies together. A namespace consists of not only classes, but also other (child) namespaces. For example, IO is a child namespace of the System namespace.
Namespaces provide identification beyond the component name. With a namespace, it is possible to use a more meaningful title (for example, System) followed by a grouping (for example, Text) to group together a collection of classes that contain similar functions. For example, the System.Text namespace contains a powerful class called StringBuilder. To reference this class, you can use the fully qualified namespace reference of System.Text.StringBuilder, as shown here:
Dim sb As New System.Text.StringBuilder()
The structure of a namespace is not a reflection of the physical inheritance of classes that make up the namespace. For example, the System.Text namespace contains another child namespace called RegularExpressions. This namespace contains several classes, but they do not inherit or otherwise reference the classes that make up the System.Text namespace.
Figure 7-1 shows how the System namespace contains the Text child namespace, which also has a child namespace, called RegularExpressions. Both of these child namespaces, Text and RegularExpressions, contain a number of objects in the inheritance model for these classes, as shown in the figure.
As shown in Figure 7-1, while some of the classes in each namespace do inherit from each other, and while all of the classes eventually inherit from the generic Object, the classes in System.Text.RegularExpressions do not inherit from the classes in System.Text.
To emphasize the usefulness of namespaces, we can draw another good example from Figure 7-1 . If you make a reference to System.Drawing.Imaging.Encoder in your application, then you are making a reference to a completely different Encoder class than the namespace shown in Figure 7-1 — System.Text.Encoder. Being able to clearly identify classes that have the same name but very different functions, and disambiguate them, is yet another advantage of namespaces.
If you are an experienced COM developer, you may note that unlike a ProgID, which reflects a one-level relationship between the project assembly and the class, a single namespace can use child namespaces to extend the meaningful description of a class. The System namespace, imported by default as part of every project created with Visual Studio, contains not only the default Object class, but also many other classes that are used as the basis for every .NET language.
What if a class you need isn't available in your project? The problem may be with the references in your project. For example, by default, the System.DirectoryServices namespace, used to get programmatic access to the Active Directory objects, is not part of your project's assembly. Using it requires adding a reference to the project assembly. The concept of referencing a namespace is very similar to the capability to reference a COM object in VB6.

In fact, with all this talk about referencing, it is probably a good idea to look at an example of adding an additional namespace to a project. Before doing that, though, you should know a little bit about how a namespace is actually implemented.
Namespaces are implemented within .NET assemblies. The System namespace is implemented in an assembly called System.dll provided with Visual Studio. By referencing this assembly, the project is capable of referencing all the child namespaces of System that happen to be implemented in this assembly. Using the preceding table, the project can import and use the System.Text namespace because its implementation is in the System.dll assembly. However, although it is listed, the project cannot import or use the System.Data namespace unless it references the assembly that implements this child of the System namespace, System.Data.dll.
Let's create a sample project so you can examine the role that namespaces play within it. Using Visual Studio 2008, create a new Visual Basic Windows Application project called Namespace_Sampler.
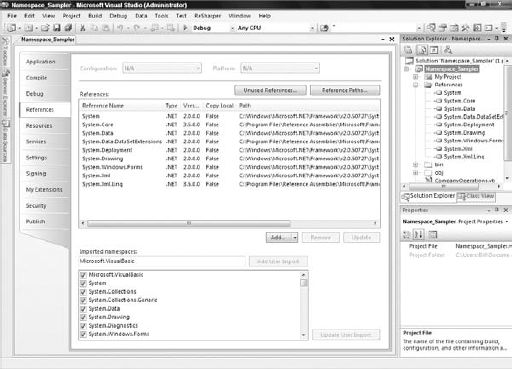
The Microsoft.VisualBasic.Compatibility.VB6 library is not part of Visual Basic 2008 projects by default. To gain access to the classes that this namespace provides, you need to add it to your project. You can do this by using the Add Reference dialog box (available by right-clicking the Project Name node within the Visual Studio Solution Explorer). The Add Reference dialog box has five tabs, each containing elements that can be referenced from your project:
.NET — This tab contains .NET assemblies that can be found in the GAC. In addition to providing the name of the assembly, you can also get the version of the assembly and the version of the framework to which the assembly is compiled. The final data point found in this tab is the location of the assembly on the machine.
COM — This tab contains all the available COM components. It provides the name of the component, the TypeLib version, and the path of the component.
Projects — This tab contains any custom .NET assemblies from any of the various projects contained within your solution.
Browse — This tab enables you to look for any component files (
.dll, .tlb, .olb, .ocx, .exe, or.manifest) on the network.Recent — This tab lists the most recently made references for quick referencing capabilities.
The Add Reference dialog is shown in Figure 7-2.

The available .NET namespaces are listed by component name. This is the same as the namespace name. Within the dialog, you can see a few columns that supply the namespace of the component, the version number of the component, the version of the .NET Framework for which the particular component is targeted, and the path location of the file. You can select a single namespace to make a reference to by clicking your mouse on the component that you are interested in. Holding down the Ctrl key and pressing the mouse button enables you to select multiple namespaces to reference.
To select a range of namespaces, first click on either the first or the last component in the dialog that is contained in the range, and then complete the range selection by holding down the Shift key and using the mouse to select the other component in the range. Once you have selected all the components that you are interested in referencing, click OK.
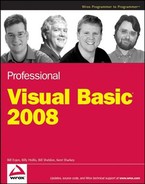
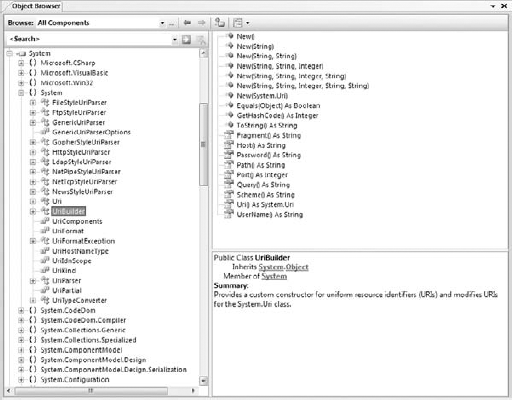
The example in Figure 7-2 is importing some namespaces from the Microsoft.VisualBasic namespace, even though only one selection has been made. This implementation, while a bit surprising at first, is very powerful. First, it shows the extensibility of namespaces. This is because the single Microsoft.VisualBasic.Compatibility.VB6 namespace is actually implemented in two separate assemblies. If you also make a reference to the Microsoft.VisualBasic.Compatibility namespace as well as the Microsoft.VisualBasic.Compatibility.Data namespace, you will see (through the Object Browser found in Visual Studio) that the Microsoft.VisualBasic.Compatibility.VB6 namespace is actually found in both locations, as shown in Figure 7-3.
Second, this implementation enables you to include only the classes that you need — in this case, those related to the VB6 (Visual Basic 6) environment or to database tools, or both types.
Note some interesting points about the Microsoft.VisualBasic namespace. First, this namespace gives you access to all the functions that VB6 developers have had for years. Microsoft has implemented these in the .NET Framework and made them available for your use within your .NET projects. Because these functions have been implemented in the .NET Framework, there is absolutely no performance hit for using them, but you will most likely find the functionality that they provide available in newer .NET namespaces. Second, contrary to what the name of the namespace suggests, this namespace is available for use by all of the .NET languages, which means that even a C# developer could use the Microsoft.VisualBasic namespace if desired.
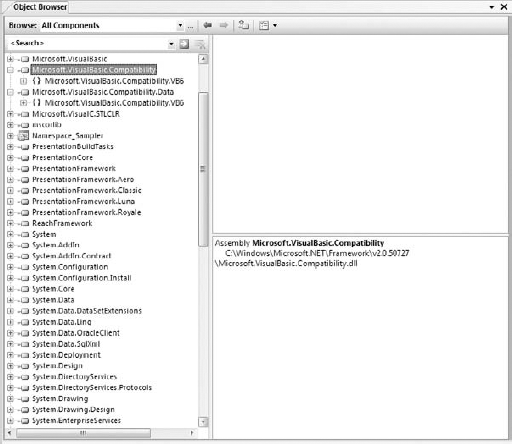
Highlighting their importance to every project, references (including namespaces) are no longer hidden from view, available only after opening a dialog box as they were in VB6. As shown in the Solution Explorer window in Figure 7-4, every new project includes a set of referenced namespaces. (If you do not see the references listed in the Solution Explorer, click the Show All Files button from the Solution Explorer menu.)
The list of default references varies depending on the type of project. The example in Figure 7-4 shows the default references for a Windows Forms project in Visual Studio 2008. If the project type were an ASP.NET Web Application, the list of references would change accordingly — the reference to the System.Windows.Forms namespace assembly would be replaced by a reference to System.Web. If the project type were an ASP.NET Web service (not shown), then the System.Windows.Forms namespace would be replaced by references to the System.Web and System.Web.Services namespaces.
In addition to making the namespaces available, references play a second important role in your project. One of the advantages of .NET is using services and components built on the common language runtime (CLR), which enables you to avoid DLL conflicts. The various problems that can occur related to DLL versioning, commonly referred to as "DLL hell," involve two types of conflict.
The first situation occurs when you have a component that requires a minimum DLL version, and an older version of the same DLL causes your product to break. The alternative situation is when you require an older version of a DLL, and a new version is incompatible. In either case, the result is that a shared file, outside of your control, creates a systemwide dependency that affects your software. With .NET, it is possible, but not required, to indicate that a DLL should be shipped as part of your project to avoid an external dependency.
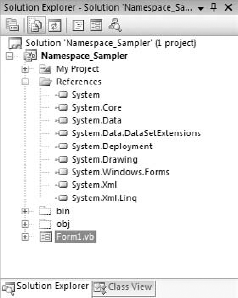
To indicate that a referenced component should be included locally, you can select the reference in the Solution Explorer and then examine the properties associated with that reference. One editable property is called Copy Local. You will see this property and its value in the Properties window within Visual Studio 2008. For those assemblies that are part of a Visual Studio 2008 installation, this value defaults to False, as shown in Figure 7-5 . However, for custom references, this property defaults to True to indicate that the referenced DLL should be included as part of the assembly. Changing this property to True changes the path associated with the assembly. Instead of using the path to the referenced file's location on the system, the project creates a subdirectory based on the reference name and places the files required for the implementation of the reference in this subdirectory.
The benefit of this is that even when another version of the DLL is later placed on the system, your project's assembly will continue to function. However, this protection from a conflicting version comes at a price: Future updates to the namespace assembly to fix flaws will be in the system version but not in the private version that is part of your project's assembly.
To resolve this, Microsoft's solution is to place new versions in directories based on their version information. If you examine the path information for all of the Visual Studio 2008 references, you will see that it includes a version number. As new versions of these DLLs are released, they are installed in a separate directory. This method allows for an escape from DLL hell, by keeping new versions from stomping on old versions, and it enables old versions to be easily located for maintenance updates. Therefore, it is often better to leave alone the default behavior of Visual Studio 2008, which is set to copy only locally custom components, until your organization implements a directory structure with version information similar to that of Microsoft.
The Visual Basic 2008 compiler will not allow you to add a reference to your assembly if the targeted implementation includes a reference that is not also referenced in your assembly. The good news is that the compiler will help. If, after adding a reference, that reference does not appear in the IntelliSense list generated by Visual Studio 2008, then go ahead and type the reference to a class from that reference. The compiler will flag it with underlining, similar to the Microsoft Word spelling or grammar error underlines. When you click the underlined text, the compiler will tell you which other assemblies need to be referenced in the project in order to use the class in question.
The generated list of references shown in the Solution Explorer for the newly created Namespace_Sampler project includes most, but not all, of the namespaces that are part of your Windows Application project. For example, one namespace not displayed as a reference is Microsoft.VisualBasic, and the accompanying Microsoft.VisualBasic.dll. Every Visual Basic 2008 project includes the namespace Microsoft.VisualBasic. This namespace is part of the Visual Studio project templates for Visual Basic 2008 and is, in short, what makes Visual Basic 2008 different from C# or any other .NET language. The implicit inclusion of this namespace is the reason why you can call IsDBNull and other methods of Visual Basic 2008 directly. The only difference in the default namespaces included with Visual Basic 2008 and C# Windows Application projects is that the former use Microsoft.VisualBasic and the latter use Microsoft.CSharp.
To see all of the namespaces that are imported automatically, such as the Microsoft.VisualBasic namespace, right-click the project name in the Solution Explorer and select Properties from the context menu. This opens the project's Properties window in Visual Studio. Select the References tab from the left pane and you will see the reference Microsoft.VisualBasic at the top of the list (see Figure 7-6).
When looking at the project's global list of imports in the text area at the bottom of the page, you can see that in addition to the Microsoft.VisualBasic namespace, the System.Collections and System.Diagnostics namespaces are also imported into the project. This is signified by the check marks next to the namespace. Unlike the other namespaces in the list, these namespaces are not listed as references in the text area directly above this. That's because implementation of the System.Collections and System.Diagnostics namespaces is part of the referenced System.dll. Similarly to Microsoft.VisualBasic, importing these namespaces allows references to the associated classes, such that a fully qualified path is not required. Because these namespaces contain commonly used classes, it is worthwhile to always include them at the project level.
The following list briefly summarizes some of the namespaces commonly used in Visual Basic 2008 projects:
System.Collections — Contains the classes that support various feature-rich object collections. Included automatically, it has classes for arrays, lists, dictionaries, queues, hash tables, and so on.
System.Collections.Generic — Ever since .NET 2.0, this namespace has enabled working with the generics capabilities of the framework — a way to build type-safe collections as well as provide generic methods and classes.
System.Data — This namespace contains the classes needed to support the core features of ADO.NET.
System.Diagnostics — Included in all Visual Basic 2008 projects, this namespace includes the debugging classes. The
TraceandDebugclasses provide the primary capabilities, but the namespace contains dozens of classes to support debugging.System.Drawing — This namespace contains simple drawing classes to support Windows Application projects.
System.EnterpriseServices — Not included automatically, the
System.EnterpriseServicesimplementation must be referenced to make it available. This namespace contains the classes that interface .NET assemblies with COM+.System.IO — This namespace contains important classes that enable you to read and write to files as well as data streams.
System.Linq — This namespace contains an object interface to work with disparate data sources in a new and easy manner. This is a new namespace in .NET 3.5.
System.Text — This commonly used namespace enables you to work with text in a number of different ways, usually in regard to string manipulation. One of the more popular objects that this namespace offers is the
StringBuilderobject.System.Threading — This namespace contains the objects needed to work with and manipulate threads within your application.
System.Web — This is the namespace that deals with one of the more exciting features of the .NET Framework: ASP.NET. This namespace provides the objects that deal with browser-server communications. Two main objects include
HttpRequest, which deals with the request from the client to the server, andHttpResponse, which deals with the response from the server to the client.System.Web.Services — This is the main namespace you use when creating XML Web Services, one of the more powerful capabilities provided with the .NET Framework. This namespace offers the classes that deal with SOAP messages and the manipulation of these messages.
System.Windows.Forms — This namespace provides classes to create Windows Forms in Windows Application projects. It contains the form elements.
Of course, to really make use of the classes and other objects in this list, you need more detailed information. In addition to resources such as Visual Studio 2008's help files, the best source of information is the Object Browser, available directly in the Visual Studio 2008 IDE. You can find it by selecting View
The Object Browser displays each of the referenced assemblies and enables you to drill down into the various namespaces. Figure 7-7 illustrates how the System.dll implements a number of namespaces, including some that are part of the System namespace. By drilling down into a namespace, you can see some of the classes available. By further selecting a class, the browser shows not only the methods and properties associated with the selected class, but also a brief outline of what that class does.
Using the Object Browser is an excellent way to gain insight into which classes and interfaces are available via the different assemblies included in your project, and how they work. Clearly, the ability to actually see which classes are available and know how to use them is fundamental to being able to work efficiently. Working effectively in the .NET CLR environment requires finding the right class for the task.
Not all namespaces should be imported at the global level. Although you have looked at the namespaces included at this level, it is much better to import namespaces only in the module where they will be used. Importing a namespace at the module level does not change setting the reference, but you do not add it into the list of imports on the project's Properties page. As with variables used in a project, it is possible to define a namespace at the module level. The advantage of this is similar to using local variables in that it helps to prevent different namespaces from interfering with each other. As this section shows, it is possible for two different namespaces to contain classes or even child namespaces with the same name.
The development environment and compiler need a way to prioritize the order in which namespaces should be checked when a class is referenced. It is always possible to unequivocally specify a class by stating its complete namespace path. This is referred to as fully qualifying your declaration. The following example fully qualifies a StringBuilder object:
Dim sb As New System.Text.StringBuilder
However, if every reference to every class needed its full namespace declaration, then Visual Basic 2008 and every other .NET language would be very difficult to program in. After all, who wants to type System.Collections.ArrayList each time an instance of the ArrayList class is wanted? If you review the global references, you will see the System.Collections namespace. Thus, you can just type ArrayList whenever you need an instance of this class, as the reference to the larger System.Collections namespace has already been made by the application.
In theory, another way to reference the StringBuilder class is to use Text.StringBuilder, but with all namespaces imported globally, there is a problem with this, caused by what is known as namespace crowding. Because there is a second namespace, System.Drawing, that has a child called Text, the compiler does not have a clear location for the Text namespace and, therefore, cannot resolve the StringBuilder class. The solution to this problem is to ensure that only a single version of the Text child namespace is found locally. That way, the compiler will use this namespace regardless of the global availability of the System.Drawing.Text namespace.
Imports statements specify to the compiler those namespaces that the code will use:
Imports Microsoft.Win32
Imports System
Imports SysDraw = System.Drawing
Once they are imported into the file, you are not required to fully qualify your object declarations in your code. For instance, if you imported the System.Data.SqlClient namespace into your file, then you would be able to create a SqlConnection object in the following manner:
Dim conn As New SqlConnection
Each of the preceding Imports statements illustrates a different facet of importing namespaces. The first namespace, Imports Microsoft.Win32, is not imported at the global level. Looking at the reference list, you may not see the Microsoft assembly referenced directly. However, opening the Object Browser reveals that this namespace is actually included as part of the System.dll.
As noted earlier, the StringBuilder references become ambiguous because both System.Text and System.Drawing.Text are valid namespaces at the global level. As a result, the compiler has no way to determine which Text child namespace is being referenced. Without any clear indication, the compiler flags Text.StringBuilder declarations in the command handler. However, using the Imports System declaration in the module tells the compiler that before checking namespaces imported at the global level, it should attempt to match incomplete references at the module level. Because the System namespace is declared at this level, if System.Drawing is not, then there is no ambiguity regarding which child namespace Text.StringBuilder belongs to.
This sequence demonstrates how the compiler looks at each possible declaration:
It first determines whether the item is a complete reference, such as
System.Text.StringBuilder.If the declaration does not match a complete reference, then the compiler tries to determine whether the declaration is from a child namespace of one of the module-level imports.
Finally, if a match is not found, then the compiler looks at the global-level imports to determine whether the declaration can be associated with a namespace imported for the entire assembly.
While the preceding logical progression of moving from a full declaration through module- to global-level imports resolves the majority of issues, it does not handle all possibilities. Specifically, if you import System.Drawing at the module level, the namespace collision would return. This is where the third import statement becomes important — this import statement uses an alias.
Aliasing has two benefits in .NET. First, aliasing enables a long namespace such as System.EnterpriseServices to be replaced with a shorthand name such as COMPlus. Second, it adds a way to prevent ambiguity among child namespaces at the module level.
As noted earlier, the System and System.Drawing namespaces both contain a child namespace of Text. Because you will be using a number of classes from the System.Drawing namespace, it follows that this namespace should be imported into the form's module. However, were this namespace imported along with the System namespace, the compiler would again find references to the Text child namespace ambiguous. By aliasing the System.Drawing namespace to SysDraw, the compiler knows that it should only check the System.Drawing namespace when a declaration begins with that alias. The result is that although multiple namespaces with the same child namespace are now available at the module level, the compiler knows that one (or more) of them should only be checked at this level when they are explicitly referenced.
Aliasing as defined here is done in the following fashion:
Imports SysDraw = System.Drawing
Making a reference to a namespace in ASP.NET is quite similar to working with Windows Forms, but you have to take some simple, additional steps. From your ASP.NET solution, first make a reference to the assemblies from the References folder, just as you do with Windows Forms. Once there, import these namespaces at the top of the page file in order to avoid having to fully qualify the reference every time on that particular page.
For example, instead of using System.Collections.Generic for each instance of use, use the < %# Import % > page directive at the top of the ASP.NET page (if the page is constructed using the inline coding style) or use the Imports keyword at the top of the ASP.NET page's code-behind file (just as you would with Windows Forms applications). The following example shows how to perform this task when using inline coding for ASP.NET pages:
<%# Import Namespace="System.Collections.Generic" %>
Now that this reference is in place on the page, you can access everything this namespace contains without having to fully qualify the object you are accessing. Note that the Import keyword in the inline example is not missing an "s" at the end. When importing in this manner, it is Import (without the "s") instead of Imports — as it is in the ASP.NET code-behind model and Windows Forms.
In ASP.NET 1.0/1.1, if you used a particular namespace on each page of your application, you need the Import statement on each and every page where that namespace was needed. ASP.NET 3.5 includes the capability to use the web.config file to make a global reference so that you don't need to make further references on the pages themselves, as shown in the following example:
<pages>
   <namespaces>
      <add namespace="System.Drawing" />
      <add namespace="Wrox.Books" />
   </namespaces>
</pages>
In this example, using the <namespaces> element in the web.config file, references are made to the System.Drawing namespace and the Wrox.Books namespace. Because these references are now contained within the web.config file, there is no need to again reference them on any of the ASP.NET pages contained within this solution.
Every assembly created in .NET is part of some root namespace. By default, this logic actually mirrors COM, in that assemblies are assigned a namespace that matches the project name. However, unlike COM, in .NET it is possible to change this default behavior. Just as Microsoft has packaged the system-level and CLR classes using well-defined names, you can create your own namespaces. Of course, it is also possible to create projects that match existing namespaces and extend those namespaces, but that is very poor programming practice.
Creating an assembly in a custom namespace can be done at one of two levels, although unless you want the same name for each assembly that will be used in a large namespace, you would normally reset the root namespace for the assembly. This is done through the assembly's project pages, reached by right-clicking the solution name in the Solution Explorer window and working off the first tab (Application) within the Properties page that opens in the document window, as shown in Figure 7-8.
The next step is optional, but, depending on whether you want to create a class at the top level or at a child level, you can add a Namespace command to your code. There is a trick to being able to create top-level namespaces or multiple namespaces within the modules that make up an assembly. Instead of replacing the default namespace with another name, you can delete the default namespace and define the namespaces only in the modules, using the Namespace command.
The Namespace command is accompanied by an End Namespace command. This End Namespace command must be placed after the End Class tag for any classes that will be part of the namespace. The following code demonstrates the structure used to create a MyMetaNamespace namespace, which contains a single class:
Namespace MyMetaNamespace
    Class MyClass1
       ' Code
    End Class
End Namespace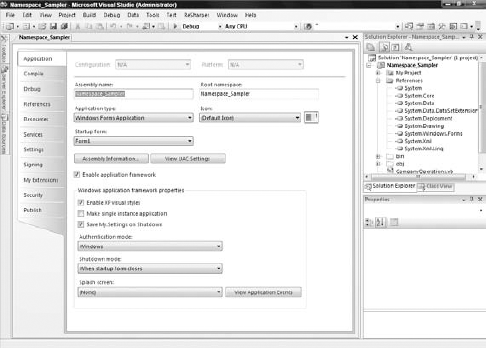
You can then utilize the MyClass1 object simply by referencing its namespace, MyMetaNamespace.MyClass1. It is also possible to have multiple namespaces in a single file, as shown here:
Namespace MyMetaNamespace1
    Class MyClass1
       ' Code
    End Class
 End Namespace

Namespace MyMetaNamespace2
   Class MyClass2
      ' Code
    End Class
 End Namespace
Using this kind of structure, if you want to utilize MyClass1, then you access it through the namespace MyMetaNamespace.MyClass1. This does not give you access to MyMetaNamespace2 and the objects that it offers; instead, you have to make a separate reference to MyMetaNamespace2.MyClass2.
The Namespace command can also be nested. Using nested Namespace commands is how child namespaces are defined. The same rules apply — each Namespace must be paired with an End Namespace and must fully encompass all of the classes that are part of that namespace. In the following example, the MyMetaNamespace has a child namespace called MyMetaNamespace.MyChildNamespace:
Namespace MyMetaNamespace
    Class MyClass1
       ' Code
    End Class

    Namespace MyChildNamespace
Class MyClass2
' Code
End Class
End Namespace
End NamespaceThis is another point to be aware of when you make references to other namespaces within your own custom namespaces. Consider the following example:
Imports System
Imports System.Data
Imports System.Data.SqlClient
Imports System.IO

Namespace MyMetaNamespace1
    Class MyClass1
       ' Code
    End Class
End Namespace
Namespace MyMetaNamespace2
   Class MyClass2
      ' Code
   End Class
End Namespace
In this example, a number of different namespaces are referenced in the file. The three namespaces referenced at the top of the code listing — the System, System.Data, and System.Data.SqlClient namespace references — are available to every namespace developed in the file. This is because these three references are sitting outside of any particular namespace declarations. However, the same is not true for the System.IO namespace reference. Because this reference is made within the MyMetaNamespace2 namespace, it is unavailable to any other namespace in the file.
Note
When you create your own namespaces, Microsoft recommends that you use a convention of CompanyName.TechnologyName — for example, Wrox.Books. This helps to ensure that all libraries are organized in a consistent way.
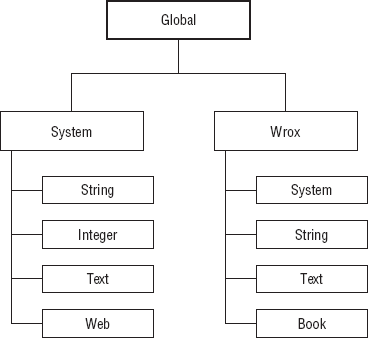
Sometimes when you are working with custom namespaces, you might find that you have locked yourself out of accessing a particular branch of a namespace, purely due to naming conflicts. Visual Basic includes the Global keyword, which can be used as the outermost root class available in the .NET Framework class library. Figure 7-9 shows a diagram of how the class structure looks with the Global keyword.
This means that you can make specifications such as
Global.System.String
or
Global.Wrox.System.Titles
The My keyword is a novel concept that was introduced in the .NET Framework 2.0 to quickly give you access to your application, your users, your resources, the computer, or the network on which the application resides. The My keyword has been referred to as a way of speed-dialing common but complicated resources to which you need access. Using the My keyword, you can quickly access a wide variety of items, such as user details or specific settings of the requestor's browser.
Though not really considered a true namespace, the My object declarations that you make work in the same way as the .NET namespace structure you are used to working with. To give you an example, let's first look at how you get the user's machine name using the traditional namespace structure:
Environment.MachineName.ToString()
For this example, you simply need to use the Environment class and use this namespace to get at the MachineName property. The following shows how you would accomplish this same task using the My keyword:
My.Computer.Info.MachineName.ToString()
Looking at this example, you may be wondering what the point is if the example that uses My is lengthier than the first example that just works off of the Environment namespace. Remember that the point is not the length of what you type to access specific classes, but a logical way to find frequently accessed resources without spending a lot of time hunting them down. Would you have known to look in the Environment class to get the machine name of the user's computer? Maybe, but maybe not. Using My.Computer.Info.MachineName.ToString is a tremendously more logical approach; and once compiled, this namespace declaration will be set to work with the same class as shown previously without a performance hit.
If you type the My keyword in your Windows Forms application, IntelliSense provides you with seven items to work with: Application, Computer, Forms, Resources, Settings, User, and WebServices. Though this keyword works best in the Windows Forms environment, there are still things that you can use in the Web Forms world. If you are working with a Web application, then you will have three items off the My keyword: Application, Computer, and User. Each of these is described further in the following sections.
The My.Application namespace gives you quick access to specific settings and points that deal with your overall application. The following table details the properties and methods of the My.Application namespace:
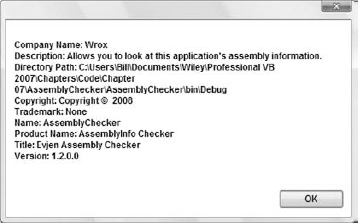
While much can be accomplished using the My.Application namespace, for an example of its use, let's focus on the Info property. This property provides access to the information stored in the application's AssemblyInfo.vb file, as well as other details about the class file. In one of your applications, you can create a message box that is displayed using the following code:
MessageBox.Show("Company Name: " & My.Application.Info.CompanyName & _
   vbCrLf & _
   "Description: " & My.Application.Info.Description & vbCrLf & _
   "Directory Path: " & My.Application.Info.DirectoryPath & vbCrLf & _
   "Copyright: " & My.Application.Info.Copyright & vbCrLf & _
   "Trademark: " & My.Application.Info.Trademark & vbCrLf & _
   "Name: " & My.Application.Info.AssemblyName & vbCrLf & _
   "Product Name: " & My.Application.Info.ProductName & vbCrLf & _
   "Title: " & My.Application.Info.Title & vbCrLf & _
   "Version: " & My.Application.Info.Version.ToString())
From this example, it is clear that you can get at quite a bit of information concerning the assembly of the running application. Running this code produces a message box similar to the one shown in Figure 7-10.
Another interesting property to look at from the My.Application namespace is the Log property. This property enables you to work with the log files for your application. For instance, you can easily write to the system's Application Event Log by first changing the application's app.config file to include the following:
<?xml version="1.0" encoding="utf-8" ?>
<configuration>
    <system.diagnostics>
        <sources>
            <source name="DefaultSource" switchName="DefaultSwitch">
<listeners>
<add name="EventLog"/>
</listeners>
</source>
</sources>
<switches>
<add name="DefaultSwitch" value="Information" />
</switches>
<sharedListeners>
<add name="EventLog"
type="System.Diagnostics.EventLogTraceListener"
initializeData="EvjenEventWriter" />
</sharedListeners>
</system.diagnostics>
</configuration>Once the configuration file is in place, you can record entries to the Application Event Log, as shown in the following simple example:
Private Sub Form1_Load(ByVal sender As System.Object, _
   ByVal e As System.EventArgs) Handles MyBase.Load

    My.Application.Log.WriteEntry("Entered Form1_Load", _
       TraceEventType.Information, 1)

End Sub
You could also just as easily use the WriteExceptionEntry method in addition to the WriteEntry method. After running this application and looking in the Event Viewer, you will see the event shown in Figure 7-11.

The previous example shows how to write to the Application Event Log when working with the objects that write to the event logs. In addition to the Application Event Log, there is also a Security Event Log and a System Event Log. Note that when using these objects, it is impossible to write to the Security Event Log, and it is only possible to write to the System Event Log if the application does it under either the Local System or the Administrator accounts.
In addition to writing to the Application Event Log, you can just as easily write to a text file. As with writing to the Application Event Log, writing to a text file also means that you need to make changes to the app.config file:
<?xml version="1.0" encoding="utf-8" ?>
<configuration>
    <system.diagnostics>
        <sources>
            <source name="DefaultSource" switchName="DefaultSwitch">
                <listeners>
                    <add name="EventLog"/>
                    <add name="FileLog" />
                </listeners>
            </source>
        </sources>
        <switches>
            <add name="DefaultSwitch" value="Information" />
        </switches>
        <sharedListeners>
            <add name="EventLog"
             type="System.Diagnostics.EventLogTraceListener"
             initializeData="EvjenEventWriter" />
            <add name="FileLog"
             type="Microsoft.VisualBasic.Logging.FileLogTraceListener,
             Microsoft.VisualBasic, Version=8.0.0.0, Culture=neutral,
             PublicKeyToken=b03f5f7f11d50a3a, processorArchitecture=MSIL"
             initializeData="FileLogWriter"/>
        </sharedListeners>
    </system.diagnostics>
</configuration>
Now with this app.config file in place, you simply need to run the same WriteEntry method as before. This time, however, in addition to writing to the Application Event Log, the information is also written to a new text file. You can find the text file at C:Documents and Settings[username]Application Data[AssemblyCompany][AssemblyProduct][Version]. For instance, in my example, the log file was found at C:Documents and SettingsAdministratorApplication DataWroxLog Writer1.2.0.0. In the .log file found, you will see a line such as the following:
DefaultSource Information 1 Entered Form1_Load
By default, it is separated by tabs, but you can change the delimiter yourself by adding a delimiter attribute to the FileLog section in the app.config file:
<add name="FileLog"
 type="Microsoft.VisualBasic.Logging.FileLogTraceListener,
 Microsoft.VisualBasic, Version=8.0.0.0, Culture=neutral,
 PublicKeyToken=b03f5f7f11d50a3a, processorArchitecture=MSIL"
 initializeData="FileLogWriter" delimiter=";" />
In addition to writing to Event Logs and text files, you can also write to XML files, console applications, and more.
The My.Computer namespace can be used to work with the parameters and details of the computer in which the application is running. The following table details the objects contained in this namespace:
Property | Description |
|---|---|
This object enables you to work with audio files from your application. This includes starting, stopping, and looping audio files. | |
This object enables you to read and write to the clipboard. | |
This enables access to the system clock to get at GMT and the local time of the computer running the application. You can also get at the tick count, which is the number of milliseconds that have elapsed since the computer was started. | |
This object provides a large collection of properties and methods that enable programmatic access to drives, folders, and files. This includes the ability to read, write, and delete items in the file system. | |
This provides access to the computer's details, such as amount of memory, the operating system type, which assemblies are loaded, and the name of the computer itself. | |
This object provides information about which keyboard keys are pressed by the end user. Also included is a single method, | |
This provides a handful of properties that enable detection of the type of mouse installed, including details such as whether the left and right mouse buttons have been swapped, whether a mouse wheel exists, and how much to scroll when the user uses the wheel. | |
| This is a read-only property that provides access to the name of the computer. |
This object provides a single property and some methods that enable you to interact with the network to which the computer on which the application is running is connected. With this object, you can use the | |
This object can provide notification when ports are available, as well as allow access to the ports. | |
This object provides programmatic access to the registry and the registry settings. Using the | |
This provides the capability to work with one or more screens that may be attached to the computer. |
There is a lot to the My.Computer namespace, and it is impossible to cover all or even most of it. For an example that uses this namespace, we'll take a look at the FileSystem property. The FileSystem property enables you to easily and logically access drives, directories, and files on the computer.
To illustrate the use of this property, first create a Windows Form with a DataGridView with a single column and a Button control. It should appear as shown in Figure 7-12.
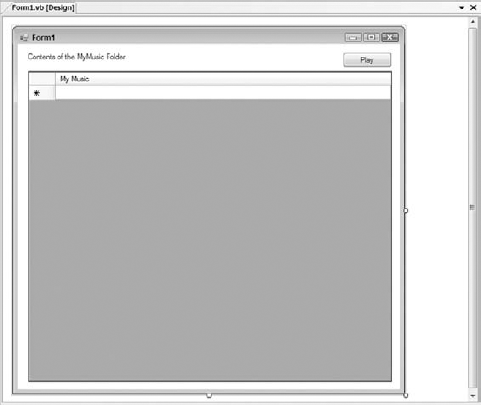
This little application will look in the user's My Music folder and list all of the .mp3 files found therein. Once listed, the user of the application will be able to select one of the listed files; and after pressing the Play button, the file will be launched and played inside Microsoft's Windows Media Player.
The first step after getting the controls on the form in place is to make a reference to the Windows Media Player DLL. You can find this on the COM tab, and the location of the DLL is C:WINDOWSSystem32wmp.dll. This provides you with an object called WMPLib in the References folder of your solution.
You might be wondering why you would make a reference to a COM object in order to play a .wma file from your application, instead of using the My.Computer.Audio namespace that is provided to you. The Audio property only allows for the playing of .wav files, because to play .wma, .mp3, and similar files, users must have the proper codecs on their machine. These codecs are not part of the Windows OS, but are part of Windows Media Player.
Now that the reference to the wmp.dll is in place, let's put some code in the Form1_Load event:
Private Sub Form1_Load(ByVal sender As System.Object, _
    ByVal e As System.EventArgs) Handles MyBase.Load

For Each MusicFile As String _
In My.Computer.FileSystem.GetFiles _
(My.Computer.FileSystem.SpecialDirectories.MyMusic, _
FileIO.SearchOption.SearchAllSubDirectories, "*.wma*")
Dim MusicFileInfo As System.IO.FileInfo = _
My.Computer.FileSystem.GetFileInfo(MusicFile.ToString())
Me.DataGridView1.Rows.Add(MusicFileInfo.Directory.Parent.Name & _
"" & MusicFileInfo.Directory.Name & "" & MusicFileInfo.Name)
Next
End SubIn this example, the My.Computer.FileSystem.GetFiles method points to the My Music folder through the use of the SpecialDirectories property. This property enables logical and easy access to folders such as Desktop, My Documents, My Pictures, Programs, and more. Though it is possible to use just this first parameter with the GetFiles method, this example makes further definitions. The second parameter defines the recurse value — which specifies whether the subfolders should be perused as well. In this case, the SearchOption enumeration is set to SearchAllSubDirectories. The last parameter defines the wildcard that should be used in searching for elements. In this case, the value of the wildcard is *.wma, which instructs the GetFile method to get only the files that are of type .wma. You could just as easily set it to *.mp3 or even just *.* to get anything contained within the folders. After it is retrieved with the GetFile method, the file is then placed inside the DataGridView control, again using the My.Computer.FileSystem namespace to define the value of the item placed within the row.
After the Form1_Load event is in place, the last event to construct is the Button1_Click event:
Private Sub Button1_Click(ByVal sender As System.Object, _
   ByVal e As System.EventArgs) Handles Button1.Click
      Dim MediaPlayer As New WMPLib.WindowsMediaPlayer
      MediaPlayer.openPlayer(My.Computer.FileSystem.SpecialDirectories.MyMusic & _
         "" & DataGridView1.SelectedCells.Item(0).Value)
End Sub
From this example, you can see that it is pretty simple to play one of the provided .wma files. It is as simple as creating an instance of the WMPLib.WindowsMediaPlayer object and using the openPlayer method, which takes as a parameter the location of the file to play. In this case, you are again using the SpecialDirectories property. The nice thing about using this property is that whereas it could be more difficult to find the user's My Music folder due to the username changing the actual location of the files that the application is looking for, using the My namespace enables it to figure out the exact location of the items. When built and run, the application provides a list of available music files, enabling you to easily select one for playing in the Media Player. This is illustrated in Figure 7-13.
Though it would be really cool if it were possible to play these types of files using the Audio property from the My.Computer namespace, it is still possible to use the My.Computer.Audio namespace for playing .wav files and system sounds.
To play a system sound, use the following construct:
My.Computer.Audio.PlaySystemSound(SystemSounds.Beep)
The system sounds in the SystemSounds enumeration include Asterisk, Beep, Exclamation, Hand, and Question.

The My.Forms namespace provides a quick and logical way to access the properties and methods of the forms contained within your solution. For instance, to get at the first form in your solution (assuming that it's named Form1), use the following namespace construct:
My.Form.Form1
To get at other forms, you simply change the namespace so that the name of the form you are trying to access follows the Form keyword in the namespace construction.
The My.Resources namespace is a very easy way to get at the resources stored in your application. If you open the MyResources.resx file from the My Projects folder in your solution, you can easily create as many resources as you wish. For example, you could create a single String resource titled MyResourceString and give it a value of St. Louis Rams.
To access the resources that you create, use the simple reference shown here:
My.Resources.MyResourceString.ToString()
Using IntelliSense, all of your created resources will appear after you type the period after the My.Resources string.
The My.User namespace enables you to work with the IPrincipal interface. You can use the My.User namespace to determine whether the user is authenticated or not, the user's name, and more. For instance, if you have a login form in your application, you could allow access to a particular form with code similar to the following:
If (Not My.User.IsInRole("Administrators")) Then
   ' Code here
End If
You can also just as easily get the user's name with the following:
My.User.Name
In addition, you can check whether the user is authenticated:
If My.User.IsAuthenticated Then
   ' Code here
End If
When not using the My.WebServices namespace, you access your Web services references in a lengthier manner. The first step in either case is to make a Web reference to some remote XML Web Service in your solution. These references will then appear in the Web References folder in the Solution Explorer in Visual Studio 2008. Before the introduction of the My namespace, you would have accessed the values that the Web reference exposed in the following manner:
Dim ws As New ReutersStocks.GetStockDetails
Label1.Text = ws.GetLatestPrice.ToString()
This works, but now with the My namespace, you can use the following construct:
Label1.Text = My.WebServices.GetStockDetails.GetLatestPrice.ToString()
You are not limited to only what the My namespace provides. Just as you can with other namespaces, you can extend this namespace until your heart is content. To show an example of extending the My namespace so that it includes your own functions and properties, in your Windows Forms application, create a new module called CompanyExtensions.vb.
The code for the entire module and the associated class is presented here:
Namespace My
    <HideModuleName()> _
    Module CompanyOperations
Private _CompanyExtensions As New CompanyExtensions
Friend Property CompanyExtensions() As CompanyExtensions
Get
Return _CompanyExtensions
End Get
Set(ByVal value As CompanyExtensions)
_CompanyExtensions = value
End Set
End Property
End Module
End Namespace
Public Class CompanyExtensions
Public ReadOnly Property CompanyDateTime() As DateTime
Get
Return DateTime.Now()
End Get
End Property
End ClassFrom this example, you can see that the module CompanyOperations is wrapped inside the My namespace. From there, a single property is exposed — CompanyExtensions. The class, CompanyExtensions, is a reference to the class found directly below in the same file. This class, CompanyExtensions, exposes a single ReadOnly Property called CompanyDateTime.
With this in place, build your application, and you are now ready to see the new expanded My namespace in action. From your Windows Form application's Page_Load event, add the following code snippet:
MessageBox.Show(My.CompanyExtensions.CompanyDateTime)
From the My namespace, you will now find the CompanyExtensions class directly in the IntelliSense, as presented in Figure 7-14

The name of the module CompanyOperations doesn't also appear in the list off My because the <HideModuleName()> attribute precedes the opening module statement. This attribute signifies that you don't want the module name exposed out to the My namespace.
The preceding example shows how to create your own sections within the My namespace, but you can also extend the sections that are already present (for example, Computer, User, etc.). Extending the My namespace is simply a matter of creating a partial class and extending it with the feature sets that you want to appear in the overall My namespace. An example of such an extension is presented in the following code sample:
Namespace My
    Partial Class MyComputer
        Public ReadOnly Property Hostname() As String
            Get
                Dim iphostentry As System.Net.IPHostEntry = _
                   System.Net.Dns.GetHostEntry(String.Empty)

                Return iphostentry.HostName.ToString()
            End Get
        End Property
    End Class
End Namespace
From this, you can see that this code is simply extending upon the already present MyComputer class:
Partial Class MyComputer

End Class
This extension exposes a single ReadOnly Property called Hostname that returns the local user's hostname. After compiling or utilizing this class in your project, you will find the Hostname property available to you within the My.Computer namespace, as shown in Figure 7-15.

The introduction of namespaces with the .NET Framework provides a powerful tool that helps to abstract logical capabilities from their physical implementation. While there are differences in the syntax of referencing objects from a namespace and referencing the same object from a COM-style component implementation, there are several similarities. After demonstrating the hierarchical structure of namespaces, this chapter covered the following:
Why namespace hierarchies are not related to class hierarchies
How to review and add references to a project
How to import and alias namespaces at the module level
How to create custom namespaces
How to use the
Mynamespace
Namespaces play an important role in enterprise software development. They enable you to separate the implementation of related functional objects while retaining the ability to group these objects, which improves the overall maintainability of your code. Anyone who has ever worked on a large project has experienced situations in which a fix to a component was delayed because of the potential impact on other components in the same project. Regardless of the logical separation of components in the same project, developers who take part in the development process worry about testing. With separate implementations for related components, it is not only possible to alleviate this concern, but also easier than ever before for a team of developers to work on different parts of the same project.