Visual Basic is a fully object-oriented language. Chapter 2 covered the basics of creating classes and objects, including the creation of methods, properties, events, operators, and instance variables. You have seen the basic building blocks for abstraction, encapsulation, and polymorphism — concepts discussed in more detail at the end of this chapter. The final major techniques you need to understand are inheritance and the use of multiple interfaces.
Inheritance is the idea that you can create a class that reuses methods, properties, events, and variables from another class. You can create a class with some basic functionality, and then use that class as a base from which to create other, more detailed, classes. All these derived classes will have the same common functionality as that base class, along with new, enhanced, or even completely changed functionality.
This chapter covers the syntax that supports inheritance within Visual Basic. This includes creating the base classes from which other classes can be derived, as well as creating those derived classes.
Visual Basic also supports a related concept: multiple interfaces. As shown in Chapter 2, all objects have a native or default interface, which is defined by the public methods, properties, and events declared in the class. In the .NET environment, an object can have other interfaces in addition to this native interface — in other words, .NET objects can have multiple interfaces.
These secondary interfaces de?ne alternative ways in which your object can be accessed by providing clearly defined sets of methods, properties, and events. Like the native interface, these secondary interfaces define how the client code can interact with your object, essentially providing a "contract" that enables the client to know exactly what methods, properties, and events the object will provide. When you write code to interact with an object, you can choose which of the interfaces you want to use; basically, you are choosing how you want to view or interact with that object.
This chapter uses relatively basic code examples so that you can focus on the technical and syntactic issues surrounding inheritance and multiple interfaces. The last part of this chapter revisits these concepts using a more sophisticated set of code as you continue to explore object-oriented programming and how to apply inheritance and multiple interfaces in a practical manner.
Of course, just knowing the syntax and learning the tools is not enough to be successful. Successfully applying Visual Basic's object-oriented capabilities requires an understanding of object-oriented programming. This chapter also applies Visual Basic's object-oriented syntax, showing how it enables you to build object-oriented applications. It also describes the four major object-oriented concepts: abstraction, encapsulation, polymorphism, and inheritance. By the end of this chapter, you will understand how to apply these concepts in your design and development efforts to create effective object-oriented applications.
Inheritance is the concept that a new class can be based on an existing class, inheriting the interface and functionality from the original class. In Chapter 2, you explored the relationship between a class and an object, and saw that the class is essentially a template from which objects can be created.
While this is very powerful, it does not provide all the capabilities you might like. In particular, in many cases a class only partially describes what you need for your object. You may have a class called Person, for instance, which has all the properties and methods that apply to all types of people, such as first name, last name, and birth date. While useful, this class probably does not have everything you need to describe a specific type of person, such as an employee or a customer. An employee would have a hire date and a salary, which are not included in Person, while a customer would have a credit rating, something neither the Person nor the Employee classes would need.
Without inheritance, you would probably end up replicating the code from the Person class in both the Employee and Customer classes so that they would have that same functionality as well as the ability to add new functionality of their own.
Inheritance makes it very easy to create classes for Employee, Customer, and so forth. You do not have to re-create that code for an employee to be a person; it automatically inherits any properties, methods, and events from the original Person class.
You can think of it this way: When you create an Employee class, which inherits from a Person class, you are effectively merging these two classes. If you then create an object based on the Employee class, then it has not only the interface (properties, methods, and events) and implementation from the Employee class, but also those from the Person class.
While an Employee object represents the merger between the Employee and Person classes, understand that the variables and code contained in each of those classes remain independent. Two perspectives are involved.
From the outside, the client code that interacts with the Employee object sees a single, unified object that represents the merger of the Employee and Person classes.
From the inside, the code in the Employee class and the code in the Person class are not totally intermixed. Variables and methods that are Private are only available within the class they were written. Variables and methods that are Public in one class can be called from the other class. Variables and methods that are declared as Friend are only available between classes if both classes are in the same Visual Basic project. As discussed later in the chapter, there is also a Protected scope that is designed to work with inheritance, but, again, this provides a controlled way for one class to interact with the variables and methods in the other class.
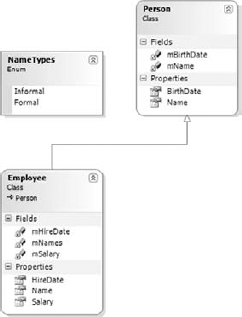
Visual Studio 2008 includes a Class Designer tool that enables you to easily create diagrams of your classes and their relationships. The Class Designer diagrams are a derivative of a standard notation called the Unified Modeling Language (UML) that is typically used to diagram the relationships between classes, objects, and other object-oriented concepts. The Class Designer diagrams more accurately and completely model .NET classes, so that is the notation used in this chapter. The relationship between the Person, Employee, and Customer classes is illustrated in Figure 3-1.
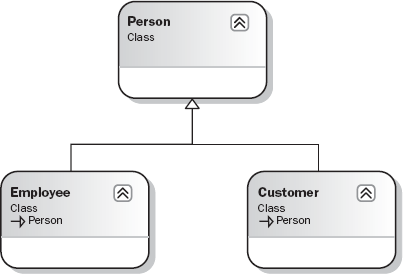
Each box in this diagram represents a class; in this case, you have Person, Employee, and Customer classes. The line from Employee back up to Person, terminating in a triangle, indicates that Employee is derived from, or inherits from, Person. The same is true for the Customer class.
Later in this chapter, you will learn when and how inheritance should be used in software design. The beginning part of this chapter covers the syntax and programming concepts necessary to implement inheritance. First you will create a base Person class. Then you will use that class to create both Employee and Customer classes that inherit behavior from Person.
Before getting into the implementation, however, it's necessary to understand some basic terms associated with inheritance — and there are a lot of terms, partly because there are often several ways to say the same thing. The various terms are all used quite frequently and interchangeably.
Though we attempt to use consistent terminology in this book, be aware that in other books and articles, and online, all these terms are used in various permutations.
Inheritance, for instance, is also sometimes referred to as generalization because the class from which you are inheriting your behavior is virtually always a more general form of your new class. A person is more general than an employee, for instance.
The inheritance relationship is also referred to as an is-a relationship. When you create a Customer class that inherits from a Person class, that customer is a person. The employee is a person as well. Thus, you have the is-a relationship. As shown later in the chapter, multiple interfaces can be used to implement something similar to the is-a relationship, the act-as relationship.
When you create a class using inheritance, it inherits behaviors and data from an existing class. That existing class is called the base class. It is also often referred to as a superclass or a parent class.
The class you create using inheritance is based on the parent class. It is called a subclass. Sometimes it is also called a child class or a derived class. In fact, the process of inheriting from a base class by a subclass is referred to as deriving. You are deriving a new class from the base class. The process is also called subclassing.
When you set out to implement a class using inheritance, you must first start with an existing class from which you will derive your new subclass. This existing class, or base class, may be part of the .NET system class library framework, it may be part of some other application or .NET assembly, or you may create it as part of your existing application.
Once you have a base class, you can then implement one or more subclasses based on that base class. Each of your subclasses automatically inherits all of the methods, properties, and events of that base class — including the implementation behind each method, property, and event. Your subclass can also add new methods, properties, and events of its own, extending the original interface with new functionality. In addition, a subclass can replace the methods and properties of the base class with its own new implementation — effectively overriding the original behavior and replacing it with new behaviors.
Essentially, inheritance is a way of merging functionality from an existing class into your new subclass. Inheritance also defines rules for how these methods, properties, and events can be merged, including control over how they can be changed or replaced, and how the subclass can add new methods, properties, and events of its own. This is what you will learn in the following sections — what these rules are and what syntax you use in Visual Basic to make it all work.
Virtually any class you create can act as a base class from which other classes can be derived. In fact, unless you specifically indicate in the code that your class cannot be a base class, you can derive from it (you will come back to this later).
Create a new Windows Application project in Visual Basic. Then add a class to the project using the Project
Public Class Person

End Class
At this point, you technically have a base class, as it is possible to inherit from this class even though it doesn't do or contain anything. You can now add methods, properties, and events to this class as you normally would. All of those interface elements would be inherited by any class you might create based on Person. For instance, add the following code:
Public Class Person

  Private mName As String
  Private mBirthDate As Date

  Public Property Name() As String
Get
Return mName
End Get
Set(ByVal value As String)
mName = value
End Set
End Property
Public Property BirthDate() As Date
Get
Return mBirthDate
End Get
Set(ByVal value As Date)
mBirthDate = value
End Set
End Property
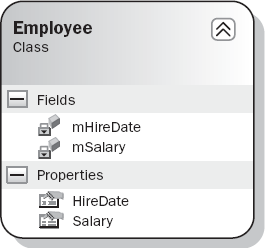
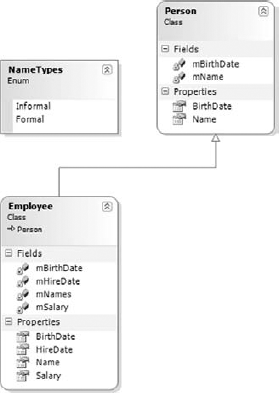
End ClassThis provides a simple method that can be used to illustrate how basic inheritance works. This class can be represented by the class diagram in Visual Studio, as shown in Figure 3-2.

In this representation of the class as it is presented from Visual Studio, the overall box represents the Person class. In the top section of this box is the name of the class and a specification that it is a class. The section below it contains a list of the instance variables, or fields, of the class, with their scope marked as Private (note the lock icon). The bottom section lists the properties exposed by the class, both marked as Public. If the class had methods or events, then they would be displayed in their own sections in the diagram.
To implement inheritance, you need to add a new class to your project. Use the Project
Public Class Employee
  Private mHireDate As Date
Private mSalary As Double

  Public Property HireDate() As Date
    Get
      Return mHireDate
    End Get
    Set(ByVal value As Date)
      mHireDate = value
    End Set
  End Property

  Public Property Salary() As Double
    Get
      Return mSalary
    End Get
    Set(ByVal value As Double)
      mSalary = value
    End Set
  End Property
End Class
This is a regular standalone class with no explicit inheritance. It can be represented by the following class diagram (see Figure 3-3).
Again, you can see the class name, its list of instance variables, and the properties it includes as part of its interface. It turns out that, behind the scenes, this class inherits some capabilities from System.Object. In fact, every class in the entire .NET platform ultimately inherits from System.Object either implicitly or explicitly. This is why all .NET objects have a basic set of common functionality, including, most notably, the GetType method, which is discussed in detail later in the chapter.
While having an Employee object with a hire date and salary is useful, it should also have Name and BirthDate properties, just as you implemented in the Person class. Without inheritance, you would probably just copy and paste the code from Person directly into the new Employee class, but with inheritance, you can directly reuse the code from the Person class. Let's make the new class inherit from Person.
To make Employee a subclass of Person, add a single line of code:
Public Class Employee
  Inherits Person
The Inherits keyword indicates that a class should derive from an existing class, inheriting the interface and behavior from that class. You can inherit from almost any class in your project, or from the .NET system class library or from other assemblies. It is also possible to prevent inheritance, which is covered later in the chapter. When using the Inherits keyword to inherit from classes outside the current project, you need to either specify the namespace that contains that class or place an Imports statement at the top of the class to import that namespace for your use.
The diagram in Figure 3-4 illustrates the fact that the Employee class is now a subclass of Person.

The line running from Employee back up to Person ends in an open triangle, which is the symbol for inheritance when using the Class Designer in Visual Studio. It is this line that indicates that the Employee class includes all the functionality, as well as the interface, of Person.
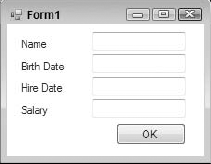
This means that an object created based on the Employee class has not only the methods HireDate and Salary, but also Name and BirthDate. To test this, bring up the designer for Form1 (which is automatically part of your project, because you created a Windows Application project) and add the following TextBox controls, along with a button, to the form:
Control Type | Name | Text Value |
|---|---|---|
TextBox | <blank> | |
TextBox | <blank> | |
TextBox | <blank> | |
TextBox | <blank> | |
button | OK |
You can also add some labels to make the form more readable. The Form Designer should now look something like Figure 3-5.
Double-click the button to bring up the code window, and enter the following code:
Private Sub btnOK_Click(ByVal sender As System.Object, _
                    ByVal e As System.EventArgs) Handles btnOK.Click
  Dim emp As New Employee()

  With emp
    .Name = "Fred"
    .BirthDate = #1/1/1960#
    .HireDate = #1/1/1980#
    .Salary = 30000

    txtName.Text = .Name
    txtBirthDate.Text = Format(.BirthDate, "Short date")
    txtHireDate.Text = Format(.HireDate, "Short date")
    txtSalary.Text = Format(.Salary, "$0.00")
  End With
End Sub
The best Visual Basic practice is to use the
Withkeyword, but be aware that this might cause issues with portability and converting code to other languages.
Even though Employee does not directly implement the Name or BirthDate methods, they are available for use through inheritance. When you run this application and click the button, your controls are populated with the values from the Employee object.
When the code in Form1 invokes the Name property on the Employee object, the code from the Person class is executed, as the Employee class has no such method built in. However, when the HireDate property is invoked on the Employee object, the code from the Employee class is executed, as it does have that method as part of its code.
From the form's perspective, it doesn't matter whether a method is implemented in the Employee class or the Person class; they are all simply methods of the Employee object. In addition, because the code in these classes is merged to create the Employee object, there is no performance difference between calling a method implemented by the Employee class or calling a method implemented by the Person class.
Although your Employee class automatically gains the Name and BirthDate methods through inheritance, it also has methods of its own — HireDate and Salary. This shows how you have extended the base Person interface by adding methods and properties to the Employee subclass.
You can add new properties, methods, and events to the Employee class, and they will be part of any object created based on Employee. This has no impact on the Person class whatsoever, only on the Employee class and Employee objects.
You can even extend the functionality of the base class by adding methods to the subclass that have the same name as methods or properties in the base class, as long as those methods or properties have different parameter lists. You are effectively overloading the existing methods from the base class. It is essentially the same thing as overloading regular methods, as discussed in Chapter 2.
For example, your Person class is currently providing your implementation for the Name property. Employees may have other names you also want to store, perhaps an informal name and a formal name in addition to their regular name. One way to accommodate this requirement is to change the Person class itself to include an overloaded Name property that supports this new functionality. However, you are really only trying to enhance the Employee class, not the more general Person class, so what you want is a way to add an overloaded method to the Employee class itself, even though you are overloading a method from its base class.
You can overload a method from a base class by using the Overloads keyword. The concept is the same as described in Chapter 2, but in this case an extra keyword is involved. To overload the Name property, for instance, you can add a new property to the Employee class. First, though, define an enumerated type using the Enum keyword. This Enum will list the different types of name you want to store. Add this Enum to the Employee.vb file, before the declaration of the class itself:
Public Enum NameTypes
  Informal = 1
  Formal = 2
End Enum


Public Class Employee
You can then add an overloaded Name property to the Employee class itself:
Public Class Employee
  Inherits Person

  Private mHireDate As Date
  Private mSalary As Double
  Private mNames As New Generic.Dictionary(Of NameTypes, String)

  Public Overloads Property Name(ByVal type As NameTypes) As String
    Get
      Return mNames(type)
    End Get
    Set(ByVal value As String)
If mNames.ContainsKey(type) Then
mNames.Item(type) = value
Else
mNames.Add(type, value)
End If
End Set
End PropertyThis Name property is actually a property array, which enables you to store multiple values via the same property. In this case, you are storing the values in a Generic.Dictionary(Of K, V) object, which is indexed by using the Enum value you just defined. Chapter 6 discusses generics in detail. For now, you can view this generic Dictionary just like any collection object that stores key/value data.
If you omit the
Overloadskeyword here, your new implementation of theNamemethod will shadow the original implementation. Shadowing is very different from overloading, and is covered later in the chapter.
Though this method has the same name as the method in the base class, the fact that it accepts a different parameter list enables you to use overloading to implement it here. The original Name property, as implemented in the Person class, remains intact and valid, but now you have added a new variation with this second Name property, as shown in Figure 3-6.
The diagram clearly indicates that the Name method in the Person class and the Name method in the Employee class both exist. If you hover over each Name property, you will see a tooltip showing the method signatures, making it clear that each one has a different signature.
You can now change Form1 to make use of this new version of the Name property. First, add a couple of new TextBox controls and associated labels. The TextBox controls should be named txtFormal and txtInformal, and the form should now look like the one shown in Figure 3-7. Double-click the form's button to bring up the code window and add the code to work with the overloaded version of the Name property:
Private Sub btnOK_Click(ByVal sender As System.Object, _
    ByVal e As System.EventArgs) Handles btnOK.Click

  Dim emp As New Employee()

  With emp
    .Name = "Fred"
    .Name (NameTypes.Formal) = "Mr. Frederick R. Jones, Sr."
    .Name (NameTypes.Informal) = "Freddy"
    .BirthDate = #1/1/1960#
    .HireDate = #1/1/1980#
    .Salary = 30000

    txtName.Text = .Name
    txtFormal.Text = .Name (NameTypes.Formal)
    txtInformal.Text = .Name (NameTypes.Informal)
    txtBirthDate.Text = Format(.BirthDate, "Short date")
    txtHireDate.Text = Format(.HireDate, "Short date")
    txtSalary.Text = Format(.Salary, "$0.00")
  End With
End Sub
The code still interacts with the original Name property as implemented in the Person class, but you are now also invoking the overloaded version of the property implemented in the Employee class.
So far, you have seen how to implement a base class and then use it to create a subclass. You also extended the interface by adding methods, and you explored how to use overloading to add methods that have the same name as methods in the base class but with different parameters.
However, sometimes you may want to not only extend the original functionality, but also actually change or entirely replace the functionality of the base class. Instead of leaving the existing functionality and just adding new methods or overloaded versions of those methods, you might want to entirely override the existing functionality with your own.
You can do exactly that. If the base class allows it, then you can substitute your own implementation of a base class method — meaning your new implementation will be used instead of the original.
By default, you can't override the behavior of methods on a base class. The base class must be coded specifically to allow this to occur, by using the Overridable keyword. This is important, as you may not always want to allow a subclass to entirely change the behavior of the methods in your base class. However, if you do wish to allow the author of a subclass to replace your implementation, you can do so by adding the Overridable keyword to your method declaration.
Returning to the Employee example, you may not like the implementation of the BirthDate method as it stands in the Person class. Suppose, for instance, that you can't employ anyone younger than 16 years of age, so any birth-date value more recent than 16 years ago is invalid for an employee.
To implement this business rule, you need to change the way the BirthDate property is implemented. While you could make this change directly in the Person class, that would not be ideal. It is perfectly acceptable to have a person under age 16, just not an employee.
Open the code window for the Person class and change the BirthDate property to include the Overridable keyword:
Public Overridable Property BirthDate() As Date
  Get
    Return mBirthDate
  End Get
  Set(ByVal value As Date)
    mBirthDate = value
  End Set
End Property
This change allows any class that inherits from Person to entirely replace the implementation of the BirthDate property with a new implementation.
By adding the Overridable keyword to your method declaration, you are indicating that you allow any subclass to override the behavior provided by this method. This means you are permitting a subclass to totally ignore your prior implementation, or to extend your implementation by doing other work before or after your implementation is run.
If the subclass does not override this method, the method works just like a regular method and is automatically included as part of the subclass's interface. Putting the Overridable keyword on a method simply allows a subclass to override the method if you choose to let it do so.
In a subclass, you override a method by implementing a method of the same name, and with the same parameter list as the base class, and then you use the Overrides keyword to indicate that you are overriding that method.
This is different from overloading, because when you overload a method you are adding a new method with the same name but a different parameter list. When you override a method, you are actually replacing the original method with a new implementation.
Without the Overrides keyword, you will receive a compilation error when you implement a method with the same name as one from the base class. Open the code window for the Employee class and add a new BirthDate property:
Public Class Employee
  Inherits Person

  Private mHireDate As Date
  Private mSalary As Double
  Private mBirthDate As Date

  Private mNames As New Generic.Dictionary(Of NameTypes, String)

  Public Overrides Property BirthDate() As Date
    Get
      Return mBirthDate
    End Get
    Set(ByVal value As Date)
      If DateDiff(DateInterval.Year, Value, Now) >= 16 Then
        mBirthDate = value
      Else
        Throw New ArgumentException( _
          "An employee must be at least 16 years old.")
      End If
    End Set
  End Property
Because you are implementing your own version of the property, you have to declare a variable to store that value within the Employee class. This is not ideal, and there are a couple of ways around it, including the MyBase keyword and the Protected scope.
Notice also that you have enhanced the functionality in the Set block, so it now raises an error if the new birth-date value would cause the employee to be less than 16 years of age. With this code, you have now entirely replaced the original BirthDate implementation with a new one that enforces your business rule (see Figure 3-8).
The diagram now includes a BirthDate method in the Employee class. While perhaps not entirely intuitive, this is how the class diagram indicates that you have overridden the method. If you hover the mouse over the property in the Employee class, the tooltip will show the method signature, including the Overrides keyword.
If you run your application and click the button on the form, then everything should work as it did before because the birth date you are supplying conforms to your new business rule. Now change the code in your form to use an invalid birth date:
With emp
  .Name = "Fred"
  .Name(NameTypes.Formal) = "Mr. Frederick R. Jones, Sr."
  .Name(NameTypes.Informal) = "Freddy"
  .BirthDate = #1/1/2000#
When you run the application (from within Visual Studio) and click the button, you receive an error indicating that the birth date is invalid. This proves that you are now using the implementation of the BirthDate method from the Employee class, rather than the one from the Person class. Change the date value in the form back to a valid value so that your application runs properly.
You have just seen how you can entirely replace the functionality of a method in the base class by overriding it in your subclass. However, this can be somewhat extreme; sometimes it's preferable to override methods so that you extend the base functionality, rather than replace the functionality.
To do this, you need to override the method using the Overrides keyword as you just did, but within your new implementation you can still invoke the original implementation of the method. This enables you to add your own code before or after the original implementation is invoked — meaning you can extend the behavior while still leveraging the code in the base class.
To invoke methods directly from the base class, you can use the MyBase keyword. This keyword is available within any class, and it exposes all the methods of the base class for your use.
Even a base class such as
Personis an implicit subclass ofSystem.Object, so it can useMyBaseto interact with its base class as well.
This means that within the BirthDate implementation in Employee, you can invoke the BirthDate implementation in the base Person class. This is ideal, as it means that you can leverage any existing functionality provided by Person while still enforcing your Employee-specific business rules.
To take advantage of this, you can enhance the code in the Employee implementation of BirthDate. First, remove the declaration of mBirthDate from the Employee class. You won't need this variable any longer because the Person implementation will keep track of the value on your behalf. Then, change the BirthDate implementation in the Employee class as follows:
Public Overrides Property BirthDate() As Date
  Get
    Return MyBase.BirthDate
  End Get

  Set(ByVal value As Date)
    If DateDiff(DateInterval.Year, Value, Now) >= 16 Then
      MyBase.BirthDate = value
    Else
      Throw New ArgumentException( _
        "An employee must be at least 16 years old.")
    End If
  End Set
End Property
Run your application and you will see that it works just fine even though the Employee class no longer contains any code to actually keep track of the birth-date value. You have effectively merged the BirthDate implementation from Person right into your enhanced implementation in Employee, creating a hybrid version of the property.
The MyBase keyword is covered in more detail later in the chapter. Here, you can see how it enables you to enhance or extend the functionality of the base class by adding your own code in the subclass but still invoking the base-class method when appropriate.
The BirthDate method is an example of a virtual method. Virtual methods are those that can be overridden and replaced by subclasses.
Virtual methods are more complex to understand than regular nonvirtual methods. With a nonvirtual method, only one implementation matches any given method signature, so there's no ambiguity about which specific method implementation will be invoked. With virtual methods, however, there may be several implementations of the same method, with the same method signature, so you need to understand the rules that govern which specific implementation of that method will be called.
When working with virtual methods, keep in mind that the data type of the object is used to determine the implementation of the method to call, rather than the type of the variable that refers to the object.
Looking at the code in your form, you can see that you are declaring an object variable of type Employee, and then creating an Employee object that you can reference via that object:
Dim emp As New Employee()
It is not surprising, then, that you are able to invoke any of the methods that are implemented as part of the Employee class, and through inheritance, any of the methods implemented as part of the Person class:
With emp
  .Name = "Fred"
  .Name(NameTypes.Formal) = "Mr. Frederick R. Jones, Sr."
  .Name(NameTypes.Informal) = "Freddy"
  .BirthDate = #1/1/1960#
  .HireDate = #1/1/1980#
  .Salary = 30000
When you call the BirthDate property, you know that you are invoking the implementation contained in the Employee class, which makes sense because you know that you are using a variable of type Employee to refer to an object of type Employee.
Because your methods are virtual methods, you can experiment with some much more interesting scenarios. For instance, suppose that you change the code in your form to interact directly with an object of type Person instead of one of type Employee:
Private Sub btnOK_Click(ByVal sender As System.Object, _
    ByVal e As System.EventArgs) Handles btnOK.Click

  Dim person As New Person()

  With person
    .Name = "Fred"
    .BirthDate = #1/1/1960#

    txtName.Text = .Name
    txtBirthDate.Text = Format(.BirthDate, "Short date")
  End With

End Sub
You can no longer call the methods implemented by the Employee class because they do not exist as part of a Person object, but only as part of an Employee object. However, you can see that both the Name and BirthDate properties continue to function as you would expect. When you run the application now, it will work just fine. You can even change the birth-date value to something that would be invalid for Employee:
.BirthDate = #1/1/2000#
The application will now accept it and work just fine, because the BirthDate method you are invoking is the original version from the Person class.
These are the two simple scenarios, when you have a variable and object of type Employee or a variable and object of type Person. However, because Employee is derived from Person, you can do something a bit more interesting. You can use a variable of type Person to hold a reference to an Employee object. For example, you can change the code in Form1 as follows:
Private Sub btnOK_Click(ByVal sender As System.Object, _
    ByVal e As System.EventArgs) Handles btnOK.Click

  Dim person As Person
  person = New Employee()
  With person
    .Name = "Fred"
    .BirthDate = #1/1/1960#

    txtName.Text = .Name
    txtBirthDate.Text = Format(.BirthDate, "Short date")
  End With
End Sub
What you are doing now is declaring your variable to be of type Person, but the object itself is an instance of the Employee class. You have done something a bit complex here, as the data type of the variable is not the same as the data type of the object itself. Remember that a variable of a base-class type can always hold a reference to an object of any subclass.
Note
This is why a variable of type System.Object can hold a reference to literally anything in the .NET Framework, because all classes are ultimately derived from System.Object.
This technique is very useful when creating generic routines. It makes use of an object-oriented concept called polymorphism, which is discussed more thoroughly later in this chapter. This technique enables you to create a more general routine that populates your form for any object of type Person. Add the following code to the form:
Private Sub DisplayPerson(ByVal thePerson As Person)
  With thePerson
    txtName.Text = .Name
    txtBirthDate.Text = Format(.BirthDate, "Short date")
  End With
End Sub
Now you can change the code behind the button to make use of this generic routine:
Private Sub btnOK_Click(ByVal sender As System.Object, _
    ByVal e As System.EventArgs) Handles btnOK.Click

  Dim person As Person
  person = New Employee()

  With person
    .Name = "Fred"
    .BirthDate = #1/1/1960#
  End With

  DisplayPerson(person)
End Sub
The benefit here is that you can pass a Person object or an Employee object to DisplayPerson and the routine will work the same either way.
When you run the application now, things get interesting. You will get an error when you attempt to set the BirthDate property because it breaks your 16-year-old business rule, which is implemented in the Employee class. How can this be when your person variable is of type Person?
This clearly demonstrates the concept of a virtual method. It is the data type of the object, in this case Employee, that is important. The data type of the variable is not the deciding factor when choosing which implementation of an overridden method is invoked.
The following table shows which method is actually invoked based on the variable and object data types when working with virtual methods:
Variable Type | Object Type | Method Invoked |
|---|---|---|
Base | Base | Base |
Base | Subclass | Subclass |
Subclass | Subclass | Subclass |
Virtual methods are very powerful and useful when you implement polymorphism using inheritance. A base-class data type can hold a reference to any subclass object, but it is the type of that specific object which determines the implementation of the method. Therefore, you can write generic routines that operate on many types of object as long as they derive from the same base class. You will learn how to make use of polymorphism and virtual methods in more detail later in this chapter.
Earlier, you wrote code in your Employee class to overload the Name method in the base Person class. This enabled you to keep the original Name functionality but also extend it by adding another Name method that accepted a different parameter list.
You have also overridden the BirthDate method. The implementation in the Employee class replaced the implementation in the Person class. Overriding is a related but different concept from overloading. It is also possible to both overload and override a method at the same time.
In the earlier overloading example, you added a new Name property to the Employee class, while retaining the functionality present in the base Person class. You may decide that you not only want to have your second overloaded implementation of the Name method, but also want to replace the existing one by overriding the existing method provided by the Person class.
In particular, you may want to do this so that you can store the Name value in the Hashtable object along with your Formal and Informal names. Before you can override the Name method, you need to add the Overridable keyword to the base implementation in the Person class:
Public Overridable Property Name() As String
  Get
    Return mName
  End Get
  Set(ByVal value As String)
    mName = value
  End Set
End Property
With that done, the Name method can now be overridden by any derived classes. In the Employee class, you can now override the Name method, replacing the functionality provided by the Person class. First add a Normal option to the Enum that controls the types of Name value you can store:
Public Enum NameTypes
  Informal = 1
  Formal = 2
  Normal = 3
End Enum
Now you can add code to the Employee class to implement a new Name property. This is in addition to the existing Name property already implemented in the Employee class:
Public Overloads Overrides Property Name() As String
  Get
    Return Name(NameTypes.Normal)
  End Get
  Set(ByVal value As String)
    Name(NameTypes.Normal) = value
  End Set
End Property
Note that you are using both the Overrides keyword, to indicate that you are overriding the Name method from the base class, and the Overloads keyword, to indicate that you are overloading this method in the subclass.
This new Name property merely delegates the call to the existing version of the Name property that handles the parameter-based names. To complete the linkage between this implementation of the Name property and the parameter-based version, you need to make one more change to that original overloaded version:
Public Overloads Property Name(ByVal type As NameTypes) As String
  Get
    Return mNames(Type)
  End Get
  Set(ByVal value As String)
    If mNames.ContainsKey(type) Then
      mNames.Item(type) = value
    Else
      mNames.Add(type, value)
    End If

    If type = NameTypes.Normal Then
      MyBase.Name = value
    End If
  End Set
End Property
This way, if the client code sets the Name property by providing the Normal index, you are still updating the name in the base class as well as in the Dictionary object maintained by the Employee class.
Overloading enables you to add new versions of existing methods as long as their parameter lists are different. Overriding enables your subclass to entirely replace the implementation of a base-class method with a new method that has the same method signature. As you just saw, you can even combine these concepts not only to replace the implementation of a method from the base class, but also to simultaneously overload that method with other implementations that have different method signatures.
However, any time you override a method using the Overrides keyword, you are subject to the rules governing virtual methods — meaning that the base class must give you permission to override the method. If the base class does not use the Overridable keyword, then you can't override the method. Sometimes you may need to override a method that is not marked as Overridable, and shadowing enables you to do just that.
The Shadows keyword can also be used to entirely change the nature of a method or other interface element from the base class, although that is something which should be done with great care, as it can seriously reduce the maintainability of your code. Normally, when you create an Employee object, you expect that it can act not only as an Employee, but also as a Person because Employee is a subclass of Person. However, with the Shadows keyword, you can radically alter the behavior of an Employee class so that it does not act like a Person. This sort of radical deviation from what is normally expected invites bugs and makes code hard to understand and maintain.
Shadowing methods is very dangerous and should be used as a last resort. It is primarily useful in cases where you have a preexisting component such as a Windows Forms control that was not designed for inheritance. If you absolutely must inherit from such a component, you may need to use shadowing to "override" methods or properties. Despite the serious limits and dangers, it may be your only option. You will explore this in more detail later. First, let's see how Shadows can be used to override nonvirtual methods.
Earlier in the chapter you learned about virtual methods and how they are automatically created in Visual Basic when the Overrides keyword is employed. You can also implement nonvirtual methods in Visual Basic. Nonvirtual methods are methods that cannot be overridden and replaced by subclasses, so most methods you implement are nonvirtual.
In the typical case, nonvirtual methods are easy to understand. They can't be overridden and replaced, so you know that there's only one method by that name, with that method signature. Therefore, when you invoke it, there is no ambiguity about which specific implementation will be called. The reverse is true with virtual methods, where there may be more than one method of the same name, and with the same method signature, so you should understand the rules governing which implementation will be invoked.
Of course, you knew it couldn't be that simple, and it turns out that you can override nonvirtual methods by using the Shadows keyword. In fact, you can use the Shadows keyword to override methods regardless of whether or not they have the Overridable keyword in the declaration.
Note
The Shadows keyword enables you to replace methods on the base class that the base-class designer didn't intend to be replaced.
Obviously, this can be very dangerous. The designer of a base class must be careful when marking a method as Overridable, ensuring that the base class continues to operate properly even when that method is replaced by another code in a subclass. Designers of base classes typically just assume that if they do not mark a method as Overridable, it will be called and not overridden. Thus, overriding a nonvirtual method by using the Shadows keyword can have unexpected and potentially dangerous side effects, as you are doing something that the base-class designer assumed would never happen.
If that isn't enough complexity, it turns out that shadowed methods follow different rules than virtual methods when they are invoked. That is, they do not act like regular overridden methods; instead, they follow a different set of rules to determine which specific implementation of the method will be invoked. In particular, when you call a nonvirtual method, the data type of the variable refers to the object that indicates which implementation of the method is called, not the data type of the object, as with virtual methods.
To override a nonvirtual method, you can use the Shadows keyword instead of the Overrides keyword. To see how this works, add a new property to the base Person class:
Public ReadOnly Property Age() As Integer
  Get
    Return CInt(DateDiff(DateInterval.Year, Now, BirthDate))
  End Get
End Property
Here you have added a new method called Age to the base class, and thus automatically to the subclass. This code has a bug, introduced intentionally for illustration. The DateDiff parameters are in the wrong order, so you will get negative age values from this routine. The bug was introduced to highlight the fact that sometimes you will find bugs in base classes that you didn't write (and which you can't fix because you don't have the source code).
The following example walks you through the use of the Shadows keyword to address a bug in your base class, acting under the assumption that for some reason you can't actually fix the code in the Person class.
Note that you are not using the Overridable keyword on this method, so any subclass is prevented from overriding the method by using the Overrides keyword. The obvious intent and expectation of this code is that all subclasses will use this implementation and not override it with their own.
However, the base class cannot prevent a subclass from shadowing a method, so it does not matter whether you use Overridable or not; either way works fine for shadowing.
Before you shadow the method, let's see how it works as a regular nonvirtual method. First, you need to change your form to use this new value. Add a text box named txtAge and a related label to the form. Next, change the code behind the button to use the Age property. You will include the code to display the data on the form right here to keep things simple and clear:
Private Sub btnOK_Click(ByVal sender As System.Object, _
    ByVal e As System.EventArgs) Handles btnOK.Click

  Dim person As Employee = New Employee()


  With person
    .Name = "Fred"
    .BirthDate = #1/1/1960#

    txtName.Text = .Name
    txtBirthDate.Text = Format(.BirthDate, "Short date")
    txtAge.Text = CStr(.Age)
  End With

End Sub
Remember to change the Employee birth-date value to something valid. At this point, you can run the application. The age field should appear in your display as expected, though with a negative value due to the bug we introduced. There's no magic or complexity here. This is basic programming with objects, and basic use of inheritance as described earlier in this chapter.
Of course, you don't want a bug in your code, but nor do you have access to the Person class, and the Person class does not allow you to override the Age method, so what can you do? The answer lies in the Shadows keyword, which allows you to override the method anyway.
Let's shadow the Age method within the Employee class, overriding and replacing the implementation in the Person class even though it is not marked as Overridable. Add the following code to the Employee class:
Public Shadows ReadOnly Property Age() As Integer
  Get
    Return CInt(DateDiff(DateInterval.Year, BirthDate, Now))
  End Get
End Property
In many ways, this looks very similar to what you have seen with the Overrides keyword, in that you are implementing a method in your subclass with the same name and parameter list as a method in the base class. In this case, however, you will see some different behavior when you interact with the object in different ways.
Technically, the Shadows keyword is not required here. Shadowing is the default behavior when a subclass implements a method that matches the name and method signature of a method in the base class. However, if you omit the Shadows keyword, then the compiler will issue a warning indicating that the method is being shadowed, so it is always better to include the keyword, both to avoid the warning and to make it perfectly clear that you chose to shadow the method intentionally.
Remember that your form's code is currently declaring a variable of type Employee and is creating an instance of an Employee object:
Dim person As Employee = New Employee()
This is a simple case, and, surprisingly, when you run the application now you will see that the value of the age field is correct, indicating that you just ran the implementation of the Age property from the Employee class. At this point, you are seeing the same behavior that you saw when overriding with the Overrides keyword.
Let's take a look at the other simple case, when you are working with a variable and object that are both of data type Person. Change the code in Form1 as follows:
Private Sub btnOK_Click(ByVal sender As System.Object, _
    ByVal e As System.EventArgs) Handles btnOK.Click

  Dim person As Person = New Person()

  With person
    .Name = "Fred"
    .BirthDate = #1/1/1960#

    txtName.Text = .Name
    txtBirthDate.Text = Format(.BirthDate, "Short date")
    txtAge.Text = CStr(.Age)
  End With
End Sub
Now you have a variable of type Person and an object of that same type. You would expect that the implementation in the Person class would be invoked in this case, and that is exactly what happens: The age field displays the original negative value, indicating that you are invoking the buggy implementation of the method directly from the Person class. Again, this is exactly the behavior you would expect from a method overridden via the Overrides keyword.
This next example is where things get truly interesting. Change the code in Form1 as follows:
Private Sub btnOK_Click(ByVal sender As System.Object, _
    ByVal e As System.EventArgs) Handles btnOK.Click

  Dim person As Person = New Employee()
  With person
    .Name = "Fred"
    .BirthDate = #1/1/1960#

    txtName.Text = .Name
    txtBirthDate.Text = Format(.BirthDate, "Short date")
    txtAge.Text = CStr(.Age)
  End With
End Sub
Now you are declaring the variable to be of type Person, but you are creating an object that is of data type Employee. You did this earlier in the chapter when exploring the Overrides keyword as well, and in that case you discovered that the version of the method that was invoked was based on the data type of the object. The BirthDate implementation in the Employee class was invoked.
If you run the application now, the rules are different when the Shadows keyword is used. In this case, the implementation in the Person class is invoked, giving you the buggy negative value. When the implementation in the Employee class is ignored, you get the exact opposite behavior of what you got with Overrides.
The following table summarizes which method implementation is invoked based on the variable and object data types when using shadowing:
Variable Type | Object Type | Method Invoked |
|---|---|---|
Base | Base | Base |
Base | Subclass | Base |
Subclass | Subclass | Subclass |
In most cases, the behavior you will want for your methods is accomplished by the Overrides keyword and virtual methods. However, in cases where the base-class designer does not allow you to override a method and you want to do it anyway, the Shadows keyword provides you with the needed functionality.
The Shadows keyword can be used not only to override nonvirtual methods, but also to totally replace and change the nature of a base-class interface element. When you override a method, you are providing a replacement implementation of that method with the same name and method signature. Using the Shadows keyword, you can do more extreme things, such as change a method into an instance variable or change a property into a function.
However, this can be very dangerous, as any code written to use your objects will naturally assume that you implement all the same interface elements and behaviors as your base class, because that is the nature of inheritance. Any documentation or knowledge of the original interface is effectively invalidated because the original implementation is arbitrarily replaced.
Note
By totally changing the nature of an interface element, you can cause a great deal of confusion for programmers who might interact with your class in the future.
To see how you can replace an interface element from the base class, let's entirely change the nature of the Age property. In fact, let's change it from a read-only property to a read-write property. You could get even more extreme — change it to a Function or a Sub.
Remove the Age property from the Employee class and add the following code:
Public Shadows Property Age() As Integer
  Get
    Return CInt(DateDiff(DateInterval.Year, BirthDate, Now))
  End Get
  Set(ByVal value As Integer)
    BirthDate = DateAdd(DateInterval.Year, -value, Now)
  End Set
End Property
With this change, the very nature of the Age method has changed. It is no longer a simple read-only property; now it is a read-write property that includes code to calculate an approximate birth date based on the age value supplied.
As it stands, your application will continue to run just fine because you are only using the read-only functionality of the property in your form. You can change the form to make use of the new read-write functionality:
Private Sub btnOK_Click(ByVal sender As System.Object, _
    ByVal e As System.EventArgs) Handles btnOK.Click

  Dim person As Person = New Employee()

  With person
    .Name = "Fred"
    .BirthDate = #1/1/1960#
    .Age = 20

    txtName.Text = .Name
    txtBirthDate.Text = Format(.BirthDate, "Short date")
    txtAge.Text = CStr(.Age)
  End With
End Sub
However, this results in a syntax error. The variable you are working with, person, is of data type Person, and that data type doesn't provide a writeable version of the Age property. In order to use your enhanced functionality, you must use a variable and object of type Employee:
Dim person As Employee = New Employee()
If you now run the application and click the button, the Age is displayed as 20, and the birth date is now a value calculated based on that age value, indicating that you are now running the shadowed version of the Age method as implemented in the Employee class.
As if that weren't odd enough, you can do some even stranger and more dangerous things. You can change Age into a variable, and you can even change its scope. For instance, you can comment out the Age property code in the Employee class and replace it with the following code:
Private Shadows Age As String
At this point, you have changed everything. Age is now a String instead of an Integer. It is a variable instead of a property or function. It has Private scope instead of Public scope. Your Employee object is now totally incompatible with the Person data type, something that shouldn't occur normally when using inheritance.
This means that the code you wrote in Form1 will no longer work. The Age property is no longer accessible and can no longer be used, so your project will no longer compile. This directly illustrates the danger in shadowing a base-class element such that its very nature or scope is changed by the subclass.
Because this change prevents your application from compiling, remove the line in the Employee class that shadows Age as a String variable, and uncomment the shadowed Property routine:
Public Shadows Property Age() As Integer
  Get
    Return CInt(DateDiff(DateInterval.Year, BirthDate, Now))
  End Get
  Set(ByVal value As Integer)
    BirthDate = DateAdd(DateInterval.Year, -value, Now)
  End Set
End Property
This restores your application to a working state.
So far, you have created a single base class and a single subclass, thus demonstrating that you can implement inheritance that is a single level deep. You can also create inheritance relationships that are several levels deep. These are sometimes referred to as chains of inheritance.
In fact, you have been creating a two-level inheritance hierarchy so far, because you know that your base class actually derived from
System.Object, but for most purposes it is easiest to simply ignore that and treat only your classes as part of the inheritance hierarchy.
Don't confuse multilevel inheritance with multiple inheritance, which is an entirely different concept that is not supported by either Visual Basic or the .NET platform itself. The idea behind multiple inheritance is that you can have a single subclass that inherits from two base classes at the same time.
For instance, an application might have a class for Customer and another class for Vendor. It is quite possible that some customers are also vendors, so you might want to combine the functionality of these two classes into a CustomerVendor class. This new class would be a combination of both Customer and Vendor, so it would be nice to inherit from both of them at once.
While this is a useful concept, multiple inheritance is complex and somewhat dangerous. Numerous problems are associated with multiple inheritance, but the most obvious is the possibility of collisions of properties or methods from the base classes. Suppose that both Customer and Vendor have a Name property. CustomerVendor would need two Name properties, one for each base class. Yet it only makes sense to have one Name property on CustomerVendor, so to which base class does it link, and how will the system operate if it does not link to the other one?
These are complex issues with no easy answers. Within the object-oriented community, there is ongoing debate as to whether the advantages of code reuse outweigh the complexity that comes along for the ride.
Multiple inheritance isn't supported by the .NET Framework, so it is likewise not supported by Visual Basic, but you can use multiple interfaces to achieve an effect similar to multiple inheritance, a topic discussed later in the chapter when we talk about implementing multiple interfaces.
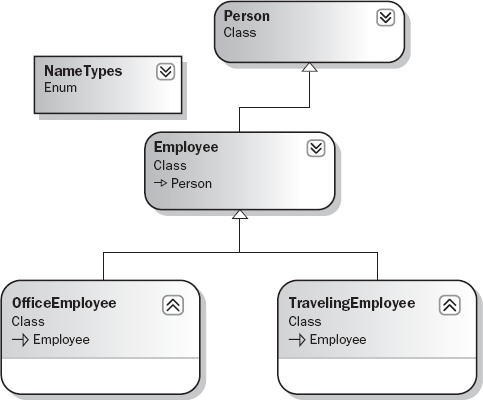
You have seen how a subclass derives from a base class with the Person and Employee classes, but nothing prevents the Employee subclass from being the base class for yet another class, a sub-subclass, so to speak. This is not at all uncommon. In the working example, you may have different kinds of employees, some who work in the office and others who travel.
To accommodate this, you may want OfficeEmployee and TravelingEmployee classes. Of course, these are both examples of an employee and should share the functionality already present in the Employee class. The Employee class already reuses the functionality from the Person class. Figure 3-9 illustrates how these classes are interrelated.
The Employee is a subclass of Person, and your two new classes are both subclasses of Employee. While both OfficeEmployee and TravelingEmployee are employees, and thus also people, they are each unique. An OfficeEmployee almost certainly has a cube or office number, while a TravelingEmployee will keep track of the number of miles traveled.
Add a new class to your project and name it OfficeEmployee. To make this class inherit from your existing Employee class, add the following code to the class:
Public Class OfficeEmployee
  Inherits Employee

End Class
With this change, the new class now has Name, BirthDate, Age, HireDate, and Salary methods. Notice that methods from both Employee and Person are inherited. A subclass always gains all the methods, properties, and events of its base class.
You can now extend the interface and behavior of OfficeEmployee by adding a property to indicate which cube or office number the employee occupies:
Public Class OfficeEmployee
  Inherits Employee

  Private mOffice As String

  Public Property OfficeNumber() As String
    Get
      Return mOffice
    End Get
    Set(ByVal value As String)
      mOffice = value
    End Set
  End Property
End Class
To see how this works, let's enhance the form to display this value. Add a new TextBox control named txtOffice and an associated label so that your form looks like the one shown in Figure 3-10.
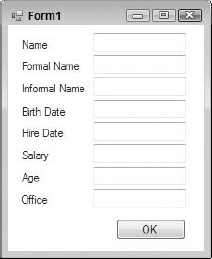
Now change the code behind the button to use the new property:
Private Sub btnOK_Click(ByVal sender As System.Object, _
    ByVal e As System.EventArgs) Handles btnOK.Click

  Dim person As OfficeEmployee = New OfficeEmployee()

  With person
    .Name = "Fred"
    .BirthDate = #1/1/1960#
    .Age = 20

    .OfficeNumber = "A42"

    txtName.Text = .Name
    txtBirthDate.Text = Format(.BirthDate, "Short date")
    txtAge.Text = CStr(.Age)

    txtOffice.Text = .OfficeNumber
  End With
End Sub
You have changed the routine to declare and create an object of type OfficeEmployee — thus enabling you to make use of the new property, as well as all existing properties and methods from Employee and Person, as they've been "merged" into the OfficeEmployee class via inheritance. If you now run the application, the name, birth date, age, and office values are displayed in the form.
Inheritance like this can go many levels deep, with each level extending and changing the behaviors of the previous levels. In fact, there is no specific technical limit to the number of levels of inheritance you can implement in Visual Basic, although very deep inheritance chains are typically not recommended and are often viewed as a design flaw, something discussed in more detail later in this chapter.
You have already seen how you can use the MyBase keyword to call methods on the base class from within a subclass. The MyBase keyword is one of three special keywords that enable you to interact with important object and class representations:
MeMyBaseMyClass
The Me keyword provides you with a reference to your current object instance. Typically, you do not need to use the Me keyword, because whenever you want to invoke a method within your current object, you can just call that method directly.
To see clearly how this works, let's add a new method to the Person class that returns the data of the Person class in the form of a String. This is interesting in and of itself, as the base System.Object class defines the ToString method for this exact purpose. Remember that all classes in the .NET Framework ultimately derive from System.Object, even if you do not explicitly indicate it with an Inherits statement. This means that you can simply override the ToString method from the Object class within your Person class by adding the following code:
Public Overrides Function ToString() As String
  Return Name
End Function
This implementation returns the person's Name property as a result when ToString is called.
By default,
ToStringreturns the class name of the class. Until now, if you called theToStringmethod on aPersonobject, you would get a result ofInheritanceAndInterfaces.Person.
Notice that the ToString method is calling another method within your same class — in this case, the Name method.
You could also write this routine using the Me keyword:
Public Overrides Function ToString() As String
  Return Me.Name
End Function
This is redundant because Me is the default for all method calls in a class. These two implementations are identical, so typically the Me keyword is simply omitted to avoid the extra typing.
To see how the ToString method now works, you can change your code in Form1 to use this value instead of the Name property:
Private Sub btnOK_Click(ByVal sender As System.Object, _
    ByVal e As System.EventArgs) Handles btnOK.Click
Dim objPerson As OfficeEmployee = New OfficeEmployee()
With objPerson
.Name = "Fred"
.BirthDate = #1/1/1960#
.Age = 20
.OfficeNumber = "A42"
txtName.Text = .ToString()
txtBirthDate.Text = Format(.BirthDate, "Short date")
txtAge.Text = CStr(.Age)
txtOffice.Text = .OfficeNumber
End With
End SubWhen you run the application, the person's name is displayed appropriately, which makes sense, as the ToString method is simply returning the result from the Name property.
Earlier, you looked at virtual methods and how they work. Because either calling a method directly or calling it using the Me keyword invokes the method on the current object, the method calls conform to the same rules as an external method call. In other words, your ToString method may not actually end up calling the Name method in the Person class if that method was overridden by a class farther down the inheritance chain, such as the Employee or OfficeEmployee classes.
For example, you could override the Name property in your OfficeEmployee class such that it always returns the informal version of the person's name, rather than the regular name. You can override the Name property by adding this method to the OfficeEmployee class:
Public Overloads Overrides Property Name() As String
  Get
    Return MyBase.Name(NameTypes.Informal)
  End Get
  Set(ByVal value As String)
    MyBase.Name = value
  End Set
End Property
This new version of the Name method relies on the base class to actually store the value, but instead of returning the regular name on request, now you are always returning the informal name:
Return MyBase.Name(NameTypes.Informal)
Before you can test this, you need to enhance the code in your form to actually provide a value for the informal name. Make the following change to the code:
Private Sub btnOK_Click(ByVal sender As System.Object,
    ByVal e As System.EventArgs) Handles btnOK.Click

  Dim objPerson As OfficeEmployee = New OfficeEmployee()

  With objPerson
   .Name = "Fred"
.Name(NameTypes.Informal) = "Freddy" .BirthDate = #1/1/1960# .Age = 20 .OfficeNumber = "A42" txtName.Text = .ToString() txtBirthDate.Text = Format(.BirthDate, "Short date") txtAge.Text = CStr(.Age) txtOffice.Text = .OfficeNumber End With End Sub
When you run the application, the Name field displays the informal name. Even though the ToString method is implemented in the Person class, it is invoking the implementation of Name from the OfficeEmployee class. This is because method calls within a class follow the same rules for calling virtual methods as code outside a class, such as your code in the form. You will see this behavior with or without the Me keyword, as the default behavior for method calls is to implicitly call them via the current object.
While methods called from within a class follow the same rules for virtual methods, this is not the case for shadowed methods. Here, the rules for calling a shadowed method from within your class are different from those outside your class.
To see how this works, make the Name property in OfficeEmployee a shadowed method instead of an overridden method:
Public Shadows Property Name() As String
  Get
    Return MyBase.Name(NameTypes.Informal)
  End Get
  Set(ByVal value As String)
    MyBase.Name = value
  End Set
End Property
Before you can run your application, you must adjust some code in the form. Because you have shadowed the Name property in OfficeEmployee, the version of Name from Employee that acts as a property array is now invalid.
Note
Shadowing a method replaces all implementations from higher in the inheritance chain, regardless of their method signature.
To make your application operate, you need to change the variable declaration and object creation to declare a variable of type Employee so that you can access the property array while still creating an instance of OfficeEmployee:
Dim person As Employee = New OfficeEmployee()
Because your variable is now of type Employee, you also need to comment out the lines that refer to the OfficeNumber property, as it is no longer available:
With person
  .Name = "Fred"
  .Name(NameTypes.Informal) = "Freddy"
  .BirthDate = #1/1/1960#
  .Age = 20

  '.OfficeNumber = "A42"

  txtName.Text = .ToString()
  txtBirthDate.Text = Format(.BirthDate, "Short date")
  txtAge.Text = CStr(.Age)

  'txtOffice.Text = .OfficeNumber
End With
When you run the application now, it displays the name Fred, rather than Freddy, meaning it is not calling the Name method from OfficeEmployee; instead, it is calling the implementation provided by the Employee class. Remember that the code to make this call still resides in the Person class, but it now ignores the shadowed version of the Name method.
Shadowed implementations in subclasses are ignored when calling the method from within a class higher in the inheritance chain. You will get this same behavior with or without the Me keyword. The Me keyword, or calling methods directly, follows the same rules for overridden methods as any other method call. For shadowed methods, however, any shadowed implementations in subclasses are ignored, and the method is called from the current level in the inheritance chain.
The Me keyword exists primarily to enable you to pass a reference to the current object as a parameter to other objects or methods. As shown when you look at the MyBase and MyClass keywords, things can get very confusing, and there may be value in using the Me keyword when working with MyBase and MyClass to ensure that it is always clear which particular implementation of a method you intended to invoke.
While the Me keyword allows you to call methods on the current object instance, at times you might want to explicitly call into methods in your parent class. Earlier, you saw an example of this when you called back into the base class from an overridden method in the subclass.
The MyBase keyword references only the immediate parent class, and it works like an object reference. This means that you can call methods on MyBase knowing that they are being called just as if you had a reference to an object of your parent class's data type.
Note
There is no way to directly navigate up the inheritance chain beyond the immediate parent, so you can't directly access the implementation of a method in a base class if you are in a sub-subclass. Such behavior isn't a good idea anyway, which is why it isn't allowed.
The MyBase keyword can be used to invoke or use any Public, Friend, or Protected element from the parent class. This includes all elements directly on the base class, and any elements the base class inherited from other classes higher in the inheritance chain.
You already used MyBase to call back into the base Person class as you implemented the overridden Name property in the Employee class.
Note
Any code within a subclass can call any method on the base class by using the MyBase keyword.
You can also use MyBase to call back into the base class implementation even if you have shadowed a method. Though it wasn't noted at the time, you have already done this in your shadowed implementation of the Name property in the OfficeEmployee class. The highlighted lines indicate where you are calling into the base class from within a shadowed method:
Public Shadows Property Name() As String
  Get
    Return MyBase.Name(NameTypes.Informal)
  End Get
  Set(ByVal value As String)
    MyBase.Name = value
  End Set
End Property
The MyBase keyword enables you to merge the functionality of the base class into your subclass code as you deem fit.
As you have seen, when you use the Me keyword or call a method directly, your method call follows the rules for calling both virtual and nonvirtual methods. In other words, as shown earlier with the Name property, a call to Name from your code in the Person class actually invoked the overridden version of Name located in the OfficeEmployee class.
While this behavior is often useful, sometimes you will want to ensure that you truly are running the specific implementation from your class; even if a subclass overrode your method, you still want to ensure that you are calling the version of the method that is directly in your class.
Maybe you decide that your ToString implementation in Person should always call the Name implementation that you write in the Person class, totally ignoring any overridden versions of Name in any subclasses.
This is where the MyClass keyword shines. This keyword is much like MyBase, in that it provides you with access to methods as though it were an object reference — in this case, a reference to an instance of the class that contains the code you are writing when using the MyClass keyword. This is true even when the instantiated object is an instance of a class derived from your class.
You have seen that a call to ToString from within Person actually invokes the implementation in Employee or OfficeEmployee if your object is an instance of either of those types. Let's restore the Name property in OfficeEmployee so that it is an overridden method, rather than a shadowed method, to demonstrate how this works:
Public Overloads Overrides Property Name() As String
  Get
    Return MyBase.Name(NameTypes.Informal)
  End Get
  Set(ByVal value As String)
    MyBase.Name = value
  End Set
End Property
With this change, and based on your earlier testing, you know that the ToString implementation in Person will automatically call this overridden version of the Name property, as the call to the Name method follows the normal rules for virtual methods. In fact, if you run the application now, the Name field on the form displays Freddy, the informal name of the person.
You can force the use of the implementation in the current class through the use of MyClass. Change the ToString method in Person as follows:
Public Overrides Function ToString() As String
  Return MyClass.Name
End Function
You are now calling the Name method, but you are doing it using the MyClass keyword. When you run the application and click the button, the Name field in the form displays Fred rather than Freddy, proving that the implementation from Person was invoked even though the data type of the object itself is OfficeEmployee.
The ToString method is invoked from Person, as neither Employee nor OfficeEmployee provides an overridden implementation. Then, because you are using the MyClass keyword, the Name method is invoked directly from Person, explicitly defeating the default behavior you would normally expect.
As discussed in Chapter 2, you can provide a special constructor method, named New, on a class and it will be the first code run when an object is instantiated. You can also receive parameters via the constructor method, enabling the code that creates your object to pass data into the object during the creation process.
Constructor methods are affected by inheritance differently than regular methods. A normal Public method, such as BirthDate on your Person class, is automatically inherited by any subclass. From there you can overload, override, or shadow that method, as discussed already.
Constructors do not quite follow the same rules. To explore the differences, let's implement a simple constructor method in the Person class:
Public Sub New()
  Debug.WriteLine("Person constructor")
End Sub
If you now run the application, you will see the text displayed in the output window in the IDE. This occurs even though the code in your form is creating an object of type OfficeEmployee:
Dim person As Employee = New OfficeEmployee()
As you might expect, the New method from your base Person class is invoked as part of the construction process of the OfficeEmployee object — simple inheritance at work. However, interesting things occur if you implement a New method in the OfficeEmployee class itself:
Public Sub New()
  Debug.WriteLine("OfficeEmployee constructor")
End Sub
Notice that you are not using the Overrides keyword, nor did you mark the method in Person as Overridable. These keywords have no use in this context, and, in fact, will cause syntax errors if you attempt to use them on constructor methods.
When you run the application now, you would probably expect that only the implementation of New in OfficeEmployee would be invoked. Certainly, that is what would occur with a normal overridden method. Of course, New isn't overridden, so when you run the application, both implementations are run, and both strings are output to the output window in the IDE.
Note that the implementation in the Person class ran first, followed by the implementation in the OfficeEmployee class. This occurs because when an object is created, all the constructors for the classes in the inheritance chain are invoked, starting with the base class and including all the subclasses one by one. In fact, if you implement a New method in the Employee class, you can see that it too is invoked:
Public Sub New()
  Debug.WriteLine("Employee constructor")
End Sub
When the application is run and the button is clicked, three strings appear in the output window. All three constructor methods were invoked, from the Person class to the OfficeEmployee class.
The rules governing constructors without parameters are pretty straightforward, but things get a bit more complex if you start requiring parameters on your constructors.
To understand why, you need to consider how even your simple constructors are invoked. While you may see them as being invoked from the base class down through all subclasses to your final subclass, what is really happening is a bit different.
In particular, it is the subclass New method that is invoked first. However, Visual Basic automatically inserts a line of code into your routine at compile time. For instance, in your OfficeEmployee class you have a constructor:
Public Sub New()
  Debug.WriteLine("OfficeEmployee constructor")
End Sub
Behind the scenes, Visual Basic inserts what is effectively a call to the constructor of your parent class on your behalf. You could do this manually by using the MyBase keyword with the following change:
Public Sub New()
  MyBase.New()
  Debug.WriteLine("OfficeEmployee constructor")
End Sub
This call must be the first line in your constructor. If you put any other code before this line, you will get a syntax error indicating that your code is invalid. Because the call is always required, and because it always must be the first line in any constructor, Visual Basic simply inserts it for you automatically.
Note that if you don't explicitly provide a constructor on a class by implementing a New method, Visual Basic creates one for you behind the scenes. The automatically created method simply has one line of code:
MyBase.New()
All classes have constructor methods, either created explicitly by you as you write a New method or created implicitly by Visual Basic as the class is compiled.
A constructor method is sometimes called a ctor, short for constructor. This term is often used by tools such as ILDASM or .NET Reflector.
By always calling MyBase.New as the first line in every constructor, you are guaranteed that it is the implementation of New in your top-level base class that actually runs first. Every subclass invokes the parent class implementation all the way up the inheritance chain until only the base class remains. Then its code runs, followed by each individual subclass, as shown earlier.
This works great when your constructors don't require parameters, but if your constructor does require a parameter, then it becomes impossible for Visual Basic to automatically make that call on your behalf. After all, how would Visual Basic know what values you want to pass as parameters?
To see how this works, change the New method in the Person class to require a name parameter. You can use that parameter to initialize the object's Name property:
Public Sub New(ByVal name As String)
  Me.Name = name
Debug.WriteLine("Person constructor")
End Sub
Now your constructor requires a String parameter and uses it to initialize the Name property. You are using the Me keyword to make your code easier to read. Interestingly enough, the compiler actually understands and correctly compiles the following code:
Name = name
However, that is not at all clear to a developer reading the code. By prefixing the property name with the Me keyword, you make it clear that you are invoking a property on the object and providing it with the parameter value.
At this point, your application won't compile because there is an error in the New method of the Employee class. In particular, Visual Basic's attempt to automatically invoke the constructor on the Person class fails because it has no idea what data value to pass for this new name parameter. There are three ways you can address this error:
If you make the Name parameter Optional, then you are indicating that the New method can be called with or without a parameter. Therefore, one viable option is to call the method with no parameters, so Visual Basic's default of calling it with no parameters works just fine.
If you overload the New method, then you can implement a second New method that doesn't accept any parameters, again allowing Visual Basic's default behavior to work as you have seen. Keep in mind that this solution only invokes the overloaded version of New with no parameter; the version that requires a parameter would not be invoked.
The final way you can fix the error is by simply providing a parameter value yourself from within the New method of the Employee class. To do this, change the Employee class as shown:
Public Sub New()
  MyBase.New("George")
  Debug.WriteLine("Employee constructor")
End Sub
By explicitly calling the New method of the parent class, you are able to provide it with the required parameter value. At this point, your application will compile, but it won't run.
What isn't clear from this code is that you have now introduced a very insidious bug. The constructor in the Person class is using the Name property to set the value:
Public Sub New(ByVal name As String)
  Me.Name = name
Debug.WriteLine("Person constructor")
End Sub
However, the Name property is overridden by the Employee class, so it is that implementation that will be run. Unfortunately, that implementation makes use of a Dictionary object, which isn't available yet! It turns out that any member variables declared in a class with the New statement, such as the Dictionary object in Employee, won't be initialized until after the constructor for that class has completed:
Private mNames As New Generic.Dictionary(Of NameTypes, String)
Because you are still in the constructor for Person, there's no way the constructor for Employee can be complete. To resolve this, you need to change the Employee class a bit so that it does not rely on the Dictionary being created in this manner. Instead, you will add code to create it when needed.
First, change the declaration of the variable in the Employee class:
Private mNames As Generic.Dictionary(Of NameTypes, String)
Then, update the Name property so that it creates the Hashtable object if needed:
Public Overloads Property Name(ByVal type As NameTypes) As String
  Get
    If mNames Is Nothing Then mNames = New Generic.Dictionary(Of NameTypes, String)
    Return mNames(type)
  End Get
  Set(ByVal value As String)
    If mNames Is Nothing Then mNames = New Generic.Dictionary(Of NameTypes, String)
    If mNames.ContainsKey(type) Then
      mNames.Item(type) = value
    Else
      mNames.Add(type, value)
    End If
    If type = NameTypes.Normal Then
      MyBase.Name = value
    End If
  End Set
End Property
This ensures that a Dictionary object is created in the Employee class code even though its constructor hasn't yet completed.
Obviously, you probably do not want to hard-code a value in a constructor as you did in the Employee class, so you may choose instead to change this constructor to also accept a name parameter. Change the Employee class constructor as shown:
Public Sub New(ByVal name As String)
  MyBase.New(name)
Debug.WriteLine("Employee constructor")
End Sub
Of course, this just pushed the issue deeper, and now the OfficeEmployee class has a compile error in its New method. Again, you can fix the problem by having that method accept a parameter so that it can provide it up the chain as required. Make the following change to OfficeEmployee:
Public Sub New(ByVal name As String)
  MyBase.New(name)
  Debug.WriteLine("OfficeEmployee constructor")
End Sub
Finally, the code in the form is no longer valid. You are attempting to create an instance of OfficeEmployee without passing a parameter value. Update that code as shown and then you can run the application:
Private Sub btnOK_Click(ByVal sender As System.Object, _
    ByVal e As System.EventArgs) Handles btnOK.Click

     Dim person As Employee = New OfficeEmployee("Mary")

     With person
      '.Name = "Fred"
Here, you are passing a name value to the constructor of OfficeEmployee. In addition, you have commented out the line of code that sets the Name property directly — meaning the value passed in the constructor will be displayed in the form.
You have seen how a subclass automatically gains all the Public methods and properties that compose the interface of the base class. This is also true of Friend methods and properties; they are inherited as well and are available only to other code in the same project as the subclass.
Private methods and properties are not exposed as part of the interface of the subclass, meaning that the code in the subclass cannot call those methods, nor can any code using your objects. These methods are only available to the code within the base class itself. This can get confusing, as the implementations contained in the Private methods are inherited and are used by any code in the base class; it is just that they are not available to be called by any other code, including code in the subclass.
Sometimes you will want to create methods in your base class that can be called by a subclass as well as the base class but not by code outside of those classes. Basically, you want a hybrid between Public and Private — methods that are private to the classes in the inheritance chain but usable by any subclasses that might be created within the chain. This functionality is provided by the Protected scope.
Protected methods are very similar to Private methods in that they are not available to any code that calls your objects. Instead, these methods are available to code within the base class and to code within any subclass. The following table lists all the available scope options:
Scope | Description |
|---|---|
Available only to code within your class | |
Available only to classes that inherit from your class | |
Available only to code within your project/component | |
Available to classes that inherit from your class (in any project) and to code within your project/component. This is a combination of | |
Available to code outside your class |
The Protected scope can be applied to Sub, Function, and Property methods. To see how the Protected scope works, let's add an Identity field to the Person class:
Public Class Person
  Private mName As String
  Private mBirthDate As String
  Private mID As String

  Protected Property Identity() As String
    Get
      Return mID
    End Get
    Set(ByVal value As String)
      mID = value
    End Set
  End Property
This data field represents some arbitrary identification number or value assigned to a person. This might be a social security number, an employee number, or whatever is appropriate.
The interesting thing about this value is that it is not currently accessible outside your inheritance chain. For instance, if you try to use it from your code in the form, then you will discover that there is no Identity property on your Person, Employee, or OfficeEmployee objects.
However, there is an Identity property now available inside your inheritance chain. The Identity property is available to the code in the Person class, just like any other method. Interestingly, even though Identity is not available to the code in your form, it is available to the code in the Employee and OfficeEmployee classes, because they are both subclasses of Person. Employee is directly a subclass, and OfficeEmployee is indirectly a subclass of Person because it is a subclass of Employee.
Thus, you can enhance your Employee class to implement an EmployeeNumber property by using the Identity property. To do this, add the following code to the Employee class:
Public Property EmployeeNumber() As Integer
  Get
    Return CInt(Identity)
End Get
Set(ByVal value As Integer)
Identity = CStr(value)
End Set
End PropertyThis new property exposes a numeric identity value for the employee, but it uses the internal Identity property to manage that value. You can override and shadow Protected elements just as you do with elements of any other scope.
Up to this point, we've focused on methods and properties and how they interact through inheritance. Inheritance, and, in particular, the Protected scope, also affects instance variables and how you work with them.
Though it is not recommended, you can declare variables in a class using Public scope. This makes the variable directly available to code both within and outside of your class, allowing any code that interacts with your objects to directly read or alter the value of that variable.
Variables can also have Friend scope, which likewise allows any code in your class or anywhere within your project to read or alter the value directly. This is also generally not recommended because it breaks encapsulation.
Note
Rather than declare variables with Public or Friend scope, it is better to expose the value using a Property method so that you can apply any of your business rules to control how the value is altered as appropriate.
Of course, you know that variables can be of Private scope, and this is typically the case. This makes the variables accessible only to the code within your class, and it is the most restrictive scope.
As with methods, however, you can also use the Protected scope when declaring variables. This makes the variable accessible to the code in your class and to the code in any class that derives from your class — all the way down the hierarchy chain.
Sometimes this is useful, because it enables you to provide and accept data to and from subclasses, but to act on that data from code in the base class. At the same time, exposing variables to subclasses is typically not ideal, and you should use Property methods with Protected scope for this instead, as they allow your base class to enforce any business rules that are appropriate for the value, rather than just hope that the author of the subclass only provides good values.
So far, we've discussed methods, properties, and variables in terms of inheritance — how they can be added, overridden, extended, and shadowed. In Visual Basic, events are also part of the interface of an object, and they are affected by inheritance as well.
Chapter 2 discusses how to declare, raise, and receive events from objects. You can add such an event to the Person class by declaring it at the top of the class:
Public Class Person
  Private mName As String
  Private mBirthDate As String
  Private mID As String

  Public Event NameChanged(ByVal newName As String)
Then, you can raise this event within the class any time the person's name is changed:
Public Overridable Property Name() As String
  Get
    Return mName
  End Get
  Set(ByVal value As String)
    mName = value
    RaiseEvent NameChanged(mName)
  End Set
End Property
At this point, you can receive and handle this event within your form any time you are working with a Person object. The nice thing about this is that your events are inherited automatically by subclasses — meaning that your Employee and OfficeEmployee objects will also raise this event. Thus, you can change the code in your form to handle the event, even though you are working with an object of type OfficeEmployee.
First, you can add a method to handle the event to Form1:
Private Sub OnNameChanged(ByVal newName As String)
  MsgBox("New name: " & newName)
End Sub
Note that you are not using the Handles clause here. In this case, for simplicity, you use the AddHandler method to dynamically link the event to this method. However, you could have also chosen to use the WithEvents and Handles keywords, as described in Chapter 2 — either way works.
With the handler built, you can use the AddHandler method to link this method to the event on the object:
Private Sub btnOK_Click(ByVal sender As System.Object, _
    ByVal e As System.EventArgs) Handles btnOK.Click

  Dim person As Employee = New OfficeEmployee("Mary")

  AddHandler person.NameChanged, AddressOf OnNameChanged
With person
.Name = "Fred"Also note that you are uncommenting the line that changes the Name property. With this change, you know that the event should fire when the name is changed.
When you run the application now, you will see a message box, indicating that the name has changed and proving that the NameChanged event really is exposed and available even though your object is of type OfficeEmployee, rather than Person.
One caveat you should keep in mind is that while a subclass exposes the events of its base class, the code in the subclass cannot raise the event. In other words, you cannot use the RaiseEvent method in Employee or OfficeEmployee to raise the NameChanged event. Only code directly in the Person class can raise the event.
To see this in action, let's add another event to the Person class, an event that can indicate the change of other arbitrary data values:
Public Class Person Private mName As String Private mBirthDate As String Private mID As String Public Event NameChanged(ByVal newName As String) Public Event DataChanged(ByVal field As String, ByVal newValue As Object)
You can then raise this event when the BirthDate is changed:
Public Overridable Property BirthDate() As Date
Get
Return mBirthDate
End Get
Set(ByVal value As Date)
mBirthDate = value
RaiseEvent DataChanged("BirthDate", value)
End Set
End PropertyIt would also be nice to raise this event from the Employee class when the Salary value is changed. Unfortunately, you can't use the RaiseEvent method to raise the event from a base class, so the following code won't work (do not enter this code):
Public Property Salary() As Double
Get
Return mSalary
End GetSet(ByVal value As Double)
mSalary = value
RaiseEvent DataChanged("Salary", value)
End Set
End PropertyFortunately, there is a relatively easy way to get around this limitation. You can simply implement a Protected method in your base class that allows any derived class to raise the method. In the Person class, you can add such a method:
Protected Sub OnDataChanged(ByVal field As String, _
ByVal newValue As Object)
RaiseEvent DataChanged(field, newValue)
End SubYou can use this method from within the Employee class to indicate that Salary has changed:
Public Property Salary() As Double
Get
Return mSalary
End Get
Set(ByVal value As Double)
mSalary = value
OnDataChanged("Salary", value)
End Set
End PropertyNote that the code in Employee is not raising the event, it is simply calling a Protected method in Person. The code in the Person class is actually raising the event, meaning everything will work as desired.
You can enhance the code in Form1 to receive the event. First, create a method to handle the event:
Private Sub OnDataChanged(ByVal field As String, ByVal newValue As Object)
MsgBox("New " & field & ": " & CStr(newValue))
End SubThen, link this handler to the event using the AddHandler method:
Private Sub btnOK_Click(ByVal sender As System.Object, _
ByVal e As System.EventArgs) Handles btnOK.Click
Dim person As Employee = New OfficeEmployee("Mary")
AddHandler person.NameChanged, AddressOf OnNameChanged
AddHandler person.DataChanged, AddressOf OnDataChangedFinally, ensure that you are changing and displaying the Salary property:
With person .Name = "Fred" .Name(NameTypes.Informal) = "Freddy" .BirthDate = #1/1/1960# .Age = 20 .Salary = 30000 txtName.Text = .ToString() txtBirthDate.Text = Format(.BirthDate, "Short date") txtAge.Text = CStr(.Age) txtSalary.Text = Format(.Salary, "0.00") End With
When you run the application and click the button now, you will get message boxes displaying the changes to the Name property, the BirthDate property (twice, once for the BirthDate property and once for the Age property, which changes the birth date), and the Salary property.
Chapter 2 explored shared methods and how they work: providing a set of methods that can be invoked directly from the class, rather than requiring that you create an actual object.
Shared methods are inherited just like instance methods and so are automatically available as methods on subclasses, just as they are on the base class. If you implement a shared method in BaseClass, you can call that method using any class derived from BaseClass.
Like regular methods, shared methods can be overloaded and shadowed. They cannot, however, be overridden. If you attempt to use the Overridable keyword when declaring a Shared method, you will get a syntax error. For instance, you can implement a method in your Person class to compare two Person objects:
Public Shared Function Compare(ByVal person1 As Person, _
    ByVal person2 As Person) As Boolean

  Return (person1.Name = person2.Name)

End Function
To test this method, let's add another button to the form, name it btnCompare, and set its Text value to Compare. Double-click the button to bring up the code window and enter the following:
Private Sub btnCompare_Click(ByVal sender As System.Object, _
    ByVal e As System.EventArgs) Handles btnCompare.Click

  Dim emp1 As New Employee("Fred")
Dim emp2 As New Employee("Mary")
MsgBox(Employee.Compare(emp1, emp2))
End SubThis code simply creates two Employee objects and compares them. Note, though, that the code uses the Employee class to invoke the Compare method, displaying the result in a message box. This establishes that the Compare method implemented in the Person class is inherited by the Employee class, as expected.
Shared methods can be overloaded using the Overloads keyword in the same manner as you overload an instance method. This means that your subclass can add new implementations of the shared method as long as the parameter list differs from the original implementation.
For example, you can add a new implementation of the Compare method to Employee:
Public Overloads Shared Function Compare(ByVal employee1 As Employee, _
    ByVal employee2 As Employee) As Boolean

  Return (employee1.EmployeeNumber = employee2.EmployeeNumber)

End Function
This new implementation compares two Employee objects, rather than two Person objects, and, in fact, compares them by employee number, rather than name. You can enhance the code behind btnCompare in the form to set the EmployeeNumber properties:
Private Sub btnCompare_Click(ByVal sender As System.Object, _
    ByVal e As System.EventArgs) Handles btnCompare.Click

  Dim emp1 As New Employee("Fred")
  Dim emp2 As New Employee("Mary")

  emp1.EmployeeNumber = 1
  emp2.EmployeeNumber = 1

  MsgBox(Employee.Compare(emp1, emp2))
End Sub
While it might make little sense for these two objects to have the same EmployeeNumber value, it does prove a point. When you run the application now, even though the Name values of the objects are different, your Compare routine will return True, proving that you are invoking the overloaded version of the method that expects two Employee objects as parameters.
The overloaded implementation is available on the Employee class or any classes derived from Employee, such as OfficeEmployee. The overloaded implementation is not available if called directly from Person, as that class only contains the original implementation.
Shared methods can also be shadowed by a subclass. This allows you to do some very interesting things, including converting a shared method into an instance method or vice versa. You can even leave the method as shared but change the entire way it works and is declared. In short, just as with instance methods, you can use the Shadows keyword to entirely replace and change a shared method in a subclass.
To see how this works, use the Shadows keyword to change the nature of the Compare method in OfficeEmployee:
Public Shared Shadows Function Compare(ByVal person1 As Person, _
    ByVal person2 As Person) As Boolean

  Return (person1.Age = person2.Age)

End Function
Notice that this method has the same signature as the original Compare method you implemented in the Person class, but instead of comparing by name, here you are comparing by age. With a normal method you could have done this by overriding, but Shared methods can't be overridden, so the only thing you can do is shadow it.
Of course, the shadowed implementation is only available via the OfficeEmployee class. Neither the Person nor Employee classes, which are higher up the inheritance chain, are aware that this shadowed version of the method exists.
To use this from your Form1 code, you can change the code for btnCompare as follows:
Private Sub btnCompare_Click(ByVal sender As System.Object, _
    ByVal e As System.EventArgs) Handles btnCompare.Click

  Dim emp1 As New Employee("Fred")
  Dim emp2 As New Employee("Mary")

  emp1.Age = 20
  emp2.Age = 25

  MsgBox(OfficeEmployee.Compare(emp1, emp2))
End Sub
Instead of setting the EmployeeNumber values, you are now setting the Age values on your objects. More important, notice that you are now calling the Compare method via the OfficeEmployee class, rather than via Employee or Person. This causes the invocation of the new version of the method, and the ages of the objects are compared.
As discussed in Chapter 2, you can create shared events, events that can be raised by shared or instance methods in a class, whereas regular events can only be raised from within instance methods.
When you inherit from a class that defines a shared event, your new subclass automatically gains that event, just as it does with regular events. As with instance events, a shared event cannot be raised by code within the subclass; it can only be raised using the RaiseEvent keyword from code in the class where the event is declared. If you want to be able to raise the event from methods in your subclass, you need to implement a Protected method on the base class that actually makes the call to RaiseEvent.
This is no different from what you saw earlier in the chapter, other than that with a shared event you can use a method with Protected scope that is marked as shared to raise the event, rather than use an instance method.
So far, you have seen how to inherit from a class, how to overload and override methods, and how virtual methods work. In all of the examples so far, the parent classes have been useful in their own right and could be instantiated and do some meaningful work. Sometimes, however, you want to create a class such that it can only be used as a base class for inheritance.
The current Person class is being used as a base class, but it can also be instantiated directly to create an object of type Person. Likewise, the Employee class is also being used as a base class for the OfficeEmployee class you created that derives from it.
If you want to make a class act only as a base class, you can use the MustInherit keyword, thereby preventing anyone from creating objects based directly on the class, and requiring them instead to create a subclass and then create objects based on that subclass.
This can be very useful when you are creating object models of real-world concepts and entities. You will look at ways to leverage this capability later in this chapter. Change Person to use the MustInherit keyword:
Public MustInherit Class Person
This has no effect on the code within Person or any of the classes that inherit from it, but it does mean that no code can instantiate objects directly from the Person class; instead, you can only create objects based on Employee or OfficeEmployee.
This does not prevent you from declaring variables of type Person; it merely prevents you from creating an object by using New Person. You can also continue to make use of Shared methods from the Person class without any difficulty.
Another option you have is to create a method (Sub, Function, or Property) that must be overridden by a subclass. You might want to do this when you are creating a base class that provides some behaviors but relies on subclasses to also provide other behaviors in order to function properly. This is accomplished by using the MustOverride keyword on a method declaration.
If a class contains any methods marked with MustOverride, the class itself must also be declared with the MustInherit keyword or you will get a syntax error:
Public MustInherit Class Person
This makes sense. If you are requiring that a method be overridden in a subclass, it stands to reason that your class can't be directly instantiated; it must be subclassed to be useful.
Let's see how this works by adding a LifeExpectancy method in Person that has no implementation and must be overridden by a subclass:
Public MustOverride Function LifeExpectancy() As Integer
Notice that there is no End Function or any other code associated with the method. When using MustOverride, you cannot provide any implementation for the method in your class. Such a method is called an abstract method or pure virtual function, as it only defines the interface, and no implementation.
Methods declared in this manner must be overridden in any subclass that inherits from your base class. If you do not override one of these methods, you will generate a syntax error in the subclass, and it won't compile. You need to alter the Employee class to provide an implementation for this method:
Public Overrides Function LifeExpectancy() As Integer
  Return 90
End Function
Your application will compile and run at this point because you are now overriding the LifeExpectancy method in Employee, so the required condition is met.
You can combine these two concepts, using both MustInherit and MustOverride, to create something called an abstract base class, sometimes referred to as a virtual class. This is a class that provides no implementation, only the interface definitions from which a subclass can be created, as shown in the following example:
Public MustInherit Class AbstractBaseClass
  Public MustOverride Sub DoSomething()
  Public MustOverride Sub DoOtherStuff()
End Class
This technique can be very useful when creating frameworks or the high-level conceptual elements of a system. Any class that inherits AbstractBaseClass must implement both DoSomething and DoOtherStuff; otherwise, a syntax error will result.
In some ways, an abstract base class is comparable to defining an interface using the Interface keyword. The Interface keyword is discussed in detail later in this chapter. You could define the same interface shown in this example with the following code:
Public Interface IAbstractBaseClass
  Sub DoSomething()
  Sub DoOtherStuff()
End Interface
Any class that implements the IAbstractBaseClass interface must implement both DoSomething and DoOtherStuff or a syntax error will result, and in that regard this technique is similar to an abstract base class.
If you want to prevent a class from being used as a base class, you can use the NotInheritable keyword. For instance, you can change your OfficeEmployee as follows:
Public NotInheritable Class OfficeEmployee
At this point, it is no longer possible to inherit from this class to create a new class. Your OfficeEmployee class is now sealed, meaning it cannot be used as a base from which to create other classes.
If you attempt to inherit from OfficeEmployee, you will get a compile error indicating that it cannot be used as a base class. This has no effect on Person or Employee; you can continue to derive other classes from them.
Typically, you want to design your classes so that they can be subclassed, because that provides the greatest long-term flexibility in the overall design. Sometimes, however, you want to ensure that your class cannot be used as a base class, and the NotInheritable keyword addresses that issue.
In Visual Basic, objects can have one or more interfaces. All objects have a primary, or native, interface, which is composed of any methods, properties, events, or member variables declared using the Public keyword. You can also have objects implement secondary interfaces in addition to their native interface by using the Implements keyword.
The native interface on any class is composed of all the methods, properties, events, and even variables that are declared as anything other than Private. Though this is nothing new, let's quickly review what is included in the native interface to set the stage for discussing secondary interfaces. To include a method as part of your interface, you can simply declare a Public routine:
Public Sub AMethod()

End Sub
Notice that there is no code in this routine. Any code would be implementation and is not part of the interface. Only the declaration of the method is important when discussing interfaces. This can seem confusing at first, but it is an important distinction, as the separation of the interface from its implementation is at the very core of object-oriented programming and design.
Because this method is declared as Public, it is available to any code outside the class, including other applications that may make use of the assembly. If the method has a property, then you can declare it as part of the interface by using the Property keyword:
Public Property AProperty() As String

End Property
You can also declare events as part of the interface by using the Event keyword:
Public Event AnEvent()
Finally, you can include actual variables, or attributes, as part of the interface:
Public AnInteger As Integer
This is strongly discouraged, because it directly exposes the internal variables for use by code outside the class. Because the variable is directly accessible from other code, you give up any and all control over the way the value may be changed or the code may be accessed.
Rather than make any variable Public, it is far preferable to make use of a Property method to expose the value. That way, you can implement code to ensure that your internal variable is only set to valid values and that only the appropriate code has access to the value based on your application's logic.
Ultimately, the native (or primary) interface for any class is defined by looking at all the methods, properties, events, and variables that are declared as anything other than Private in scope. This includes any methods, properties, events, or variables that are inherited from a base class.
You are used to interacting with the default interface on most objects, so this should seem pretty straightforward. Consider this simple class:
Public Class TheClass
  Public Sub DoSomething()

  End Sub

  Public Sub DoSomethingElse()

  End Sub
End Class
This defines a class and, by extension, defines the native interface that is exposed by any objects you instantiate based on this class. The native interface defines two methods: DoSomething and DoSomethingElse. To make use of these methods, you simply call them:
Dim myObject As New TheClass()

myObject.DoSomething()

myObject.DoSomethingElse()
This is the same thing you did in Chapter 2 and so far in this chapter. However, let's take a look at creating and using secondary interfaces, because they are a bit different.
Sometimes it's helpful for an object to have more than one interface, thereby enabling you to interact with the object in different ways. Inheritance enables you to create subclasses that are specialized cases of the base class. For example, your Employee is a Person.
However, sometimes you have a group of objects that are not the same thing, but you want to be able to treat them as though they were the same. You want all these objects to act as the same thing, even though they are all different.
For instance, you may have a series of different objects in an application, product, customer, invoice, and so forth. Each of these would have default interfaces appropriate to each individual object — and each of them is a different class — so there's no natural inheritance relationship implied between these classes. At the same time, you may need to be able to generate a printed document for each type of object, so you would like to make them all act as a printable object.
To accomplish this, you can define a generic interface that enables generating such a printed document. You can call it IPrintableObject.
By convention, this type of interface is typically prefixed with a capital "I" to indicate that it is a formal interface.
Each of your application objects can choose to implement the IPrintableObject interface. Every object that implements this interface must include code to provide actual implementation of the interface, which is unlike inheritance, whereby the code from a base class is automatically reused.
By implementing this common interface, you can write a routine that accepts any object that implements the IPrintableObject interface and then print it — while remaining totally oblivious to the "real" data type of the object or methods its native interface might expose. Before you learn how to use an interface in this manner, let's walk through the process of actually defining an interface.
You define a formal interface using the Interface keyword. This can be done in any code module in your project, but a good place to put this type of definition is in a standard module. An interface defines a set of methods (Sub, Function, or Property) and events that must be exposed by any class that chooses to implement the interface.
Add a module to the project using Project
Public Interface IPrintableObject

End Interface

Module Interfaces

End Module
A code module can contain a number of interface definitions, and these definitions must exist outside of any other code block. Thus, they do not go within a Class or Module block; they are at a peer level to those constructs.
Interfaces must be declared using either Public or Friend scope. Declaring a Private or Protected interface results in a syntax error. Within the Interface block of code, you can define the methods, properties, and events that make up your particular interface. Because the scope of the interface is defined by the Interface declaration itself, you can't specify scopes for individual methods and events; they are all scoped like the interface itself.
For instance, add the following code:
Public Interface IPrintableObject
   Function Label(ByVal index As Integer) As String
   Function Value(ByVal index As Integer) As String
   ReadOnly Property Count() As Integer
End Interface
This defines a new data type, somewhat like creating a class or structure, which you can use when declaring variables. For instance, you can now declare a variable of type IPrintableObject:
Private printable As IPrintableObject
You can also have your classes implement this interface, which requires each class to provide implementation code for each of the three methods defined on the interface.
Before you implement the interface in a class, let's see how you can use the interface to write a generic routine that can print any object that implements IPrintableObject.
Interfaces define the methods and events (including parameters and data types) that an object is required to implement if you choose to support the interface. This means that, given just the interface definition, you can easily write code that can interact with any object that implements the interface, even though you do not know what the native data types of those objects will be.
To see how you can write such code, let's create a simple routine in your form that can display data to the output window in the IDE from any object that implements IPrintableObject. Bring up the code window for your form and add the following routine:
Public Sub PrintObject(obj As IPrintableObject)
  Dim index As Integer

  For index = 0 To obj.Count
    Debug.Write(obj.Label(index) & ": ")
    Debug.WriteLine(obj.Value(index))
  Next
End Sub
Notice that you are accepting a parameter of type IPrintableObject. This is how secondary interfaces are used, by treating an object of one type as though it were actually of the interface type. As long as the object passed to this routine implements the IPrintableObject interface, your code will work fine.
Within the PrintObject routine, you are assuming that the object will implement three elements — Count, Label, and Value — as part of the IPrintableObject interface. Secondary interfaces can include methods, properties, and events, much like a default interface, but the interface itself is defined and implemented using some special syntax.
Now that you have a generic printing routine, you need a way to call it. Bring up the designer for Form1, add a button, and name it btnPrint. Double-click the button and put this code behind it:
Private Sub btnPrint_Click(ByVal sender As System.Object, _
    ByVal e As System.EventArgs) Handles btnPrint.Click

  Dim obj As New Employee("Andy")

  obj.EmployeeNumber = 123
  obj.BirthDate = #1/1/1980#
  obj.HireDate = #1/1/1996#

  PrintObject(obj)
End Sub
This code simply initializes an Employee object and calls the PrintObject routine. Of course, this code produces runtime exceptions, because PrintObject is expecting a parameter that implements IPrintableObject, and Employee implements no such interface. Let's move on and implement that interface in Employee so that you can see how it works.
Any class (other than an abstract base class) can implement an interface by using the Implements keyword. For instance, you can implement the IPrintableObject interface in Employee by adding the following line:
Public Class Employee
  Inherits Person
  Implements IPrintableObject
This causes the interface to be exposed by any object created as an instance of Employee. Adding this line of code and pressing Enter triggers the IDE to add skeleton methods for the interface to your class. All you need to do is provide implementations for the methods.
To implement an interface, you must implement all the methods and properties defined by that interface.
Before actually implementing the interface, however, let's create an array to contain the labels for the data fields so that you can return them via the IPrintableObject interface. Add the following code to the Employee class:
Public Class Employee
  Inherits Person
  Implements IPrintableObject
  Private mLabels() As String = {"ID", "Age", "HireDate"}
  Private mHireDate As Date
  Private mSalary As Double
To implement the interface, you need to create methods and properties with the same parameter and return data types as those defined in the interface. The actual name of each method or property does not matter because you are using the Implements keyword to link your internal method names to the external method names defined by the interface. As long as the method signatures match, you are all set.
This applies to scope as well. Although the interface and its methods and properties are publicly available, you do not have to declare your actual methods and properties as Public. In many cases, you can implement them as Private, so they do not become part of the native interface and are only exposed via the secondary interface.
However, if you do have a Public method with a method signature, you can use it to implement a method from the interface. This has the interesting side effect that this method provides implementation for both a method on the object's native interface and one on the secondary interface.
In this case, you will use a Private method, so it is only providing implementation for the IPrintableObject interface. Implement the Label method by adding the following code to Employee:
Private Function Label(ByVal index As Integer) As String _
      Implements IPrintableObject.Label

    Return mLabels(index)
End Function
This is just a regular Private method that returns a String value from the pre-initialized array. The interesting part is the Implements clause on the method declaration:
Private Function Label(ByVal index As Integer) As String _
      Implements IPrintableObject.Label
By using the Implements keyword in this fashion, you are indicating that this particular method is the implementation for the Label method on the IPrintableObject interface. The actual name of the private method could be anything. It is the use of the Implements clause that makes this work. The only requirement is that the parameter data types and the return value data type must match those defined by the IPrintableObject interface.
This is very similar to using the Handles clause to indicate which method should handle an event. In fact, like the Handles clause, the Implements clause allows you to have a comma-separated list of interface methods that should be implemented by this one function.
You can then move on to implement the other two elements defined by the IPrintableObject interface by adding this code to Employee:
Private Function Value(ByVal index As Integer) As String _
    Implements IPrintableObject.Value

  Select Case index
    Case 0
      Return CStr(EmployeeNumber)
    Case 1
      Return CStr(Age)
    Case Else
Return Format(HireDate, "Short date")
End Select
End Function
Private ReadOnly Property Count() As Integer _
Implements IPrintableObject.Count
Get
Return UBound(mLabels)
End Get
End PropertyYou can now run this application and click the button. The output window in the IDE will display your results, showing the ID, age, and hire-date values as appropriate.
Any object could create a similar implementation behind the IPrintableObject interface, and the PrintObject routine in your form would continue to work regardless of the native data type of the object itself.
Secondary interfaces provide a guarantee that all objects implementing a given interface have exactly the same methods and events, including the same parameters.
The Implements clause links your actual implementation to a specific method on an interface. For instance, your Value method is linked to IPrintableObject.Value using the following clause:
Private Function Value(ByVal index As Integer) As String _
    Implements IPrintableObject.Value
Sometimes, your method might be able to serve as the implementation for more than one method, either on the same interface or on different interfaces.
Add the following interface definition to Interfaces.vb:
Public Interface IValues
  Function GetValue(ByVal index As Integer) As String
End Interface
This interface defines just one method, GetValue. Notice that it defines a single Integer parameter and a return type of String, the same as the Value method from IPrintableObject. Even though the method name and parameter variable name do not match, what counts here is that the parameter and return value data types do match.
Now bring up the code window for Employee. You will have it implement this new interface in addition to the IPrintableObject interface:
Public Class Employee
  Inherits Person
  Implements IPrintableObject
  Implements IValues
You already have a method that returns values. Rather than re-implement that method, it would be nice to just link this new GetValues method to your existing method. You can easily do this because the Implements clause allows you to provide a comma-separated list of method names:
Private Function Value(ByVal index As Integer) As String _
    Implements IPrintableObject.Value, IValues.GetValue


  Select Case Index
    Case 0
      Return CStr(EmployeeNumber)
    Case 1
      Return CStr(Age)
    Case Else
      Return Format(HireDate, "Short date")
  End Select

End Function
This is very similar to the use of the Handles keyword, covered in Chapter 2. A single method within the class, regardless of scope or name, can be used to implement any number of methods as defined by other interfaces as long as the data types of the parameters and return values all match.
You can combine implementation of secondary interfaces and inheritance at the same time. When you inherit from a class that implements an interface, your new subclass automatically gains the interface and implementation from the base class. If you specify that your base-class methods are overridable, then the subclass can override those methods. This not only overrides the base-class implementation for your native interface, but also overrides the implementation for the interface. For instance, you could declare the Value method in the interface as follows:
Public Overridable Function Value(ByVal index As Integer) As String _
    Implements IPrintableObject.Value, IValues.GetValue
Now it is Public, so it is available on your native interface, and it is part of both the IPrintableObject and IValues interfaces. This means that you can access the property three ways in client code:
Dim emp As New Employee()
Dim printable As IPrintableObject = emp
Dim values As IValues = emp

Debug.WriteLine(emp.Value(0))
Debug.WriteLine(printable.Value(0))
Debug.WriteLine(values.GetValue(0))
Note that you are also now using the Overrides keyword in the declaration. This means that a subclass of Employee, such as OfficeEmployee, can override the Value method. The overridden method will be the one invoked, regardless of whether you call the object directly or via an interface.
Combining the implementation of an interface in a base class along with overridable methods can provide a very flexible object design.
Abstraction is the process by which you can think about specific properties or behaviors without thinking about a particular object that has those properties or behaviors. Abstraction is merely the ability of a language to create "black box" code, to take a concept and create an abstract representation of that concept within a program.
A Customer object, for example, is an abstract representation of a real-world customer. A DataSet object is an abstract representation of a set of data.
Abstraction enables you to recognize how things are similar and to ignore differences, to think in general terms and not in specifics. A TextBox control is an abstraction because you can place it on a form and then tailor it to your needs by setting properties. Visual Basic enables you to define abstractions using classes.
Any language that enables a developer to create a class from which objects can be instantiated meets this criterion, and Visual Basic is no exception. You can easily create a class to represent a customer, essentially providing an abstraction. You can then create instances of that class, whereby each object can have its own attributes, representing a specific customer.
In Visual Basic, you implement abstraction by creating a class using the Class keyword. To see this in action, bring up Visual Studio and create a new Visual Basic Windows Application project named "OOExample." Once the project is open, add a new class to the project using the Project
Public Class Customer
   Private mID As Guid = Guid.NewGuid
   Private mName As String
   Private mPhone As String

   Public Property ID() As Guid
     Get
       Return mID
     End Get
     Set(ByVal value As Guid)
       mID = value
     End Set
   End Property

   Public Property Name() As String
     Get
       Return mName
     End Get
     Set(ByVal value As String)
       mName = value
     End Set
   End Property

   Public Property Phone() As String
     Get
Return mPhone
End Get
Set(ByVal value As String)
mPhone = value
End Set
End Property
End ClassYou know that a real customer is a lot more complex than an ID, name, and phone number; but at the same time, you know that in an abstract sense, your customers really do have names and phone numbers, and that you assign them unique ID numbers to keep track of them. In this case, you are using a globally unique identifier (GUID) as a unique ID. Thus, given an ID, name, and phone number, you know which customer you are dealing with, and so you have a perfectly valid abstraction of a customer within your application.
You can then use this abstract representation of a customer from within your code by using data binding to link the object to a form. First, build the project. Then click the Data

Finish the wizard. The Customer class will be displayed as an available data source, as shown in Figure 3-12, if you are working in Design view.
Click on Customer in the window. Customer should change its display to a combo box. Open the combo box and change the selection from DataGridView to Details. This way, you get a details view of the object on your form. Open the designer for Form1 and drag the Customer class from the Data Sources window onto the form. The result should look something like the dialog shown in Figure 3-13.
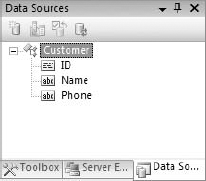
All you need to do now is add code to create an instance of the Customer class to act as a data source for the form. Double-click on the form to bring up its code window and add the following code:
Public Class Form1
Private Sub Form1_Load(ByVal sender As System.Object, _
ByVal e As System.EventArgs) Handles MyBase.Load
Me.CustomerBindingSource.DataSource = New Customer()
End Sub
End ClassYou are using the ability of Windows Forms to data bind to a property on an object. You learn more about data binding later. For now, it is enough to know that the controls on the form are automatically tied to the properties on your object.
Now you have a simple user interface (UI) that both displays and updates the data in your Customer object, with that object providing the UI developer with an abstract representation of the customer. When you run the application, you will see a display like the one shown in Figure 3-14.
Here, you have displayed the pre-generated ID value, and have entered values for Name and Phone directly into the form.
Perhaps the most important of the object-oriented concepts is that of encapsulation. Encapsulation is the idea that an object should totally separate its interface from its implementation. All the data and implementation code for an object should be entirely hidden behind its interface. This is the concept of an object as a black box.
The idea is that you can create an interface (by creating public methods in a class) and, as long as that interface remains consistent, the application can interact with your objects. This remains true even if you entirely rewrite the code within a given method. The interface is independent of the implementation.
Encapsulation enables you to hide the internal implementation details of a class. For example, the algorithm you use to find prime numbers might be proprietary. You can expose a simple API to the end user but hide all of the logic used in your algorithm by encapsulating it within your class.
This means that an object should completely contain any data it requires and should contain all the code required to manipulate that data. Programs should interact with an object through an interface, using the properties and methods of the object. Client code should never work directly with the data owned by the object.
Note
Programs interact with objects by sending messages to the object indicating which method or property they want to have invoked. These messages are generated by other objects or external sources such as the user. The object reacts to these messages through methods or properties.
Visual Basic classes entirely hide their internal data and code, providing a well-established interface of properties and methods with the outside world. Let's look at an example. Add the following class to your project; the code defines its native interface:
Public Class Encapsulation
Public Function DistanceTo(ByVal x As Single, ByVal y As Single) As Single
End Function
Public Property CurrentX() As Single
Get
End Get
Set(ByVal value As Single)
End Set
End Property
Public Property CurrentY() As Single
Get
End Get
Set(ByVal value As Single)
End Set
End Property
End ClassThis creates an interface for the class. At this point, you can write client code to interact with the class, because from a client perspective, all you care about is the interface. Bring up the designer for Form1 and add a button to the form, and then write the following code behind the button:
Private Sub btnEncapsulation_Click(ByVal sender As System.Object, _ ByVal e As System.EventArgs) Handles btnEncapsulation.Click Dim obj As New Encapsulation MsgBox(obj.DistanceTo(10, 10)) End Sub
Even though you have no actual code in the Encapsulation class, you can still write code to use that class because the interface is defined.
This is a powerful idea. It means you can rapidly create class interfaces against which other developers can create the UI or other parts of the application while you are still creating the implementation behind the interface.
From here, you could do virtually anything you like in terms of implementing the class. For example, you could use the values to calculate a direct distance:
Imports System.Math Public Class Encapsulation
Private mX As Single
Private mY As Single
Public Function DistanceTo(ByVal x As Single, ByVal y As Single) As Single
Return CSng(Sqrt((x − mX) ^ 2 + (y − mY) ^ 2))
End Function
Public Property CurrentX() As Single
Get
Return mX
End Get
Set(ByVal value As Single)
mX = value
End Set
End Property
Public Property CurrentY() As Single
Get
Return mY
End Get
Set(ByVal value As Single)
mY = value
End Set
End Property
End ClassNow when you run the application and click the button, you get a meaningful value as a result. Even better, encapsulation enables you to change the implementation without changing the interface. For example, you can change the distance calculation to find the distance between the points (assuming that no diagonal travel is allowed):
Public Function DistanceTo(ByVal x As Single, ByVal y As Single) As Single
Return Abs(x − mX) + Abs(y − mY)
End FunctionThis results in a different value being displayed when the program is run. You have not changed the interface of the class, so your working client program has no idea that you have switched from one implementation to the other. You have achieved a total change of behavior without any change to the client code. This is the essence of encapsulation.
Of course, a user might have a problem if you make such a change to your object. If applications were developed expecting the first set of behaviors, and then you changed to the second, there could be some interesting side effects. The key point is that the client programs would continue to function, even if the results are quite different from when you began.
Polymorphism is often considered to be directly tied to inheritance (discussed next). In reality, it is largely independent. Polymorphism means that you can have two classes with different implementations or code, but with a common set of methods, properties, or events. You can then write a program that operates upon that interface and does not care about which type of object it operates at runtime.
To properly understand polymorphism, you need to explore the concept of a method signature, sometimes also called a prototype. All methods have a signature, which is defined by the method's name and the data types of its parameters. You might have code such as this:
Public Function CalculateValue() As Integer End Sub
In this example, the signature is as follows:
f()If you add a parameter to the method, the signature will change. For example, you could change the method to accept a Double:
Public Function CalculateValue(ByVal value As Double) As Integer
Then, the signature of the method is as follows:
f(Double)Polymorphism merely says that you should be able to write client code that calls methods on an object, and as long as the object provides your methods with the method signatures you expect, it does not matter from which class the object was created. Let's look at some examples of polymorphism within Visual Basic.
You can use several techniques to achieve polymorphic behavior:
Late binding
Multiple interfaces
Reflection
Inheritance
Late binding actually enables you to implement "pure" polymorphism, although at the cost of performance and ease of programming. Through multiple interfaces and inheritance, you can also achieve polymorphism with much better performance and ease of programming. Reflection enables you to use either late binding or multiple interfaces, but against objects created in a very dynamic way, even going so far as to dynamically load a DLL into your application at runtime so that you can use its classes. The following sections walk through each of these options to see how they are implemented and to explore their pros and cons.
Typically, when you interact with objects in Visual Basic, you are interacting with them through strongly typed variables. For example, in Form1 you interacted with the Encapsulation object with the following code:
Private Sub btnEncapsulation_Click(ByVal sender As System.Object, _ ByVal e As System.EventArgs) Handles btnEncapsulation.Click Dim obj As New Encapsulation MsgBox(obj.DistanceTo(10, 10)) End Sub
The obj variable is declared using a specific type (Encapsulation) — meaning that it is strongly typed or early bound.
You can also interact with objects that are late bound. Late binding means that your object variable has no specific data type, but rather is of type Object. To use late binding, you need to use the Option Strict Off directive at the top of your code file (or in the project's properties). This tells the Visual Basic compiler that you want to use late binding, so it will allow you to do this type of polymorphism. Add the following to the top of the Form1 code:
Option Strict Off
With Option Strict turned off, Visual Basic treats the Object data type in a special way, enabling you to attempt arbitrary method calls against the object even though the Object data type does not implement those methods. For example, you could change the code in Form1 to be late bound as follows:
Private Sub btnEncapsulation_Click(ByVal sender As System.Object, _ ByVal e As System.EventArgs) Handles btnEncapsulation.Click Dim obj As Object = New Encapsulation MsgBox(obj.DistanceTo(10, 10)) End Sub
When this code is run, you get the same result as you did before, even though the Object data type has no DistanceTo method as part of its interface. The late-binding mechanism, behind the scenes, dynamically determines the real type of your object and invokes the appropriate method.
When you work with objects through late binding, neither the Visual Basic IDE nor the compiler can tell whether you are calling a valid method. Here, there is no way for the compiler to know that the object referenced by your obj variable actually has a DistanceTo method. It just assumes that you know what you are talking about and compiles the code.
At runtime, when the code is actually invoked, it attempts to dynamically call the DistanceTo method. If that is a valid method, then your code will work; otherwise, you will get an error.
Obviously, there is a level of danger when using late binding, as a simple typo can introduce errors that can only be discovered when the application is actually run. However, it also offers a lot of flexibility, as code that makes use of late binding can talk to any object from any class as long as those objects implement the methods you require.
There is a substantial performance penalty for using late binding. The existence of each method is discovered dynamically at runtime, and that discovery takes time. Moreover, the mechanism used to invoke a method through late binding is not nearly as efficient as the mechanism used to call a method that is known at compile time.
To make this more obvious, change the code in Form1 by adding a generic routine that displays the distance:
Private Sub btnEncapsulation_Click(ByVal sender As System.Object, _ ByVal e As System.EventArgs) Handles btnEncapsulation.Click Dim obj As New Encapsulation ShowDistance(obj) End Sub Private Sub ShowDistance(ByVal obj As Object) MsgBox(obj.DistanceTo(10, 10)) End Sub
Notice that the new ShowDistance routine accepts a parameter using the generic Object data type — so you can pass it literally any value — String, Integer, or one of your own custom objects. It will throw an exception at runtime, however, unless the object you pass into the routine has a DistanceTo method that matches the required method signature.
You know that your Encapsulation object has a method matching that signature, so your code works fine. Now let's add another simple class to demonstrate polymorphism. Add a new class to the project and name it Poly.vb:
Public Class Poly
Public Function DistanceTo(ByVal x As Single, ByVal y As Single) As Single
Return x + y
End Function
End ClassThis class is about as simple as you can get. It exposes a DistanceTo method as part of its interface and provides a very basic implementation of that interface.
You can use this new class in place of the Encapsulation class without changing the ShowDistance method by using polymorphism. Return to the code in Form1 and make the following change:
Private Sub btnEncapsulation_Click(ByVal sender As System.Object, _ ByVal e As System.EventArgs) Handles btnEncapsulation.Click Dim obj As New Poly ShowDistance(obj) End Sub
Even though you changed the class of object you are passing to ShowDistance to one with a different overall interface and different implementation, the method called within ShowDistance remains consistent, so your code will run.
Late binding is flexible and easy, but it is not ideal because it defeats the IDE and compiler type checking that enables you to fix bugs due to typos during the development process. It also has a negative impact on performance.
Another way to implement polymorphism is to use multiple interfaces. This approach avoids late binding, meaning the IDE and compiler can check your code as you enter and compile it. Moreover, because the compiler has access to all the information about each method you call, your code runs much faster.
Remove the Option Strict directive from the code in Form1. This will cause some syntax errors to be highlighted in the code, but don't worry — you will fix those soon enough.
Visual Basic not only supports polymorphism through late binding, but also implements a stricter form of polymorphism through its support of multiple interfaces. (Earlier you learned about multiple interfaces, including the use of the Implements keyword and how to define interfaces.)
With late binding, you have learned how to treat all objects as equals by making them all appear using the Object data type. With multiple interfaces, you can treat all objects as equals by making them all implement a common data type or interface.
This approach has the benefit that it is strongly typed, meaning the IDE and compiler can help you find errors due to typos because the names and data types of all methods and parameters are known at design time. It is also fast in terms of performance: Because the compiler knows about the methods, it can use optimized mechanisms for calling them, especially compared to the dynamic mechanisms used in late binding.
Return to the project to implement polymorphism with multiple interfaces. First, add a module to the project using the Project
Public Interface IShared Function CalculateDistance(ByVal x As Single, ByVal y As Single) As Single End Interface
Now you can make both the Encapsulation and Poly classes implement this interface. First, in the Encapsulation class, add the following code:
Public Class Encapsulation
Implements IShared
Private mX As Single
Private mY As Single
Public Function DistanceTo(ByVal x As Single, ByVal y As Single) _
As Single Implements IShared.CalculateDistance
Return CSng(Sqrt((x - mX) ^ 2 + (y - mY) ^ 2))
End FunctionHere you are implementing the IShared interface, and because the CalculateDistance method's signature matches that of your existing DistanceTo method, you are simply indicating that it should act as the implementation for CalculateDistance.
You can make a similar change in the Poly class:
Public Class Poly
Implements IShared
Public Function DistanceTo(ByVal x As Single, ByVal y As Single) As Single _
Implements IShared.CalculateDistance
Return x + y
End Function
End ClassNow this class also implements the IShared interface, and you are ready to see polymorphism implemented in your code. Bring up the code window for Form1 and change your ShowDistance method as follows:
Private Sub ShowDistance(ByVal obj As IShared) MsgBox(obj.CalculateDistance(10, 10)) End Sub
Note that this eliminates the compiler error you saw after removing the Option Strict directive from Form1.
Instead of accepting the parameter using the generic Object data type, you are now accepting an IShared parameter — a strong data type known by both the IDE and the compiler. Within the code itself, you are calling the CalculateDistance method as defined by that interface.
This routine can now accept any object that implements IShared, regardless of what class that object was created from, or what other interfaces that object may implement. All you care about here is that the object implements IShared.
You have learned how to use late binding to invoke a method on any arbitrary object as long as that object has a method matching the method signature you are trying to call. You have also walked through the use of multiple interfaces, which enables you to achieve polymorphism through a faster, early-bound technique. The challenge with these techniques is that late binding can be slow and hard to debug, and multiple interfaces can be somewhat rigid and inflexible.
Enter reflection. Reflection is a technology built into the .NET Framework that enables you to write code that interrogates an assembly to dynamically determine the classes and data types it contains. Using reflection, you can load the assembly into your process, create instances of those classes, and invoke their methods.
When you use late binding, Visual Basic makes use of the System.Reflection namespace behind the scenes on your behalf. You can choose to manually use reflection as well. This gives you even more flexibility in how you interact with objects.
For example, suppose that the class you want to call is located in some other assembly on disk — an assembly you did not specifically reference from within your project when you compiled it. How can you dynamically find, load, and invoke such an assembly? Reflection enables you to do this, assuming that the assembly is polymorphic. In other words, it has either an interface you expect or a set of methods you can invoke via late binding.
To see how reflection works with late binding, we'll create a new class in a separate assembly (project) and use it from within the existing application. Choose File
Public Class External
Public Function DistanceTo(ByVal x As Single, ByVal y As Single) As Single
Return x * y
End Function
End ClassNow compile the assembly by choosing Build
Option Strict Off Imports System.Reflection
Remember that because you are using late binding, Form1 also must use Option Strict Off. Without this, late binding isn't available.
Add a button with the following code (you have to import the System.Reflections namespace for this to work):
Private Sub Button1_Click(ByVal sender As System.Object, _
ByVal e As System.EventArgs) Handles button1.Click
Dim obj As ObjectDim dll As Assembly
dll = Assembly.LoadFrom("......ObjectsinReleaseObjects.dll")
obj = dll.CreateInstance("Objects.External")
MsgBox(obj.DistanceTo(10, 10))
End SubThere is a lot going on here, so let's walk through it. First, notice that you are reverting to late binding; your obj variable is declared as type Object. You will look at using reflection and multiple interfaces in a moment, but for now you will use late binding.
Next, you have declared a dll variable as type Reflection.Assembly. This variable will contain a reference to the Objects assembly that you will be dynamically loading through your code. Note that you are not adding a reference to this assembly via Project
You then load the external assembly dynamically by using the Assembly.LoadFrom method:
dll = Assembly.LoadFrom("....ObjectsinObjects.dll")This causes the reflection library to load your assembly from a file on disk at the location you specify. Once the assembly is loaded into your process, you can use the myDll variable to interact with it, including interrogating it to get a list of the classes it contains or to create instances of those classes.
Note
You can also use the [Assembly].Load method, which scans the directory containing your application's .exe file (and the global assembly cache) for any EXE or DLL containing the Objects assembly. When it finds the assembly, it loads it into memory, making it available for your use.
You can then use the CreateInstance method on the assembly itself to create objects based on any class in that assembly. In this case, you are creating an object based on the External class:
obj = dll.CreateInstance("Objects.External")Now you have an actual object to work with, so you can use late binding to invoke its DistanceTo method. At this point, your code is really no different from that in the earlier late-binding example, except that the assembly and object were created dynamically at runtime, rather than being referenced directly by your project.
Now you should be able to run the application and have it dynamically invoke the assembly at runtime.
You can also use both reflection and multiple interfaces together. You have seen how multiple interfaces enable you to have objects from different classes implement the same interface and thus be treated identically. You have also seen how reflection enables you to load an assembly and class dynamically at runtime.
You can combine these concepts by using an interface shared in common between your main application and your external assembly, using reflection to load that external assembly dynamically at runtime.
First, create the interface that will be shared across both application and assembly. To do so, add a new Class Library project to your solution named Interfaces. Once it is created, drag and drop the Interfaces.vb module from your original application into the new project (hold down the Shift key as you move it). This makes the IShared interface part of that project and no longer part of your base application.
Of course, your base application still uses IShared, so you want to reference the Interfaces project from your application to gain access to the interface. Do this by right-clicking your OOExample project in the Solution Explorer window and selecting Add Reference. Then add the reference, as shown in Figure 3-15.

Because the IShared interface is now part of a separate assembly, add an Imports statement to Form1, Encapsulation, and Poly so that they are able to locate the IShared interface:
Imports Interfaces
Be sure to add this to the top of all three code modules.
You also need to have the Objects project reference Interfaces, so right-click Objects in the Solution Explorer and choose Add Reference there as well. Add the reference to Interfaces and click OK. At this point, both the original application and the external assembly have access to the IShared interface. You can now enhance the code in Objects by changing the External class:
Imports Interfaces Public Class External
Implements IShared
Public Function DistanceTo(ByVal x As Single, ByVal y As Single) _
As Single Implements IShared.CalculateDistance
Return x * y
End Function
End ClassWith both the main application and external assembly using the same data type, you are ready to implement the polymorphic behavior using reflection.
Remove the Option Strict Off code from Form1. Bring up the code window for Form1 and change the code behind the button to take advantage of the IShared interface:
Private Sub btnReflection_Click(ByVal sender As System.Object, _
ByVal e As System.EventArgs) Handles Button1.Click
Dim obj As IShared
Dim dll As Assembly
dll = Assembly.LoadFrom("......ObjectsinReleaseObjects.dll")
obj = CType(dll.CreateInstance("Objects.External"), IShared)
ShowDistance(obj)
End SubAll you have done here is change the code so that you can pass your dynamically created object to the ShowDistance method, which you know requires a parameter of type IShared. Because your class implements the same IShared interface (from Interfaces) used by the main application, this will work perfectly. Rebuild and run the solution to see this in action.
This technique is very nice, as the code in ShowDistance is strongly typed, providing all the performance and coding benefits; but both the DLL and the object itself are loaded dynamically, providing a great deal of flexibility to your application.
Inheritance, discussed earlier in this chapter, can also be used to enable polymorphism. The idea here is very similar to that of multiple interfaces, as a subclass can always be treated as though it were the data type of the parent class.
Note
Many people consider the concepts of inheritance and polymorphism to be tightly intertwined. As you have seen, however, it is perfectly possible to use polymorphism without inheritance.
At the moment, both your Encapsulation and Poly classes are implementing a common interface named IShared. You can use polymorphism to interact with objects of either class via that common interface.
The same is true if these are child classes based on the same base class through inheritance. To see how this works, in the OOExample project, add a new class named Parent and insert the following code:
Public MustInherit Class Parent
Public MustOverride Function DistanceTo(ByVal x As Single, _
ByVal y As Single) As Single
End ClassAs described earlier, this is an abstract base class, a class with no implementation of its own. The purpose of an abstract base class is to provide a common base from which other classes can be derived.
To implement polymorphism using inheritance, you do not need to use an abstract base class. Any base class that provides overridable methods (using either the MustOverride or Overridable keywords) will work fine, as all its subclasses are guaranteed to have that same set of methods as part of their interface, and yet the subclasses can provide custom implementation for those methods.
In this example, you are simply defining the DistanceTo method as being a method that must be overridden and implemented by any subclass of Parent. Now you can bring up the Encapsulation class and change it to be a subclass of Parent:
Public Class Encapsulation Inherits Parent Implements IShared
You do not need to stop implementing the IShared interface just because you are inheriting from Parent; inheritance and multiple interfaces coexist nicely. You do, however, have to override the DistanceTo method from the Parent class.
The Encapsulation class already has a DistanceTo method with the proper method signature, so you can simply add the Overrides keyword to indicate that this method will override the declaration in the Parent class:
Public Overrides Function DistanceTo( _ ByVal x As Single, _ByVal y As Single) _ As Single Implements IShared.CalculateDistance
At this point, the Encapsulation class not only implements the common IShared interface and its own native interface, but also can be treated as though it were of type Parent, as it is a subclass of Parent. You can do the same thing to the Poly class:
Public Class Poly
Inherits Parent
Implements IShared
Public Overrides Function DistanceTo( _
ByVal x As Single, ByVal y As Single) _
As Single Implements IShared.CalculateDistance
Return x + yEnd Function End Class
Finally, you can see how polymorphism works by altering the code in Form1 to take advantage of the fact that both classes can be treated as though they were of type Parent. First, you can change the ShowDistance method to accept its parameter as type Parent and to call the DistanceTo method:
Private Sub ShowDistance(ByVal obj As Parent) MsgBox(obj.DistanceTo(10, 10)) End Sub
Then, you can add a new button to create an object of either type Encapsulation or Poly and pass it as a parameter to the method:
Private Sub btnInheritance_Click(ByVal sender As System.Object, _ ByVal e As System.EventArgs) Handles btnInheritance.Click ShowDistance(New Poly) ShowDistance(New Encapsulation) End Sub
Polymorphism is a very important concept in object-oriented design and programming, and Visual Basic provides you with ample techniques through which it can be implemented.
The following table summarizes the different techniques and their pros and cons, and provides some high-level guidelines about when to use each:
Inheritance is the concept that a new class can be based on an existing class, inheriting its interface and functionality. The mechanics and syntax of inheritance are described earlier in this chapter, so we won't rehash them here. However, you have not yet looked at inheritance from a practical perspective, and that is the focus of this section.
Inheritance is one of the most powerful object-oriented features a language can support. At the same time, inheritance is one of the most dangerous and misused object-oriented features.
Properly used, inheritance enables you to increase the maintainability, readability, and reusability of your application by offering you a clear and concise way to reuse code, via both interface and implementation. Improperly used, inheritance creates applications that are very fragile, whereby a change to a class can cause the entire application to break or require changes.
Inheritance enables you to implement an is-a relationship. In other words, it enables you to implement a new class that "is a" more specific type of its base class. Properly used, inheritance enables you to create child classes that are actually the same as the base class.
For example, you know that a duck is a bird. However, a duck can also be food, though that is not its primary identity. Proper use of inheritance enables you to create a Bird base class from which you can derive a Duck class. You would not create a Food class and subclass Duck from Food, as a duck isn't primarily food — it merely acts as food sometimes.
This is the challenge. Inheritance is not just a mechanism for code reuse, but a mechanism to create classes that flow naturally from another class. If you use it anywhere you want code reuse, you will end up with a real mess on your hands. If you use it anywhere you just want a common interface but where the child class is not really the same as the base class, then you should use multiple interfaces — something we'll discuss shortly.
Note
The question you must ask when using inheritance is whether the child class is a more specific version of the base class.
For example, you might have different types of products in your organization. All of these products have some common data and behaviors — e.g., they all have a product number, a description, and a price. However, if you have an agricultural application, you might have chemical products, seed products, fertilizer products, and retail products. These are all different — each having its own data and behaviors — and yet each one of them really is a product. You can use inheritance to create this set of products, as illustrated by the class diagram in Figure 3-16.
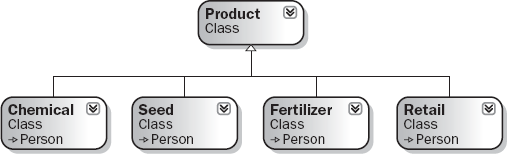
This diagram shows that you have an abstract base Product class, from which you derive the various types of product your system actually uses. This is an appropriate use of inheritance because each child class is obviously a more specific form of the general Product class.
Alternately, you might try to use inheritance just as a code-sharing mechanism. For example, you may look at your application, which has Customer, Product, and SalesOrder classes, and decide that all of them need to be designed so that they can be printed to a printer. The code to handle the printing will all be somewhat similar, so to reuse that printing code, you create a base PrintableObject class. This would result in the diagram shown in Figure 3-17.
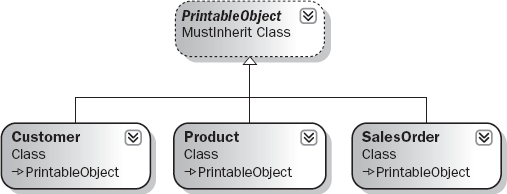
Intuitively, you know that this does not represent an is-a relationship. A Customer can be printed, and you are getting code reuse, but a customer is not a specific case of a printable object. Implementing a system such as this results in a fragile design and application. This is a case where multiple interfaces are a far more appropriate technology.
To illustrate this point, you might later discover that you have other entities in your organization that are similar to a customer but not quite the same. Upon further analysis, you may determine that Employee and Customer are related because they are specific cases of a Contact class. The Contact class provides commonality in terms of data and behavior across all these other classes (see Figure 3-18).

However, now your Customer is in trouble; you have said it is a PrintableObject, and you are now saying it is a Contact. You might be able to just derive Contact from PrintableObject (see Figure 3-19).

The problem with this is that now Employee is also of type PrintableObject, even if it shouldn't be, but you are stuck because, unfortunately, you decided early on to go against intuition and say that a Customer is a PrintableObject.
This problem could be solved by multiple inheritance, which would enable Customer to be a subclass of more than one base class — in this case, of both Contact and PrintableObject. However, the .NET platform and Visual Basic do not support multiple inheritance in this way. An alternative is to use inheritance for the is-a relationship with Contact, and use multiple interfaces to enable the Customer object to act as a PrintableObject by implementing an IPrintableObject interface.
What you have just seen is how inheritance can accidentally cause reuse of code where no reuse was desired, but you can take a different view of this model by separating the concept of a framework from your actual application. The way you use inheritance in the design of a framework is somewhat different from how you use inheritance in the design of an actual application.
In this context, the word framework is being used to refer to a set of classes that provide base functionality that isn't specific to an application, but rather may be used across a number of applications within the organization, or perhaps even beyond the organization. The .NET Framework base class library is an example of a very broad framework you use when building your applications.
The PrintableObject class discussed earlier, for example, may have little to do with your specific application, but may be the type of thing that is used across many applications. If so, it is a natural candidate for use as part of a framework, rather than being considered part of your actual application.
Framework classes exist at a lower level than application classes. For example, the .NET base-class library is a framework on which all .NET applications are built. You can layer your own framework on top of the .NET Framework as well (see Figure 3-20).
If you take this view, then the PrintableObject class wouldn't be part of your application at all, but part of a framework on which your application is built. If so, then the fact that Customer is not a specific case of PrintableObject does not matter as much, as you are not saying that it is such a thing, but rather that it is leveraging that portion of the framework's functionality.
To make all this work requires a lot of planning and forethought in the design of the framework itself. To see the dangers you face, consider that you might want to not only print objects, but also store them in a file. In that case, you might have not only PrintableObject, but also SavableObject as a base class.
The question is, what do you do if Customer should be both printable and savable? If all printable objects are savable, you might have the result shown in Figure 3-21.
Alternately, if all savable objects are printable, you might have the result shown in Figure 3-22. However, neither of these truly provides a decent solution, as it is likely that the concept of being printable and the concept of being savable are different and not interrelated in either of these ways.
When faced with this sort of issue, it is best to avoid using inheritance and instead rely on multiple interfaces.
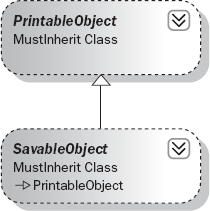
While inheritance is powerful, it is really geared around implementing the is-a relationship. Sometimes you will have objects that need a common interface, even though they are not really a specific case of some base class that provides that interface. We've just explored that issue in the discussion of the PrintableObject, SavableObject, and Customer classes.
Sometimes multiple interfaces are a better alternative than inheritance. The syntax for creating and using secondary and multiple interfaces was discussed.
Multiple interfaces can be viewed as another way to implement the is-a relationship, although it is often better to view inheritance as an is-a relationship and to view multiple interfaces as a way of implementing an act-as relationship.
Considering this further, we can say that the PrintableObject concept could perhaps be better expressed as an interface — IPrintableObject.
When the class implements a secondary interface such as IPrintableObject, you are not really saying that your class is a printable object, you are saying that it can "act as" a printable object. A Customer is a Contact, but at the same time it can act as a printable object. This is illustrated in Figure 3-23.
The drawback to this approach is that you have no inherited implementation when you implement IPrintableObject. Earlier you saw how to reuse common code as you implement an interface across multiple classes. While not as automatic or easy as inheritance, it is possible to reuse implementation code with a bit of extra work.

Perhaps the best way to see how inheritance and multiple interfaces interact is to look at an example. Returning to the original OOExample project, the following example combines inheritance and multiple interfaces to create an object that has both an is-a and act-as relationship at the same time. As an additional benefit, you will be using the .NET Framework's capability to print to a printer or Print Preview dialog.
You already have a simple Customer class in the project, so now add a Contact base class. Choose Project
Public MustInherit Class Contact
Private mID As Guid = Guid.NewGuid
Private mName As String
Public Property ID() As Guid
Get
Return mID
End Get
Set(ByVal value As Guid)
mID = value
End Set
End Property
Public Property Name() As String
Get
Return mName
End Get
Set(ByVal value As String)
mName = value
End Set
End Property
End ClassNow you can make the Customer class inherit from this base class because it is a Contact. In addition, because your base class now implements both the ID and Name properties, you can simplify the code in Customer by removing those properties and their related variables:
Public Class Customer
Inherits Contact
Private mPhone As String
Public Property Phone() As String
Get
Return mPhone
     End Get
     Set(ByVal value As String)
       mPhone = value
     End Set
   End Property
End ClassThis shows the benefit of subclassing Customer from Contact, as you are now sharing the ID and Name code across all other types of Contact as well.
You also know that a Customer should be able to act as a printable object. To do this in such a way that the implementation is reusable requires a bit of thought. First, though, you need to define the IPrintableObject interface.
You will use the standard printing mechanism provided by .NET from the System.Drawing namespace. As shown in Figure 3-24, add a reference to System.Drawing.dll to the Interfaces project.

With that done, bring up the code window for Interfaces.vb in the Interfaces project and add the following code:
Imports System.Drawing

Public Interface IPrintableObject
  Sub Print()
  Sub PrintPreview()
  Sub RenderPage(ByVal sender As Object, _
      ByVal ev As System.Drawing.Printing.PrintPageEventArgs)
End Interface
This interface ensures that any object implementing IPrintableObject will have Print and PrintPreview methods, so you can invoke the appropriate type of printing. It also ensures that the object has a RenderPage method, which can be implemented by that object to render the object's data on the printed page.
At this point, you could simply implement all the code needed to handle printing directly within the Customer object. This isn't ideal, however, as some of the code will be common across any objects that want to implement IPrintableObject, and it would be nice to find a way to share that code.
To do this, you can create a new class, ObjectPrinter. This is a framework-style class, in that it has nothing to do with any particular application, but can be used across any application in which IPrintableObject will be used.
Add a new class named ObjectPrinter to the ObjectAndComponents project. This class will contain all the code common to printing any object. It makes use of the built-in printing support provided by the .NET Framework class library. To use this, you need to import a couple of namespaces, so add the following code to the new class:
Imports System.Drawing
Imports System.Drawing.Printing
Imports Interfaces
You can then define a PrintDocument variable, which will hold the reference to your printer output. You will also declare a variable to hold a reference to the actual object you will be printing. Notice that you are using the IPrintableObject interface data type for this variable:
Public Class ObjectPrinter
  Private WithEvents document As PrintDocument
  Private printObject As IPrintableObject
Now you can create a routine to kick off the printing process for any object implementing IPrintableObject. This code is totally generic; you will write it here so it can be reused across other classes:
Public Sub Print(ByVal obj As IPrintableObject)
  printObject = obj

  document = New PrintDocument()
document.Print()
End Sub
Likewise, you can implement a method to show a print preview of your object. This code is also totally generic, so add it here for reuse:
Public Sub PrintPreview(ByVal obj As IPrintableObject)
  Dim PPdlg As PrintPreviewDialog = New PrintPreviewDialog()

  printObject = obj

  document = New PrintDocument()
  PPdlg.Document = document
  PPdlg.ShowDialog()
End Sub
Finally, you need to catch the PrintPage event that is automatically raised by the .NET printing mechanism. This event is raised by the PrintDocument object whenever the document determines that it needs data rendered onto a page. Typically, it is in this routine that you would put the code to draw text or graphics onto the page surface. However, because this is a generic framework class, you won't do that here; instead, delegate the call back into the actual application object that you want to print:
Private Sub PrintPage(ByVal sender As Object, _
      ByVal ev As System.Drawing.Printing.PrintPageEventArgs) _
      Handles document.PrintPage

    printObject.RenderPage(sender, ev)
  End Sub

End Class
This enables the application object itself to determine how its data should be rendered onto the output page. You can see how to do that by implementing the IPrintableObject interface on the Customer class:
Imports Interfaces

Public Class Customer
  Inherits Contact
  Implements IPrintableObject
By adding this code, you require that your Customer class implement the Print, PrintPreview, and RenderPage methods. To avoid wasting paper as you test the code, make both the Print and PrintPreview methods the same and have them just do a print preview display:
Public Sub Print() _
  Implements Interfaces.IPrintableObject.Print

  Dim printer As New ObjectPrinter()
  printer.PrintPreview(Me)

End Sub
Notice that you are using an ObjectPrinter object to handle the common details of doing a print preview. In fact, any class you ever create that implements IPrintableObject will have this exact same code to implement a print-preview function, relying on your common ObjectPrinter to take care of the details.
You also need to implement the RenderPage method, which is where you actually put your object's data onto the printed page:
Private Sub RenderPage(ByVal sender As Object, _
    ByVal ev As System.Drawing.Printing.PrintPageEventArgs) _
    Implements IPrintableObject.RenderPage

    Dim printFont As New Font("Arial", 10)
    Dim lineHeight As Single = printFont.GetHeight(ev.Graphics)
    Dim leftMargin As Single = ev.MarginBounds.Left
    Dim yPos As Single = ev.MarginBounds.Top

    ev.Graphics.DrawString("ID: " & ID.ToString, printFont, Brushes.Black, _
      leftMargin, yPos, New StringFormat())

    yPos += lineHeight
    ev.Graphics.DrawString("Name: " & Name, printFont, Brushes.Black, _
      leftMargin, yPos, New StringFormat())

    ev.HasMorePages = False

End Sub
All of this code is unique to your object, which makes sense because you are rendering your specific data to be printed. However, you don't need to worry about the details of whether you are printing to paper or print preview; that is handled by your ObjectPrinter class, which in turn uses the .NET Framework. This enables you to focus on generating the output to the page within your application class.
By generalizing the printing code in ObjectPrinter, you have achieved a level of reuse that you can tap into via the IPrintableObject interface. Any time you want to print a Customer object's data, you can have it act as an IPrintableObject and call its Print or PrintPreview method. To see this work, add a new button control to Form1 with the following code:
Private Sub btnPrint_Click(ByVal sender As System.Object, _
  ByVal e As System.EventArgs) Handles btnPrint.Click

  Dim obj As New Customer
  obj.Name = "Douglas Adams"
  CType(obj, IPrintableObject).PrintPreview()

End Sub
This code creates a new Customer object and sets its Name property. You then use the CType method to access the object via its IPrintableObject interface to invoke the PrintPreview method.
When you run the application and click the button, you will get a print preview display showing the object's data (see Figure 3-25).
Most of the examples discussed so far have illustrated how you can create a child class based on a single parent class. That is called single-level inheritance. In fact, inheritance can be many levels deep. For example, you might have a deep hierarchy such as the one shown in Figure 3-26.
From the root of System.Object down to NAFTACustomer you have four levels of inheritance. This can be described as a four-level inheritance chain.
There is no hard-and-fast rule about how deep inheritance chains should go, but conventional wisdom and general experience with inheritance in other languages such as Smalltalk and C++ indicate that the deeper an inheritance chain becomes, the harder it is to maintain an application.
This happens for two reasons. First is the fragile base class or fragile superclass issue, discussed shortly. The second reason is that a deep inheritance hierarchy tends to seriously reduce the readability of your code by scattering the code for an object across many different classes, all of which are combined by the compiler to create your object.
One of the reasons for adopting object-oriented design and programming is to avoid so-called spaghetti code, whereby any bit of code you might look at does almost nothing useful but instead calls various other procedures and routines in other parts of your application. To determine what is going on with spaghetti code, you must trace through many routines and mentally piece together what it all means.
Object-oriented programming can help you avoid this problem, but it is most definitely not a magic bullet. In fact, when you create deep inheritance hierarchies, you are often creating spaghetti code because each level in the hierarchy not only extends the previous level's interface, but almost always also adds functionality. Thus, when you look at the final NAFTACustomer class, it may have very little code. To figure out what it does or how it behaves, you have to trace through the code in the previous four levels of classes, and you might not even have the code for some of those classes, as they might come from other applications or class libraries you have purchased.
On the one hand, you have the benefit that you are reusing code, but on the other hand, you have the drawback that the code for one object is actually scattered through five different classes. Keep this in mind when designing systems with inheritance — use as few levels in the hierarchy as possible to provide the required functionality.
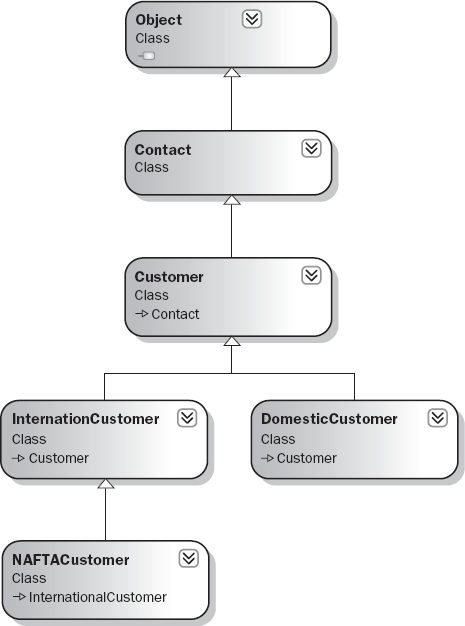
You have explored where it is appropriate to use inheritance and where it is not. You have also explored how you can use inheritance and multiple interfaces in conjunction to implement both is-a and act-as relationships simultaneously within your classes.
Earlier, we noted that while inheritance is an incredibly powerful and useful concept, it can also be very dangerous if used improperly. You have seen some of this danger in the discussion of the misapplication of the is-a relationship, and how you can use multiple interfaces to avoid those issues.
One of the most classic and common problems with inheritance is the fragile-base-class problem. This problem is exacerbated when you have very deep inheritance hierarchies, but it exists even in a single-level inheritance chain.
The issue you face is that a change in the base class always affects all child classes derived from that base class. This is a double-edged sword. On the one hand, you get the benefit of being able to change code in one location and have that change automatically cascade through all derived classes. On the other hand, a change in behavior can have unintended or unexpected consequences farther down the inheritance chain, which can make your application very fragile and hard to change or maintain.
There are obvious changes you might make, which require immediate attention. For example, you might change your Contact class to have FirstName and LastName instead of simply Name as a property. In the Contact class, replace the mName variable declaration with the following code:
Private mFirstName As String
Private mLastName As String
Now replace the Name property with the following code:
Public Property FirstName() As String
  Get
    Return mFirstName
  End Get
  Set(ByVal value As String)
    mFirstName = value
  End Set
End Property

Public Property LastName() As String
  Get
    Return mLastName
  End Get
  Set(ByVal value As String)
    mLastName = value
  End Set
End Property
At this point, the Error List window in the IDE will display a list of locations where you need to alter your code to compensate for the change. This is a graphic illustration of a base-class change that causes cascading changes throughout your application. In this case, you have changed the base-class interface, thus changing the interface of all subclasses in the inheritance chain.
To avoid having to fix code throughout your application, always strive to keep as much consistency in your base class interface as possible. In this case, you can implement a read-only Name property that returns the full name of the Contact:
Public ReadOnly Property Name() As String
  Get
    Return mFirstName & " " & mLastName
  End Get
End Property
This resolves most of the items in the Error List window. You can fix any remaining issues by using the FirstName and LastName properties. For example, in Form1 you can change the code behind your button to the following:
Private Sub Button1_Click(ByVal sender As System.Object, _
     ByVal e As System.EventArgs) Handles button1.Click

  Dim obj As New Customer
  obj.FirstName = "Douglas"
  obj.LastName = "Adams"
  CType(obj, Interfaces.IPrintableObject).Print()
End Sub
Any change to a base class interface is likely to cause problems, so think carefully before making such a change.
Unfortunately, there is another, more subtle type of change that can wreak more havoc on your application: an implementation change. This is the core of the fragile-base-class problem.
Encapsulation provides you with a separation of interface from implementation. However, keeping your interface consistent is merely a syntactic concept. If you change the implementation, you are making a semantic change, a change that does not alter any of your syntax but can have serious ramifications on the real behavior of the application.
In theory, you can change the implementation of a class, and as long as you do not change its interface, any client applications using objects based on that class will continue to operate without change. Of course, reality is never as nice as theory, and more often than not a change to implementation will have some consequences on the behavior of a client application.
For example, you might use a SortedList to sort and display some Customer objects. To do this, add a new button to Form1 with the following code:
Private Sub btnSort_Click(ByVal sender As System.Object, _
  ByVal e As System.EventArgs) Handles btnSort.Click

  Dim col As New Generic.SortedDictionary(Of String, Customer)
  Dim obj As Customer

  obj = New Customer()
  obj.FirstName = "Douglas"
  obj.LastName = "Adams"
  col.Add(obj.Name, obj)

  obj = New Customer()
  obj.FirstName = "Andre"
  obj.LastName = "Norton"
  col.Add(obj.Name, obj)

  Dim item As Generic.KeyValuePair(Of String, Customer)
  Dim sb As New System.Text.StringBuilder

  For Each item In col
    sb.AppendLine(item.Value.Name)
Next MsgBox(sb.ToString) End Sub
This code simply creates a couple of Customer objects, sets their FirstName and LastName properties, and inserts them into a generic SortedDictionary object from the System.Collections.Generic namespace.
Items in a SortedDictionary are sorted based on their key value, and you are using the Name property to provide that key, meaning that your entries will be sorted by name. Because your Name property is implemented to return first name first and last name second, your entries will be sorted by first name.
If you run the application, the dialog will display the following:
Andre Norton
Douglas Adams
However, you can change the implementation of your Contact class — not directly changing or affecting either the Customer class or your code in Form1 — to return last name first and first name second, as shown here:
Public ReadOnly Property Name() As String
  Get
    Return mLastName & ", " & mFirstName
  End Get
End Property
While no other code requires changing, and no syntax errors are flagged, the behavior of the application is changed. When you run it, the output will now be as follows:
Adams, Douglas
Norton, Andre
Maybe this change is inconsequential. Maybe it totally breaks the required behavior of your form. The developer making the change in the Contact class might not even know that someone was using that property for sort criteria.
This illustrates how dangerous inheritance can be. Changes to implementation in a base class can cascade to countless other classes in countless applications, having unforeseen side effects and consequences of which the base-class developer is totally unaware.
This chapter demonstrated how Visual Basic enables you to create and work with classes and objects. Visual Basic provides the building blocks for abstraction, encapsulation, polymorphism, and inheritance.
You have learned how to create both simple base classes as well as abstract base classes. You have also explored how you can define formal interfaces, a concept quite similar to an abstract base class in many ways.
You also walked through the process of subclassing, creating a new class that derives both interface and implementation from a base class. The subclass can be extended by adding new methods or altering the behavior of existing methods on the base class.
By the end of this chapter, you have seen how object-oriented programming flows from the four basic concepts of abstraction, encapsulation, polymorphism, and inheritance. The chapter provided basic information about each concept and demonstrated how to implement them using Visual Basic.
By properly applying object-oriented design and programming, you can create very large and complex applications that remain maintainable and readable over time. Nonetheless, these technologies are not a magic bullet. Improperly applied, they can create the same hard-to-maintain code that you might create using procedural or modular design techniques.
It is not possible to fully cover all aspects of object-oriented programming in a single chapter. Before launching into a full-blown object-oriented project, we highly recommend looking at other books specifically geared toward object-oriented design and programming.