Probably the biggest and most exciting addition to the .NET Framework 3.5 is the addition of the .NET Language Integrated Query Framework (LINQ) into Visual Basic 2008. Basically, what LINQ provides is a lightweight façade over programmatic data integration. This is a big deal, because data is king.
Pretty much every application deals with data in some manner, whether that data comes from memory (in-memory data), databases, XML files, text files, or somewhere else. Many developers find it very difficult to move from the strongly typed, object-oriented world of Visual Basic to the data tier, where objects are second-class citizens. The transition from the one world to the next was a kludge at best and full of error-prone actions.
In VB, programming with objects means a wonderful, strongly typed ability to work with code. You can navigate very easily through the namespaces, work with a debugger in the Visual Studio IDE, and more. However, when you have to access data, you will notice that things are dramatically different.
You end up in a world that is not strongly typed, and debugging is a pain or even nonexistent. You end up spending most of the time sending strings to the database as commands. As a developer, you also have to be aware of the underlying data and how it is structured or how all the data points relate.
Microsoft has provided LINQ as a lightweight façade that provides a strongly typed interface to the underlying data stores. LINQ provides the means for developers to stay within the coding environment they're used to and access the underlying data as objects that work with the IDE, IntelliSense, and even debugging.
With LINQ, the queries that you create now become first-class citizens within the .NET Framework alongside everything else you are used to. When you begin to work with queries for the data store you're working with, you will quickly realize that they now work and behave as if they were types in the system. This means that you can now use any .NET-complaint language and query the underlying data store as you never have before.
Figure 11-1 shows LINQ's place in querying data.

Looking at the figure, you can see that different types of LINQ capabilities are available depending on the underlying data you're going to be working with in your application:
LINQ to Objects
LINQ to DataSets
LINQ to SQL
LINQ to Entities
LINQ to XML
As a developer, you are given class libraries that provide objects that, using LINQ, can be queried like any other data store. In fact, objects are nothing more than data that is stored in memory. Indeed, your objects themselves might be querying data. This is where LINQ to Objects comes into play.
LINQ to SQL, LINQ to Entities, and LINQ to DataSets provide the means to query relational data. Using LINQ, you can query directly against your database and even against the stored procedures that your database exposes. The last item in the diagram is the capability to query against your XML using LINQ to XML. What makes LINQ so exciting is that it matters very little what you are querying against, as your queries will be quite similar.
This chapter takes a close look at LINQ to SQL and LINQ to XML. You will get a taste of how to perform LINQ to Object queries via this focus as well.
LINQ to SQL in particular is a means to have a strongly typed interface against a SQL Server database. You will find that the approach that LINQ to SQL provides is by far the easiest approach there is at present for querying SQL Server. It's not simply about querying single tables within the database; for instance, if you call the Customers table of the Microsoft sample Northwind database and want to pull a customer's specific orders from the Orders table in the same database, then LINQ will use the relations of the tables and make the query on your behalf. LINQ will query the database and load up the data for you to work with from your code (again, strongly typed).
Keep in mind that LINQ to SQL is not only about querying data; you can also perform the Insert, Update, and Delete statements that you need to perform.
In addition, you can interact with the entire process and customize the operations performed to add your own business logic to any of the CRUD operations (Create/Read/Update/Delete).
Visual Studio 2008 is highly integrated with LINQ to SQL in that you will find an extensive user interface that enables you to design the LINQ to SQL classes you will work with.
The following section demonstrates how to set up a LINQ to SQL instance and pull items from the Products table of the Northwind database.
To illustrate using LINQ to SQL, this example begins by calling a single table from the Northwind database and using this table to populate some results to the screen.
First, create a console application (using the .NET Framework 3.5) and add the Northwind database file to this project (Northwind.MDF).
The following example makes use of the
Northwind.mdfSQL Server Express Database file. To get this database, search for "Northwind and pubs Sample Databases for SQL Server 2000" atwww.microsoft.com/downloads/details.aspx?familyid=06616212-0356-46a0-8da2-eebc53a68034&displaylang=en. Once you've installed it, you'll find theNorthwind.mdffile in theC:SQL Server 2000 Sample Databasesdirectory. To add this database to your application, right-click on the solution you are working with and select Add Existing Item. From the provided dialog, you'll then be able to browse to the location of theNorthwind.mdffile that you just installed. If you have trouble getting permissions to work with the database, make a data connection to the file from the Visual Studio Server Explorer. You will be asked to be made the appropriate user of the database, and VS will make the appropriate changes on your behalf for this to occur. When added, you will encounter a Data Source Configuration Wizard. For the purposes of this chapter, simply press the Cancel button when you encounter this dialog.
By default now, when creating many of the application types provided in the .NET Framework 3.5 within Visual Studio 2008, you will already have the proper references in place to work with LINQ. When creating a console application, you will get the references shown in Figure 11-2.

The next step is to add a LINQ to SQL class.
When working with LINQ to SQL, one of the big advantages is that Visual Studio 2008 does an outstanding job of making it as easy as possible. VS 2008 provides an object-relational mapping designer, called the Object Relational Designer (O/R Designer), that enables you to visually design the object-to-database mapping.
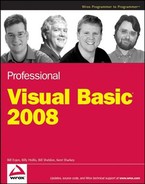
To start this task, right-click on your solution and select Add New Item from the provided menu. From the items in the Add New Item dialog, select the LINQ to SQL Classes option, shown in Figure 11-3.
Because this example uses the Northwind database, name the file Northwind.dbml. Click the Add button, which will create a couple of files for you. The Solution Explorer, after adding the Northwind.dbml file, is shown in Figure 11-4.
A number of items were added to your project with this action. First, the Northwind.dbml file was added, which contains two components. Because the LINQ to SQL class that was added works with LINQ, the System.Data.Linq reference was also added on your behalf.

Another big addition to the IDE that appeared when you added the LINQ to SQL class to your project (the Northwind.dbml file) was a visual representation of the .dbml file. The new O/R Designer appears as a tab within the document window directly in the IDE. Figure 11-5 shows a view of the O/R Designer when it is first initiated.

The O/R Designer consists of two parts. The first is for data classes, which can be tables, classes, associations, and inheritances. Dragging such items on this design surface will give you a visual representation of the object that can be worked with. The second part (on the right) is for methods, which map to the stored procedures within a database.
When viewing your .dbml file within the O/R Designer, you also have an Object Relational Designer set of controls in the Visual Studio Toolbox, as shown in Figure 11-6.

For this example, you need to work with the Products table from the Northwind database, which means you need to create a Products table that will use LINQ to SQL to map to this table. Accomplishing this task is simply a matter of opening a view of the tables contained within the database from the Server Explorer dialog within Visual Studio and dragging and dropping the Products table onto the design surface of the O/R Designer. The results of this action are illustrated in Figure 11-7.

With this action, a bunch of code is added to the designer files of the .dbml file on your behalf. These classes give you strongly typed access to the Products table. For a demonstration of this, turn your attention to the console application's Module1.vb file. Following is the code required for this example:
Module Module1

    Sub Main()
        Dim dc As NorthwindDataContext = New NorthwindDataContext()

        Dim query = dc.Products

        For Each item In query
            Console.WriteLine("{0} | {1} | {2}", _
               item.ProductID, item.ProductName, item.UnitsInStock)
        Next

        Console.ReadLine()
    End Sub

End Module
This short bit of code is querying the Products table within the Northwind database and pulling out the data to display. It is important to step through this code starting with the first line in the Main method:
Dim dc As NorthwindDataContext = New NorthwindDataContext()
The NorthwindDataContext object is an object of type DataContext. Basically, you can view this as something that maps to a Connection type object. This object works with the connection string and connects to the database for any required operations.
The next line is quite interesting:
Dim query = dc.Products
Here, you are using an implicitly typed variable. If you are unsure of the output type, you can assign a type to the query variable and the type will be set into place at compile time. Actually, the code dc.Products returns a System.Data.Linq.Table(Of ConsoleApplication1.Product) object, and this is what the query type is set as when the application is compiled. Therefore, this means that you could have also just as easily written the statement as follows:
Dim query As Table(Of Product) = dc.Products
This approach is actually better because programmers who look at the application's code later will find it easier to understand what is happening, as just using Dim query by itself has so much of a hidden aspect to it. To use Table(Of Product), which is basically a generic list of Product objects, you should make a reference to the System.Data.Linq namespace (using Imports System.Data.Linq).
The value assigned to the Query object is the value of the Products property, which is of type Table(Of Product). From there, the next bit of code iterates through the collection of Product objects found in Table(Of Product):
For Each item In query
   Console.WriteLine("{0} | {1} | {2}", _
      item.ProductID, item.ProductName, item.UnitsInStock)
Next
The iteration, in this case, pulls out the ProductID, ProductName, and UnitsInStock properties from the Product object and writes them out to the program. Because you are using only a few of the items from the table, the O/R Designer enables you to delete the columns that are you not interested in pulling from the database. The results from the program are presented here:
1 | Chai | 39
2 | Chang | 17
3 | Aniseed Syrup | 13
4 | Chef Anton's Cajun Seasoning | 53
5 | Chef Anton's Gumbo Mix | 0

** Results removed for space reasons **

73 | Röd Kaviar | 101
74 | Longlife Tofu | 4
75 | Rhönbräu Klosterbier | 125
76 | Lakkalikööri | 57
77 | Original Frankfurter grüne Soβe | 32
From this example, you can see just how easy it really is to query a SQL Server database using LINQ to SQL.
The great thing about LINQ is that it gives you strongly typed objects to use in your code (with IntelliSense), and these objects map to existing database objects. Again, LINQ is nothing more than a thin façade over these pre-existing database objects. The following table shows the mappings that exist between the database objects and the LINQ objects:
Database Object | LINQ Object |
|---|---|
Database | DataContext |
Table | |
View | Class and Collection |
Column | Property |
Relationship | |
Stored Procedure | Method |
On the left side, you are dealing with your database. The database is the entire entity: the tables, views, triggers, stored procedures — everything that makes up the database. On the right, or LINQ side, you have an object called the DataContext object. A DataContext object is bound to the database. For the required interaction with the database, it contains a connection string that handles all of the transactions that occur, including any logging. It also manages the output of the data. In short, the DataContext object completely manages the transactions with the database on your behalf.
Tables, as you saw in the example, are converted to classes. This means that if you have a Products table, you will have a Product class. Note that LINQ is name-friendly in that it changes plural tables to singular to provide the proper name to the class that you are using in your code. In addition to database tables being treated as classes, database views are treated the same. Columns, conversely, are treated as properties. This enables you to manage the attributes (names and type definitions) of the column directly.
Relationships are nested collections that map between these various objects. This gives you the ability to define relationships that are mapped to multiple items.
It's also important to understand the mapping of stored procedures. These actually map to methods within your code off the DataContext instance. The next section takes a closer look at the DataContext and the table objects within LINQ.
Looking at the architecture of LINQ to SQL, you will notice that there are really three layers: your application, the LINQ to SQL layer, and the SQL Server database. As you saw in the previous examples, you can create a strongly typed query in your application's code:
dc.Products
This in turn is translated to a SQL query by the LINQ to SQL layer, which is then supplied to the database on your behalf:
SELECT [t0].[ProductID], [t0].[ProductName], [t0].[SupplierID],
[t0].[CategoryID], [t0].[QuantityPerUnit], [t0].[UnitPrice],
[t0].[UnitsInStock], [t0].[UnitsOnOrder], [t0].[ReorderLevel],
[t0].[Discontinued]
FROM [dbo].[Products] AS [t0]
In return, the LINQ to SQL layer takes the rows coming out of the database from this query and turns them into a collection of strongly typed objects that you can easily work with.
In the preceding section, you learned that the DataContext object manages the transactions that occur with the database you are working with when working with LINQ to SQL. There is actually a lot that you can do with the DataContext object.
In instantiating one of these objects, note that it takes a few optional parameters:
A string that represents the location of the SQL Server Express database file or the name of the SQL Server that is used
A connection string
Another
DataContextobject
The first two string options also provide the option to include your own database mapping file. Once you have instantiated this object, you are then able to programmatically use it for many types of operations.
One of the simpler things you can accomplish with the DataContext object is running quick commands that you write yourself using the ExecuteQuery method. For instance, if you are going to pull all the products from the Products table using the ExecuteQuery(Of TResult) method, then your code would be similar to the following:
Imports System.Data.Linq

Module Module1

    Sub Main()
        Dim dc As DataContext = New DataContext("Data Source=.SQLEXPRESS;" & _
           "AttachDbFilename=|DataDirectory|NORTHWND.MDF;" & _
           "Integrated Security=True;User Instance=True")"

        Dim myProducts As IEnumerable(Of Product) = _
           dc.ExecuteQuery(Of Product)("SELECT * FROM PRODUCTS", "")

        For Each item In myProducts
            Console.WriteLine(item.ProductID & " | " & item.ProductName)
        Next

        Console.ReadLine()
    End Sub

End Module
In this case, the ExecuteQuery(Of TResult) method is called, passing in a query string and returning a collection of Product objects. The query utilized in the method call is a simple Select statement that doesn't require any additional parameters to be passed in. Because no parameters are passed in with the query, you instead need to use double quotes as the second required parameter to the method call. If you were going to optionally substitute any values in the query, then you would construct your ExecuteQuery(Of TResult) call as follows:
Dim myProducts As IEnumerable(Of Product) = _
   dc.ExecuteQuery(Of Product) _
     ("SELECT * FROM PRODUCTS WHERE UnitsInStock > {0}", 50)
In this case, the {0} is a placeholder for the substituted parameter value that you are going to pass in, and the second parameter of the ExecuteQuery(Of TResult) method is the parameter that will be used in the substitution.
The Connection property actually returns an instance of the System.Data.SqlClient.SqlConnection that is used by the DataContext object. This is ideal if you need to share this connection with other ADO.NET code that you might be using in your application, or if you need to get at any of the SqlConnection properties or methods that it exposes. For instance, getting at the connection string is a simple matter:
Dim dc As NorthwindDataContext = New NorthwindDataContext()

Console.WriteLine(dc.Connection.ConnectionString)
If you have an ADO.NET transaction that you can use, you are able to assign that transaction to the DataContext object instance using the Transaction property. You can also use Transaction using the TransactionScope object from the .NET 2.0 Framework. You would need to make a reference to the System.Transactions namespace in your References folder for this example to work:
Imports System.Transactions

Module Module1

    Sub Main()
        Dim dc As NorthwindDataContext = New NorthwindDataContext()

        Using myScope As TransactionScope = New TransactionScope()
            Dim p1 As Product = New Product() _
               With {.ProductName = "Bill's Product"}
            dc.Products.InsertOnSubmit(p1)

            Dim p2 As Product = New Product() _
               With {.ProductName = "Another Product"}
            dc.Products.InsertOnSubmit(p2)

            Try
                dc.SubmitChanges()

                Console.WriteLine(p1.ProductID)
                Console.WriteLine(p2.ProductID)
            Catch ex As Exception
                Console.WriteLine(ex.ToString())
            End Try

            myScope.Complete()
        End Using

        Console.ReadLine()
    End Sub

End Module
In this case, the TransactionScope object is used; and if one of the operations on the database fails, then everything will be rolled back to the original state.
In addition to the items just described, several other methods and properties are available from the DataContext object. The following table shows some of the available methods from DataContext:
Method | Description |
|---|---|
Enables you to create a database on the server | |
Enables you to determine whether a database exists and can be opened | |
Deletes the associated database | |
Enables you to pass in a command to the database to be executed | |
Enables you to pass queries directly to the database | |
The | |
Provides access to the commands that are performed | |
Provides access to a collection of tables from the database | |
Enables you to refresh your objects from the data stored within the database | |
Executes the | |
Converts an |
In addition to these methods, the DataContext object exposes some of the properties shown in the following table:
The Table(TEntity) object is a representation of the tables that you are working with from the database. For instance, you saw the use of the Product class, which is a Table(Of Product) instance. As you will see throughout this chapter, several methods are available from the Table(TEntity) object. Some of these methods are defined in the following table:
Method | Description |
|---|---|
Enables you to attach an entity to the | |
Enables you to attach a collection of entities to the | |
| Enables you to put all the pending actions into a state of readiness for deletion. Everything here is enacted when the |
Enables you to put a pending action into a state of readiness for deletion. Everything here is enacted when the | |
Provides an array of modified objects. You will be able to access their current and changed values. | |
Provides a new list for binding to the data store | |
Provides an instance of the object as it appeared in its original state | |
| Enables you to put all the pending actions into a state of readiness for insertion. Everything here is enacted when the |
Enables you to put a pending action into a state of readiness for insertion. Everything here is enacted when the |
While the new O/R Designer in Visual Studio 2008 makes the creation of everything you need for LINQ to SQL quite easy, the underlying framework upon which this all rests also enables you to do everything from the ground up yourself. This provides you with the most control over what happens.
To accomplish the same task, you need to expose your Customers table yourself. The first step is to create a new class in your project called Customer.vb. The code for this class is presented here:
Imports System.Data.Linq.Mapping

<Table(Name:="Customers")> _
Public Class Customer
    <Column(IsPrimaryKey:=True)> _
    Public CustomerID As String
    <Column()> _
    Public CompanyName As String
    <Column()> _
    Public ContactName As String
    <Column()> _
    Public ContactTitle As String
    <Column()> _
    Public Address As String
    <Column()> _
    Public City As String
    <Column()> _
    Public Region As String
    <Column()> _
    Public PostalCode As String
    <Column()> _
    Public Country As String
    <Column()> _
    Public Phone As String
    <Column()> _
    Public Fax As String
End Class
Here, the Customer.vb file defines the Customer object that you want to use with LINQ to SQL. The class has the Table attribute assigned to it in order to signify the Table class. The Table class attribute includes a property called Name, which defines the name of the table to use within the database that is referenced with the connection string. Using the Table attribute also means that you need to make a reference to the System.Data.Linq.Mapping namespace in your code.
In addition to the Table attribute, each of the defined properties in the class makes use of the Column attribute. As stated earlier, columns from the SQL Server database will map to properties in your code.
With only this class in place, you are able to query the Northwind database for the Customers table. The code to accomplish this task is as follows:
Imports System.Data.Linq

Module Module1

    Sub Main()
        Dim dc As DataContext = New DataContext("Data Source=.SQLEXPRESS;
           AttachDbFilename=|DataDirectory|NORTHWND.MDF;
           Integrated Security=True;User Instance=True") ' Put on one line

        dc.Log = Console.Out ' Used for outputting the SQL used
Dim myCustomers As Table(Of Customer) = dc.GetTable(Of Customer)()
For Each item As Customer In myCustomers
   Console.WriteLine("{0} | {1}", item.CompanyName, item.Country)
Next
Console.ReadLine()
End Sub
End ModuleIn this case, the default DataContext object is used, and the connection string to the Northwind SQL Server Express database is passed in as a parameter. A Table class of type Customer is then populated using the GetTable(TEntity) method. For this example, the GetTable(TEntity) operation uses your custom-defined Customer class:
dc.GetTable(Of Customer)()
In this example, LINQ to SQL will use the DataContext object to make the query to the SQL Server database on your behalf, and will get the returned rows as strongly typed Customer objects. This enables you to then iterate through each of the Customer objects in the Table object's collection and get the information that you need, as is done with the Console.WriteLine statements:
For Each item As Customer In myCustomers
Console.WriteLine("{0} | {1}", item.CompanyName, item.Country)
NextRunning this code will produce the following results in your console application:
SELECT [t0].[CustomerID], [t0].[CompanyName], [t0].[ContactName],
[t0].[ContactTitle], [t0].[Address], [t0].[City], [t0].[Region],
[t0].[PostalCode], [t0].[Country], [t0].[Phone], [t0].[Fax]
FROM [Customers] AS [t0]
-- Context: SqlProvider(Sql2005) Model: AttributedMetaModel Build: 3.5.21022.8

Alfreds Futterkiste | Germany
Ana Trujillo Emparedados y helados | Mexico
Antonio Moreno Taquería | Mexico
Around the Horn | UK
Berglunds snabbköp | Sweden

// Output removed for clarity

Wartian Herkku | Finland
Wellington Importadora | Brazil
White Clover Markets | USA
Wilman Kala | Finland
Wolski  Zajazd | Poland
Note that the query grabbed every column specified in your Customer class file. If you remove the columns that you are not going to need, you then have a new Customer class file:
Imports System.Data.Linq.Mapping

<Table(Name:="Customers")> _
Public Class Customer
    <Column(IsPrimaryKey:=True)> _
    Public CustomerID As String
    <Column()> _
    Public CompanyName As String
    <Column()> _
    Public Country As String
End Class
In this case, I removed all the columns that are not utilized by the application. Now if you run the console application and look at the SQL query that is produced, you will see the following results:
SELECT [t0].[CustomerID], [t0].[CompanyName], [t0].[Country]
FROM [Customers] AS [t0]
Now, only the three columns that are defined within the Customer class are utilized in the query to the Customers table.
The property CustomerID is interesting in that you are able to signify that this column is a primary key for the table through the use of the IsPrimaryKey setting in the Column attribute. This setting takes a Boolean value, which in this case is set to True.
The other important aspect of the columns is that the name of the property that you define in the Customer class needs to be the same name as that used in the database. For instance, if you change the name of the CustomerID property to MyCustomerID, you will get the following exception when you run your console application:
System.Data.SqlClient.SqlException was unhandled
  Message="Invalid column name 'MyCustomerID'."
  Source=".Net SqlClient Data Provider"
  ErrorCode=-2146232060
  Class=16
  LineNumber=1
  Number=207
  Procedure=""
  Server="\\.\pipe\F5E22E37-1AF9-44\tsql\query"
To get around this, you have to define the name of the column in the custom Customer class that you have created. You can do this by using the Column attribute, as illustrated here:
<Column(IsPrimaryKey:=True, Name:="CustomerID")> _
Public MyCustomerID As String
Like the Table attribute, the Column attribute includes a Name property that enables you to specify the name of the column as it appears in the Customers table. Doing this will generate a query:
SELECT [t0].[CustomerID] AS [MyCustomerID], [t0].[CompanyName], [t0].[Country]
FROM [Customers] AS [t0]
This also means that you now need to reference the column using the new name of MyCustomerID (e.g., item.MyCustomerID).
Using the plain-vanilla DataContext object probably isn't the best approach; instead, you'll find that you have more control by creating your own DataContext class. To accomplish this task, create a new class called MyNorthwindDataContext.vb and have the class inherit from DataContext. Your class in its simplest form is illustrated here:
Imports System.Data.Linq

Public Class MyNorthwindDataContext
    Inherits DataContext

    Public Customers As Table(Of Customer)

    Public Sub New()
        MyBase.New("Data Source=.SQLEXPRESS;
           AttachDbFilename=|DataDirectory|NORTHWND.MDF;
           Integrated Security=True;User Instance=True") ' Put on one line
    End Sub
End Class
Here, the class MyNorthwindDataContext inherits from DataContext and provides an instance of the Table(Of Customer) object from your Customer class that you created earlier. The constructor is the other requirement of this class. This constructor uses a base to initialize a new instance of the object referencing a file (in this case a connection to a SQL database file).
Using your own DataContext object enables you to change the code in your application as follows:
Imports System.Data.Linq

Module Module1

    Sub Main()
        Dim dc As MyNorthwindDataContext = New MyNorthwindDataContext()

        Dim myCustomers As Table(Of Customer) = dc.Customers

        For Each item As Customer In myCustomers
            Console.WriteLine("{0} | {1}", item.CompanyName, item.Country)
        Next

        Console.ReadLine()
    End Sub

End Module
By creating an instance of the MyNorthwindDataContext object, you are enabling the class to manage the connection to the database. Note that now you have direct access to the Customer class through the dc.Customers statement.
The examples provided in this chapter are bare-bones examples, as they don't include all the error handling and logging that would generally be part of building your applications. This abbreviated style enables the examples to highlight the main points being discussed, and nothing more.
In addition to building your custom object in your own .vb file and then tying that class to the DataContext that you have built, you can also use the O/R Designer in Visual Studio 2008 to build your class files. When completed, Visual Studio will create the appropriate .vb file on your behalf, and by using the O/R Designer, you also have a visual representation of the class file and any possible relationships you have established.
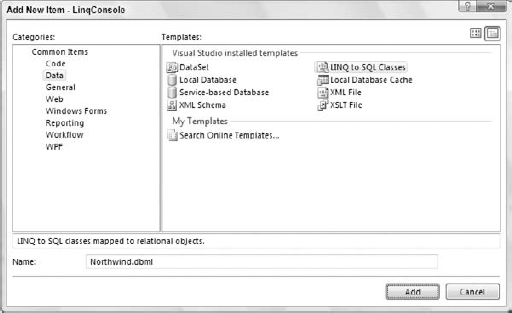
For example, when viewing the Designer view of your .dbml file, note the three items in the Toolbox: Class, Association, and Inheritance. Take the Class object from the Toolbox and drop it onto the design surface. You will be presented with an image of the generic class, as shown in Figure 11-8.
From here, click on the Class1 name and rename this class to Customer. Then, by right-clicking next to the name, you can add properties to the class file by selecting Add

As shown in the figure, the CustomerID property is properly represented with a primary key icon next to the name. With this in place, expand the plus sign next to the Northwind.dbml file. You will find two files here: Northwind.dbml.layout and Northwind.designer.vb. The Northwind.dbml.layout file is an XML file that helps Visual Studio with the visual representation shown in the O/R Designer. The most important file is Northwind.designer.vb. This is the Customer class file that was created on your behalf. If you open this file, you can see what Visual Studio created for you.
First, you will find the Customer class file within the code:
<Table(Name:="Customers")>  _
Partial Public Class Customer
 Implements System.ComponentModel.INotifyPropertyChanging, _
    System.ComponentModel.INotifyPropertyChanged

   ' Code removed for clarity

End Class
The Customer class is the name of the class according to what you provided in the designer. The class comes with the Table attribute and provides a Name value of Customers, as this is the name of the database that this object needs to work with when connecting to the Northwind database.
Within the Customer class are the three properties you defined. Presented here is just one of the properties, CustomerID:
<Column(Storage:="_CustomerID", CanBeNull:=false, IsPrimaryKey:=true)>  _
Public Property CustomerID() As String
    Get
       Return Me._CustomerID
    End Get
    Set
       If (String.Equals(Me._CustomerID, value) = false) Then
          Me.OnCustomerIDChanging(value)
          Me.SendPropertyChanging
          Me._CustomerID = value
          Me.SendPropertyChanged("CustomerID")
          Me.OnCustomerIDChanged
       End If
    End Set
End Property
Like before, when you built a class for yourself, the properties defined here use the Column attribute and some of the properties available to this attribute. You can see that the primary key setting is specified using the IsPrimaryKey item.
In addition to the Customer class is a class that inherits from the DataContext object:
<System.Data.Linq.Mapping.DatabaseAttribute(Name:="NORTHWND")>  _
Partial Public Class NorthwindDataContext
 Inherits System.Data.Linq.DataContext

   ' Code removed for clarity

End Class
This DataContext object, NorthwindDataContext, enables you to connect to the Northwind database and make use of the Customers table, as accomplished in the previous examples.
Using the O/R Designer is a process that can make the creation of your database object class files simple and straightforward. However, you have also seen that if you want complete control, you can code everything yourself to get the results you want.
As you have seen so far in this chapter, there are a number of ways in which you can query the database from the code of your application. In some of the simplest forms, your queries looked like the following:
Dim query As Table(Of Product) = dc.Products
This command pulled down the entire Products table to your Query object instance.
In addition to pulling down a straight table using dc.Products, you are about to use a strongly typed query expression directly in your code:
Module Module1

    Sub Main()
        Dim dc As NorthwindDataContext = New NorthwindDataContext()

        Dim query = From p In dc.Products Select p

        For Each item In query
            Console.WriteLine(item.ProductID & " | " & item.ProductName)
        Next

        Console.ReadLine()
    End Sub


End Module
In this case, a query object (again, a Table(Of Product) object) is populated with the query value of From p in dc.Products Select p.
You can use several query expressions from your code. The preceding example is a simple select statement that returns the entire table. The following list of items includes some of the other query expressions that you have at your disposal:
Description | |
|---|---|
Select <expression> | |
Where <expression>, Distinct | |
Any(<expression>), All(<expression>) | |
<expression> Join <expression> On <expression> Equals <expression> | |
Group By <expression>, Into <expression>, <expression> Group Join <decision> On <expression> Equals <expression> Into <expression> | |
Count([<expression>]), Sum(<expression>), Min(<expression>), Max(<expression>), Avg(<expression>) | |
Skip [While] <expression>, Take [While] <expression> | |
Union, Intersect, Except | |
In addition to straight queries for the entire table, you can filter items using the Where and Distinct options. The following example queries the Products table for a specific type of record:
Dim query = From p In dc.Products _
            Where p.ProductName.StartsWith("L") _
            Select p
Here, this query is selecting all the records from the Products table that start with the letter "L." This is done via the Where p.ProductName.StartsWith("L") expression. You will find a large selection of methods available off the ProductName property that enable you to fine-tune the filtering you need. This operation produces the following results:
65 | Louisiana Fiery Hot Pepper Sauce
66 | Louisiana Hot Spiced Okra
67 | Laughing Lumberjack Lager
74 | Longlife Tofu
76 | Lakkalikööri
You can add as many of these expressions to the list as you need. For instance, the next example adds two Where statements to your query:
Dim query = From p In dc.Products _
            Where p.ProductName.StartsWith("L") _
            Where p.ProductName.EndsWith("i") _
            Select p
In this case, a filter expression looks for items with a product name starting with the letter "L," and then a second expression is included to ensure that a second criterion is also applied, which states that the items must also end with the letter i. This would give you the following results:
76 | Lakkalikööri
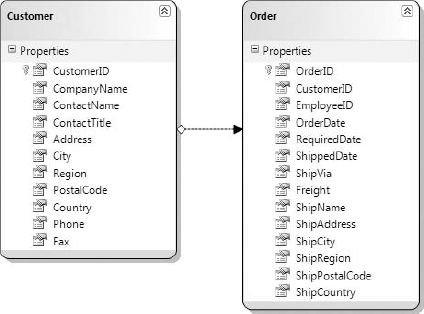
In addition to working with one table, you can work with multiple tables and perform joins with your queries. If you drag and drop both the Customers table and the Orders table onto the Northwind.dbml design surface, you will get the result shown in Figure 11-10.

After you drag and drop both of these elements onto the design surface, Visual Studio knows that there is a relationship between them and creates this relationship for you in the code and represents it with the black arrow.
From here, you can use a Join statement in your query to work with both of the tables, as shown in the following example:
Module Module1

    Sub Main()
        Dim dc As NorthwindDataContext = New NorthwindDataContext()

        dc.Log = Console.Out

        Dim query = From c In dc.Customers _
                    Join o In dc.Orders On c.CustomerID Equals o.CustomerID _
                    Order By c.CustomerID _
                    Select c.CustomerID, c.CompanyName, _
                       c.Country, o.OrderID, o.OrderDate
For Each item In query
Console.WriteLine(item.CustomerID & " | " & item.CompanyName _
& " | " & item.Country & " | " & item.OrderID _
& " | " & item.OrderDate)
Next
Console.ReadLine()
End Sub
End ModuleThis example is pulling from the Customers table and joining on the Orders table where the CustomerID columns match. This is done through the Join statement:
Join o In dc.Orders On c.CustomerID Equals o.CustomerID
From here, a new object is created with the Select statement; and this new object is comprised of the CustomerID, CompanyName, and Country columns from the Customers table as well as the OrderID and OrderDate columns from the Orders table.
When it comes to iterating through the collection of this new object, note that the For Each statement does not define the variable item with a specific type, as the type is not known yet:
For Each item In query
   Console.WriteLine(item.CustomerID & " | " & item.CompanyName _
        & " | " & item.Country & " | " & item.OrderID _
        & " | " & item.OrderDate)
Next
The item object here has access to all the properties specified in the class declaration. Running this example, you will get results similar to what is presented here in this partial result:
WILMK | Wilman Kala | Finland | 10695 | 10/7/1997 12:00:00 AM
WILMK | Wilman Kala | Finland | 10615 | 7/30/1997 12:00:00 AM
WILMK | Wilman Kala | Finland | 10673 | 9/18/1997 12:00:00 AM
WILMK | Wilman Kala | Finland | 11005 | 4/7/1998 12:00:00 AM
WILMK | Wilman Kala | Finland | 10879 | 2/10/1998 12:00:00 AM
WILMK | Wilman Kala | Finland | 10873 | 2/6/1998 12:00:00 AM
WILMK | Wilman Kala | Finland | 10910 | 2/26/1998 12:00:00 AM
You can easily group items with your queries. In the Northwind.dbml example that you have been working with so far, drag and drop the Categories table onto the design surface. You will then see that there is a relationship between this table and the Products table. The following example demonstrates how to group products by category:
Module Module1

    Sub Main()
        Dim dc As NorthwindDataContext = New NorthwindDataContext()
Dim query = From p In dc.Products _
Order By p.Category.CategoryName Ascending _
Group p By p.Category.CategoryName Into Group _
Select Category = CategoryName, Products = Group
For Each item In query
Console.WriteLine(item.Category)
For Each innerItem In item.Products
Console.WriteLine(" " & innerItem.ProductName)
Next
Console.WriteLine()
Next
Console.ReadLine()
End Sub
End ModuleThis example creates a new object, which is a group of categories, and packages the entire Product table into this new table, called Group. Before that, the categories are ordered by name using the Order By statement, and the order provided is Ascending (the other option being Descending). The output is the Category (passed in through the CategoryName property) and the Product instance. The iteration with the For Each statements is done once for the categories and again for each of the products that are found in the category.
A partial output of this program is presented here:
Beverages
      Chai
      Chang
      Guaraná Fantástica
      Sasquatch Ale
      Steeleye Stout
      Côte de Blaye
      Chartreuse verte
      Ipoh Coffee
      Laughing Lumberjack Lager
      Outback Lager
      Rhönbräu Klosterbier
      Lakkalikööri

Condiments
      Aniseed Syrup
      Chef Anton's Cajun Seasoning
      Chef Anton's Gumbo Mix
      Grandma's Boysenberry Spread
      Northwoods Cranberry Sauce
      Genen Shouyu
      Gula Malacca
Sirop d'érable
Vegie-spread
Louisiana Fiery Hot Pepper Sauce
Louisiana Hot Spiced Okra
Original Frankfurter grüne SoβeMany more commands and expressions are available to you beyond what has been presented in this chapter.
So far, you have been querying the tables directly and leaving it up to LINQ to create the appropriate SQL statement for the operation. When working with pre-existing databases that make heavy use of stored procedures (and for those who want to follow the best practice of using stored procedures within a database), LINQ is still a viable option.
LINQ to SQL treats working with stored procedures as a method call. As you saw in Figure 11-5, the design surface called the O/R Designer enables you to drag and drop tables onto it so that you can then programmatically work with the table. On the right side of the O/R Designer is a pane in which you can drag and drop stored procedures.
Any stored procedures that you drag and drop onto this part of the O/R Designer become available methods to you off the DataContext object. For this example, drag and drop the TenMostExpensiveProducts stored procedure onto this part of the O/R Designer. The following code shows how you would call this stored procedure within the Northwind database:
Imports System.Data.Linq

Module Module1

    Sub Main()
        Dim dc As NorthwindDataContext = New NorthwindDataContext()

        Dim result As ISingleResult(Of Ten_Most_Expensive_ProductsResult) = _
                dc.Ten_Most_Expensive_Products()

        For Each item As Ten_Most_Expensive_ProductsResult In result
            Console.WriteLine(item.TenMostExpensiveProducts & " | " & _
                   item.UnitPrice)
        Next

        Console.ReadLine()
    End Sub

End Module
The rows coming out of the stored procedure are collected into an ISingleResult(Of Ten_Most_Expensive_ProductsResult) object. From here, iteration through this object is simple. As you can see from this example, calling your stored procedures is a straightforward process.
As stated earlier, probably the biggest and most exciting addition to the .NET Framework 3.5 is the addition of the .NET Language Integrated Query framework (LINQ) into VB 2008. LINQ comes in many flavors depending on the final data store you are working with in querying your data. The preceding section took a look at using LINQ to SQL to query SQL Server databases. This section takes a quick look at using LINQ to query your XML data sources instead.
Extensible Markup Language (XML) is now in widespread use. Many applications on the Internet or residing on individual computers use some form of XML to run or manage the processes of an application. Earlier books about XML commented that XML was going to be the "next big thing." Now, it is the big thing. In fact, there really isn't anything bigger.
Microsoft has been working for years to make using XML in the .NET world as easy as possible. You cannot help but notice the additional capabilities and enhancements to XML usage introduced in each new version of the .NET Framework. In fact, Bill Gates highlighted Microsoft's faith in XML in his keynote address at the Microsoft Professional Developers Conference in 2005 when he stated that XML is being pushed deeper and deeper into the Windows core each year. If you look around the .NET Framework, you will probably agree.
With the introduction of LINQ to the .NET Framework 3.5, the focus was on easy access to the data that you want to work with in your applications. One of the main data stores in the application space is XML, so it was really a no-brainer to create the LINQ to XML implementation.
Before the LINQ to XML release, working with XML using System.Xml was not the easiest thing in the world to achieve. With the inclusion of System.Xml.Linq, you now have a series of capabilities that make the process of working with XML in your code much easier to achieve.
In creating XML within the application code, many developers turned to the XmlDocument object to do this job. This object enables you to create XML documents that in turn enable you to append elements, attributes, and other items in a hierarchical fashion. With LINQ to XML and the inclusion of the new System.Xml.Linq namespace, you now have some new objects available that make the creation of XML documents a much simpler process.
An interesting side note to the LINQ to XML feature set is that the Visual Basic 2008 team at Microsoft actually took the LINQ to XML capabilities a little further in some areas. For instance, something you can't accomplish in C# 2008 that you can do in Visual Basic 2008 is include XML as a core part of the language. XML literals are now a true part of the Visual Basic language, and you can paste XML fragments directly in your code for inclusion — the XML is not treated as a string.
One issue that was somewhat ignored in parts of the .NET Framework 2.0 was how the items in the framework dealt with the inclusion of XML namespaces and prefixes in documents. LINQ to XML makes this an important part of the XML story, and you will find the capabilities for working with these types of objects to be quite simple.
Even if the LINQ querying capability were not around, the new objects available to work with the XML (available in place of working directly with the DOM in this release of the framework) are so good that they can even stand on their own outside LINQ. Within the new System.Xml.Linq namespace, you will find a series of new LINQ to XML helper objects that make working with an XML document in memory that much easier. The following sections describe the new objects that are available to you within this new namespace.
Many of the examples in this chapter use a file called
Hamlet.xml, which you can find athttp://metalab.unc.edu/bosak/xml/eg/shaks200.zip. It includes all of Shakespeare's plays as XML files.
The XDocument is a replacement of the XmlDocument object from the pre-.NET 3.5 world. The XDocument object is easier to work with when dealing with XML documents. It works with the other new objects in this space, such as the XNamespace, XComment, XElement, and XAttribute objects.
One of the more important members of the XDocument object is the Load method:
Dim xdoc As XDocument = XDocument.Load("C:Hamlet.xml")The preceding example loads the Hamlet.xml contents as an in-memory XDocument object. You can also pass a TextReader or XmlReader object into the Load method. From here, you are able to programmatically work with the XML:
Dim xdoc As XDocument = XDocument.Load("C:Hamlet.xml")

Console.WriteLine(xdoc.Root.Name.ToString())
Console.WriteLine(xdoc.Root.HasAttributes.ToString())
This produces the following results:
PLAY
False
Another important member to be aware of is the Save method, which, like the Load method, enables you to save to a physical disk location or to a TextWriter or XmlWriter object. Note that you need to be running Visual Studio as an administrator for this to work:
Dim xdoc As XDocument = XDocument.Load("C:Hamlet.xml")

xdoc.Save("C:CopyOfHamlet.xml")One of the more common objects that you will work with is the XElement object. With this object, you can easily create even single-element objects that are XML documents themselves, and even fragments of XML. For instance, here is an example of writing an XML element with a corresponding value:
Dim xe As XElement = New XElement("Company", "Lipper")
Console.WriteLine(xe.ToString())
When creating a new XElement object, you can define the name of the element as well as the value used in the element. In this case, the name of the element will be <Company>, while the value of the <Company> element will be Lipper. Running this in a console application, you will get the following result:
<Company>Lipper</Company>
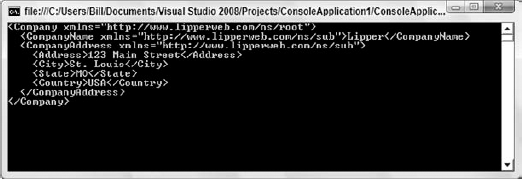
You can also create a more complete XML document using multiple XElement objects, as shown in the following example:
Module Module1

    Sub Main()
        Dim xe As XElement = New XElement("Company", _
            New XElement("CompanyName", "Lipper"), _
            New XElement("CompanyAddress", _
                New XElement("Address", "123 Main Street"), _
                New XElement("City", "St. Louis"), _
                New XElement("State", "MO"), _
                New XElement("Country", "USA")))

        Console.WriteLine(xe.ToString())

        Console.ReadLine()
    End Sub

End Module
Running this application yields the results shown in Figure 11-11.

The XNamespace is an object that represents an XML namespace; and it is easily applied to elements within your document. For example, you can take the previous example and easily apply a namespace to the root element:
Module Module1

    Sub Main()
        Dim ns As XNamespace = "http://www.lipperweb.com/ns/1"

        Dim xe As XElement = New XElement(ns + "Company", _
            New XElement("CompanyName", "Lipper"), _
            New XElement("CompanyAddress", _
                New XElement("Address", "123 Main Street"), _
                New XElement("City", "St. Louis"), _
                New XElement("State", "MO"), _
                New XElement("Country", "USA")))

        Console.WriteLine(xe.ToString())

        Console.ReadLine()
    End Sub

End Module
In this case, an XNamespace object is created by assigning it a value of http://www.lipperweb.com/ns/1. From there, it is actually used in the root element <Company> with the instantiation of the XElement object:
Dim xe As XElement = New XElement(ns + "Company", _
This will produce the results illustrated in Figure 11-12.

Besides dealing with the root element, you can also apply namespaces to all your elements, as shown in the following example:
Module Module1
Sub Main()
Dim ns1 As XNamespace = "http://www.lipperweb.com/ns/root"
Dim ns2 As XNamespace = "http://www.lipperweb.com/ns/sub"
Dim xe As XElement = New XElement(ns1 + "Company", _
New XElement(ns2 + "CompanyName", "Lipper"), _
New XElement(ns2 + "CompanyAddress", _
New XElement(ns2 + "Address", "123 Main Street"), _
New XElement(ns2 + "City", "St. Louis"), _
New XElement(ns2 + "State", "MO"), _
New XElement(ns2 + "Country", "USA")))
Console.WriteLine(xe.ToString())
Console.ReadLine()
End Sub
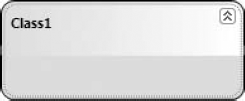
End ModuleThis produces the results shown in Figure 11-13.
In this case, the sub-namespace was applied to everything specified except for the <Address>, <City>, <State>, and <Country> elements, because they inherit from their parent, <CompanyAddress>, which has the namespace declaration.
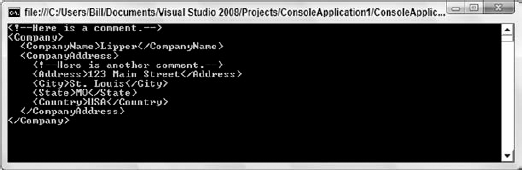
The XComment object enables you to easily add XML comments to your XML documents. Adding a comment to the top of the document is shown in the following example:
Module Module1

    Sub Main()
        Dim xdoc As XDocument = New XDocument()

        Dim xc As XComment = New XComment("Here is a comment.")
        xdoc.Add(xc)

        Dim xe As XElement = New XElement("Company", _
            New XElement("CompanyName", "Lipper"), _
            New XElement("CompanyAddress", _
                New XComment("Here is another comment."), _
                New XElement("Address", "123 Main Street"), _
                New XElement("City", "St. Louis"), _
                New XElement("State", "MO"), _
                New XElement("Country", "USA")))

        xdoc.Add(xe)

        Console.WriteLine(xdoc.ToString())

        Console.ReadLine()
    End Sub

End Module
Here, an XDocument object containing two XML comments is written to the console, one at the top of the document and another within the <CompanyAddress> element. The output is shown in Figure 11-14.
In addition to elements, another important aspect of XML is attributes. Adding and working with attributes is done through the use of the XAttribute object. The following example adds an attribute to the root <Customers> node:
Module Module1

    Sub Main()
        Dim xe As XElement = New XElement("Company", _
            New XAttribute("MyAttribute", "MyAttributeValue"), _
            New XElement("CompanyName", "Lipper"), _
            New XElement("CompanyAddress", _
                New XElement("Address", "123 Main Street"), _
                New XElement("City", "St. Louis"), _
                New XElement("State", "MO"), _
                New XElement("Country", "USA")))

        Console.WriteLine(xe.ToString())

        Console.ReadLine()
    End Sub

End Module
Here, the attribute MyAttribute with a value of MyAttributeValue is added to the root element of the XML document, producing the results shown in Figure 11-15.

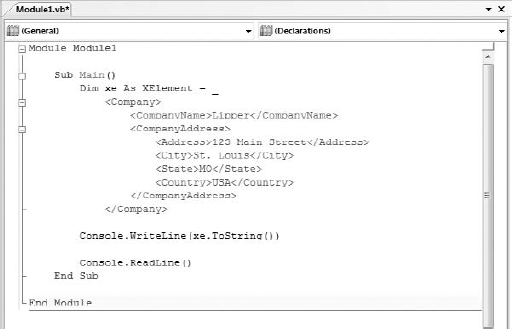
Visual Basic takes LINQ to XML one step further, enabling you to place XML directly in your code. Using XML literals (something not available in C# 2008), you can place XML directly in your code for working with the XDocument and XElement objects. Earlier, the use of the XElement object was presented as follows:
Module Module1

    Sub Main()
        Dim xe As XElement = New XElement("Company", _
New XElement("CompanyName", "Lipper"), _
New XElement("CompanyAddress", _
New XElement("Address", "123 Main Street"), _
New XElement("City", "St. Louis"), _
New XElement("State", "MO"), _
New XElement("Country", "USA")))
Console.WriteLine(xe.ToString())
Console.ReadLine()
End Sub
End ModuleUsing XML literals, you can use the following syntax:
Module Module1

    Sub Main()
        Dim xe As XElement = _
            <Company>
                <CompanyName>Lipper</CompanyName>
                <CompanyAddress>
                    <Address>123 Main Street</Address>
                    <City>St. Louis</City>
                    <State>MO</State>
                    <Country>USA</Country>
                </CompanyAddress>
            </Company>

        Console.WriteLine(xe.ToString())

        Console.ReadLine()
    End Sub

End Module
This enables you to place the XML directly in the code (see Figure 11-16). The best part about this is the IDE support for XML literals. Visual Studio 2008 has IntelliSense and excellent color-coding for the XML that you place in your code file.
You can also use inline variables in the XML document. For instance, if you wanted to declare the value of the <CompanyName> element outside the XML literal, then you could use a construct similar to the following:
Module Module1

    Sub Main()
        Dim companyName As String = "Lipper"

        Dim xe As XElement = _
            <Company>
                <CompanyName><%= companyName %></CompanyName>
<CompanyAddress>
<Address>123 Main Street</Address>
<City>St. Louis</City>
<State>MO</State>
<Country>USA</Country>
</CompanyAddress>
</Company>
Console.WriteLine(xe.ToString())
Console.ReadLine()
End Sub
End ModuleIn this case, the <CompanyName> element is assigned a value of Lipper from the companyName variable, using the syntax <%= companyName %>.
Now that you can get your XML documents into an XDocument object and work with the various parts of this document, you can also use LINQ to XML to query your XML documents and work with the results.
Notice that querying a static XML document using LINQ to XML takes almost no work at all. The following example makes use of the hamlet.xml file and queries to get all the players (actors) who appear in a play. Each of these players is defined in the XML document with the <PERSONA> element:
Module Module1

    Sub Main()
        Dim xdoc As XDocument = XDocument.Load("C:hamlet.xml")

        Dim query = From people In xdoc.Descendants("PERSONA") _
                    Select people.Value

        Console.WriteLine("{0} Players Found", query.Count())
        Console.WriteLine()

        For Each item In query
            Console.WriteLine(item)
        Next

        Console.ReadLine()
    End Sub

End Module
In this case, an XDocument object loads a physical XML file (hamlet.xml) and then performs a LINQ query over the contents of the document:
Dim query = From people In xdoc.Descendants("PERSONA") _
            Select people.Value
The people object is a representation of all the <PERSONA> elements found in the document. Then the Select statement gets at the values of these elements. From there, a Console.WriteLine method is used to write out a count of all the players found, using query.Count. Next, each of the items is written to the screen in a For Each loop. The results you should see are presented here:
26 Players Found

CLAUDIUS, king of Denmark.
HAMLET, son to the late, and nephew to the present king.
POLONIUS, lord chamberlain.
HORATIO, friend to Hamlet.
LAERTES, son to Polonius.
LUCIANUS, nephew to the king.
VOLTIMAND
CORNELIUS
ROSENCRANTZ
GUILDENSTERN
OSRIC
A Gentleman
A Priest.
MARCELLUS
BERNARDO
FRANCISCO, a soldier.
REYNALDO, servant to Polonius.
Players.
Two Clowns, grave-diggers.
FORTINBRAS, prince of Norway.
A Captain.
English Ambassadors.
GERTRUDE, queen of Denmark, and mother to Hamlet.
OPHELIA, daughter to Polonius.
Lords, Ladies, Officers, Soldiers, Sailors, Messengers, and other Attendants.
Ghost of Hamlet's Father.
Numerous dynamic XML documents can be found on the Internet these days. Blog feeds, podcast feeds, and more provide XML documents by sending a request to a specific URL endpoint. These feeds can be viewed either in the browser, through an RSS-aggregator, or as pure XML:
Module Module1

    Sub Main()
        Dim xdoc As XDocument = _
               XDocument.Load("http://geekswithblogs.net/evjen/Rss.aspx")

        Dim query = From rssFeed In xdoc.Descendants("channel") _
                    Select Title = rssFeed.Element("title").Value, _
                       Description = rssFeed.Element("description").Value, _
                       Link = rssFeed.Element("link").Value

        For Each item In query
            Console.WriteLine("TITLE: " + item.Title)
            Console.WriteLine("DESCRIPTION: " + item.Description)
            Console.WriteLine("LINK: " + item.Link)
        Next

        Console.WriteLine()

        Dim queryPosts = From myPosts In xdoc.Descendants("item") _
                Select Title = myPosts.Element("title").Value, _
                       Published = _
                         DateTime.Parse(myPosts.Element("pubDate").Value), _
                       Description = myPosts.Element("description").Value, _
                       Url = myPosts.Element("link").Value, _
                       Comments = myPosts.Element("comments").Value

        For Each item In queryPosts
            Console.WriteLine(item.Title)
        Next

        Console.ReadLine()
    End Sub

End Module
Here, the Load method of the XDocument object points to a URL where the XML is retrieved. The first query pulls out all the main sub-elements of the <channel> element in the feed and creates new objects called Title, Description, and Link to get at the values of these sub-elements.
From there, a For Each statement is run to iterate through all the items found in this query. The results are as follows:
TITLE: Bill Evjen's Blog
DESCRIPTION: Code, Life and Community
LINK: http://geekswithblogs.net/evjen/Default.aspx
The second query works through all the <item> elements and the various sub-elements it contains (these are all the blog entries found in the blog). Though a lot of the items found are rolled up into properties, in the For Each loop, only the Title property is used. You will see results similar to the following from this query:
AJAX Control Toolkit Controls Grayed Out - HOW TO FIX
Welcome .NET 3.5!
Visual Studio 2008 Released
IIS 7.0 Rocks the House!
Word Issue - Couldn't Select Text
Microsoft Releases XML Schema Designer CTP1
Silverlight Book
Microsoft Tafiti as a beta
ReSharper on Visual Studio 2008
Windows Vista Updates for Performance and Reliability Issues
New Version of ODP.NET for .NET 2.0 Released as Beta Today
First Review of Professional XML
Go to MIX07 for free!
Microsoft Surface and the Future of Home Computing?
Alas my friends - I'm *not* TechEd bound
New Book - Professional VB 2005 with .NET 3.0!
An article showing Oracle and .NET working together
My Latest Book - Professional XML
CISCO VPN Client Software on Windows Vista
Server-Side Excel Generation
Scott Guthrie Gives Short Review of Professional ASP.NET 2.0 SE
Windows Forms Additions in the Next Version of .NET
Tag, I'm It
If you have been working with the XML document hamlet.xml, you probably noticed that it is quite large. You've seen how you can query into the XML document in a couple of ways, and now this section takes a look at reading and writing to the XML document.
Earlier you saw just how easy it is to query into an XML document using the LINQ query statements, as shown here:
Dim query = From people In xdoc.Descendants("PERSONA") _
            Select people.Value
This query returns all the players found in the document. Using the Element method of the XDocument object, you can also get at specific values of the XML document you are working with. For instance, continuing to work with the hamlet.xml document, the following XML fragment shows you how the title is represented:
<?xml version="1.0"?>

<PLAY>
   <TITLE>The Tragedy of Hamlet, Prince of Denmark</TITLE>

   <!-- XML removed for clarity -->

</PLAY>
As you can see, the <TITLE> element is a nested element of the <PLAY> element. You can easily get at the title by using the following bit of code:
Dim xdoc As XDocument = XDocument.Load("C:hamlet.xml")

Console.WriteLine(xdoc.Element("PLAY").Element("TITLE").Value)
This bit of code writes out the title, The Tragedy of Hamlet, Prince of Denmark, to the console screen. In the code, you were able to work down the hierarchy of the XML document by using two Element method calls — first calling the <PLAY> element, and then the <TITLE> element found nested within the <PLAY> element.
Continuing with the hamlet.xml document, you can view a long list of players who are defined with the use of the <PERSONA> element:
<?xml version="1.0"?>

<PLAY>
   <TITLE>The Tragedy of Hamlet, Prince of Denmark</TITLE>

   <!-- XML removed for clarity -->

   <PERSONAE>
      <TITLE>Dramatis Personae</TITLE>

      <PERSONA>CLAUDIUS, king of Denmark. </PERSONA>
      <PERSONA>HAMLET, son to the late,
       and nephew to the present king.</PERSONA>
      <PERSONA>POLONIUS, lord chamberlain. </PERSONA>
      <PERSONA>HORATIO, friend to Hamlet.</PERSONA>
      <PERSONA>LAERTES, son to Polonius.</PERSONA>
      <PERSONA>LUCIANUS, nephew to the king.</PERSONA>

      <!-- XML removed for clarity -->

   </PERSONAE>

</PLAY>
Using that, review this bit of the code's use of this XML:
Dim xdoc As XDocument = XDocument.Load("C:hamlet.xml")

Console.WriteLine( _
   xdoc.Element("PLAY").Element("PERSONAE").Element("PERSONA").Value)
This bit of code starts at <PLAY>, works down to the <PERSONAE> element, and then makes use of the <PERSONA> element. However, using this you will get the following result:
CLAUDIUS, king of Denmark
Although there is a collection of <PERSONA> elements, you are only dealing with the first one that is encountered using the Element().Value call.
In addition to reading from an XML document, you can also write to the document just as easily. For instance, if you wanted to change the name of the first player of the hamlet file, you could make use of the code here to accomplish that task:
Module Module1

    Sub Main()
        Dim xdoc As XDocument = XDocument.Load("C:hamlet.xml")

        xdoc.Element("PLAY").Element("PERSONAE"). _
           Element("PERSONA").SetValue("Bill Evjen, king of Denmark")

        Console.WriteLine(xdoc.Element("PLAY"). _
           Element("PERSONAE").Element("PERSONA").Value)

        Console.ReadLine()
    End Sub

End Module
In this case, the first instance of the <PERSONA> element is overwritten with the value of Bill Evjen, king of Denmark using the SetValue method of the Element object. After the SetValue is called and the value is applied to the XML document, the value is then retrieved using the same approach as before. Running this bit of code, you can indeed see that the value of the first <PERSONA> element has been changed.
Another way to change the document (by adding items to it in this example) is to create the element you want as XElement objects and then add them to the document:
Module Module1

    Sub Main()
        Dim xdoc As XDocument = XDocument.Load("C:hamlet.xml")

        Dim xe As XElement = New XElement("PERSONA", _
"Bill Evjen, king of Denmark")
xdoc.Element("PLAY").Element("PERSONAE").Add(xe)
Dim query = From people In xdoc.Descendants("PERSONA") _
Select people.Value
Console.WriteLine("{0} Players Found", query.Count())
Console.WriteLine()
For Each item In query
Console.WriteLine(item)
Next
Console.ReadLine()
End Sub
End ModuleIn this case, an XElement document called xe is created. The construction of xe gives you the following XML output:
<PERSONA>Bill Evjen, king of Denmark</PERSONA>
Then, using the Element().Add method from the XDocument object, you are able to add the created element:
xdoc.Element("PLAY").Element("PERSONAE").Add(xe)Next, querying all the players, you will now find that instead of 26, as before, you now have 27, with the new one at the bottom of the list. Besides Add, you can also use AddFirst, which does just that — adds the player to the beginning of the list instead of the end, as is the default.
When working with LINQ to SQL or LINQ to XML, you are limited to working with the specific data source for which it was designed. In fact, you are able to mix multiple data sources together when working with LINQ. To demonstrate this, this section uses LINQ to SQL to query the customers in the Northwind database and turn the results pulled into an XML document.
Instructions for getting the Northwind sample database file as well as information on working with LINQ to SQL are found earlier in this chapter.
If you don't already have it, add the Northwind SQL Server Express Edition database file to your project. From there, right-click on the project to add a new LINQ to SQL class file to your project. Name the file Northwind.dbml.
This operation gives you a design surface to work with. From the Server Explorer, drag and drop both the Customers and the Orders tables onto the design surface. This action establishes a relationship between these two tables. At this point, your view in the IDE should look similar to what is shown in Figure 11-17.
Now that you have your Northwind.dbml in place, you are ready to query this database structure and output the results as an XML file.
The next step in your console application is to put the following code in your Module1.vb file:
Module Module1

    Sub Main()
        Dim dc As NorthwindDataContext = New NorthwindDataContext()

        Dim xe As XElement = New XElement("Customer", _
            From c In dc.Customers _
            Select New XElement("Customer", _
                New XElement("CustomerId", c.CustomerID), _
                New XElement("CompanyName", c.CompanyName), _
                New XElement("Country", c.Country), _
                New XElement("OrderNum", c.Orders.Count)))

        xe.Save("C:myCustomers.xml")
        Console.WriteLine("File created")

        Console.ReadLine()
    End Sub

End Module
This example creates a new instance of the NorthwindDataContext object, which is created for you automatically with the LINQ to SQL class you created. Then, instead of using the typical
Dim query = [query]you populate the query performed in an XElement object called xe. Within the select statement of the query, you also create an iteration of Customers objects with the nested elements of <Customer>, <CustomerId>, <CompanyName>, <Country>, and <OrderNum>. Once queried, the xe instance is then saved to disk using xe.Save. On disk, looking at the myCustomers.xml file, you will see the following results (abbreviated here):
<?xml version="1.0" encoding="utf-8"?>
<Customer>
  <Customer>
    <CustomerId>ALFKI</CustomerId>
    <CompanyName>Alfreds Futterkiste</CompanyName>
    <Country>Germany</Country>
    <OrderNum>6</OrderNum>
  </Customer>
  <Customer>
    <CustomerId>ANATR</CustomerId>
    <CompanyName>Ana Trujillo Emparedados y helados</CompanyName>
    <Country>Mexico</Country>
    <OrderNum>4</OrderNum>
  </Customer>

  <!-- XML removed for clarity -->

  <Customer>
    <CustomerId>WILMK</CustomerId>
    <CompanyName>Wilman Kala</CompanyName>
    <Country>Finland</Country>
    <OrderNum>7</OrderNum>
  </Customer>
  <Customer>
    <CustomerId>WOLZA</CustomerId>
    <CompanyName>Wolski  Zajazd</CompanyName>
    <Country>Poland</Country>
    <OrderNum>7</OrderNum>
  </Customer>
</Customer>
From this, you can see just how easy it is to mix the two data sources using LINQ. Using LINQ to SQL, the customers were pulled from the database, and then using LINQ to XML, an XML file was created and output to disk.
One of the most exciting features of the .NET Framework 3.5 release is the LINQ capabilities that the platform provides. This chapter focused on using LINQ to SQL and some of the options available to you in querying your SQL Server databases.
Using LINQ to SQL, you are able to have a strongly typed set of operations for performing CRUD operations against your database. In addition, though, you are still able to use pre-existing access capabilities, whether that is interacting with ADO.NET or working with your stored procedures. For example, you can still use your XmlReader and XmlWriter code along with the new LINQ to XML capabilities.
This chapter also described how to use LINQ to XML and some of the options available to you in reading and writing from XML files and XML sources, whether the source is static or dynamic.
You were also introduced to the new LINQ to XML helper objects XDocument, XElement, XNamespace, XAttribute, and XComment. These outstanding new objects make working with XML easier than ever before.