
Modern, multitasking operating systems often need to run applications that operate in the background and that are independent of the user who is logged in. From Windows NT to Windows Vista, such applications are called Windows Services (formerly known as NT Services). The tasks carried out by Windows Services are typically long-running tasks and have little or no direct interaction with a user (so they don't usually have user interfaces). Such applications may be started when the computer is booted and often continue to run until the computer is shut down.
This chapter covers the following:
The characteristics of a Windows Service
How to interact with a Windows Service using Visual Studio 2008 and the management applets in the Windows Control Panel
How to create, install, and communicate with a Windows Service using Visual Basic
How to debug a Windows Service from within Visual Studio 2008
As VB6 did not offer direct support for the creation of Windows Services, you might be unfamiliar with such applications. To help you understand the variety of such applications, this chapter examines some scenarios for which a Windows Service application is a good solution.
Microsoft SQL Server, Exchange Server, Internet Information Server (IIS), and antivirus software all use Windows Services to perform tasks in response to events that occur on the system overall. Only a background service, or Windows Service, that runs no matter which user is logged in, could perform such operations. For example, consider these potential Windows Services:
A file watcher — Suppose you are running an FTP server that enables users to place files in a particular directory. You could use a Windows Service to monitor and process files within that directory as they arrive. The service runs in the background and detects when files are changed or added within the directory, and then extracts information from these files in order to process orders, or update address and billing information. You will see an example of such a Windows Service later in this chapter.
An automated stock price reporter — You could build a system that extracts stock prices from a Web service or website and then e-mails the information to users. You could set thresholds such that an e-mail is sent only when the stock price reaches a certain price. This Windows Service can be automated to extract the information every 10 minutes, every 10 seconds, or whatever you choose. Because a Windows Service can contain any logic that does not require a user interface, you have a lot of flexibility in constructing such applications.
Microsoft Transaction Server (MTS) — Part of COM+ Services in Windows 2000 and later, this is an object broker that manages instances of components. It is used regularly by professional developers. This service runs constantly in the background and manages components as soon as the computer is booted, just like IIS or Exchange Server.
To properly design and develop a Windows Service, it is important to understand how it differs from a typical Windows program. Here are the most important characteristics of a Windows Service:
It can start before a user logs on. The system maintains a list of Windows Services, which can be set to start at boot time. Services can also be installed such that they require a manual startup and will not start at bootup.
It can run under a different account from that of the current user. Most Windows Services provide functionality that needs to be running all the time, and some load before a user logs on, so they cannot depend on a user being logged on to run.
It has its own process. It does not run in the process of a program communicating with it (Chapter 29 has more information on processes).
It typically has no user interface. This is because the service may be running under a different account from that of the current user, or the service may start at bootup, which means that calls to put up a user interface might fail because they are out of context (it's possible to create a Windows Service with a user interface, but Visual Basic 2008 can't be used to do it; you will learn why later).
It requires a special installation procedure; just clicking on a compiled EXE will not run it. The program must run in a special context in the operating system, and a specific installation process is required to do the configuration necessary for a Windows Service to be run in this special context.
It works with a Service Control Manager (discussed shortly). The Service Control Manager is required to provide an interface to the Windows Service. External programs that want to communicate with a Windows Service (for example, to start or stop the service) must go through the Service Control Manager. The Service Control Manager is an operating-system-level program, but it has a user interface that can be used to start and stop services, and this interface can be accessed through the Computer Management section of the Control Panel.
You can view the services that are used on your computer by opening the Service Control Manager user interface. To do so in Windows 2000, select Administrative Tools
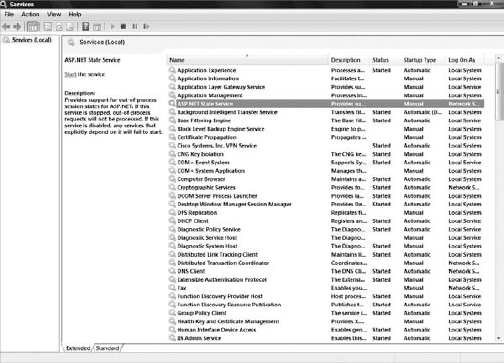
The Status column indicates the current state of the service. If this column is blank, then the service has not been started since the last time the computer was booted. Other possible values for Status are Started, Stopped, and Paused. You can access additional settings and details concerning a service by double-clicking it.
When a service is started, it automatically logs into the system using either a user or a system account:
The user account is a regular NT account that allows the program to interact with the system — in essence, the service impersonates a user.
The system account is not associated with a particular user.
The Service Control Manager shown in Figure 33-1 is part of the operating system (OS), which is what supports Windows Services; it is not a part of the .NET Framework. Any service run by the OS is exposed through the Service Control Manager, regardless of how the service was created or installed. You can also interact with Windows Services via the Server Explorer in Visual Studio 2008. You will see this technique later.
Prior to the release of the .NET Framework, most Windows Services were created with C++. Third-party toolkits were available to enable Windows Services to be created in VB6 and earlier, but deployment problems and threading issues meant that few developers took this route.
In .NET, the functionality needed to interface to the operating system is wrapped up in the .NET Framework classes, so any .NET-compliant language can now be used to create a Windows Service.
Several base classes are needed to create a Windows Service:
System.ServiceProcess.ServiceBase— Provides the base class for the Windows Service. The class containing the logic that will run in the service inherits fromServiceBase. A single executable can contain more than one service, but each service in the executable is a separate class that inherits fromServiceBase.System.Configuration.Install.Installer— This is a generic class that performs the installation chores for a variety of components. One class in a Windows Service process must inherit and extendInstallerin order to provide the interface necessary to install the service under the various Windows operating systems.
Each class that inherits from Installer needs to contain an instance of each of the following classes:
System.ServiceProcess.ServiceProcessInstaller— This class contains the information needed to install a .NET executable that contains Windows Services (that is, an executable that contains classes that inherit fromServiceBase). The .NET installation utility for Windows Services (InstallUtil.exe, discussed later) calls this class to get the information it needs to perform the installation.System.ServiceProcess.ServiceInstaller— This class also interacts with theInstallUtil.exeinstallation program. WhereasServiceProcessInstallercontains information needed to install the executable as a whole,ServiceInstallercontains information on a specific service in the executable. If an executable contains more than one service, then an instance ofServiceInstalleris needed for each one.
For most Windows Services you develop, you can let Visual Studio 2008 take care of Installer, ServiceProcessInstaller, and ServiceInstaller. You just need to set a few properties. The class you should thoroughly understand is ServiceBase, as this is the class that contains the functionality of a Windows Service and therefore must inherit from it.
ServiceBase contains several useful properties and methods, but initially it is more important to understand the events of ServiceBase. Most of these events are fired by the Service Control Manager when the state of the service is changed. The most important events are as follows:
Event | How and When the Event Is Used |
|---|---|
| Occurs when the service is started. This is where the initialization logic for a service is usually placed. |
Occurs when the service is stopped. Cleanup and shutdown logic are generally placed here. | |
Occurs when the service is paused. Any logic required to suspend operations during a pause goes here. | |
Occurs when a service continues after being paused | |
Occurs when the operating system is being shut down | |
| Occurs when a change event is received from a Terminal Session service. This method was new in .NET Framework 2.0. |
Occurs when the system's power management software causes a change in the power status of the system. This is typically used to change the behavior of a service when a system is going in or out of a "suspended" power mode. This is more frequent with end users who are working on laptops. | |
Occurs when an external program has told the Service Control Manager that it wants to send a command to the service. The operation of this event is covered in "Communicating with the Service." |
The events used most frequently are OnStart, OnStop, and OnCustomCommand. The OnStart and OnStop events are used in almost every Windows Service written in Visual Basic, and the OnCustomCommand is used when any special configuration of the service needs to be done while the service is running.
All of these are Protected events, so they are only available to classes that inherit from ServiceBase. Because of the restricted context in which it runs, a Windows Service component that inherits from ServiceBase often lacks a public interface. While you can add public properties and methods to such a component, they are of limited use, because outside programs cannot obtain an object reference to running a Windows Service component.
To be active as a Windows Service, an instance of ServiceBase must be started via the shared Run method of the ServiceBase class. However, normally you don't have to write code to do this because the template code generated by Visual Studio 2008 places the correct code in the Main subroutine of the project for you.
The most commonly used property of ServiceBase is the AutoLog property. This Boolean property is set to True by default. If True, then the Windows Service automatically logs the Start, Stop, Pause, and Continue events to an Event Log. The Event Log used is the Application Event Log and the Source in the log entries is taken from the name of the Windows Service. This automatic event logging is stopped by setting the AutoLog property to False.
The following File Watcher example goes into more detail about the automatic logging capabilities in a Windows Service, and about Event Logs in general.
The Installer, ServiceProcessInstaller, and ServiceInstaller classes are quite simple to build and use if you are employing Visual Studio 2008. After you create your Windows Service project, Visual Studio 2008 will create a class file called Service1.vb for you. To add the Installer, ServiceProcessInstaller, and ServiceInstaller classes to your project, simply right-click the design surface of this ServiceBase class, Service1.vb, and select Add Installer. This creates the code framework necessary to use them.
The Installer class (named ProjectInstaller.vb by default in a Windows Service project) generally needs no interaction at all — it is ready to use when created by Visual Studio 2008. However, it may be appropriate to change some properties of the ServiceProcessInstaller and ServiceInstaller classes. You can do this by simply highlighting these objects on the design surface and changing their properties directly in the Properties window of Visual Studio 2008. The properties that are typically modified for ServiceProcessInstaller include the following:
Account — This specifies the type of account under which the entire service application will run. Different settings give the services in the application different levels of privilege on the local system. For simplicity, this chapter uses the highest level of privilege,
LocalSystem, for most of the examples. If this property is set toUser(which is the default), then you must supply a username and password, and that user's account is used to determine privileges for the service. If there is any possibility that a service could access system resources that should be "out of bounds," then using theUsersetting to restrict privileges is a good idea. BesidesLocalSystemandUser, other possible settings for theAccountproperty includeNetworkServiceandLocalService.Username — If
Accountis set toUser, then this property specifies the user account to use in determining the privileges the system will have and how it interacts with other computers on the network. If this property is left blank, then it is requested when the service is installed.Password — This property indicates the password to access the user account specified in the
Usernameproperty. If the password is left blank, then it is requested when the service is installed.HelpText — This specifies information about the service that will be displayed in certain installation options.
If the Account property is set to User, then it is good practice to set up a special user account for the service, rather than rely on some existing account intended for a live user. The special account can be set up with exactly the appropriate privileges for the service. This way, it is not as vulnerable to having its password or its privileges inadvertently changed in a way that would cause problems in running the service.
For the ServiceInstaller class, the properties you might change include the following:
DisplayName — The name of the service displayed in the Service Manager or the Server Explorer can be different from the class name and the executable name if desired, though it is better to make this name the same as the class name for the service.
StartType — This specifies how the service is started. The default is
Manual, which means you must start the service yourself, as it will not start automatically after the system boots. If you want the service to always start when the system starts, then change this property toAutomatic. The Service Manager can be used to override theStartTypesetting.ServiceName — The name of the service that this
ServiceInstallerhandles during installation. If you changed the class name of the service after using the Add Installer option, then you would need to change this property to correspond to the new name for the service.
ServiceProcessInstaller and ServiceInstaller are used as necessary during the installation process, so there is no need to understand or manipulate the methods of these.
It is possible to place more than one class that inherits from ServiceBase in a single Windows Service executable. Each such class then allows for a separate service that can be started, stopped, and so on, independently of the other services in the executable.
If a Windows Service executable contains more than one service, then it must contain one ServiceInstaller for each service. Each ServiceInstaller is configured with the information used for its associated service, such as the displayed name and the start type (automatic or manual). However, the executable still needs only one ServiceProcessInstaller, which works for all the services in the executable. It is configured with the account information that is used for all the services in the executable.
Another important .NET Framework class used with Windows Services is System.ServiceProcess.ServiceController. This class is not used when constructing a service. It is used by external applications to communicate with a running service, enabling operations such as starting and stopping the service. The ServiceController class is described in detail in "Communicating with the Service."
The ServiceBase and ServiceController classes can be used to create typical Windows Services that work with high-level system resources such as the file system or performance counters. However, some Windows Services need to interact at a deeper level. For example, a service may work at the kernel level, fulfilling functions such as that of a device driver.
Presently, the .NET Framework classes for Windows Services cannot be used to create such lower-level services, which rules out both VB and C# as tools to create them. C++ is typically the tool of choice for these types of services. If the .NET version of C++ is used, the code for such services would typically run in unmanaged mode.
Another type of service that cannot be created with the .NET Framework classes is one that interacts with the Windows desktop. Again, C++ is the preferred tool for such services.
You'll look at the types of services that are possible during the discussion of the ServiceType property of the ServiceController class, in "Communicating with the Service."
Now it is time to create and use a Windows Service with Visual Basic, using the previously discussed .NET Framework classes. These tasks are demonstrated later in a detailed example. Here is a high-level description of the necessary tasks:
Create a new project of the type Windows Service. By default, the service will be in a module named
Service1.vb, but it can be renamed, like any other .NET module. (The class automatically placed inService1.vbis namedService1by default, and it inherits fromServiceBase.)Place any logic needed to run when the service is started in the
OnStartevent of the service class. You can find the code listing for theService1.vbfile by double-clicking this file's design surface.Add any additional logic that the service needs to carry out its operation. Logic can be placed in the class for the service, or in any other class module in the project. Such logic is typically called via some event that is generated by the operating system and passed to the service, such as a file changing in a directory, or a timer tick.
Add an installer to the project. This module provides the interface to the Windows operating system to install the module as a Windows Service. The installer is a class that inherits from
System.Configuration.Install.Installer, and it contains instances of theServiceProcessInstallerandServiceInstallerclasses.Set the properties of the installer modules as necessary. The most common settings needed are the account under which the service will run and the name the service will display in the Service Control Manager.
Build the project. This results in an EXE file. For example, if the service were named
WindowsService1, then the executable file would be namedWindowsService1.exe.Install the Windows Service with a command-line utility named
InstallUtil.exe. (As previously mentioned, a service cannot be started by just running the EXE file.)Start the Windows Service with the Service Control Manager (available via the Control Panel

You can also start a service from the command console if the proper paths to .NET are set. The command is NET START <servicename>. Note that the <servicename> used in this command is the name of the service, not the name of the executable in which the service resides. Depending on the configuration of your system, a service started with any of the aforementioned methods will sometimes fail, resulting in an error message indicating that the service did not start in a timely fashion. This may be because the .NET libraries and other initialization tasks did not finish fast enough to suit the Service Control Manager. If this happens, attempt to start the service again; it usually succeeds the second time.
Steps 2 through 5 can be done in a different order. It doesn't matter whether the installer is added and configured before or after the logic that does the processing for the service is added.
At this point, a service is installed and running. The Service Manager or the Server Explorer can stop the service, or it will be automatically stopped when the system is shut down. The command to stop the service in a command console is NET STOP <servicename>.
The service does not automatically start the next time the system is booted unless it is configured for that. This can be done by setting the StartType property for the service to Automatic when developing the service, or it can be done in the Service Manager. Right-clicking the service in the Service Manager provides access to this capability.
This process is superficially similar to doing most other Visual Basic projects. There are a few important differences, however:
You cannot debug the project in the environment as you normally would any other Visual Basic program. The service must be installed and started before it can be debugged. It is also necessary to attach to the process for the service to do debugging. Details about this are included in "Debugging the Service."
Even though the result of the development is an EXE, you should not include any message boxes or other visual elements in the code. The Windows Service executable is more like a component library in that sense, and should not have a visual interface. If you include visual elements such as message boxes, the results can vary. In some cases, the UI code will have no effect. In other cases, the service may hang when attempting to write to the user interface.
Finally, be especially careful to handle all errors within the program. The program is not running in a user context, so a runtime error has no place to report itself visually. Handle all errors with structured exception handling, and use an Event Log or other offline means to record and communicate runtime errors.
To illustrate the outlined steps, the following example creates a simple service that checks the value of a performance counter, and when the value of the counter exceeds a certain value, the service beeps every three seconds. This is a good example for stepping through the process of creating, installing, and starting a Windows Service. It contains very little logic, and you can easily tell when it is working.
In the first phase of the example, you create a service that always beeps. Then, in the second phase, you add logic to monitor the performance counter and only beep when the counter exceeds a specific value:
Start a new Windows Service project using Visual Studio 2008. Name the project
CounterMonitor.In the Solution Explorer, rename
Service1.vbtoCounterMonitor.vb.Click the design surface for
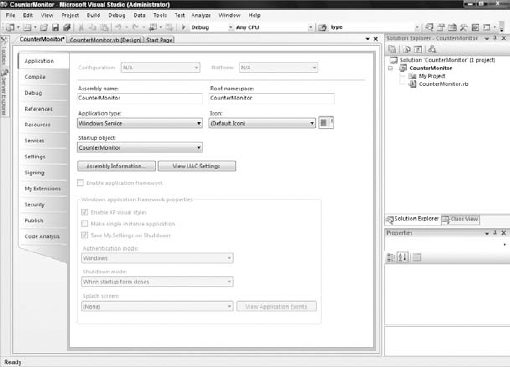
CounterMonitor.vb. In the Properties window, change theServiceNameproperty fromService1toCounterMonitor(theNameproperty changes the name of the class on which the service is based, while theServiceNameproperty changes the name of the service as known to the Service Control Manager).Right-click the project for the service and select Properties. You will then be presented with the CounterMonitor Property Pages as one of the paged tabs directly in Visual Studio. From the Application tab, set the Application Type drop-down list to Windows Service if necessary (it should already be set to this), and from the drop-down list named Startup Object, make sure
CounterMonitoris selected (see Figure 33-2).Go back to the
CounterMonitor.vbfile's Design view and open the Visual Studio 2008 Toolbox. Open the Components (not the Windows Forms) node in the Toolbox. Drag aTimercontrol from the Toolbox onto theCounterMonitordesign surface. It will appear on the design surface with the nameTimer1. It is very important that you grab the correctTimerobject from the Toolbox. Visual Studio 2008 does not have theTimerobject for this example in the Toolbox, whereas earlier versions of Visual Studio before VS 2005 did. To ensure that you have the correctTimerobject, right-click on the Toolbox and select Choose Items from the menu. In the .NET Framework Components tab of the Choose Toolbox Items dialog, scroll down until you see a couple ofTimerobjects. In the list are a couple ofTimerobjects from theSystem.Windows.Formsnamespace, but you want to instead choose theTimerobject that is part of theSystem.Timersnamespace. This is theTimerobject that you work with for the rest of this example.In the Properties window for
Timer1, change theIntervalproperty to a value of3000(that's 3,000 milliseconds, which causes the timer to fire every three seconds).Go to the code for
CounterMonitor.vb. Inside theOnStartevent handler (which is already created for you in the code), enter the following:Timer1.Enabled = True
In the
OnStopevent for the class, enter the following:Timer1.Enabled = False
Create an
Elapsedevent for the timer by highlightingTimer1in the left-hand drop-down box at the top of the code editor window. Select theElapsedevent in the right-hand drop-down box from the Code view of the file.In the
Elapsedevent, place the following line:Beep()
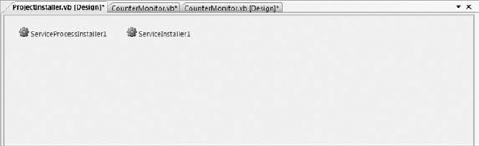
Now add an installer to the project. Go back to the design surface for
CounterMonitorand right-click it. Select Add Installer. A new file calledProjectInstaller1.vbis created and added to the project. TheProjectInstaller1.vbfile has two components added to its design surface:ServiceProcessInstaller1andServiceInstaller1, as shown in Figure 33-3.On the
ProjectInstaller.vbdesign surface, highlight theServiceProcessInstaller1control. In its Properties window, change theAccountproperty toLocalSystem.Highlight the
ServiceInstaller1control. In its Properties window, type in CounterMonitor as the value of theDisplayNameproperty.Now build the project by right-clicking on the solution and selecting Build from the menu. An EXE named
CounterMonitor.exewill be created for the service.
Now you are ready to install the service. The utility for doing this, InstallUtil.exe, must be run from a command line. It is located in the .NET utilities directory, found at C:WINNTMicrosoft.NETFrameworkv2.0.50727 on Windows 2000 and NT systems, or C:WindowsMicrosoft.NETFrameworkv2.0.50727 on Windows XP, Windows Vista, Windows Server 2003, and Windows Server 2008.
You can easily access this utility (and all the other .NET utilities in that directory) using an option from the Programs menu that is installed with Visual Studio 2008. Choose Microsoft Visual Studio 2008
InstallUtil CounterMonitor.exe
Check the messages generated by InstallUtil.exe to ensure that the installation of the service was successful. The utility generates several lines of information; if successful, the last two lines are as follows:
The Commit phase completed successfully.

The transacted install has completed.
If these two lines do not appear, then you need to read all the information generated by the utility to find out why the install didn't work. Reasons might include a bad pathname for the executable, or trying to install the service when it is already installed (it must be uninstalled before it can be reinstalled), as described later.
Later in this chapter, you will create your own "control panel" screen to start and stop the service. For now, to test the new Windows Service, you will use the Server Explorer in Visual Studio 2008. Open the Server Explorer in Visual Studio 2008 and expand the Services node. The resulting screen is shown in Figure 33-4.

If the CounterMonitor service does not appear in the list, then the installation failed. Try the installation again and check the error messages. Right-click the CounterMonitor service and select the Start menu option. You will hear the service beep every three seconds. You can stop the service by right-clicking it again and selecting the Stop menu option.
You can also use the Service Control Manager built into Windows to start the CounterMonitor service, shown in Figure 33-5.
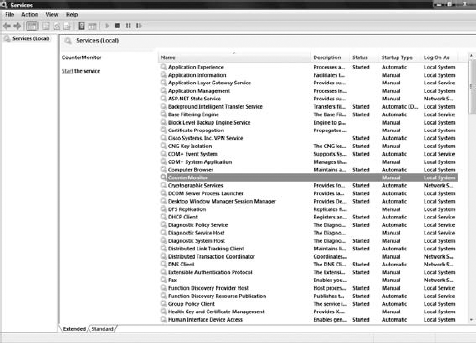
Start CounterMonitor by right-clicking it and selecting Start or by clicking the Start link. As before, you will hear your computer beep every three seconds. Stop the service by right-clicking CounterMonitor and selecting Stop or by clicking the Stop link. Note that if you already started the service via the Server Explorer (as described earlier), then it will be in a started state when you access the Service Control Manager program.
Uninstalling the service is very similar to installing it. The service must be in a stopped state before it can be uninstalled, but the uninstall operation will attempt to stop the service if it is running. The uninstall operation is done in the same command window (with the Visual Studio 2008 Command Prompt) as the install operation, and the command used is the same as the one for installation, except that the option /u is included just before the name of the service. Remember that you need to navigate to C:Users[ user ]DocumentsVisual Studio 2008ProjectsCounterMonitorProjectsCounterMonitorCounterMonitorobjDebug to run this command:
InstallUtil.exe /u CounterMonitor.exe
You can tell that the uninstall was successful if the information displayed by the utility contains the following line:
Service CounterMonitor was successfully removed from the system.
If the uninstall is not successful, read the rest of the information to determine why. Besides typing in the wrong pathname, another common reason for failure is trying to uninstall a service that is in a running state and could not be stopped in a timely fashion.
Once you have uninstalled CounterMonitor, it will no longer show up in the list of available services to start and stop (at least, after a refresh it will not).
Note
A Windows Service must be uninstalled and reinstalled every time you make changes to it. You should uninstall CounterMonitor now because you are about to add new capabilities to it.
Performance counters are a system-level function of Windows. They are used to track usage of system resources. Performance counters can be expressed as counts (number of times a Web page was hit), percentages (how much disk space is left), or other types of information. Many counters are automatically maintained by the operating system, but applications can create and manage their own performance counters.
To demonstrate how services can interact with system-level functionality, you will add to the CounterMonitor the capability to monitor a particular performance counter, and only beep when the performance counter exceeds a certain value.
Performance counters can be monitored by a user with the Performance Monitor. A variety of performance counters are built into the operating system, providing access to information such as the number of threads currently active on the system, or the number of documents in a print queue. Any of these, and any custom performance counters, can be graphed in the Performance Monitor.
This example creates a performance counter named ServiceCounter. Then you will change CounterMonitor to check that counter and only beep when its value is over 5. To test it, you will also create a small Windows Forms application that increments and decrements the counter.
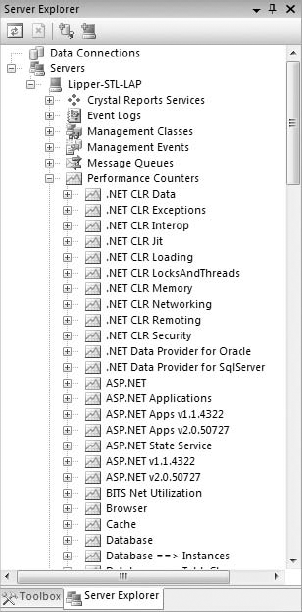
Performance counters are typically accessed in Visual Studio 2008 through the Server Explorer tab. To see the available performance counters, open the Server Explorer, shown in Figure 33-6.
To see the categories of performance counters, click the plus sign next to the Performance Counters option in the Server Explorer. Several dozen categories will be shown. You can look at the counters in any particular category by clicking the plus sign next to the category.
You can also create new categories and new counters. For this example, you need to create a new category for the counter called Service Counters. To do that, right-click the Performance Counters option in the Server Explorer and select the Create New Category option. In the resulting Performance Counter Builder dialog box (shown in Figure 33-7), enter the name of the category as Service Counters, and create a new counter by clicking the New button and entering TestCounter for the name. Once that is complete, click the OK button. Visual Studio 2008 will then create a new category called Service Counters that contains a single performance counter called TestCounter.
Using a performance counter in the CounterMonitor service you created earlier is straightforward. Open the CounterMonitor project and go to the design surface for CounterMonitor. Then open the Server Explorer so that it shows the TestCounter performance counter you created. Click TestCounter from within the Server Explorer and drag it onto the CounterMonitor.vb design surface.
A new visual control named PerformanceCounter1 will appear on the page's design surface, ready for use. Change the logic in the Elapsed event for Timer1 as shown here:
If PerformanceCounter1.RawValue > mnMaxValue Then
    Beep()
End If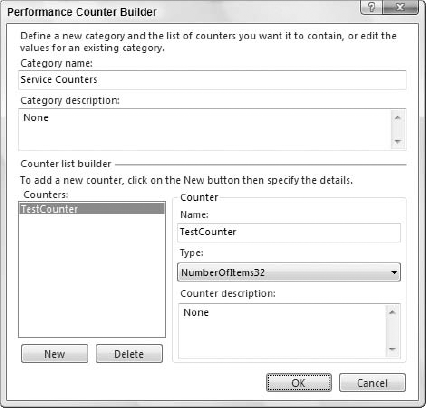
The RawValue property being used in this code fetches the unformatted value of the counter. For counters that track whole numbers (such as the number of times a Web page is hit), the RawValue property is normally used to get the value of the counter for testing or display. Some other types of counters use a NextValue method to get a formatted value. See the CounterType property of the PerformanceCounter class for more information on the types of performance counters available.
Next, put this statement in the code module just under the first line of the CounterMonitor class:
Dim mnMaxValue As Integer = 5
This creates the mnMaxValue as a Private variable. Now build the service again, install it as before, and start the service. It should not beep at this point because the value in the performance counter is zero. You can leave the counter running, because you will now create a program to change the value in the performance counter, thereby making the service begin beeping.
To manipulate the performance counter, you will build a small forms-based application. Close the CounterMonitor solution in Visual Studio and start a new Windows Application Project named CounterTest. Place two buttons on Form1 and change their properties as shown in the following table:
Then, open the Server Explorer and drag the TestCounter performance counter onto the form itself, just as you did earlier with the CounterMonitor project. As with all nonvisible components from the Toolbox, the counter will appear in the component tray (just under the form), rather than on the form's design surface.
The PerformanceCounter1 control for CounterTest needs one property change. Set the ReadOnly property of the control to False. This enables the application to manipulate the counter. (This change was unnecessary for the CounterMonitor Windows Service project because that project only reads the value of the performance counter and does not change it.)
Now double-click btnIncrement to get to its click event. Place the following code in the event:
PerformanceCounter1.Increment()
Double-click the btnDecrement to get to its click event. Place the following code in the event:
PerformanceCounter1.Decrement()
Build and run the program and click the Increment button six times. If the CounterMonitor service is running, then on the sixth click it will begin beeping because the value in the counter has exceeded five. Then click the Decrement button a couple of times, and the beeping will stop.
If you want to monitor the current value of the counter, select Start
Up to this point, you have learned how to do the following:
If these procedures are sufficient to start, stop, and check on the service through the Server Explorer or the Service Control Manager, and there is no need for any other communication with the service, then this is all you have to do. However, it is often helpful to create a specialized application to manipulate your service. This application will typically be able to start and stop a service, and check on its status. The application may also need to communicate with the service to change its configuration. Such an application is often referred to as a control panel for the service, even though it does not necessarily reside in the operating system's Control Panel. A commonly used example of such an application is the SQL Server Service Manager, whose icon appears in the tray on the taskbar (normally in the lower-right section of the screen) if you have SQL Server installed.
Such an application needs a way to communicate with the service. The .NET Framework base class that is used for such communication is ServiceController. It is in the System.ServiceProcess namespace. You need to add a reference to System.ServiceProcess.dll (which contains this namespace) before a project can use the ServiceController class.
The ServiceController class provides an interface to the Service Control Manager, which coordinates all communication with Windows Services. However, you do not have to know anything about the Service Control Manager to use the ServiceController class. You just manipulate the properties and methods of the ServiceController class, and any necessary communication with the Service Control Manager is accomplished on your behalf behind the scenes.
It is a good idea to use exactly one instance of the ServiceController class for each service you are controlling. Multiple instances of ServiceController that are communicating with the same service can have timing conflicts. Typically, that means using a module-level object variable to hold the reference to the active ServiceController, and instantiating the ServiceController during the initialization logic for the application. The following example uses this technique.
The constructor for the ServiceController requires the name of the Windows Service with which it will be communicating. This is the same name that was placed in the ServiceName property of the class that defined the service. You will see how to instantiate the ServiceController class shortly.
The ServiceController class has several members that are useful in manipulating services. Here are the most important methods, followed by another table of the most important properties:
Method | Purpose |
|---|---|
| A method to start the service |
| A method to stop the service |
| A method to ensure that the |
| A method used to send a custom command to the service. This method is covered later in the section "Custom Commands." |
Here are the most important properties:
To manipulate the service, you will enhance the CounterTest program created earlier. Here are step-by-step instructions to do that:
Add three new buttons to the
CounterTestform, with the following names and text labels:Add a reference to the DLL that contains the
ServiceControllerclass: Select ProjectAdd this line at the top of the code for
Form1:Imports System.ServiceProcess
As discussed, the project needs only one instance of the
ServiceControllerclass. Create a module-level object reference to aServiceControllerclass by adding the following line of code within theForm1class:Dim myController As ServiceController
Create a Form Load event in
Form1, and place the following line of code in it to instantiate theServiceControllerclass:myController = New ServiceController("CounterMonitor")
You now have a ServiceController class named myController that you can use to manipulate the CounterMonitor Windows Service. In the click event for btnCheckStatus, place the following code:
Dim sStatus As String
myController.Refresh()
sStatus = myController.Status.ToString

MsgBox(myController.ServiceName & " is in state: " & sStatus)
In the click event for btnStartService, place this code:
Try
    myController.Start()
Catch exp As Exception
    MsgBox("Could not start service or the service is already running")
End Try
In the click event for btnStopService, place this code:
If myController.CanStop Then
    myController.Stop()
Else
    MsgBox("Service cannot be stopped or the service is already stopped")
End If
Run and test the program. The service may already be running because of one of your previous tests. Make sure the performance counter is high enough to make the service beep, and then test starting and stopping the service.
ServiceController classes can be created for any Windows Service, not just those created in .NET. For example, you could instantiate a ServiceController class that was associated with the Windows Service for Internet Information Server (IIS) and use it to start, pause, and stop IIS. The code would look just like the code used earlier for the application that controlled the CounterMonitor service. The only difference is that the name of the service would need to be changed in the line that instantiates the ServiceController (step 5).
Keep in mind that the ServiceController is not communicating directly with the service. It is working through the Service Control Manager. That means the requests from the Service Controller to start, stop, or pause a service do not behave synchronously. As soon as the ServiceController has passed the request to the ServicesControlManager, it continues to execute its own code without waiting for the Service Control Manager to pass on the request, or for the service to act on the request.
Some services need additional operations besides starting and stopping. For example, for the CounterMonitor Windows Service, you might want to set the threshold value of the performance counter that causes the service to begin beeping, or you might want to change the interval between beeps.
With most components, you would implement such functionality through a public interface. That is, you would put public properties and methods on the component. However, you cannot do this with a Windows Service because it has no public interface that you can access from outside the service.
To deal with this need, the interface for a Windows Service contains a special event called OnCustomCommand. The event arguments include a numeric code that can serve as a command sent to the Windows Service. The code can be any number in the range 128 to 255. (The numbers under 128 are reserved for use by the operating system.)
To fire the event and send a custom command to a service, the ExecuteCommand method of the ServiceController is used. The ExecuteCommand method takes the numeric code that needs to be sent to the service as a parameter. When this method is accessed, the ServiceController class tells the Service Control Manager to fire the OnCustomCommand event in the service, and to pass it the numeric code.
The next example demonstrates this process in action. Suppose you want to be able to change the interval between beeps for the CounterMonitor service. You cannot directly send the beep interval that you want, but you can pick various values of the interval, and associate a custom command numeric code with each.
For example, assume you want to be able to set intervals of 1 second, 3 seconds (the default), or 10 seconds. You could set up the following correspondence:
Custom Command Numeric Code | Beep Interval |
|---|---|
| One second (1,000 milliseconds) |
| Three seconds (3,000 milliseconds) |
| Ten seconds (10,000 milliseconds) |
The correspondences in the table are completely arbitrary. You could use any codes between 128 and 255 to associate with the beep intervals. These were chosen because they are easy to remember.
First, you need to change the CounterMonitor service so that it is able to accept the custom commands for the beep interval. To do that, first make sure the CounterMonitor service is uninstalled from any previous installs. Then open the Visual Studio 2008 project for the CounterMonitor service.
Create an OnCustomCommand event in the service: Open the code window for CounterMonitor.vb and type Protected Overrides OnCustomCommand. By this point, IntelliSense will kick in and you can press the Tab key to autocomplete the shell event. Notice how it only accepts a single Integer as a parameter:
Protected Overrides Sub OnCustomCommand(ByVal command As Integer)

End Sub
In the OnCustomCommand event, place the following code:
Timer1.Enabled = False
Select Case command
    Case 201
        Timer1.Interval = 1000
    Case 203
        Timer1.Interval = 3000
    Case 210
        Timer1.Interval = 10000
End Select
Timer1.Enabled = True
Build the countermonitor service, reinstall it, and start it.
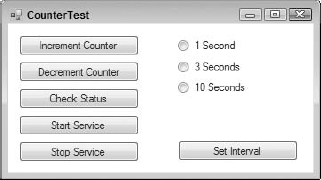
Now you can enhance the CounterTest application created earlier to set the interval. To enable users to pick the interval, you will use radio buttons. On the CounterTest program Form1 (which currently contains five buttons), place three radio buttons. Set their text labels as follows:
RadioButton1 -1 secondRadioButton2 -3 secondsRadioButton3 -10 seconds
Place a button directly under these option buttons. Name it btnSetInterval and set its text to Set Interval. In the click event for this button, place the following code:
Dim nIntervalCommand As Integer = 203
If RadioButton1.Checked Then
    nIntervalCommand = 201
End If
If RadioButton2.Checked Then
    nIntervalCommand = 203
End If
If RadioButton3.Checked Then
    nIntervalCommand = 210
End If
myController.ExecuteCommand(nIntervalCommand)
At this point, Form1 should look something like the screen shown in Figure 33-8.
Start the CounterTest control program and test the capability to change the beep interval. Make sure the performance counter is high enough that the CounterMonitor service beeps, and remember that every time you stop and restart the service, it resets the beep interval to three seconds.
Because the OnCustomCommand event only takes numeric codes as input parameters, you cannot directly pass strings to the service. For example, if you wanted to reconfigure a directory name for a service, you could not just send the directory name over. Instead, it would be necessary to place the information to be passed to the service in a file in some known location on disk. Then a custom command for the service could instruct it to look at the standard file location and read the information in the file. What the service did with the contents of the file would, of course, be customized for the service.
Now let's step through another example to illustrate what a Windows Service can do and how to construct one. You will build a service that monitors a particular directory and reacts when a new or changed file is placed in the directory. The example Windows Service application waits for those files, extracts information from them, and then logs an event to a system log to record the file change.
As before, create a Windows Service from the built-in template named Windows Service in the New Project screen. Name the new project FileWatcherService and click OK. This creates a new service class called Service1.vb. Rename this to FileWatcherService.vb. Right-click the design surface, select Properties, and set the ServiceName property to FileWatcherService.
As in the first example, set the application type to Windows Service and reset the project's start object to FileWatcherService. All of this is illustrated earlier in this chapter.
The way to ensure that the service is doing its job is by having it write events to a system Event Log. Event Logs are available under the Windows operating system. As with many other system-level features, the use of Event Logs is simplified in .NET because a .NET Framework base class does most of the work for you.
There are three Event Logs on the system: Application, Security, and System. Normally, your applications should only write to the Application log. A property of a log entry called Source identifies the application writing the message. This property does not have to be the same as the executable name of the application, but it is often given that name to make it easy to identify the source of the message.
You can look at the events in the Event Log by using the Event Viewer. Select Control Panel
It was mentioned earlier in the chapter that the AutoLog property of the ServiceBase class determines whether the service automatically writes events to the Application log. The AutoLog property instructs the service to use the Application Event Log to report command failures, as well as information for OnStart, OnStop, OnPause, and OnContinue events on the service. What is actually logged to the Event Log is an entry indicating whether the service started successfully and stopped successfully, and any errors that might have occurred. If you look in the Application Event Log now, these events are logged for the CounterMonitor Windows Service that you created and ran earlier in the chapter.
You can turn off Event Log reporting by setting the AutoLog property to False in the Properties window for the service, but leave it set to True for this example. That means some events will be logged automatically (without you including any code for them). Then, you add some code to the service to log additional events not covered by the AutoLog property. First, though, you need to implement a file monitoring control in the project.
For performance reasons, you should do all of your work on a separate thread to your main application thread. You want to leave your main application free to accept any requests from the user or the operating system. You can do this by using some of the different components that create their own threads when they are launched. The Timer component and the FileSystemWatcher component are two examples. When the Timer component fires its Elapsed event, a thread is spawned and any code placed within that event will work on that newly created thread. The same thing happens when the events for the FileSystemWatcher component fire.
You can learn more about threading in .NET in Chapter 26.
The FileSystemWatcher component is used to monitor a particular directory. The component implements Created, Changed, Deleted, and Renamed events, which are fired when files are placed in the directory, changed, deleted, or renamed, respectively.
The operation that takes place when one of these events is fired is determined by the application developer. Most often, logic is included to read and process the new or changed files. However, you are just going to write a message to a log file.
To implement the component in the project, drag and drop a FileSystemWatcher control from the Components tab of the Toolbox onto the designer surface of FileWatcherService.vb. This control is automatically called FileSystemWatcher1.
The FileSystemWatcher control should not generate any events until the service is initialized and ready to handle them. To prevent this, set the EnableRaisingEvents property to False. This prevents the control from firing any events. You will enable it during the OnStart event in the service. These events fired by the FileSystemWatcher are controlled using the NotifyFilter property, discussed later.
The path that you want to monitor is the TEMP directory on the C: drive, so set the Path property to C:TEMP (be sure to confirm that there is a TEMP directory on your C: drive). Of course, this path can be changed to monitor any directory depending on your system, including any network or removable drives.
You only want to monitor when a file is freshly created or the last modified value of a file has changed. To do this, set the NotifyFilter property to FileName, LastWrite. You could also watch for other changes such as attributes, security, size, and directory name changes as well, just by changing the NotifyFilter property. Note that you can specify multiple changes to monitor by including a comma-separated list.
The types of files that you will look for are text files, so set the Filter property to .txt. Note that if you were going to watch for all file types, then the value of the Filter property would be set to *.*.
If you wanted to watch subdirectories, you would set the IncludeSubdirectories property to True. This example leaves it as False, which is the default value. Figure 33-9 shows how the properties should be set.

Now that some properties are set, let's add some code to the OnStart event. You want to start the FileSystemWatcher1 component so it will start triggering events when files are created or copied into the directory you are monitoring, so set the EnableRaisingEvents property to True:
Protected Overrides Sub OnStart(ByVal args() As String)
    ' Start monitoring for files
    FileSystemWatcher1.EnableRaisingEvents = True
End Sub
After the file monitoring properties are initialized, you are ready to start the monitoring. When the service stops, you need to stop the file monitoring process. Add the following code to the OnStop event:
Protected Overrides Sub OnStop()
    ' Stop monitoring for files
     FileSystemWatcher1.EnableRaisingEvents = False
End SubNow you are ready to place an EventLog component in the service to facilitate logging of events. Drag and drop an EventLog control from the Components tab of the Toolbox onto the designer surface of FileWatcherService.vb. This control is automatically called EventLog1.
Set the Log property for Eventlog1 to Application, and set the Source property to FileWatcherService.
Next, you will place some logic in the Created event of the FileSystemWatcher component to log when a file has been created. This event fires when a file has been placed or created in the directory that you are monitoring. It fires because the information last modified on the file has changed.
Select FileSystemWatcher1 from the Class Name drop-down list and select Created from the Method Name drop-down list. The Created event will be added to your code. Add code to the Created event as follows:
Public Sub FileSystemWatcher1_Created(ByVal sender As Object, _
ByVal e As System.IO.FileSystemEventArgs) _
Handles FileSystemWatcher1.Created
Dim sMessage As String
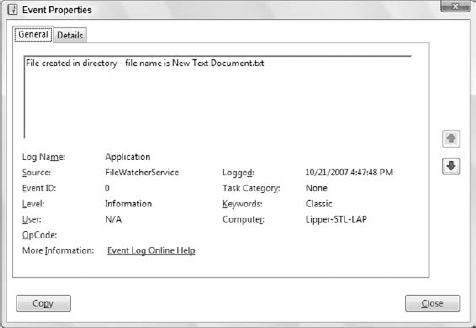
sMessage = "File created in directory - file name is " + e.Name
EventLog1.WriteEntry(sMessage)
End SubNotice that the event argument's object (the object named "e" in the event parameters) includes a property called Name. This property holds the name of the file that generated the event.
At this point, you could add the other events for FileSystemWatcher (Changed, Deleted, Renamed) in a similar way and create corresponding log messages for those events. To keep the example simple, you will just use the Created event in this service.
You need to add an Installer class to this project to install the application. This is done as it was in the CounterMonitor example, by right-clicking the design surface for the service and selecting Add Installer or by clicking the Add Installer link in the Properties window of Visual Studio 2008. Don't forget to change the Account property to LocalSystem, or set it to User and fill in the Username and Password properties.
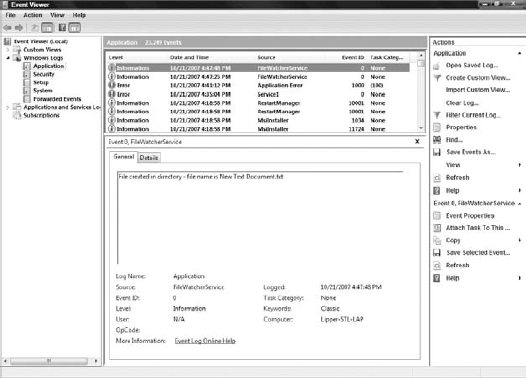
As before, you must install the service using InstallUtil.exe. Then, start it with the Server Explorer or the Service Manager. Upon successful compilation of these steps, you will get a message logged for any file with a .txt extension that you copy or create in the monitored directory. After dropping some sample text files into the monitored directory, you can use the Event Viewer to ensure that the events are present.
Figure 33-10 shows the Event Viewer with several example messages created by the service. If you right-click one of the events for FileWatcherService, you will see a detail screen. Notice that the message corresponds to the Event Log message you constructed in the Created event of the FileSystemWatcher control in the service, as shown in Figure 33-11.
Because a service must be run from within the context of the Service Control Manager, rather than from within Visual Studio 2008, debugging a service is not as straightforward as debugging other Visual Studio 2008 application types. To debug a service, you must start the service and then attach a debugger to the process in which it is running. You can then debug the application using all of the standard debugging functionality of Visual Studio 2008.
Note
Don't attach to a process unless you know what the process is and understand the consequences of attaching to and possibly killing that process.
To avoid going through this extra effort, you may want to test most of the code in your service in a standard Windows Forms application. This test-bed application can have the same components (FileSystemWatchers, EventLogs, Timers, and so on) as the Windows Service, and thus will be able to run the same logic in events. Once you have checked out the logic in this context, you can just copy and paste it into a Windows Service application.
However, sometimes the service itself needs to be debugged directly, so it is important to understand how to attach to the service's process and do direct debugging. You can only debug a service when it is running. When you attach the debugger to the service, you are interrupting it. The service is suspended for a short period while you attach to it. It is also interrupted when you place breakpoints and step through your code.
Attaching to the service's process enables you to debug most, but not all, of the service's code. For instance, because the service has already been started, you cannot debug the code in the service's OnStart method this way, or the code in the Main method that is used to load the service. To debug the OnStart event or any of the Visual Studio 2008 designer code, you have to add a dummy service and start that service first. In the dummy service, you would create an instance of the service that you want to debug. You can place some code in a Timer object and create the new instance of the object that you want to debug after 30 seconds or so. Allow enough time to attach to the debugger before the new instance is created. Meanwhile, place breakpoints in your startup code to debug those events, if desired.
Follow these steps to debug a service:
Install the service.
Start the service, either from the Service Control Manager, from Server Explorer, or from code.
In Visual Studio 2008, load the solution for the service. Then select Attach to Process from the Debug menu. The Attach to Process dialog box appears (see Figure 33-12).
For a Windows Service, the desired process to attach to is not a foreground process; be sure to check the check box next to the "Show processes from all users" option.
In the Available Processes section, click the process indicated by the executable name for the service, and then click Attach.
You can now debug your process. Place a breakpoint in the code for the service at the place you want to debug. Cause the code in the service to execute (by placing a file in a monitored directory, for example).

Let's go through an actual scenario, using your earlier CounterMonitor example. Bring up both the CounterMonitor project and the CounterTest project in separate instances of the Visual Studio 2008 IDE. Make sure that the CounterMonitor service has been started. It is best if you hear it beeping — that way you know it is working. If necessary, increment the performance counter to make it beep.
In the CounterMonitor project, select Debug
You will then get a dialog box asking you what program types you are interested in debugging. Because you are working solely within .NET, check the box next to Common Language Runtime and leave the rest unchecked. Click the OK button, and then click the Close button on the Processes dialog box. You are now attached to the process running CounterMonitor in the background.
Place a breakpoint on the first line of the OnCustomCommand event:
Timer1.Enabled = False
Now you are ready to check debugging. Bring up the CounterTest program and start it. Press one of the radio buttons to change the beep interval. You will hear the beeping stop because CounterMonitor.exe has entered debugging mode. Switch back to the CounterMonitor project. The cursor will be on the breakpoint line in OnCustomCommand. You can use the normal commands at this point to step through the code.
This chapter presented a general overview of what a Windows Service is and how to create one with Visual Basic. The techniques in this chapter can be used for many different types of background service, including the following:
Automatically moving statistical files from a database server to a web server
Pushing general files across computers and platforms
A watchdog timer to ensure that a connection is always available
An application to move and process FTP files, or indeed files received from any source
While Visual Basic cannot be used to create every type of Windows Service, it is effective at creating many of the most useful ones. The .NET Framework classes for Windows Services make this creation relatively straightforward. The designers generate much of the routine code needed, enabling you, as a developer, to concentrate on the code that is specific to your particular Windows Service.