
In today's network-centric world, it is very likely that applications will need to work with other computers over a private network, the Internet, or both. This chapter details how to do the following:
Download resources from the Web
Design your own communication protocols
Reuse Internet Explorer in your applications
Downloading content from the Web is very easy, and in this chapter you will throw together a basic application before getting into some meatier topics. This application downloads HTML from a Web page and displays it in a text box. Later, you will learn how you can display HTML properly by hosting Internet Explorer (IE) directly using the WebBrowser control in Windows Forms applications, but for now, you will just use plain text.
In order to download a Web page, you need to be able to identify the remote page that you wish to download, make a request of the web server that can provide that page, listen for the response, and download the data for the resource.
The relevant classes for this example are System.Uri, System.Net.WebRequest, System.Net.HttpWebRequest, and System.Net.HttpWebResponse:
System.Uriis a useful general-purpose class for expressing a Uniform Resource Identifier (URI). A Uniform Resource Locator (URL) is a type of URI (although, in reality, the terms are so confused that they are often used interchangeably). A URI, however, is "more than" a URL, which is why this .NET class isUriand notUrl. System. You will find thatUrihas many properties for decoding a URI. For example, if you had a string such aswww.lipperweb.com:8080/myservices/myservice.asmx?WSDL, you could use thePortproperty to extract the port number, theQueryproperty to extract the query string, and so on.A
WebRequestexpresses some kind of Internet resource, whether it is located on the LAN or WAN. (A better name for this class would beNetRequest, as the classes are not specifically related to the Web protocol.)Protocol-specific descendants of
WebRequestcarry out the actual request:HttpWebRequestexpresses an HTTP download andFileWebRequestexpresses a file download — for example,//c:/MyFile.txt.An
HttpWebResponseis returned once a connection to the web server has been made and the resource is available to download.
There are another two major classes related to working with the Internet in the .NET Framework: System.Net.WebClient and System.Net.WebProxy. WebClient, the latter being a helper class that wraps the request and response classes previously mentioned.
Because this is a professional-level book, this example shows you what to do behind the scenes — in effect, re-engineer what WebClient can do. You will look at WebProxy later, which enables you to explicitly define a proxy server to use for Internet communications.
Let's use these classes to build an application. Create a new Windows application, create a new form, and add controls to it as shown in Figure 34-1.

The control names are textUrl, buttonGo, and textData. The Anchor properties of the controls are set so that the form resizes properly. The textUrl should be set to Top, Left, Right. Set buttonGo to Top, Right, and set textData to Top, Left, Bottom, Right.
Add the following namespace import declarations to the form's code:
Imports System.IO
Imports System.Net
Imports System.Text
To keep the code simple, you will include all the functionality in the Click handler of buttonGo. Ideally, you want to break the code in the handler out to a separate method. This enriches the interface of the object and promotes good reuse.
The first thing you do here is create a new System.Uri based on the URL that the user enters into the text box:
Private Sub buttonGo_Click(ByVal sender As System.Object, _
 ByVal e As System.EventArgs) Handles buttonGo.Click

   Dim uri As New Uri(textUrl.Text)
Then, illustrate some of the useful properties of System.Uri:
Dim builder As New StringBuilder()
builder.Append("AbsolutePath: " & uri.AbsolutePath & VbCrLf)
builder.Append("AbsoluteUri: " & uri.AbsoluteUri & VbCrLf)
builder.Append("Host: " & uri.Host & VbCrLf)
builder.Append("HostNameType: " & uri.HostNameType.ToString() & _
                VbCrLf)
builder.Append("LocalPath: " & uri.LocalPath & VbCrLf)
builder.Append("PathAndQuery: " & uri.PathAndQuery & VbCrLf)
builder.Append("Port: " & uri.Port & VbCrLf)
builder.Append("Query: " & uri.Query & VbCrLf)
builder.Append("Scheme: " & uri.Scheme)

MessageBox.Show(builder.ToString())
The shared Create method of System.Net.WebRequest is used to create the actual object that you can use to download the Web resource. Note that you do not create an instance of HttpWebRequest; you are working with a return object of type WebRequest. However, you will actually be given an HttpWebRequest object, and WebRequest chooses the most appropriate class to return based on the URI. This enables you to build your own handlers for different network resources that can be used by consumers who simply supply an appropriate URL.
To make the request and get the response back from the server (so that ultimately you can access the data), you call the GetResponse method of WebRequest. In this case, you get an HttpWebResponse object — again, it is up to the implementation of the WebRequest-derived object, in this case HttpWebRequest, to return an object of the most suitable type.
If the request is not OK, then you will get an exception (which, for the sake of simplicity, you won't bother processing). If the request is OK, then you can get the length and type of the response using properties of the WebResponse object:
Dim request As WebRequest = WebRequest.Create(uri)
Dim response As WebResponse = request.GetResponse()
builder = New StringBuilder()
builder.Append("Request type: " & request.GetType().ToString() & VbCrLf)
builder.Append("Response type: " & response.GetType().ToString() & VbCrLf)
builder.Append("Content length: " & response.ContentLength & _
        " bytes" & VbCrLf)
builder.Append("Content type: " & response.ContentType & VbCrLf)

MessageBox.Show(builder.ToString())
It just remains for you to download the information. You can do this through a stream (WebResponse objects return a stream by overriding GetResponseStream); moreover, you can use a System.IO.StreamReader to download the whole lot in a single call by calling the ReadToEnd method. This method only downloads text, so if you want to download binary data, then you have to use the methods on the Stream object directly, or use a System.IO.BinaryReader:
Dim stream As Stream = response.GetResponseStream()
 Dim reader As New StreamReader(stream)
 Dim data As String = reader.ReadToEnd()

 reader.Close()
 stream.Close()

 textData.Text = data
End Sub
If you run the application, enter a URL of www.reuters.com, and click Go, you will see debugging information about the URL, as shown in Figure 34-2.
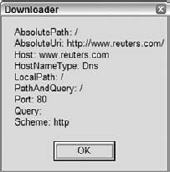
This is a simple URL. The application tells you that the scheme is http and the host name type is Dns. If you enter an IP into the URL to be requested, rather than a host name, then this type will come back as IPv4. This tells you where the host name came from; in this case, it is a general Internet host name. Next, the application provides information about the response (see Figure 34-3).
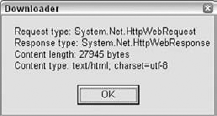
The response data itself is shown in Figure 34-4.
Perhaps the most important exception to be aware of when using these classes is the System.Net.WebException exception. If anything goes wrong on the WebRequest.GetResponse call, then this exception is thrown. Among other things, this exception provides access to the WebResponse object through the Response property. The StatusCode property of WebResponse tells you what actually happened through the HttpStatusCode enumeration. For example, HttpStatusCode.NotFound is the equivalent of the HTTP 404 status code.

There may be times when you need to transfer data across a network (either a private network or the Internet) but the existing techniques and protocols do not exactly suit your needs. For example, you cannot download resources using the techniques discussed at the start of this chapter, and you cannot use Web services (as described in chapter 28) or remoting (as described in Chapter 29). When this happens, the best course of action is to roll your own protocol using sockets.
TCP/IP and, therefore, the Internet itself are based on sockets. The principle is simple: establish a port at one end and allow clients to "plug in" to that port from the other end. Once the connection is made, applications can send and receive data through a stream. For example, HTTP nearly always operates on port 80, so a web server opens a socket on port 80 and waits for incoming connections (Web browsers, unless told otherwise, attempt to connect to port 80 in order to make a request of that web server).
In .NET, sockets are implemented in the System.Net.Sockets namespace and use classes from System.Net and System.IO to get the stream classes. Although working with sockets can be a little tricky outside of .NET, the framework includes some superb classes that enable you to open a socket for inbound connections (System.Net.TcpListener) and for communication between two open sockets (System.Net.TcpClient). These two classes, in combination with some threading shenanigans, enable you to build your own protocol through which you can send any data you like. With your own protocol, you have ultimate control over the communication.
To demonstrate these techniques, you are going to build Wrox Messenger, a very basic instant messenger application similar to MSN Messenger.
You will wrap all the functionality of your application into a single Windows application, which will act as both a server that waits for inbound connections and a client that has established outbound connections.
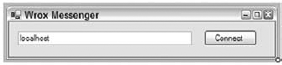
Create a new project called WroxMessenger. Change the title of Form1 to Wrox Messenger and add a TextBox control called textConnectTo and a Button control called buttonConnect. The form should appear as shown in Figure 34-5.
You will learn more about this in greater detail later, but for now, it is very important that all of your UI code runs in the same thread, and that the thread is actually the main application that creates and runs Form1.
To keep track of what is happening, you will add a field to Form1 that enables you to store the ID of the startup thread and report that ID on the caption. This helps provide a context for the thread/UI issues discussed later. You also need some namespace imports and a constant specifying the ID of the default port. Add the following code to Form1:
Imports System.Net
Imports System.Net.Sockets
Imports System.Threading

Public Class Form1

   Private Shared _mainThreadId As Integer
   Public Const ServicePort As Integer = 10101
Next, create a New method for Form1 (Form1.vb) and add this code to the constructor that populates the field and changes the caption:
Public Sub New()

   ' This call is required by the Windows Form Designer.
   InitializeComponent()

   ' Add any initialization after the InitializeComponent() call.
   _mainThreadId = System.Threading.Thread.CurrentThread.GetHashCode()

   Text &= "-" & _mainThreadId.ToString()
End Sub
Note that you can get to the Form1.vb file's New method by using Visual Studio and selecting Form1 and New in the uppermost drop-downs in the document window. This causes the Form1.vb file's New method to be created on your behalf.
To listen for incoming connections, you will create a separate class called Listener. This class uses an instance of System.Net.Sockets.TcpListener to wait for incoming connections. Specifically, it opens a TCP port that any client can connect to — sockets are not platform-specific. Although connections are always made on a specific, known port, the actual communication takes place on a port of the TCP/IP subsystem's choosing, which means you can support many inbound connections at once, despite the fact that each of them connects to the same port. Sockets are an open standard available on pretty much any platform. For example, if you publish the specification for your protocol, then developers working on Linux can connect to your Wrox Messenger service.
When you detect an inbound connection, you are given a System.Net.Sockets.TcpClient object. This is your gateway to the remote client. To send and receive data, you need to obtain a System.Net.NetworkStream object (returned through a call to GetStream on TcpClient), which returns a stream that you can use.
Create a new class called Listener. This thread needs members to hold an instance of a System.Threading.Thread object, and a reference back to the Form1 class that is the main form in the application. Not covered here is how to spin up and down threads, or synchronization. (Refer to Chapter 26 if you need more information about that.)
Here is the basic code for the Listener class:
Imports System.Net.Sockets
Imports System.Threading

Public Class Listener

 Private _main As Form1
 Private _listener As TcpListener
 Private _thread As Thread

 Public Sub New(ByVal main As Form1)
  _main = main
 End Sub

 Public Sub SpinUp()

  ' create and start the new threads...
  _thread = New Thread(AddressOf ThreadEntryPoint)
  _thread.Start()
 End Sub
End Class
The obvious missing method here is ThreadEntryPoint. This is where you need to create the socket and wait for inbound connections. When you get them, you are given a TcpClient object, which you pass back to Form1, where the conversation window can be created. You create this method in the Listener.vb class file.
To create the socket, create an instance of TcpListener and give it a port. In your application, the port you are going to use is 10101. This port should be free on your computer, but if the debugger breaks on an exception when you instantiate TcpListener or call Start, then try another port. Once you have done that and called Start to configure the object to listen for connections, you drop into an infinite loop and call AcceptTcpClient. This method blocks until the socket is closed or a connection becomes available. If you get Nothing back, then either the socket is closed or there is a problem, so you drop out of the thread. If you get something back, then you pass the TcpClient over to Form1 through a call to the (not yet built) ReceiveInboundConnection method:
' ThreadEntryPoint...
Protected Sub ThreadEntryPoint()

 ' Create a socket...
 _listener = New TcpListener(Form1.ServicePort)
 _listener.Start()

 ' Loop infinitely, waiting for connections.
 Do While True

  ' Get a connection...
Dim client As TcpClient = _listener.AcceptTcpClient()
  If client Is Nothing Then
   Exit Do
  End If
  ' Process it...
  _main.ReceiveInboundConnection(client)
  Loop
End Sub
It is in the ReceiveInboundConnection method that you create the Conversation form that the user can use to send messages.
When building Windows Forms applications that support threading, there is always the possibility of running into a problem with the Windows messaging subsystem. This is a very old part of Windows that powers the Windows user interface (the idea has been around since version 1.0 of the platform, although the implementation on modern Windows versions is far removed from the original).
Even those who are not familiar with old-school Windows programming, such as MFC, Win32, or even Win16 development, should be familiar with events. When you move a mouse over a form, you get MouseMove events. When you close a form, you get a Closed event. There is a mapping between these events and the messages that Windows passes around to support the actual display of the windows. For example, whenever you receive a MouseMove event, a message called WM_MOUSEMOVE is sent to the window by Windows, in response to the mouse driver. In .NET and other rapid application development (RAD) environments such as VB and Delphi, this message is converted into an event that you can write code against.
Although this is getting way off the topic — you know how to build Windows Forms applications by now and don't need the details of messages such as WM_NCHITTEST or WM_PAINT — it has an important implication. In effect, Windows creates a message queue for each thread into which it posts the messages that the thread's windows have to work with. This queue is looped on a virtually constant basis, and the messages are distributed to the appropriate window (remember that small controls such as buttons and text boxes are also windows). In .NET, these messages are turned into events, but unless the message queue is looped, the messages do not get through.
Suppose Windows needs to paint a window. It posts a WM_PAINT message to the queue. A message loop implemented on the main thread of the process containing the window detects the message and dispatches it on to the appropriate window, where it is processed. Now suppose that the queue is not looped. The message is never picked up and the window is never painted.
In a Windows application, a single thread is usually responsible for message dispatch. This thread is typically (but not necessarily) the main application thread — the one that is created when the process is first created. If you create windows in a different thread, then that new thread has to support the message dispatch loop so that messages destined for the windows get through. However, with Listener, you have no code for processing the message loop, and there is little point in writing any because the next time you call AcceptTcpClient, you are going to block, and everything will stop working.
The trick, therefore, is to create the windows only in the main application thread, which is the thread that created Form1 and is processing the messages for all the windows created in this thread. You can pass calls from one thread to the other by calling the Invoke method of Form1.
This is where things start to get complicated. There is a very lot of code to write to get to a point where you can see that the socket connection has been established and get conversation windows to appear. Here is what you need to do:
Create a new Conversation form. This form needs controls for displaying the total content of the conversation, plus a
TextBoxcontrol for adding new messages.The Conversation window needs to be able to send and receive messages through its own thread.
Form1needs to be able to initiate new connections. This will be done in a separate thread that is managed by the thread pool. When the connection has been established, a new Conversation window needs to be created and configured.Form1also needs to receive inbound connections. When it gets one of these, a new Conversation must be created and configured.
Let's look at each of these challenges.
The simplest place to start is to build the new Conversation form, which needs three TextBox controls (textUsername, textMessages, and textMessage) and a Button control (buttonSend), as shown in Figure 34-6.

This class requires a number of fields and an enumeration. It needs fields to hold the username of the user (which you will default to Evjen), the underlying TcpClient, and the NetworkStream returned by that client. The enumeration indicates the direction of the connection (which will help you when debugging):
Imports System.Net
Imports System.Net.Sockets
Imports System.Text
Imports System.Threading
Imports System.Runtime.Serialization.Formatters.Binary

Public Class Conversation

   Private _username As String = "Evjen"
   Private _client As TcpClient
   Private _stream As NetworkStream
Private _direction As ConversationDirection

   Public Enum ConversationDirection As Integer
      Inbound = 0
      Outbound = 1
   End Enum
At this point, we won't look into the issues surrounding establishing a thread for exchanging messages, but we will look at implementing the ConfigureClient method. This method eventually does more work than this, but for now it sets a couple of fields and calls UpdateCaption:
Public Sub ConfigureClient(ByVal client As TcpClient, _
              ByVal direction As ConversationDirection)
   ' Set it up...
   _client = client
   _direction = direction

   ' Update the window...
   UpdateCaption()
End Sub

Protected Sub UpdateCaption()

   ' Set the text.
   Dim builder As New StringBuilder(_username)
   builder.Append(" - ")
   builder.Append(_direction.ToString())
   builder.Append(" - ")
   builder.Append(Thread.CurrentThread.GetHashCode())
   builder.Append(" - ")

   If Not _client Is Nothing Then
      builder.Append("Connected")
   Else
      builder.Append("Not connected")
   End If

   Text = builder.ToString()
End Sub
Note a debugging issue to deal with: if you are connecting to a conversation on the same machine, then you need a way to change the name of the user sending each message; otherwise, things get confusing. That is what the topmost TextBox control is for. In the constructor, set the text for the textUsername.Text property:
Public Sub New()

   ' This call is required by the Windows Form Designer.
   InitializeComponent()

   ' Add any initialization after the InitializeComponent() call.
   textUsername.Text = _username
End Sub
On the TextChanged event for this control, update the caption and the internal _username field:
Private Sub textUsername_TextChanged(ByVal sender As System.Object, _
                   ByVal e As System.EventArgs) _
                   Handles textUsername.TextChanged

   _username = textUsername.Text
   UpdateCaption()
End SubForm1 needs to be able to both initiate connections and receive inbound connections — the application is both a client and a server. You have already created some of the server portion by creating Listener; now you will look at the client side.
The general rule when working with sockets is that any time you send anything over the wire, you must perform the actual communication in a separate thread. Virtually all calls to send and receive do so in a blocking manner; that is, they block until data is received, block until all data is sent, and so on.
If threads are used well, then the UI will keep running as normal, irrespective of the problems that may occur during transmitting and receiving. This is why in the InitiateConnection method on Form1, you defer processing to another method called InitiateConnectionThreadEntryPoint, which is called from a new thread:
Public Sub InitiateConnection()
   InitiateConnection(textConnectTo.Text)
End Sub

Public Sub InitiateConnection(ByVal hostName As String)

   ' Give it to the threadpool to do...
   ThreadPool.QueueUserWorkItem(AddressOf _
   Me.InitiateConnectionThreadEntryPoint, hostName)
End Sub

Private Sub buttonConnect_Click(ByVal sender As System.Object, _
                ByVal e As System.EventArgs) _
                Handles buttonConnect.Click

   InitiateConnection()
End Sub
Inside the thread, you try to convert the host name that you are given into an IP address (localhost is used as the host name in the demonstration, but it could be the name of a machine on the local network or a host name on the Internet). This is done through the shared GetHostEntry method on System.Net.Dns, and returns a System.Net.IPHostEntry object. Because a host name can point to multiple IP addresses, you will just use the first one that you are given. You take this address expressed as an IP (for example, 192.168.0.4) and combine it with the port number to get a new System.Net.IPEndPoint. Then, you create a new TcpClient from this IPEndPoint and try to connect.
If at any time an exception is thrown (which can happen because the name could not be resolved or the connection could not be established), you pass the exception to HandleInitiateConnectionException. If it succeeds, then you pass it to ProcessOutboundConnection. Both of these methods will be implemented shortly:
Private Sub InitiateConnectionThreadEntryPoint(ByVal state As Object)

   Try
      ' Get the host name...
      Dim hostName As String = CStr(state)

      ' Resolve...
      Dim hostEntry As IPHostEntry = Dns.GetHostEntry(hostName)
      If Not hostEntry Is Nothing Then

         ' Create an end point for the first address.
         Dim endPoint As New IPEndPoint(hostEntry.AddressList(0), ServicePort)

         ' Create a TCP client...
         Dim client As New TcpClient()
         client.Connect(endPoint)

         ' Create the connection window...
         ProcessOutboundConnection(client)
      Else
         Throw New ApplicationException("Host '" & hostName & _
            "' could not be resolved.")
      End If
   Catch ex As Exception
      HandleInitiateConnectionException(ex)
   End Try
End Sub
When it comes to HandleInitiateConnectionException, you start to see the inter-thread UI problems that were mentioned earlier. When there is a problem with the exception, you need to tell the user, which means you need to move the exception from the thread-pool-managed thread into the main application thread. The principle for this is the same; you need to create a delegate and call that delegate through the form's Invoke method. This method does all the hard work in marshaling the call across to the other thread.
Here is what the delegates look like. They have the same parameters of the calls themselves. As a naming convention, it is a good idea to use the same name as the method and tack the word Delegate on the end:
Public Class Form1

   Private Shared _mainThreadId As Integer
   ' delegates...
   Protected Delegate Sub HandleInitiateConnectionExceptionDelegate( _
                                             ByVal ex As Exception)
In the constructor for Form1, you capture the thread caller's thread ID and store it in _mainThreadId. Here is a method that compares the captured ID with the ID of the current thread:
Public Shared Function IsMainThread() As Boolean
   If Thread.CurrentThread.GetHashCode() = _mainThreadId Then
Return True
   Else
      Return False
   End If
End Function
The first thing you do at the top of HandleInitiateConnectionException is check the thread ID. If it does not match, then you create the delegate and call it. Notice that you set the delegate to call back into the same method because the second time it is called, you would have moved to the main thread; therefore, IsMainThread returns True, and you can process the exception properly:
Protected Sub HandleInitiateConnectionException(ByVal ex As Exception)

   ' main thread?
   If IsMainThread() = False Then

      ' Create and call...
      Dim args(0) As Object
      args(0) = ex
      Invoke(New HandleInitiateConnectionExceptionDelegate(AddressOf _
         HandleInitiateConnectionException), args)

      ' return
      Return
   End If

   ' Show it.
   MessageBox.Show(ex.GetType().ToString() & ":" & ex.Message)
End Sub
The result is that when the call comes in from the thread-pool-managed thread, IsMainThread returns False, and the delegate is created and called. When the method is entered again as a result of the delegate call, IsMainThread returns True, and you see the message box.
When it comes to ProcessOutboundConnection, you have to again jump into the main UI thread. However, the magic behind this method is implemented in a separate method called Process-Connection, which can handle either inbound or outbound connections. Here is the delegate:
Public Class Form1

   Private Shared _mainThreadId As Integer
   Private _listener As Listener

   Protected Delegate Sub ProcessConnectionDelegate(ByVal client As _
      TcpClient, ByVal direction As Conversation.ConversationDirection)
   Protected Delegate Sub HandleInitiateConnectionExceptionDelegate(ByVal _
      ex As Exception)
Here is the method itself, which creates the new Conversation form and calls the ConfigureClient method:
Protected Sub ProcessConnection(ByVal client As TcpClient, _
   ByVal direction As Conversation.ConversationDirection)
' Do you have to move to another thread?
   If IsMainThread() = False Then

      ' Create and call...
      Dim args(1) As Object
      args(0) = client
      args(1) = direction
      Invoke(New ProcessConnectionDelegate(AddressOf ProcessConnection), args)

      Return
   End If


   ' Create the conversation window...
   Dim conversation As New Conversation()
   conversation.Show()
   conversation.ConfigureClient(client, direction)
End Sub
Of course, ProcessOutboundConnection needs to defer to ProcessConnection:
Public Sub ProcessOutboundConnection(ByVal client As TcpClient)
   ProcessConnection(client, Conversation.ConversationDirection.Outbound)
End Sub
Now that you can connect to something on the client side, let's look at how to receive connections (on the server side).
You have already built Listener, but you have not created an instance of it or spun up its thread to wait for incoming connections. To do that, you need a field in Form1 to hold an instance of the object. You also need to tweak the constructor. Here is the field:
Public Class Form1

   Private _mainThreadId As Integer
   Private _listener As Listener
Here is the new code that needs to be added to the constructor:
Public Sub New()

   ' This call is required by the Windows Form Designer.
   InitializeComponent()

   ' Add any initialization after the InitializeComponent() call.
   _mainThreadId = System.Threading.Thread.CurrentThread.GetHashCode()

   Text &= "-" & _mainThreadId.ToString()

   ' listener...
   _listener = New Listener(Me)
   _listener.SpinUp()
End Sub
When inbound connections are received, you get a new TcpClient object. This is passed back to Form1 through the ReceiveInboundConnection method. This method, like ProcessOutboundConnection, defers to ProcessConnection. Because ProcessConnection already handles the issue of moving the call to the main application thread, ReceiveInboundConnection looks like this:
Public Sub ReceiveInboundConnection(ByVal client As TcpClient)
   ProcessConnection(client, Conversation.ConversationDirection.Inbound)
End Sub
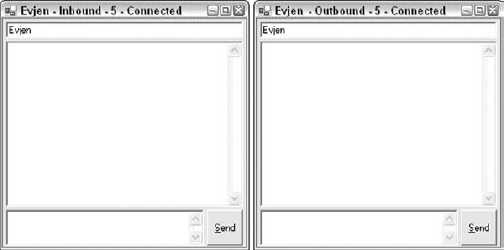
If you run the project now, you should be able to click the Connect button and see two windows — Inbound and Outbound (see Figure 34-7).
If you close all three windows, the application keeps running because you have not written code to close down the listener thread, and having an open thread like this keeps the application open. Select Debug
By clicking the Connect button, you are calling InitiateConnection. This spins up a new thread in the pool that resolves the given host name (localhost) into an IP address. This IP address, in combination with a port number, is then used in the creation of a TcpClient object. If the connection can be made, then ProcessOutboundConnection is called, which results in the first of the conversation windows being created and marked as "outbound."
This example is somewhat artificial, as the two instances of Wrox Messenger should be running on separate computers. On the remote computer (if you are connecting to localhost, this will be the same computer), a connection is received through the AcceptTcpClient method of TcpListener. This results in a call to ReceiveInboundConnection, which in turn results in the creation of the second conversation window, this time marked as "inbound."
The next step is to determine how to exchange messages between the two conversation windows. You already have a TcpClient in each case, so all you have to do is send binary data down the wire on one side and pick it up at the other end. The two conversation windows act as both client and server, so both need to be able to send and receive.
You have three challenges to meet:
You need to establish one thread to send data and another thread to receive data.
Data sent and received needs to be reported back to the user so that he or she can follow the conversation.
The data that you want to send has to be converted into a wire-ready format, which in .NET terms usually means serialization.
The power of sockets enables you to define whatever protocol you like for data transmission. If you wanted to build your own SMTP server, you could implement the (publicly available) specifications, set up a listener to wait for connections on port 25 (the standard port for SMTP), wait for data to come in, process it, and return responses as appropriate.
It is best to work in this way when building protocols. Unless there are very strong reasons for not doing so, make your server as open as possible: don't tie it to a specific platform. This is how things are done on the Internet. To an extent, things like Web Services should negate the need to build your own protocols; as you go forward, you will rely instead on the "remote object available to local client" paradigm.
Now it is time to consider the idea of using the serialization features of .NET to transmit data across the network. After all, you have already seen this in action with Web Services and remoting. You can take an object in .NET, use serialization to convert it to a string of bytes, and expose that string to a Web Service consumer, to a remoting client, or even to a file.
Chapter 29 discussed the BinaryFormatter and SoapFormatter classes. You could use either of those classes, or create your own custom formatter, to convert data for transmission and reception. In this case, you are going to create a new class called Message and use BinaryFormatter to crunch it down into a wire-ready format and convert it back again for processing.
This approach is not ideal from the perspective of interoperability, because the actual protocol used is lost in the implementation of the .NET Framework, rather than being under your absolute control.
If you want to build an open protocol, this is not the best way to do it. Unfortunately, the best way is beyond the scope of this book, but a good place to start is to look at existing protocols and standards and model any protocol on their approach. BinaryFormatter provides a quick-and-dirty approach, which is why you are going to use it here.
The Message class contains two fields, _username and _message, which form the entirety of the data that you want to transmit. The code for this class follows; note how the Serializable attribute is applied to it so that BinaryFormatter can change it into a wire-ready form. You are also providing a new implementation of ToString:
Imports System.Text

<Serializable()> Public Class Message
Private _username As String
   Private _message As String

   Public Sub New(ByVal name As String)
      _username = name
   End Sub

   Public Sub New(ByVal name As String, ByVal message As String)
      _username = name
      _message = message
   End Sub

   Public Overrides Function ToString() As String
      Dim builder As New StringBuilder(_username)
      builder.Append(" says:")
      builder.Append(ControlChars.CrLf)
      builder.Append(_message)
      builder.Append(ControlChars.CrLf)

      Return builder.ToString()
   End Function

End Class
Now all you have to do is spin up two threads, one for transmission and one for reception, updating the display. You need two threads per conversation, so if you have 10 conversations open, you need 20 threads plus the main UI thread, plus the thread running TcpListener.
Receiving messages is easy. When calling Deserialize on BinaryFormatter, you give it the stream returned to you from TcpClient. If there is no data, then this blocks. If there is data, then it is decoded into a Message object that you can display. If you have multiple messages coming down the pipe, then BinaryFormatter keeps processing them until the pipe is empty. Here is the method for this, which should be added to Conversation. Remember that you haven't implemented ShowMessage yet:
Protected Sub ReceiveThreadEntryPoint()

   ' Create a formatter...
   Dim formatter As New BinaryFormatter()

   ' Loop
   Do While True
      ' Receive...
      Dim message As Message = formatter.Deserialize(_stream)

      If message Is Nothing Then
         Exit Do
      End If

      ' Show it...
      ShowMessage(message)
   Loop
End Sub
Transmitting messages is a bit more complex. You want a queue (managed by a System.Collections.Queue) of outgoing messages. Every second, you will examine the state of the queue. If you find any messages, then you use BinaryFormatter to transmit them. Because you will be accessing this queue from multiple threads, you use a System.Threading.ReaderWriterLock to control access. To minimize the amount of time you spend inside locked code, you quickly transfer the contents of the shared queue into a private queue that you can process at your leisure. This enables the client to continue to add messages to the queue through the UI, even though existing messages are being sent by the transmit thread.
First, add the following members to Conversation:
Public Class Conversation

   Private _username As String = "Evjen"
   Private _client As TcpClient
   Private _stream As NetworkStream
   Private _direction As ConversationDirection
   Private _receiveThread As Thread
   Private _transmitThread As Thread
   Private _transmitQueue As New Queue()
   Private _transmitLock As New ReaderWriterLock()
Now, add this method again to Conversation:
Protected Sub TransmitThreadEntryPoint()

   ' Create a formatter...
   Dim formatter As New BinaryFormatter()
   Dim workQueue As New Queue()

   ' Loop
   Do While True

      ' Wait for the signal...
      Thread.Sleep(1000)

      ' Go through the queue...
      _transmitLock.AcquireWriterLock(-1)
      Dim message As Message
      workQueue.Clear()

      For Each message In _transmitQueue
         workQueue.Enqueue(message)
      Next

      _transmitQueue.Clear()
      _transmitLock.ReleaseWriterLock()

      ' Loop the outbound messages...
      For Each message In workQueue

         ' Send it...
         formatter.Serialize(_stream, message)
Next Loop End Sub
When you want to send a message, you call one version of the SendMessage method. Here are all of the implementations, and the Click handler for buttonSend:
Private Sub buttonSend_Click(ByVal sender As System.Object, _
   ByVal e As System.EventArgs) Handles buttonSend.Click

   SendMessage(textMessage.Text)
End Sub

Public Sub SendMessage(ByVal message As String)
   SendMessage(_username, message)
End Sub

Public Sub SendMessage(ByVal username As String, ByVal message As String)
   SendMessage(New Message(username, message))
End Sub

Public Sub SendMessage(ByVal message As Message)
   ' Queue it
   _transmitLock.AcquireWriterLock(-1)
   _transmitQueue.Enqueue(message)
   _transmitLock.ReleaseWriterLock()

   ' Show it...
   ShowMessage(message)
End Sub
ShowMessage is responsible for updating textMessages so that the conversation remains up to date (notice how you add the message both when you send it and when you receive it so that both parties have an up-to-date thread). This is a UI feature, so it is good practice to pass it over to the main application thread for processing. Although the call in response to the button click comes off the main application thread, the one from inside ReceiveThreadEntryPoint does not. Here is what the delegate looks like:
Public Class Conversation

   ' members...
   Private _username As String = "Evjen"
   Private _client As TcpClient
   Private _stream As NetworkStream
   Private _direction As ConversationDirection
   Private _receiveThread As Thread
   Private _transmitThread As Thread
   Private _transmitQueue As New Queue()
   Private _transmitLock As New ReaderWriterLock()

   Public Delegate Sub ShowMessageDelegate(ByVal message As Message)
Here is the method implementation:
Public Sub ShowMessage(ByVal message As Message)
   ' Thread?
   If Form1.IsMainThread() = False Then

      ' Run...
      Dim args(0) As Object
      args(0) = message
      Invoke(New ShowMessageDelegate(AddressOf ShowMessage), args)

      ' Return...
      Return
   End If

   ' Show it...
   textMessages.Text &= message.ToString()
End Sub
All that remains now is to spin up the threads. This should be done from within ConfigureClient. Before the threads are spun up, you need to obtain the stream and store it in the private _stream field. After that, you create new Thread objects as normal:
Public Sub ConfigureClient(ByVal client As TcpClient, _
ByVal direction As ConversationDirection)
' Set it up...
_client = client
_direction = direction
' Update the window...
UpdateCaption()
' Get the stream...
_stream = _client.GetStream()
' Spin up the threads...
_transmitThread = New Thread(AddressOf TransmitThreadEntryPoint)
_transmitThread.Start()
_receiveThread = New Thread(AddressOf ReceiveThreadEntryPoint)
_receiveThread.Start()
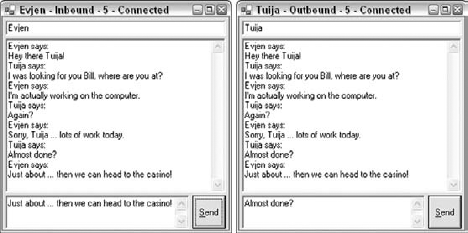
End SubAt this point, you should be able to connect and exchange messages, as shown in Figure 34-8.
Note that the screenshots show the username of the inbound connection as Tuija. This was done with the textUsername text box so that you can follow which half of the conversation comes from where.
You have yet to solve the problem of neatly closing the application, or, in fact, dealing with one person in the conversation closing down his or her window, indicating a wish to end the conversation. When the process ends (whether neatly or forcefully), Windows automatically mops up any open connections and frees up the port for other processes.
Suppose you have two computers, one window per computer, as you would in a production environment. When you close your window, you are indicating that you want to end the conversation. You need to close the socket and spin down the transmission and reception threads. At the other end, you should be able to detect that the socket has been closed, spin down the threads, and tell the user that the other user has terminated the conversation.
This all hinges on being able to detect when the socket has been closed. Unfortunately, Microsoft has made this very hard due to the design of the TcpClient class. TcpClient effectively encapsulates a System.Net.Sockets.Socket class, providing methods for helping to manage the connection lifetime and communication streams. However, TcpClient does not have a method or property that answers the question, "Am I still connected?" Therefore, you need get hold of the Socket object that TcpClient is wrapping, and then you can use its Connected property to determine whether the connection has been closed.
TcpClient does support a property called Client that returns a Socket, but this property is protected, meaning you can only access it by inheriting a new class from TcpClient. There is another way, though: You can use reflection to get at the property and call it without having to inherit a new class.
Microsoft claims that this is a legitimate technique, even though it appears to violate every rule in the book about encapsulation. Reflection is designed not only for finding out which types are available, and learning which methods and properties each type supports, but also for invoking those methods and properties whether they're protected or public. Therefore, in Conversation, you need to store the socket:
Public Class Conversation

   Private _username As String = "Evjen"
   Private _client As TcpClient
   Private _socket As Socket
In ConfigureClient, you use Reflection to peek into the Type object for TcpClient and dig out the Client property. Once you have a System.Reflection.PropertyInfo for this property, you can retrieve its value by using the GetValue method. Don't forget to import the System.Reflection namespace:
Public Sub ConfigureClient(ByVal client As TcpClient, _
              ByVal direction As ConversationDirection)
' Set it up...
_client = client
_direction = direction
' Update the window...
UpdateCaption()
' Get the stream...
_stream = _client.GetStream()
' Get the socket through reflection...
Dim propertyInfo As PropertyInfo = _
_client.GetType().GetProperty("Client", _
BindingFlags.Instance Or BindingFlags.Public)
If Not propertyInfo Is Nothing Then
_socket = propertyInfo.GetValue(_client, Nothing)
Else
Throw New Exception("Could not retrieve Client property from TcpClient")
End If
' Spin up the threads...
_transmitThread = New Thread(AddressOf TransmitThreadEntryPoint)
_transmitThread.Start()
_receiveThread = New Thread(AddressOf ReceiveThreadEntryPoint)
_receiveThread.Start()
End SubApplications are able to check the state of the socket either by detecting when an error occurs because you have tried to send data over a closed socket or by actually checking whether the socket is connected. If you either do not have a Socket available in socket (that is, it is Nothing) or you have one and it tells you that you are disconnected, then you give the user some feedback and exit the loop. By exiting the loop, you effectively exit the thread, which is a neat way of quitting the thread. Notice as well that you might not have a window at this point (you might be the one who closed the conversation by closing the window), so you wrap the UI call in a Try Catch (the other side will see a <disconnect> message):
Protected Sub TransmitThreadEntryPoint()
   ' Create a formatter...
   Dim formatter As New BinaryFormatter()
   Dim workQueue As New Queue()
   ' name...
   Thread.CurrentThread.Name = "Tx-" & _direction.ToString()
   ' Loop...
   Do While True
      ' Wait for the signal...
      Thread.Sleep(1000)
      ' Disconnected?
      If _socket Is Nothing OrElse _socket.Connected = False Then
         Try
            ShowMessage(New Message("Debug", "<disconnect>"))
         Catch
         End Try
Exit Do
End If
' Go through the queue...ReceiveThreadEntryPoint also needs some massaging. When the socket is closed, the stream is no longer valid and so BinaryFormatter.Deserialize throws an exception. Likewise, you quit the loop and therefore neatly quit the thread:
Protected Sub ReceiveThreadEntryPoint()
    ' Create a formatter...
    Dim formatter As New BinaryFormatter()

    ' Loop...
    Do While True

       ' Receive...
       Dim message As Message = Nothing
       Try
          message = formatter.Deserialize(_stream)
       Catch
       End Try

       If message Is Nothing Then
          Exit Do
       End If
       ' Show it...
       ShowMessage(message)
    Loop
 End Sub
How do you deal with actually closing the socket? You tweak the Dispose method of the form itself (you can find this method in the Windows-generated code section of the file), and if you have a _socket object, you close it:
Protected Overloads Overrides Sub Dispose(ByVal disposing As Boolean)
   If disposing Then
      If Not (components Is Nothing) Then
         components.Dispose()
      End If
   End If

   ' Close the socket...
   If Not _socket Is Nothing Then
      _socket.Close()
      _socket = Nothing
   End If

   MyBase.Dispose(disposing)
End Sub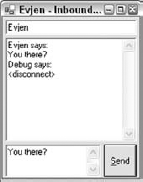
Now you will be able to start a conversation; and if one of the windows is closed, then <disconnect> will appear in the other, as shown in Figure 34-9. In the background, the four threads (one transmit and one receive per window) will spin down properly.
The application itself still will not close properly, even if you close all the windows, because you need to stop the Listener when Form1 closes. To do so, make Listener implement IDisposable:
Public Class Listener
  Implements IDisposable

   Public Sub Dispose() Implements System.IDisposable.Dispose

     ' Stop it...
     Finalize()
     GC.SuppressFinalize(Me)

   End Sub

   Protected Overrides Sub Finalize()

      ' Stop the listener...
      If Not _listener Is Nothing Then
         _listener.Stop()
         _listener = Nothing
      End If

      ' Stop the thread...
      If Not _thread Is Nothing Then
         _thread.Join()
         _thread = Nothing
      End If

      ' Call up...
      MyBase.Finalize()

 End Sub
Now all that remains is to call Dispose from within Form1. A good place to do this is in the Closed event handler:
Protected Overrides Sub OnClosed(ByVal e As System.EventArgs)
   If Not _listener Is Nothing Then
      _listener.Dispose()
      _listener = Nothing
   End If
End Sub
After the code is compiled again, the application can be closed.
A common requirement of modern applications is to display HTML files and other files commonly used with Internet applications. Although the .NET Framework has considerable support for common image formats (such as GIF, JPEG, and PNG), working with HTML used to be a touch trickier in versions 1.0 and 1.1 of the .NET Framework. Life was made considerably easier with the inclusion of the WebBrowser control in the .NET Framework 2.0.
Note
For information on how to accomplish this task using the .NET Framework 1.0 or 1.1, please review the second and third editions of this book.
You don't want to have to write your own HTML parser, so using this control to display HTML pages is, in most cases, your only option. Microsoft's Internet Explorer was implemented as a standalone component comprising a parser and a renderer, all packaged up in a neat COM object. The WebBrowser control "simply" utilizes this COM object. There is nothing to stop you from using this COM object directly in your own applications, but it is considerably easier to use the newer control for hosting Web pages in your applications.
Yes, a COM object. There is no managed version of Internet Explorer for use with .NET. Considering that writing an HTML parser is extremely hard, and writing a renderer is extremely hard, it is easy to conclude that it's much easier to use interop to get to Internet Explorer in .NET applications than to have Microsoft try to rewrite a managed version of it just for .NET. Maybe we will see "Internet Explorer .NET" within the next year or two, but for now you have to use interop.
These sections demonstrate how to build a mini-browser application. Sometimes you might want to display HTML pages without giving users UI widgets such as a toolbar or the capability to enter their own URLs. You might also want to use the control in a nonvisual manner. For example, using the WebBrowser control, you can retrieve Web pages and then print the results without ever needing to display the contents. Let's start, though, by first creating a simple form that contains only a TextBox control and a WebBrowser control.
The first step is to create a new Windows Forms application called MiniBrowser. On the default form, place a single TextBox control and the WebBrowser control, as shown in Figure 34-10.

The idea is that when the end user presses the Enter key (Return key), the URL entered in the text box will be the HTML page that is retrieved and displayed in the WebBrowser control. To accomplish this task, use the following code for your form:
Public Class Form1
Private Sub TextBox1_KeyPress(ByVal sender As Object, _
ByVal e As System.Windows.Forms.KeyPressEventArgs) Handles TextBox1.KeyPress
If e.KeyChar = Chr(13) Then
WebBrowser1.Navigate(TextBox1.Text)
End If
End Sub
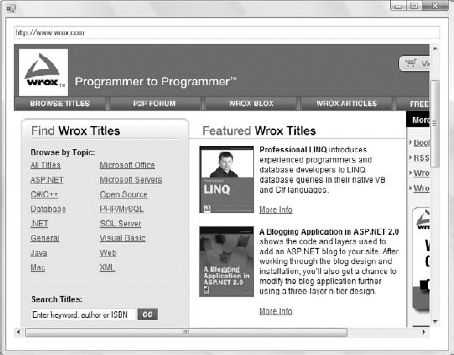
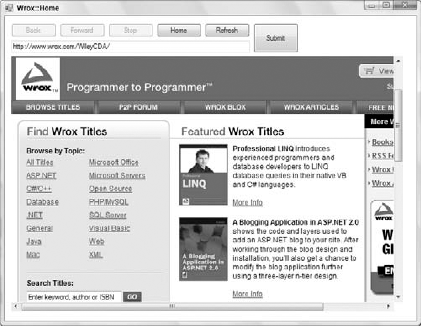
End ClassFor this simple example, you check the key presses that are made in the TextBox1 control, and if the key press is a specific one — the Enter key — then you use the WebBrowser control's Navigate method to navigate to the requested page. The Navigate method can take a single String value, which represents the location of the Web page to retrieve. The example shown in Figure 34-11 shows the Wrox website.
Sometimes, the goal is not to host a browser inside the application but instead to allow the user to find the website in a typical Web browser. For an example of this task, create a Windows Form that has a LinkLabel control on it. For instance, you can have a form that has a LinkLabel control on it that simply states "Visit your company website!"
Once this control is in place, use the following code to launch the company's website in an independent browser, as opposed to directly in the form of your application:
Public Class Form1

    Private Sub LinkLabel1_LinkClicked(ByVal sender As System.Object, _
       ByVal e As System.Windows.Forms.LinkLabelLinkClickedEventArgs) Handles _
       LinkLabel1.LinkClicked

        Dim wb As New WebBrowser
        wb.Navigate("http://www.wrox.com", True)

    End Sub

End Class
In this example, when the LinkLabel control is clicked by the user, a new instance of the WebBrowser class is created. Then, using the WebBrowser's Navigate method, the code specifies the location of the Web page as well as a Boolean value that specifies whether this endpoint should be opened within the Windows Form application (a False value) or from within an independent browser (a True value). By default, this is set to False. With the preceding construct, when the end user clicks the link found in the Windows application, a browser instance is instantiated and the Wrox website is immediately launched.
Note that when working with the MiniBrowser example in which the WebBrowser control is directly in the form, when you click the links, the text in the TextBox1 control is not updated. You can fix this by listening for events coming off the WebBrowser control and adding handlers to the control.
It is easy to update the form's title with the HTML page's title. Create a DocumentTitleChanged event and update the form's Text property:
Private Sub WebBrowser1_DocumentTitleChanged(ByVal sender As Object, _
   ByVal e As System.EventArgs) Handles WebBrowser1.DocumentTitleChanged

    Me.Text = WebBrowser1.DocumentTitle.ToString()

End Sub
In this case, when the WebBrowser control notices that the page title has changed (due to changing the page viewed), the DocumentTitleChanged event will fire. In this case, you change the form's Text property (its title) to the title of the page being viewed using the DocumentTitle property of the WebBrowser control.
Next, update the text string that appears in the form's text box, based on the complete URL of the page being viewed. To do this, you can use the WebBrowser control's Navigated event:
Private Sub WebBrowser1_Navigated(ByVal sender As Object, _
   ByVal e As System.Windows.Forms.WebBrowserNavigatedEventArgs) Handles _
   WebBrowser1.Navigated

    TextBox1.Text = WebBrowser1.Url.ToString()

End Sub
In this case, when the requested page is finished being downloaded in the WebBrowser control, the Navigated event is fired. You simply update the Text value of the TextBox1 control to be the URL of the page. This means that once a page is loaded in the WebBrowser control's HTML container, if the URL changes in this process, then the new URL will be shown in the text box. For example, if you employ these steps and navigate to the Wrox website (www.wrox.com), the page's URL will immediately change to http://www.wrox.com/WileyCDA/. This process also means that if the end user clicks one of the links contained within the HTML view, then the URL of the newly requested page will also be shown in the text box.
Now if you run the application with the preceding changes put into place, the form's title and address bar will work as they do in Microsoft's Internet Explorer, as demonstrated in Figure 34-12.
For this exercise, you will add to the top of the control a simple toolbar that gives you the usual features you would expect from a Web browser — that is, Back, Forward, Stop, Refresh, and Home.
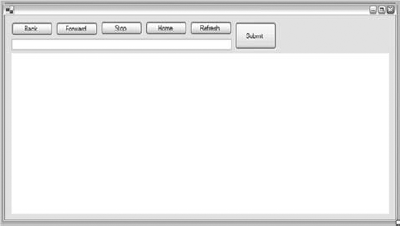
Rather than use the ToolBar control, you will add a set of button controls at the top of the control where you currently have the address bar. Add five buttons to the top of the control, as illustrated in Figure 34-13.
I have changed the text on the buttons to indicate their function. Of course, you can use a screen capture utility to "borrow" button images from IE and use those. The buttons should be named buttonBack, buttonForward, buttonStop, buttonRefresh, and buttonHome. To get the resizing to work properly, make sure that you set the Anchor property of the three buttons on the right to Top, Right.

On startup, buttonBack, buttonForward, and buttonStop should be disabled because there is no point to the buttons if there is no initial page loaded. You will later tell the WebBrowser control when to enable and disable the Back and Forward buttons, depending on where the user is in the page stack. In addition, when a page is being loaded, you need to enable the Stop button, but you also need to disable the Stop button once the page has finished being loaded.
First, though, you will add the functionality behind the buttons. The WebBrowser class itself has all the methods you need, so this is all very straightforward:
Public Class Form1
    Private Sub Form1_Load(ByVal sender As System.Object, _
     ByVal e As System.EventArgs) Handles MyBase.Load
        buttonBack.Enabled = False
        buttonForward.Enabled = False
buttonStop.Enabled = False
End Sub
Private Sub buttonBack_Click(ByVal sender As System.Object, _
ByVal e As System.EventArgs) Handles buttonBack.Click
WebBrowser1.GoBack()
TextBox1.Text = WebBrowser1.Url.ToString()
End Sub
Private Sub buttonForward_Click(ByVal sender As System.Object, _
ByVal e As System.EventArgs) Handles buttonForward.Click
WebBrowser1.GoForward()
TextBox1.Text = WebBrowser1.Url.ToString()
End Sub
Private Sub buttonStop_Click(ByVal sender As System.Object, _
ByVal e As System.EventArgs) Handles buttonStop.Click
WebBrowser1.Stop()
End Sub
Private Sub buttonRefresh_Click(ByVal sender As System.Object, _
ByVal e As System.EventArgs) Handles buttonRefresh.Click
WebBrowser1.Refresh()
End Sub
Private Sub buttonHome_Click(ByVal sender As System.Object, _
ByVal e As System.EventArgs) Handles buttonHome.Click
WebBrowser1.GoHome()
TextBox1.Text = WebBrowser1.Url.ToString()
End Sub
Private Sub buttonSubmit_Click(ByVal sender As System.Object, _
ByVal e As System.EventArgs) Handles buttonSubmit.Click
WebBrowser1.Navigate(TextBox1.Text)
End Sub
Private Sub WebBrowser1_CanGoBackChanged(ByVal sender As Object, _
ByVal e As System.EventArgs) Handles WebBrowser1.CanGoBackChanged
If WebBrowser1.CanGoBack = True Then
buttonBack.Enabled = True
Else
buttonBack.Enabled = False
End If
End Sub
Private Sub WebBrowser1_CanGoForwardChanged(ByVal sender As Object, _
ByVal e As System.EventArgs) Handles WebBrowser1.CanGoForwardChanged
If WebBrowser1.CanGoForward = True Then
buttonForward.Enabled = True
Else
buttonForward.Enabled = False
End If
End SubPrivate Sub WebBrowser1_Navigated(ByVal sender As Object, _
ByVal e As System.Windows.Forms.WebBrowserNavigatedEventArgs) Handles _
WebBrowser1.Navigated
TextBox1.Text = WebBrowser1.Url.ToString()
Me.Text = WebBrowser1.DocumentTitle.ToString()
End Sub
Private Sub WebBrowser1_Navigating(ByVal sender As Object, _
 ByVal e As System.Windows.Forms.WebBrowserNavigatingEventArgs) Handles _
 WebBrowser1.Navigating
    buttonStop.Enabled = True
End Sub
Private Sub WebBrowser1_DocumentCompleted(ByVal sender As Object, _
 ByVal e As System.Windows.Forms.WebBrowserDocumentCompletedEventArgs) _
 Handles WebBrowser1.DocumentCompleted
    buttonStop.Enabled = False
End Sub
End ClassSeveral different activities are occurring in this example, as there are many options for the end user when using this MiniBrowser application. First, for each of the button Click events, there is a specific WebBrowser class method assigned as the action to initiate. For instance, for the Back button on the form, you simply use the Web Browser control's GoBack method. The same is true for the other buttons — for the Forward button you have the GoForward method, and for the other buttons you have methods such as Stop, Refresh, and GoHome. This makes it simple and straightforward to create a toolbar that provides actions similar to those of Microsoft's Internet Explorer.
When the form is first loaded, the Form1_Load event disables the appropriate buttons. From there, users can enter a URL in the text box and click the Submit button to have the application retrieve the desired page.
To manage the enabling and disabling of the buttons, you have to key in a couple of events. As mentioned before, whenever downloading begins you need to enable Stop. For this, you simply add an event handler for the Navigating event to enable the Stop button:
Private Sub WebBrowser1_Navigating(ByVal sender As Object, _
ByVal e As System.Windows.Forms.WebBrowserNavigatingEventArgs) Handles _
WebBrowser1.Navigating
buttonStop.Enabled = True
End SubNext, the Stop button is again disabled when the document has finished loading:
Private Sub WebBrowser1_DocumentCompleted(ByVal sender As Object, _
ByVal e As System.Windows.Forms.WebBrowserDocumentCompletedEventArgs) _
Handles WebBrowser1.DocumentCompleted
buttonStop.Enabled = False
End SubEnabling and disabling the appropriate Back and Forward buttons depends on the ability to go backward or forward in the page stack. This is achieved by using both the CanGoForwardChanged and the CanGoBackChanged events:
Private Sub WebBrowser1_CanGoBackChanged(ByVal sender As Object, _
     ByVal e As System.EventArgs) Handles WebBrowser1.CanGoBackChanged
        If WebBrowser1.CanGoBack = True Then
            buttonBack.Enabled = True
        Else
            buttonBack.Enabled = False
        End If
    End Sub

    Private Sub WebBrowser1_CanGoForwardChanged(ByVal sender As Object, _
     ByVal e As System.EventArgs) Handles WebBrowser1.CanGoForwardChanged
        If WebBrowser1.CanGoForward = True Then
            buttonForward.Enabled = True
        Else
            buttonForward.Enabled = False
        End If
    End Sub
Run the project now, visit a Web page, and click through a few links. You should also be able to use the toolbar to enhance your browsing experience. The end product is shown in Figure 34-14.
You are not limited to using just Web pages within the WebBrowser control. In fact, you can enable end users to view many different types of documents. So far, you have seen how to use the WebBrowser control to access documents that have been purely accessible by defining a URL, but the WebBrowser control also enables you to use an absolute path and define endpoints to files such as Word documents, Excel documents, PDFs, and more.
For instance, suppose you are using the following code snippet:
WebBrowser1.Navigate("C:Financial Report.doc")This would open the Word document in your application. Not only would the document appear in the WebBrowser control, but the Word toolbar would also be present, as shown in Figure 34-15.
In Figure 34-16, the WebBrowser control shows an Adobe PDF file.

In addition to simply opening specific documents in the control, users can also drag and drop documents onto the WebBrowser control's surface, and the document dropped will automatically be opened within the control. To turn off this capability (which is enabled by default), set the WebBrowser control's AllowWebBrowserDrop property to False.
Not only can users use the WebBrowser control to view pages and documents, they can also use the control to send these pages and documents to the printer for printing. To print the page or document being viewed in the control, simply use the following construct:
WebBrowser1.Print()
As before, it is possible to print the page or document without viewing it by using the WebBrowser class to load an HTML document and print it without even displaying the loaded document, as shown here:
Dim wb As new WebBrowser
wb.Navigate("http://www.wrox.com")
wb.Print()This chapter began by examining just how easy it is to download resources from a web server using classes built into the .NET Framework. System.Uri enables you to express a URI, and System.Net. WebRequest, in combination with System.Net.HttpWebRequest and System.Net. HttpWebResponse, enables you to physically obtain the data.
This chapter also described how you can build your own network protocol by using sockets, implemented in the System.Net.Sockets namespace. You learned how TcpListener and TcpClient make it relatively easy to work with sockets, and you spent a lot of time working with threads and the various UI challenges that such work poses in order to make the application as usable as possible.
Finally, you learned how you can use the WebBrowser control in your own Windows Form application to work with HTML and other documents.