Another integration option we are going to talk about is Power Automate. If you are new to Power Automate, the simplest explanation would be to call it a cloud tool to automate your business processes. It is a workflow creation tool, whereby our workflow can be associated with a trigger and perform some predefined actions. We can consider it somewhat like our Dynamics 365 CE workflows, which are very useful, especially for business users. Before talking more about Power Automate, let's discuss the built-in workflow capabilities of Dynamics 365 CE a little bit, which are now known as classical workflows. For our integration purposes, we will be using a combination of Dynamics 365 CE workflows and Power Automate. Workflows perform different tasks based on our requirements. We can design a workflow using the workflow designer, where we can configure a workflow trigger that is responsible for starting the workflow and corresponding workflow actions. If you are an admin user or you have access to processes, you can see all the workflows created for your organization by navigating to Settings | Processes. When creating a workflow, we have the following options to configure it:

In the preceding screenshot, you can see three main areas. Let's discuss some details about these areas, as follows:
- Available to Run: This area provides different ways to run our workflow. We can run our workflow as a background process, which means it will run as an asynchronous process in the background. It won't respond to actions immediately because of its asynchronous nature. We can also create a synchronous workflow, which is known as a real-time workflow. Real-time workflows will respond to our actions immediately, and they don't run in the background. Under this setting, we can configure our workflow to run on demand. These on-demand workflows are available to run for selected records from Dynamics 365 CE views, using the RUN WORKFLOW button. We can also configure our workflow to run as a child process, which means we can call our workflow from other workflows.
- Options for Automatic Processes: In this area, we can set a scope for our workflow, where we have different options, similar to the access levels of security roles. The scope of the workflow defines the records on which you can run a workflow. For example, if the scope is set to the User level, you can run a workflow only on the record that you created; and if the workflow scope is Organization, then the workflow can be executed for all of the records of the Dynamics 365 CE organization. It is recommended to have your workflow scope set as Organization, to avoid any runtime errors. Start when options allow us to configure a trigger for our workflow; for example, if we want to run our workflow when a record is created or when any field is updated. We can select the field that we want to use to run our workflow by using the Select button. We can also run our workflow when a record status changes, when a field is assigned to another user, and when a record is deleted.
- Add Step: This option allows us to configure actions such as create records, update records, assign records and send email records. We can also perform conditional checks before performing these actions. We also have options to use such as the wait option, which can be used to run the workflow after waiting for a specific time period.
We can extend the capability of a workflow by writing custom workflow assemblies, just like plugin assemblies. Although the out-of-the-box workflow tool is great for automating tasks inside Dynamics 365 CE, it does not provide any options for integrating Dynamics 365 CE with other applications. To overcome this limitation, we can utilize Power Automate's capabilities. If there are any requirements that can be fulfilled with a workflow tool, then we should always opt to do so. However, if we are looking to automate our business processes using multiple applications, then we should consider using Power Automate. We want to use Power Automate to send an SMS notification when a vehicle service is completed, but there is no direct option available to run Power Automate when any field is updated in Dynamics 365 CE. So, let's add a custom two-option field on an auto service (opportunity) entity and call it Send SMS. We will update this field to Yes when the status reason for the auto service is changed to Completed. We have added a new option to the Auto Service Status option set field. We need to place this on the form so that we can set this field from the workflow. Let's create our workflow to set this field, as follows:
- Navigate to the HIMBAP Auto Service solution and select Processes.
- Click on the New button, and fill in the following information:
- Process Name: Trigger SMS Notification
- Category: Workflow
- Entity: Auto Service
- Click on OK. It will open the workflow designer for us.
- Set Workflow Scope as Organization and select Record field changes. We need to select the Status Reason field from the available options.
- Click on Add Step and add a condition check from the dropdown. We need to check whether the Status Reason value is shown as complete, as shown in the following screenshot:

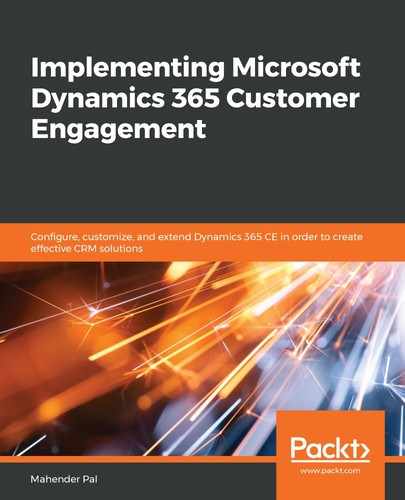
- Select the row immediately after the check condition and add an update step from the Add Step option. We need to click on the Set Properties button and set our Send SMS field to Yes, as shown in the following screenshot:
- We have our workflow ready. When the vehicle service is complete, it will set this field to Yes, and in Power Automate, we will check this field. If it is true, we will send an SMS to the customer.
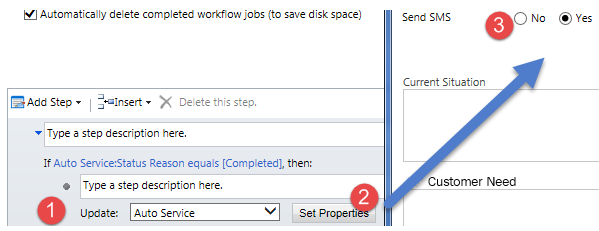
Now, let's talk about Power Automate. Power Automate provides the option to integrate it with different online services; for example, in the following screenshot, we can see some of the services that we can use in Power Automate:

Currently, Power Automate supports more than 300 connectors to connect with different applications. Similar to our Dynamics 365 CE classical workflows, Power Automate can be associated with a trigger to run automatically, or we can create a push-button flow. This type of flow can be initiated from mobile devices by simply tapping a button.
Power Automate has the following plans, which can be selected based on our requirements:
- Per User Plan: $15 per user/month
- Per Flow Plan: $500 per month
The Per User Plan will be able to create an unlimited number of flows to implement automation, whereas the second plan is for an organization and includes five flows per month. Additional flows can be purchased for $100 per month. Power Automate is included with the Dynamics 365 license, so there is no need to buy a separate license for Power Automate if you are a Dynamics 365 user. However, there is an API limit, depending on your Dynamics 365 license. For example, if you are using the Dynamics 365 Enterprise app, the number of API requests is limited to 20,000 per day; and if you are using the Dynamics 365 Professional app, API requests are limited to 10,000 per day.
While working with Power Automate, we can design our own flow, or we can use an existing generic template to create a flow. These templates are divided into different categories based on their functionality. In the following screenshot, different template categories are shown, such as Approval, Email, Events and calendar, Notifications, and so on, which can be used to automate approval processes and other activities:
Dynamics 365 CE now contains a FLOW button, which we can use to create a flow or see a flow that we created for the current entity; for example, the following button is available on the account entity's home screen:

Now that we know some details about Power Automate, let's create a flow that will send a notification to the customer based on the Send Notification field, which is set by the workflow that we created in the previous step. To send an SMS, we first need to connect with a service that will help us to do this. We are going to use a trial account of Twilio. You can set up a trial account at https://www.twilio.com. Once you have your trial account set up, you can head to the console dashboard and get your ACCOUNT SID and AUTH TOKEN from there, like so:

Let's use the following steps to create a flow:
- Click on the Home button and select Flow, as shown in the following screenshot:

It may ask you to configure your country if you are starting Flow for the first time.
- Navigate to My flows and create an Automated—from blank flow, as shown in the following screenshot:

- Let's use a flow name of Send SMS Notification and choose for the flow to be triggered when a Dynamics 365 record is updated.
- Select the organization name and the entity name as Auto Services.
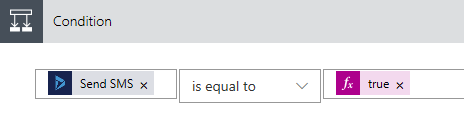
- Click on New Step and add a condition control. We need to add a condition to check whether our Send SMS field is set to true. When you click on the text field, it will display the Dynamic content editor. From there, we can select our Send SMS field, as follows:

We need to compare it, as follows:
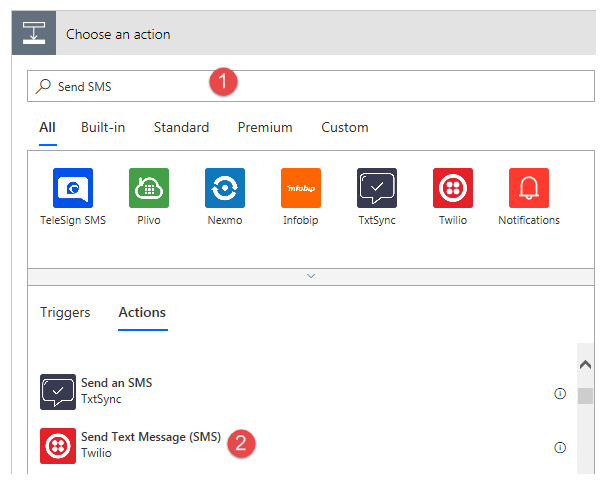
- Click on Add Action under the If yes block after the preceding condition, search for Send SMS, and select Send Text Message (SMS) using Twilio, as follows:
- Enter your Twilio account ID and the authentication token that you copied from the console dashboard.
- We need to provide three things—our Twilio phone number, which we will use to send an SMS; the verified phone number of our customer (we need to set up a verified number in the Twilio app); and the SMS text that we want to send to our customers.
- Finally, we need to add an Update Step to update the auto service record, and we need to set the Send Notification field back to No.
- After all these steps, our flow should look as follows:

Now, when the Auto Service record status reason is set to Completed, our Dynamics 365 workflow will run, and it will set the Send Notification field to true. And finally, Power Automate will trigger and send a notification to the customer, as follows:

This is how we can use Power Automate to integrate Dynamics 365 CE with other cloud services.
Now that we know how to integrate Dynamics 365 CE with Power Automate, let's now see how we can use PowerApps canvas apps with Dynamics 365 CE.