
Chapter 1. Discovering Mule
- An introduction to enterprise integration
- Building, testing, and deploying your first Mule application
All it takes is a simple request: send this to Salesforce, publish that to Twitter, connect to the inventory mainframe. All of a sudden, your application, which was living a happy digital life in splendid isolation, has to connect to a system that’s not only remote but also exotic. It speaks a different language, or speaks a known language but uses a bizarre protocol, or it can only be spoken to at certain times during the night...in Asia. It goes up and down without notice. Soon, you start thinking in terms of messages, transformation, protocols, and connectors. Welcome to the world of integration!
The IT landscape has been shaped by years of software evolution, business mergers, and third-party API integration, which led to a complex panorama of heterogeneous systems of all ages and natures. Strategic commercial decisions or critical reorganizations heavily rely on these systems working together as seamlessly as possible. The need for application integration is thus a reality that all enterprise developers will have to deal with during the course of their careers. As Michael Nygard, author of Release It! (Pragmatic Bookshelf, March 2007) states, “Real enterprises are always messier than the enterprise architecture would ever admit. New technologies never quite fully supplant old ones. A mishmash of integration technologies will be found, from flat-file transfer with batch processing to publish/subscribe messaging.”
Developing integration applications encompasses a variety of difficulties:
- Protocol— Applications can accept input from a variety of means, ranging from a local filesystem to a RESTful API.
- Data format— Speaking the right protocol is only part of the solution, since applications can use almost any form of representation for the data they exchange.
- Invocation styles— Synchronous, asynchronous, RPC, messaging, and batch call semantics entail very different integration strategies.
- Lifecycle and management— Applications of different origins that serve varied purposes tend to have disparate development, maintenance, and operational lifecycles.
- Error handling— Error handling is crucial in any application and is amplified with applications that are forced to integrate with remote, and often unreliable, systems.
- Monitoring— Integration applications often have more esoteric monitoring requirements than a traditional web or server-side application. These include the monitoring of transactions per second, awareness of the latency of remote servers, and the absence of events, to name a few.
This book is about Mule, the leading open source enterprise integration platform, which will help you tackle these difficulties and much more. Mule frees you from much of the plumbing associated with enterprise application integration, allowing you to focus on your application’s core requirements.
In this chapter, you’ll gain a high-level understanding of Mule before we dive head first into building a real, complete Mule application. This will prepare you for the rest of the book, in which you’ll learn how Mule lets you focus your development effort on solving business problems instead of fighting low-level integration “donkey work.”
1.1. Enterprise Integration Patterns and service-oriented architecture
The last decade or so has seen a renaissance of application integration. Gone are the days of proprietary messaging stacks and closed APIs. Open platforms, protocols, and services dominate the landscape. Nothing is more evidence of this than the “API Explosion” of recent years as companies, organizations, and governments race to expose their data. REST, JSON, and lightweight message brokers lead the charge but, as always, don’t allow you to throw out what’s already in place (or more importantly, what already works). These nimble new technologies also don’t solve what is ultimately the bigger problem: how these services are composed into distributed applications.
Until Hohpe and Woolf’s seminal publication of Enterprise Integration Patterns (Addison-Wesley, November 2003), there was little in the way of prescribed solutions to solve these, and many other, integration challenges. When developers of integration applications finally had a catalog of patterns, they were still left with little in the way of implementations. This is how Mule and many other open source and commercial integration frameworks received their cue. The integration developer was now freed from having to implement the patterns and could once again focus on the solutions.
A parallel phenomena to the publishing of Enterprise Integration Patterns was the emergence of service-oriented architecture. Service-oriented architecture, or SOA, is a software architecture style that acknowledges the need for integration up front by providing well-defined, programmatic means for interacting with an application. Initially embodied by the heavyweight SOAP specification and more recently refined by the widespread adoption of REST and JSON, SOA has become pervasive in the modern software development landscape.
Early SOA adoption was usually done with heavyweight integration technologies like SOAP, verbose XML, and the complicated infrastructures and tooling that come along with these technologies. Compounding this complexity was an unfortunately common “waterfall” approach to integration development, in which existing infrastructures were “converted” to SOA over a long period of time. The fate of many such projects is unfortunately obvious to anyone reading this book.
Guerrilla SOA, a concept introduced by Jim Webber (www.infoq.com/interviews/jimwebber-qcon-london), is the idea that service-oriented architecture can be introduced in a lean, incremental, and agile manner. We’ll see in this book how Mule, along with lightweight messaging patterns, alleviates the pain of introducing SOA to your applications.
We’ll cover Guerrilla SOA, as well as other architectural approaches, in chapter 7.
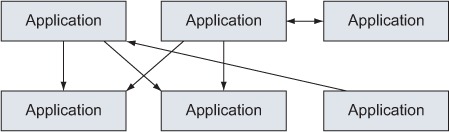
There is a natural, but unfortunate, tendency to integrate applications informally. This often leads to “spaghetti integration,” as illustrated by figure 1.1. Applications in such implementations are connected directly to each other in a “point-to-point” manner. On a small scale this might be OK. Pain quickly becomes apparent, however, as the number of integration points grows. The application becomes mission critical, and your remote systems begin to change.
Figure 1.1. Point-to-point, or spaghetti, integration
A pattern described in Enterprise Integration Patterns that solves this problem received attention from the industry and community: the message bus, commonly called an enterprise service bus, or ESB, when implemented. The ESB, depicted in figure 1.2, provides a solution to the problem of point-to-point integration. An ESB architecture prescribes placing a dedicated integration application, called a bus, in between all of your integration points. Your previous point-to-point integrations now all talk to the bus, which decouples them from the remote applications.
Figure 1.2. Application integration with an ESB

This decoupling is achieved by protocol adaptation and a canonical data format. Protocol adaptation means the bus can communicate over different transport protocols, like HTTP or FTP. A canonical data format is a common format all messages are transformed to, usually a common Java domain model or XML schema. This allows you to centralize concerns like security, auditing, and routing onto the ESB framework. It also means your client applications are insulated from the volatility typically present in integrating with remote applications. This provides the flexibility to do things such as swap out one vendor API for another without having to modify every downstream application.
Although Mule is often billed as an ESB, it’s important to note that an ESB is an architecture and not a product. We’ll discuss using Mule as an ESB, as well as in many other ways, in chapter 7.
1.2. The Mule project
The Mule project was started with the motivation to make life simpler for developers of integration applications. A major driver for the project was the need to build a lightweight, modular integration solution that could scale from an application-level messaging framework to an enterprise-wide, highly distributable enterprise services bus.
What’s in the name
“After working on a couple of bespoke ESB systems, I found that there was a lot of infrastructure work to be done before you can really start thinking about implementing any logic. I regard this infrastructure work as ‘donkey work’ as it needs doing for every project. I preferred Mule over Donkey and Ass just didn’t seem right ;-). A Mule is also commonly referred to as a carrier of load, moving it from one place to another. The load we specialize in moving is your enterprise information.”
—Ross Mason, cofounder of MuleSoft
Mule’s core is an event-driven framework combined with a unified representation of messages, expandable with pluggable extensions. These extensions provide support for a wide range of transports or add extra features, such as distributed transactions, security, and management. Mule’s developer-friendly framework offers programmers the means to graft on additional behavior such as specific message processing or custom data transformation. This philosophy has allowed Mule to quickly adapt to and support emergent trends in enterprise computing, such as NoSQL, distributed memory grids, and lightweight messaging protocols like AMQP and ZeroMQ.
This orientation toward software developers helps Mule to remain focused on its core goals and to carefully avoid entering the philosophical debate about the role of an ESB in an integration scenario. Although Mule is often billed as an ESB, and can be used in such a fashion, the framework makes no dictation on the architecture of your integration applications. Moreover, Mule was conceived as an open source project, forcing it to stick to its mission to deliver a down-to-earth integration framework and not to digress to less-practical or broader concerns. Finally, the strategic decision to develop Mule in the open allowed contributors to provide patches and improvements, turning it into a solid and proven platform.
Mule 3, released in 2010, represented a significant departure from Mule 2 (on which the first edition of this book was based). The most noticeable differences reside in new configuration mechanisms that aim to simplify Mule configuration. Most specifically, the introduction of the “flow” construct frees the user from the rigid service-based configuration model of Mule 2. Flows allow the free composition of message processors, contributing to the prodigious simplification of the often-verbose XML configurations in Mule 2.
Mule Studio, introduced in 2012, further simplifies integration application development with Mule. Mule Studio is a graphical, Eclipse-based development environment. Among its features are drag-and-drop composition of flows, full XML round-tripping, and the ability to run Mule applications directly in the IDE or deploy them to a server or to the cloud.
Extending and developing for Mule has also been greatly simplified. Mule DevKit, which we’ll cover in depth in chapter 13, makes it easy to write custom Mule components that fully integrate with the Mule ecosystem. Annotations have also been widely adopted by the framework, simplifying the development and testing of these components. Cloud connectors streamline integration with remote APIs and platforms. A new deployment model trivializes packaging and deploying Mule applications.
The configuration and developer simplifications in Mule 3 are complemented by incremental changes to the framework. Expression evaluation has been standardized by the Mule Expression Language. REST support is now native and is coupled with support for JSON.
1.3. Competition
The large enterprise players (IBM, Oracle, Red Hat, and so on) all have an ESB in their catalog. They are typically based on their middleware technologies and are usually at the core of a much broader SOA product suite. There are also some commercial ESBs that have been built by vendors not in the field of Java EE application servers, like the ones from Progress Software and Software AG.
Mule Enterprise Edition
A commercially supported version of Mule with additional features and support options is supplied by MuleSoft. More details about Mule EE can be found in appendix C.
Commercial ESBs mainly distinguish themselves from Mule in the following aspects:
- Prescriptive deployment model, whereas Mule supports a wide variety of deployment strategies (presented in chapter 8)
- Prescriptive SOA methodology, whereas Mule can embrace the architectural style and SOA practices in place where it’s deployed
- Mainly focused on higher-level concerns, whereas Mule deals extensively with all the details of integration
- Strict full-stack web service orientation, whereas Mule’s capabilities as an integration framework open it to all sorts of other protocols
Mule is not the only available open source ESB. To name a few, major OSS actors such as Red Hat and Apache provide their own solutions. Spring also provides an integration framework built on their dependency injection container. Although most of these products use proprietary architectures and configurations, the integration products from the Apache Software Foundation are notably standards-focused: ServiceMix was previously based on the Java Business Integration (JBI) specification, Tuscany follows the standards defined by the OASIS Open Composite Services Architecture (SCA and SDO), and Synapse has extensive support for WS-* standards.
One way to decide whether a tool is good for you is to get familiar with it and see if you can wrap your mind around its concepts easily. This chapter will provide that. Now let’s dive in head first and create a real, working Mule application.
1.4. Mule: a quick tutorial
To frame the examples in this book, we hereby introduce you to Prancing Donkey Maltworks, Inc. Prancing Donkey is a rapidly expanding, medium-sized, US-based microbrewery. Its small but competent development group has selected Mule to ease the integration pains as they grow.
Our tour of Mule will begin with a tutorial. You’ll build an application to allow third parties to register products for sale on www.theprancingdonkey.com, Prancing Donkey’s online store. This application will allow Prancing Donkey’s partners to post product data, formatted as JSON, to an HTTP URL. Once the data is accepted, it will be transformed from its original format, a stream of bytes, into a String and placed in a JMS queue from which subsequent processing can take place. This tutorial will demonstrate common tasks you’ll perform when building applications with Mule.
You’ll start by creating a new Mule project for your application using Mule Studio. You’ll then author an integration flow to process product data and test it with an embedded version of the Mule Server in Mule Studio. You’ll formalize this test by writing a functional test to programmatically assert that your flow behaves the way you expect. Finally, you’ll download the Mule Server and deploy your packaged application to it, demonstrating a typical lifecycle of building, testing, and deploying a Mule application.
1.4.1. Installing Mule Studio
Mule Studio can be downloaded from www.mulesoft.org. Once you download it, uncompress the archive and double-click on the Mule icon, and you’ll be presented with a screen like the one in figure 1.3.
Figure 1.3. Launching Mule Studio

Before you can create a project, you’ll need to install the Mule Community Runtime. To do this, click Help and then Install New Software. In the screen that follows, expand the drop-down list prefixed with Work With: and select Mule ESB Runtimes for Studio. Finally, select Mule ESB Server Runtime 3.4.0 CE, as illustrated in figure 1.4.
Figure 1.4. Installing the community runtime

You can now click Create a Project to get started (figure 1.5).
Figure 1.5. Creating a new Mule project

Here you set the project’s name, give it a description, and select the Mule runtime—in this case, Mule 3.4.0 Community Edition, which is the most recent as of this writing.
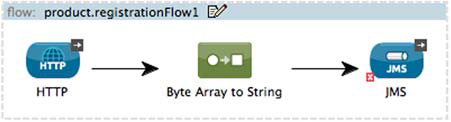
Clicking Next again gives you the opportunity to enable Maven for this project. Skip this part, and the next few steps, by clicking Next, and then you’ll click Finish to start authoring your flow (figure 1.6).
Figure 1.6. Defining the initial flow

After you set the name and description of the flow, you can dive in and use Mule Studio to graphically define your integration.
1.4.2. Designing the flow
Flows are the primary mechanism for building integration applications with Mule. A flow consists of a source of data followed by a series of message processors. A message begins its life from an inbound endpoint, which could be an HTTP POST or the scheduled polling of a database table, and is processed by the subsequent processors in the flow in the order in which they are defined. Flows support multiple invocation styles as defined by their exchange pattern. A one-way exchange pattern typically means the flow is asynchronous, for instance. The request-response exchange pattern means the flow will return a result. A flow can optionally end with an outbound endpoint, which sends the message to another flow or server.
The palette on the right-hand side of the screen contains the library of endpoints and message processors you’ll use to build your flows. Use the filter search box to find the HTTP endpoint and drag it into your flow. Your screen should now look something like figure 1.7.
Figure 1.7. Dragging the HTTP inbound endpoint to the flow

The vertical orientation of the HTTP endpoint indicates that the flow’s exchange pattern is request-response. Exchange patterns indicate if a flow returns a result or not. Let’s configure the flow’s exchange pattern to one-way, along with the host, port, and path the HTTP server will be listening on. You can do this by right-clicking on the HTTP endpoint, which will show you something that looks like figure 1.8.
Figure 1.8. Configuring the HTTP endpoint’s properties

You now need to add two more message processors to this flow: the byte-array-to-string transformer and the JMS outbound endpoint. The byte-array-to-string transformer is needed to transform the HTTP inbound endpoint’s default payload type, a stream of bytes, to an instance of a String. You’ll once again drag these from the library of processors on the right into your flow, leaving you with something that looks like figure 1.9.
Figure 1.9. Adding the byte-array-to-string transformer and JMS outbound endpoint to the flow
Now right-click on the JMS endpoint and define the queue to dispatch to (figure 1.10).
Figure 1.10. Configuring the JMS endpoint’s properties

You might notice that the JMS endpoint has a red X on it. This is because you haven’t configured a JMS broker for it to connect to. Let’s configure it to use an instance of ActiveMQ, an Apache-licensed, open source messaging broker that supports JMS, running on localhost (you’ll install ActiveMQ in a second). To do this you’ll need to right-click on the endpoint, select the References tab and click on the Plus icon, as illustrated in figures 1.11 and 1.12. You need to change the JMS spec to 1.1.
Figure 1.11. Configuring the JMS connector

Figure 1.12. Configuring the ActiveMQ connector

Now let’s set up a local ActiveMQ instance that you can use to test with. Download ActiveMQ (http://activemq.apache.org/download-archives.html; we tested with version 5.5.1), uncompress the file, navigate into the bin directory, and then run activemq start.
Let’s take a step back and consider what you’ve done. Products will be posted to the HTTP endpoint as JSON. The byte-array-to-string transformer converts the raw bytes of the HTTP POST to a String. We’ll discuss transformers in depth in chapter 4. The JMS outbound endpoint then finally dispatches the String to the specified JMS queue. Endpoints are Mule’s mechanism for getting data into and out of flows. We’ll discuss both in detail in chapter 3.
1.5. Running, testing, and deploying the application
We just finished developing our first Mule application as well as setting up a messaging broker for it to interact with. Now let’s see how we can run, test, and deploy the application.
1.5.1. Running the application
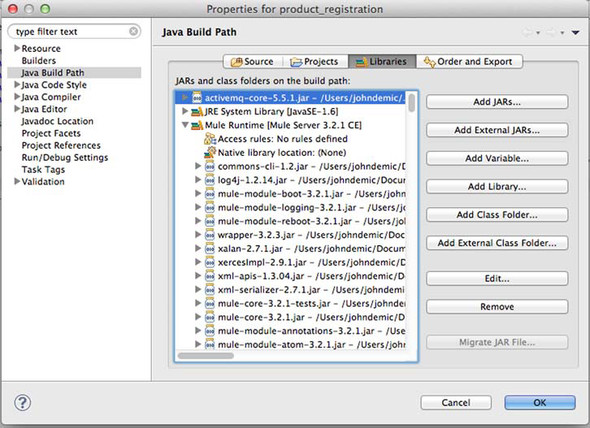
Before you can run the application, you’ll need to add the JAR for ActiveMQ to your project. The procedure is identical to adding a JAR to any Eclipse project. Right-click on Mule Runtime in the Project Explorer pane on the left, select Build Path, and then select Configure Build Path. At this point, you’ll be presented with a screen like that in figure 1.13, in which you can add the ActiveMQ JAR to the project.
Figure 1.13. Adding a JAR
Now you’re ready to run your application. Before you do that, however, let’s modify your flow to log some output to the console. This will give you some visual feedback that things are behaving properly.
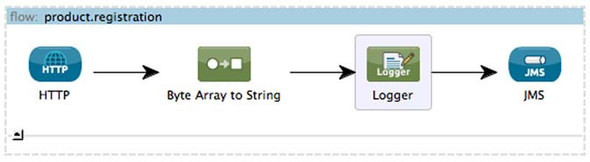
You can do this by selecting a logger and dragging it into the flow after the byte-array-to-string transformer and before the JMS outbound endpoint. You’ll set the message attribute to print a String followed by the payload of the message, using the Mule Expression Language. The Mule Expression Language, or MEL, is a lightweight scripting language that’s evaluated at runtime. The payload, in this case, will be the JSON content of the data being sent to Mule. This is illustrated in figure 1.14.
Figure 1.14. Adding a logger to the flow
Right-clicking the project on the Project Explorer page and selecting Run As and then Mule Application, as illustrated in figure 1.15, will launch the app in an embedded Mule instance. You should see something like figure 1.16 in your console, illustrating the app is running.
Figure 1.15. Running the application

Figure 1.16. Examining the console output
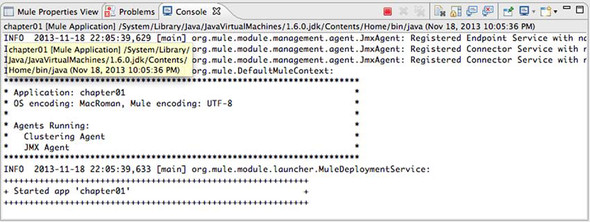
After posting some JSON data using a tool such as curl or Rest Console to http://localhost:8080/products, you should see something like the following logged to the console:
INFO  2013-07-09 08:17:43,468
[[chapter01].connector.http.mule.default.receiver.02]
org.mule.api.processor.LoggerMessageProcessor:
We received a message: {"name":"Widget",
        "price": 9.99,
                "weight": 1.0,
        "sku": "abcd-12345"}
The logger shows that your byte-array-to-string transformer has successfully transformed the InputStream to a String. Now let’s check ActiveMQ’s console to make sure the message is in the queue. Point a browser at http://localhost:8161/admin/queues.jsp, and you should see one message in the products queue, similar to what’s shown in figure 1.17.
Figure 1.17. Looking at the products queue

Now that you’ve manually verified that the flow works, let’s write a functional test so that you can programmatically verify that it works.
1.5.2. Testing the flow
You’re now ready to write a test for the flow you’ve written. Create a class called ProductServiceFunctionalTestCase. You can do this by right-clicking on src/test/java in the Package Explorer on the right side of the screen, then selecting New, and then Class. Modify the newly created class to look like the following listing.
Listing 1.1. Extending FunctionalTestCase to ensure that your configuration works

We’ll discuss testing in detail in chapter 12, but let’s do a quick rundown of the previous listing to get a preview. The provided TestCase extends Functional-TestCase, a base class provided by Mule that abstracts the details of starting and stopping a Mule instance from your tests. The method’s abstract getConfigResources() method points the test case at the configuration to use to bootstrap Mule.
Mule’s testing framework uses JUnit 4, as you can probably tell by the @Test annotation on testCanRegisterProducts. You’ll use the MuleClient, a facility described in depth in chapter 12, to interact with the Mule flow programatically. Your test data, in this case some simple JSON, is defined at ![]() . You POST the JSON to the HTTP endpoint
. You POST the JSON to the HTTP endpoint ![]() , and then wait for it to appear on the JMS queue
, and then wait for it to appear on the JMS queue ![]() . Once you either receive the message or RECEIVE_TIMEOUT is met, your assertions, starting with
. Once you either receive the message or RECEIVE_TIMEOUT is met, your assertions, starting with ![]() , are run. You first do a series of assertions that ensure your response or payload isn’t null and that an exception wasn’t
thrown during processing. You then assert that the payload on the JMS queue matched the data you posted to the HTTP endpoint
, are run. You first do a series of assertions that ensure your response or payload isn’t null and that an exception wasn’t
thrown during processing. You then assert that the payload on the JMS queue matched the data you posted to the HTTP endpoint
![]() .
.
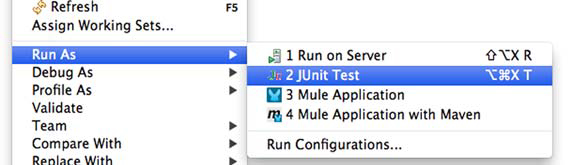
Go ahead and run the test by right-clicking on the test case and selecting Run As and then JUnit Test. This will start an instance of Mule that your test will be executed against. If everything went well, you should see a green bar indicating that the test passed (see figure 1.18).
Figure 1.18. Running the FunctionalTestCase
1.5.3. Working with the XML configuration
It’s possible to develop extremely sophisticated integration applications using the graphical editor of Mule Studio. Eventually, however, you’ll probably need to at least look at, if not edit, the Mule XML configuration that’s generated by Mule Studio. This not only enables you to understand what your flows are doing behind the scenes, but also gives you the ability to fully harness Mule’s power as an integration framework.
Studio and XML examples
The examples in this book will mostly focus on the XML configuration of flows. We will, however, show the corresponding screenshots of the flows in Mule Studio where it makes sense. It’s also important to note that no functionality in the CE version of Mule is dependent on Mule Studio. Your choice of IDE, or your choice to use no IDE, is largely irrelevant when working with Mule applications.
Clicking on the Configuration XML tab below the flow will show you the Mule configuration XML that corresponds to this application. The next listing shows what the XML looks like for the flow you developed.
Listing 1.2. The product registration flow


The first thing to notice about this configuration file is the declaration of namespaces ![]() . These namespaces implement the XML domain-specific language used by Mule’s XML configuration. The flow and its message processors’
configurations follow. These map one-to-one to the elements you dragged in the graphical view.
. These namespaces implement the XML domain-specific language used by Mule’s XML configuration. The flow and its message processors’
configurations follow. These map one-to-one to the elements you dragged in the graphical view.
Automatic namespace imports
Users of Mule 2 will be happy to note that Studio automatically imports namespace declarations for you, freeing you from having to manually add them every time you introduce a new transport or module into your Mule application.
1.5.4. Deploying to the Mule standalone server
Confident that your application is in good shape thanks to your testing, you’re now ready to deploy. Before that, however, you need a running Mule server. You can download the Mule standalone server from www.mulesoft.org/download-mule-esb-community-edition. You’ll want to download the Mule ESB standalone runtime (without Mule Studio). Uncompress the file, navigate into the bin directory, and run the mule executable to start a standalone instance of the Mule server.
Now you’ll use Mule Studio to build your deployment artifact. First you need to export the application as a Mule deployable archive. You can do this by right-clicking on the project, selecting Export, selecting Mule Studio Project to Mule Deployable Archive (includes Studio metadata), and then setting the path to where you want the ZIP file, Mule’s deployment artifact, saved. This is illustrated in figures 1.19, 1.20, and 1.21.
Figure 1.19. Choose to export the application.

Figure 1.20. Choose the format to export to.
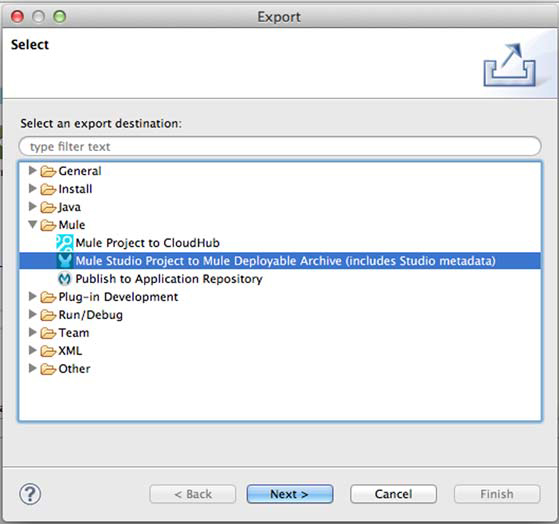
Figure 1.21. Choose where to save the resulting ZIP file.

Now that you’ve exported the Mule application as a ZIP file, you can deploy it.[1] This is accomplished by copying the ZIP file to the apps directory of wherever you installed the Mule standalone server. After a few seconds, you should see something like the following appear on the console on which Mule is running:
1 We’ll discuss Mule deployment options in detail in chapter 8.
INFO  2011-12-19 10:01:07,741 [Mule.app.deployer.monitor.1.thread.1]
org.mule.module.launcher.DeploymentService:
++++++++++++++++++++++++++++++++++++++++++++++++++++++++++++
+ Started app 'productservice-1.0-SNAPSHOT'                +

++++++++++++++++++++++++++++++++++++++++++++++++++++++++++++
That’s it! You’ve developed a functional, well-tested, integration application with around 20 lines of XML and a small amount of Java. Hopefully you can appreciate the relative difficulty of implementing a similar approach without Mule; you would need to do the following:
- Bootstrap a web server to accept HTTP requests
- Configure and manage the JMS connection factories, sessions, and so on
- Figure out a way to functionally test the application
- Decide how to package and deploy the application
That’s a lot of time being wasted writing code that isn’t solving your goal: bridging an HTTP request to JMS. Throughout this book, you’ll see numerous examples of how Mule simplifies and speeds up common integration tasks.
1.6. Summary
By this point you’ve received a primer on enterprise integration, learned about the philosophy and features of Mule 3, and written, tested, and deployed a working Mule app. We’re now ready to formally begin our discussion of Mule; next, we’ll discuss processing messages with Mule.