
Chapter 5. Routing data with Mule
- Content-based routing with Mule
- Filtering messages
- Scatter/gather
- Reliability routing
You’ve probably been exposed to a router at some point in your career. Usually these are of the network variety, like the DSL router in your bedroom or a core router in your data center. In either case, the router’s function is the same: to selectively move around data. Not surprisingly, many of the concepts that underlie network routing are also applicable to routing data between applications. You’ll see in this chapter how to route data using Mule.
You’ve already seen an example of routing in chapter 3, where you saw how the choice router uses a message’s payload to determine which execution path it takes. Let’s see how to use Mule’s routers to solve an integration problem.
In listing 3.18 in chapter 3, you saw how Prancing Donkey was dispatching alert notifications to file and JMS endpoints. As it turns out, the majority of the notifications produced by the cooling system are innocuous and don’t require immediate action. Let’s modify the example to only route messages to the JMS queue if they’re of critical importance (see figure 5.1).
Figure 5.1. Dispatch cooling alerts

Listing 5.1. Routing messages using expressions
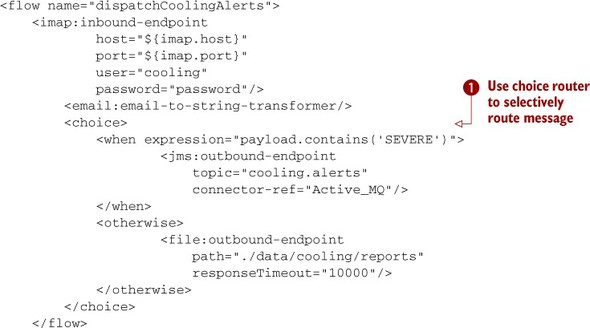
The choice router defined at ![]() evaluates the supplied expression and routes the messages to either the JMS or file endpoint. If the message’s payload contains
the string SEVERE, then the message is routed to JMS. Otherwise it’s saved as a file to the /data/cooling/reports directory.
evaluates the supplied expression and routes the messages to either the JMS or file endpoint. If the message’s payload contains
the string SEVERE, then the message is routed to JMS. Otherwise it’s saved as a file to the /data/cooling/reports directory.
In this chapter, we’ll investigate Mule data-routing capabilities:
- You’ll learn how the Mule Expression Language (MEL) is used to decide how to route a message.
- We’ll discuss Mule’s filtering capabilities, examining some of Mule’s more useful out-of-the-box filters.
- You’ll see how Mule supports the splitting, aggregation, and collection processing of messages.
- You’ll see how reliability routers introduce reliability for potentially unreliable transports like HTTP.
Framing these examples will be the use cases of Prancing Donkey. We’ll revisit some of Prancing Donkey’s use cases from the previous chapters and demonstrate how they can be improved or augmented with Mule’s routing capabilities. We’ll also expand on the domain model introduced in chapter 3, expanding its scope to include some of Prancing Donkey’s operational concerns.
By the end of this chapter, you’ll hopefully be able to look at your integration challenges in terms of Mule’s routing concepts, making it easier for you to identify and solve integration problems.
5.1. Deciding how to route a message
The crux of any routing implementation is the logic that determines where the data goes. Mule greatly simplifies the implementation of this logic by letting you use the Mule Expression Language to determine how a message is routed.
In listing 3.3 in chapter 3, you saw how Prancing Donkey built a simple web service that allowed them to receive callback notifications from Arnor Accounting. Arnor Accounting added a new feature in which rejected expense reports would be returned and annotated where corrections needed to be made. Let’s see how you can route messages with the annotated spreadsheets as payloads to a different directory than the status reports.
5.1.1. Using the choice router
The following listing demonstrates how the Content-Type header of an HTTP POST request can determine which directory an expense report is saved in (see figure 5.2).
Figure 5.2. Routing expense reports based on Content-Type

Listing 5.2. Routing expense reports based on Content-Type

The MEL expression ![]() evaluates the MIME type of the message’s payload and routes it to ./data/expenses/rejected if it’s an Excel spreadsheet.
Another common use case is to route a message based on its Java type. This is illustrated in the next listing, where you route
a message to a JMS queue depending on the class of the payload (see figure 5.3).
evaluates the MIME type of the message’s payload and routes it to ./data/expenses/rejected if it’s an Excel spreadsheet.
Another common use case is to route a message based on its Java type. This is illustrated in the next listing, where you route
a message to a JMS queue depending on the class of the payload (see figure 5.3).
Figure 5.3. Routing a message based on the type of the payload

Listing 5.3. Routing a message based on the type of the payload

This example will route a message to either the brews or orders queue based on its type. Messages whose payloads aren’t of either type are routed to the dead-letter queue.
The payload itself can also be used to route a message. XML payloads, for instance, can be routed using XPath expressions. If you recall from listing 3.3 in chapter 3, Prancing Donkey implemented a Mule flow to log expense report statuses received on a JMS queue. Let’s modify that example to print a different log message based on the XML content of the payload, shown in the next listing (see figure 5.4).
Figure 5.4. Routing a message using an XPath expression
Listing 5.4. Routing a message using an XPath expression

In this case, messages whose status element equals FAILED will be logged differently than messages that have been successfully processed.
Mule’s message processors combined with the Mule Expression Language lay the foundation of data routing with Mule. You’ll use MEL over the course of this chapter to decide where Mule routes messages.
5.2. Using filters
Mule’s filters determine what continues processing through a flow. Filtering is typically used for policy enforcement. You might want to ensure only a certain type of JMS message is consumed from a particular queue. Mule provides dedicated routers for these common use cases. More elaborate filtering is also made easy with the Mule Expression Language, as you’ll see shortly.
5.2.1. Filtering by payload type and header
The payload-type-filter ensures that a message is passed only if its payload is of the required type. Let’s implement the receiving end of the JMS queues from listing 5.3 (see figure 5.5):
Figure 5.5. Filter messages by type

<flow name="acceptBrewDefinitions">
    <jms:inbound-endpoint queue="brews.definitions"
        connector-ref="Active_MQ" />
    <payload-type-filter expectedType="com.prancingdonkey.domain.Brew"/>
    <component
         class="com.prancingdonkey.service.BrewProcessingService"/>
</flow>
These flows are now guaranteed to only process messages with the matching payload types.[1]
1 The payload-type-filter can also be implemented as an expression-filter that checks the payload’s type.
It’s also possible to filter based on a message’s headers. The following flow routes a message based on a priority header (see figure 5.6):
Figure 5.6. Filter messages by priority header

<flow name="processOrders">
    <http:inbound-endpoint exchange-pattern="request-response"
    host="${http.host}" port="${http.port}" path="orders"/>
    <component
    class="com.prancingdonkey.service.OrderPreProcessingService"/>
    <expression-filter
expression="message.inboundProperties['PD_PRIORITY'] == 'HIGH'"/>
    <jms:outbound-endpoint queue="orders.critical"
        connector-ref="Active_MQ" />
</flow>
This flow accepts order data (you’ll see the exact format of it a little bit later) and sends it to a Java class for processing. If the PD_PRIORITY header is set to HIGH, then the message is routed to a JMS queue for processing critical orders.
Let’s take a look at how to filter message payloads with textual or XML content.
5.2.2. Filtering text and XML
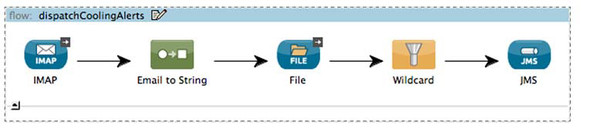
Filtering messages with textual payloads is easy with Mule’s wildcard and regular expression filters. The wildcard filter applies a shell-like wildcard to the message’s payload. If the payload matches the wildcard, then the message is passed. Let’s augment listing 5.2 to log all cooling reports but only dispatch those with SEVERE payloads to JMS (see figure 5.7):
Figure 5.7. Using the wildcard filter to filter text and XML
<flow name="dispatchCoolingAlerts">
       <imap:inbound-endpoint host="${imap.host}"
           port="${imap.port}"
           user="cooling"
           password="password"
           responseTimeout="10000" />
       <email:email-to-string-transformer/>
       <wildcard-filter pattern="*SEVERE*"/>
       <jms:outbound-endpoint
           topic="cooling.alerts"
           connector-ref="Active_MQ"
          />
   </flow>
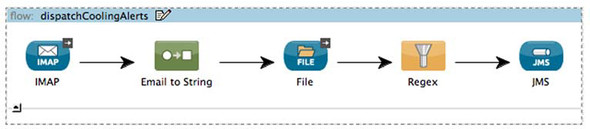
You can tighten up this flow by filtering with a regular expression filter (see figure 5.8):
Figure 5.8. Filtering with a regular expression
<flow name="dispatchCoolingAlertsWithRegex">
    <imap:inbound-endpoint
            host="${imap.host}"
            port="${imap.port}"
            user="cooling"
            password="password"/>
    <email:email-to-string-transformer/>
    <file:outbound-endpoint path="./data/cooling/reports"/>
    <regex-filter pattern="^LEVEL: SEVERE$"/>
    <jms:outbound-endpoint topic="cooling.alerts"
                           connector-ref="Active_MQ"/>
</flow>
The wildcard and regex filters are useful for filtering textual payloads. Using these filters to process structured textual data like XML, however, can be cumbersome. You’ll see in the next section how XPath expressions can be used to filter XML. XPath filter evaluations provide a fine-grained way to determine the validity of a message. While this is useful, you often want to ensure an XML document is valid prior to processing it. The schema-validation-filter provides this functionality.
The following example demonstrates an HTTP-to-JMS proxy that rejects messages that don’t conform to the given schema (see figure 5.9):
Figure 5.9. Validate and dispatch cooling alerts

<flow name="validateAndDispatchOrders">
    <http:inbound-endpoint exchange-pattern="one-way"
        host="${http.host}" port="${http.port}"
        path="orders"/>
    <mulexml:schema-validation-filter
        schemaLocations="orders.xsd"
        returnResult="true"/>
    <jms:outbound-endpoint topic="orders.submitted"
        connector-ref="jmsConnector"/>
</flow>
The filters we’ve considered so far are powerful, but somewhat simplistic. Let’s see how you can use Mule Expression Language to perform powerful filtering without writing any Java code.
5.2.3. Filtering with expressions
It’s often the case that a message filtering requirement won’t be easily met with the built-in filters you just saw. In many cases, however, Mule’s expression filter will give you the same amount of flexibility without writing any Java code.
One of the benefits of working with structured data, such as XML or object graphs, is the availability of structurally aware query tools. In chapter 3, we introduced Java classes that began to model Prancing Donkey’s domain. We’ll build on this in listings 5.5 and 5.6 by introducing an Order object to model a customer order for cases of Prancing Donkey’s brew and show how it can be used with Mule’s expression filter.
Listing 5.5. Java class for an Order
public class Order implements Serializable {

  private String id;
  private String priority;
  private String customerId;
  private BigDecimal total;
  private BigDecimal shippingCost;
  private List<LineItem> lineItems;
  ...getters / setters omitted
Listing 5.6. Java class for a LineItem
public class LineItem {

  private Brew brew;
  private Integer quantity;
  ...getters / setters omitted
The Order class contains a collection of LineItem classes. The latter represents an order for a quantity of cases of brew, represented by the Brew object. When serialized to XML, an order might look something like the following listing.
Listing 5.7. XML representation of an Order
<order>
   <id>4d3196a9-aecc-4b46-be21-2b7be47a8b19</id>
   <priority>NORMAL</priority>
   <customerId>d69d3d89-9955-45c7-8167-24bf2733b347</customerId>
   <total>100.23</total>
   <shippingCost>21.23</shippingCost>
   <lineItems>
       <lineItem>
           <brew>11</brew>
           <quantity>2</quantity>
       </lineItem>
        <lineItem>
           <brew>3</brew>
           <quantity>1</quantity>
       </lineItem>
   </lineItems>
</order>
Now let’s implement a flow that subscribes to a JMS topic for order data and performs some processing on messages that are of HIGH priority (see figure 5.10):
Figure 5.10. Route high-priority orders with XPath

<flow name="routeHighPriorityOrdersWithXpath">
    <jms:inbound-endpoint topic="orders"
        connector-ref="jmsConnector" />
   <expression-filter
expression="xpath('/order/priority').text == 'HIGH'"/>
        <component
class="com.prancingdonkey.service.HighPriorityOrderProcessingService"/>
</flow>
The expression filter takes a Mule expression as its argument. In this example, you use the Mule Expression Language’s xpath support to evaluate the given expression against the message’s XML payload. The xpath expression will ensure that messages with high-priority order payloads will get processed by HighPriorityOrderProcessingService.
The Mule Expression Language also allows you to navigate arbitrary object graphs using a dot notation. You could use this to perform the same filtering if Prancing Donkey were not serializing their objects to XML prior to publishing them on the topic (see figure 5.11):
Figure 5.11. Route highpriority orders with properties
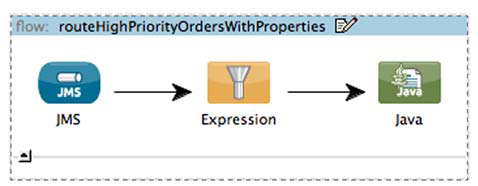
<flow name="routeHighPriorityOrdersWithProperties">
   <jms:inbound-endpoint topic="orders"
       connector-ref="Active_MQ"/>
   <expression-filter
       expression="payload.priority == 'HIGH'" />
    <component
      class="com.prancingdonkey.service.HighPriorityOrderProcessingService" />
</flow>
The same expression would evaluate against instances of this Java object as they would against the XML document.
We’ll come back to this domain model and routing expressions later in this chapter. Now we’ll take a look at logical filters, which allow you to combine the various filters in composites.
5.2.4. Logical filtering
Logical filters let you perform Boolean operations using two or more filters. Mule supplies and, or, and not filters for Boolean evaluation. These are equivalent to the &&, ||, and ! operators in the Java language. Let’s modify listing 5.7 to ensure the flow only processes Order objects. Listing 5.8 contains the configuration (see figure 5.12).
Figure 5.12. Using a logical filter

Listing 5.8. Using a logical filter
<flow name="routeHighPriorityOrdersOfTheCorrectType">

    <jms:inbound-endpoint topic="orders"
        connector-ref="Active_MQ"/>
    <and-filter>
        <payload-type-filter
                expectedType="com.prancingdonkey.domain.Order"/>
        <expression-filter
            expression="payload.priority == 'HIGH'"/>
    </and-filter>
    <component
class="com.prancingdonkey.service.HighPriorityOrderProcessingService"/>
</flow>
As you probably guessed, this filter will consume messages that are of type com.prancingdonkey.domain.Order and for which the supplied XPath expression evaluates to true. You’re also able to nest logical filters.
Listing 5.9. Nesting logical filters
<flow name="routeHighPriorityOrdersOfTheCorrectType">
    <jms:inbound-endpoint queue="orders"
                          connector-ref="jmsConnector" />
    <and-filter>
        <or-filter>
            <expression-filter
        expression="payload.priority == 'HIGH'"/>
            <expression-filter
 expression="message.inboundProperties['PD_PRIORITY']
  == 'HIGH'"/>
        </or-filter>
        <payload-type-filter
 expectedType="com.prancingdonkey.domain.Order"/>
        </and-filter>
        <component
class="com.prancingdonkey.service.HighPriorityOrderProcessingService"/>
</flow>
In this example, you open the scope of the flow to process messages that have payloads of type com.prancingdonkey.domain.Order and have either a priority of HIGH when Order’s getPriority() method is called or the PD_PRIORITY header on the message is set to HIGH.
Let’s switch gears and take a look at two slightly more complicated filters.
5.2.5. Ensuring atomic delivery with the idempotent filter
It can be very important to guarantee a message is only processed once. Canonical examples abound in the banking industry. You want to be very sure you’re not processing the same withdrawal or debit twice, for instance. It’s conceivable, however, for a message to be delivered or sent more than one time. Someone might hit submit twice on an online banking form, or a malicious user may be deliberately injecting duplicate messages into your system.
Mule’s idempotent-message-filter ensures that a flow only processes a message once. By default, the idempotent-message-filter will use the message’s ID to determine if it’s been delivered. Typically, however, this behavior is overridden by setting the idExpression attribute on the filter to something that makes sense in the business domain. Let’s extend the example in section 5.2.4 to include an idemponent-message-filter. We’ll configure the idExpression to use the order’s ID to determine if the message has been processed already (see figure 5.13).
Figure 5.13. Use XPath to determine ID for idempotency
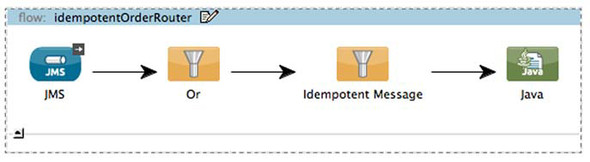
Listing 5.10. Ensuring idempotent delivery with the idempotent-message-filter

The idempotent-message-filter configured at ![]() uses the supplied XPath expression to determine the ID of the order. Mule will use this ID to determine if the message has
been processed, and pass the message if it hasn’t. By default, Mule stores the list of processed messages as text files in
a directory local to the filesystem. You can override the location of this directory by setting the simple-text-file-store element on the filter:
uses the supplied XPath expression to determine the ID of the order. Mule will use this ID to determine if the message has
been processed, and pass the message if it hasn’t. By default, Mule stores the list of processed messages as text files in
a directory local to the filesystem. You can override the location of this directory by setting the simple-text-file-store element on the filter:
<idempotent-message-filter
         idExpression="xpath('/order/id').text">
    <simple-text-file-store directory="/opt/idempotent"/>
</idempotent-message-filter>
Object stores other than files are also supported by the idempontent-message-filter. You can configure an in-memory store or a custom-object store. The latter is particularly useful if you’re using Mule in a clustered or load-balanced environment. You could implement an object store that stores idempotent IDs in a shared location, like an Apache Cassandra instance, so that the history of processed messages is available to every Mule node in the cluster. You’ll see how to implement custom object stores in chapter 12.
Using the idempotent-message-filter with Mule EE
The idempotent-message-filter is automatically cluster aware if you’re running the Enterprise HA version of Mule.
Let’s now investigate what happens when messages are blocked by a filter.
5.2.6. Using the message filter
You may be wondering what happens to messages that are blocked by one of the filters we’ve described. By default, no action is taken, and the message is dropped. If you want to override this behavior, for instance, to send the message to a dead-letter queue or throw an exception, you need to use a message filter. The message filter is a wrapper around a filter expression that lets you route filtered messages. Let’s send blocked messages to a JMS queue, as shown in the following listing.
Listing 5.11. Route to a DLQ

Message filter and catch-all routing
The message filter provides functionality similar to catch-all strategies with routers used in Mule 2 services.
Setting the onAccepted attribute of the messageFilter will route the blocked message to the supplied address. The messageFilter takes an additional, mutually exclusive attribute called throwOnUnaccepted. Setting this to true will cause Mule to throw an exception when the message is blocked. We’ll talk more about how to handle exceptions in flows in chapter 9.
At this point, you’ve seen how to use Mule’s choice router to direct a message in the appropriate direction. We also took a look at a number of Mule’s filters, which provide facilities to stop a message from being processed any further in a flow. In all the examples so far, however, there’s been a one-to-one mapping between a message and its ultimate destination. Let’s investigate how you can use Mule to route a message to multiple destinations.
5.3. Routing to multiple recipients
You often need to send a message to more than one endpoint. A monitoring alert, for instance, might need to reach the following destinations:
- The email address of an admin
- A local log file
- A database for archiving
In this section, we’ll take a look at Mule’s recipient list router, among others. These message processors will allow you to route messages to multiple endpoints. You’ll see how you can also synchronously route these messages and aggregate their responses.
5.3.1. Dispatching messages with the all router
The all routing message processor sends a message to a group of endpoints. The next listing shows how alerts from Salesforce are routed (see figure 5.14).
Figure 5.14. Multicast data to SMTP and MongoDB endpoints

Listing 5.12. Multicast data to SMTP and MongoDB endpoints

The all router in this example is sending the alert to the SMTP outbound endpoint to email an administrator, and writing the alert to a MongoDB collection for archival purposes.
The all router and multicasting
The all router is analogous to the multicasting router in Mule 2.
The all router and message copies
The all router makes a copy of the MuleMessage for each recipient.
5.3.2. Scatter/gather IO with the all router
In the previous example, your use of the all router was fire-and-forget; the goal was to dispatch the alert to the appropriate endpoints and not expect a response. The all router can also be used with the request-response exchange pattern. In this case, the responses from the outbound endpoints can be aggregated together. You’ll see more about message aggregation in the next section, but let’s look at an example that uses the all router in conjunction with Prancing Donkey’s Order domain object to calculate the net price for an order.
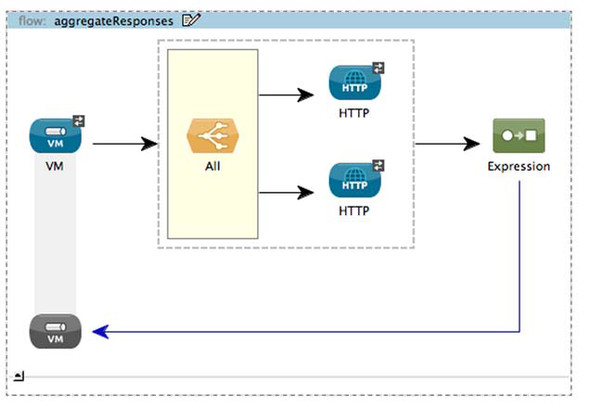
Prancing Donkey has two internal web services used to calculate shipping and sales tax for an order. Let’s implement a Mule flow that accepts an Order object, routes the object to these two web services, and aggregates the responses to return a net price, shown in the next listing (see figure 5.15).
Figure 5.15. Scatter/gather IO
Listing 5.13. Scatter/gather IO
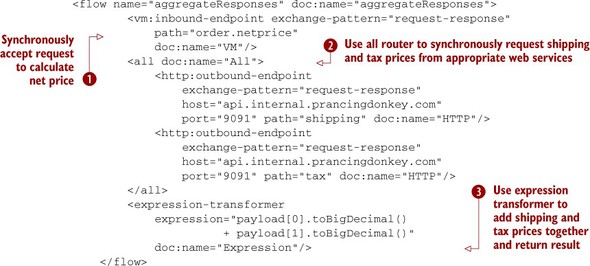
The internal API methods exposed by Prancing Donkey take the XML serialized Order objects and return the calculated shipping and tax prices. The VM inbound endpoint ![]() synchronously accepts the XML representation of the Order object. The all router
synchronously accepts the XML representation of the Order object. The all router ![]() then synchronously sends the order to each API. The output of the all router is a Collection containing the response from each endpoint. The response from each API call is added to this collection and is transformed
by the expression transformer
then synchronously sends the order to each API. The output of the all router is a Collection containing the response from each endpoint. The response from each API call is added to this collection and is transformed
by the expression transformer ![]() . The summed result is then returned to the caller of the VM inbound endpoint.
. The summed result is then returned to the caller of the VM inbound endpoint.
Using the all router in this fashion provides a powerful method to aggregate responses from multiple sources. You’ll see another way to do this when we discuss message splitting and aggregation in the next section. For now, however, let’s consider how you can invoke a sequence of message processors asynchronously using a different thread of execution.
5.3.3. Going async with the async processor
The all router is appropriate when you want to synchronously dispatch or aggregate requests to endpoints. What’s your option, however, when you want a series of message processors to be processed asynchronously in a different thread? In such a case, the async messaging scope is necessary.
To see why this is useful, let’s consider a use case for Prancing Donkey. Prancing Donkey’s customers are able to place orders via a mobile phone application. On the server side, this process consists of a few steps:
- Validate the request (ensure the credit card is valid, the request is well formed, and so on)
- Perform order preprocessing using a Java class
- Perform order processing using a Java class
- Execute a method on a Java class to perform the shipping operations
The easiest way to implement this would be to have an HTTP inbound endpoint followed by three Java components corresponding to each step. The downside of this approach, however, is that the mobile user’s experience is now coupled to pieces of order processing they probably don’t care about. It would be ideal if you could accept the HTTP request and return a response to the user after validating the request, allowing the rest of the order processing to occur asynchronously in a different thread (see the following listing).
Listing 5.14. Asynchronously processing an Order
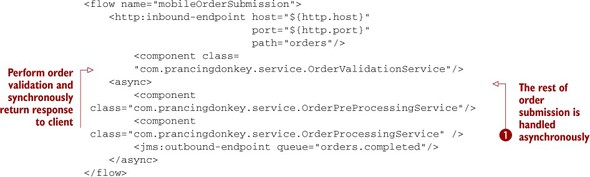
The http:inbound-endpoint will receive the request and invoke OrderValidationService to ensure the request is valid. This will return a response to the client, in this case a mobile phone app, indicating whether or not the order was successfully submitted, along with a tracking ID that the app can use later on to check the status of the order.
The async scope beginning at ![]() invokes the contained message processors using a different thread. This allows you to quickly return a response to the mobile
app, while allowing back-end processing to occur independently.
invokes the contained message processors using a different thread. This allows you to quickly return a response to the mobile
app, while allowing back-end processing to occur independently.
So far, you’ve seen how Mule’s routing message processors can selectively route messages, stop messages from being routed, route messages to multiple endpoints, and asynchronously handle back-channel responses. One thing we haven’t discussed, however, is how to route groups of messages together.
5.4. Routing and processing groups of messages
The messages we’ve processed so far in this chapter, up until we discussed scatter/gather IO with the all router, were atomic in nature. Processing groups of messages, however, can be as common a use case. You could have a process that’s waiting for data from a variety of remote systems and can’t proceed until it gets it from all of them. You also might selectively choose to split your data, process it, and then aggregate the results. This should be familiar to anyone with exposure to the map-reduce programming paradigm.
We’ll demonstrate Mule’s splitting and aggregation features by parallelizing the processing of Prancing Donkey’s orders to multiple Mule nodes over JMS. Prancing Donkey ultimately wants to be able to split Order objects up into individual LineItems, submit these to JMS for distributed processing, and then aggregate the results to complete the order. Finally, you’ll see how the foreach message processor allows you to iterate over the payload of a message, potentially routing each element individually.
Let’s start off by seeing how the Orders will be split up.
5.4.1. Splitting up messages
Prancing Donkey passes around order data using XML documents. These documents contain high-level data about the order, including who the customer is and how they’re paying, as well as data about each line item. Small orders will only contain a few line items, but larger orders, perhaps for restaurant chains or distributors, might contain hundreds of line items. A certain amount of processing needs to be done for each line item: calculating its shipping cost, updating the inventory system, submitting the line item to an analytics system, and so on. Performing these tasks sequentially isn’t feasible for orders with a large number of items.
The following listing demonstrates how Prancing Donkey is splitting the order up into its constituent line items in order to distribute the work required to process each LineItem object (see figure 5.16).
Figure 5.16. Splitting line items

Listing 5.15. Splitting line items
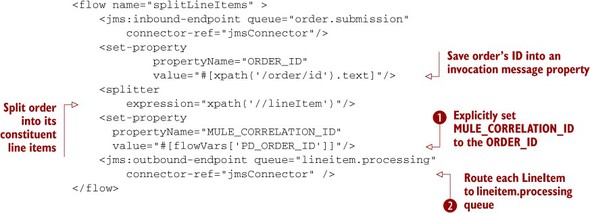
This flow accepts a message containing an Order payload. It will split the Order into its individual LineItem objects, and place each LineItem object in a JMS queue for processing. Because you’re sending the LineItems over JMS, it’s very likely that a different Mule instance listening to that queue will process the LineItem. Mule uses two special headers, called MULE_CORRELATION_ID and MULE_CORRELATION_GROUP_SIZE, to keep track of these messages when responses come back from the different systems. The fact that the correlation state is maintained in the individual messages means that a different Mule instance than the one that did the splitting can assume aggregation duties for the message group.
Mule will automatically set a MULE_CORRELATION_ID if one isn’t explicitly set. In the previous case, Prancing Donkey is explicitly
setting the MULE_CORRELATION_ID to be the Order’s ID. This will allow them to reference the Order when the LineItems are correlated. The MULE_CORRELATION_GROUP_SIZE is automatically set to the amount of elements in the collection. Each LineItem is then dispatched to the lineitem.processing queue ![]() with its MULE_CORRELATION_ID header explicitly set
with its MULE_CORRELATION_ID header explicitly set ![]() . An Order with 100 LineItems and an ID of 6ed49087-2765-45f6-a9bf-ade2aea363c9, for example, would result in 100 messages dispatched on the lineitem.processing queue. Each message would have its MULE_CORRELATION_ID set to 6ed49087-2765-45f6-a9bf-ade2aea363c9 and its MULE_CORRELATION_GROUP_SIZE
set to 100.
. An Order with 100 LineItems and an ID of 6ed49087-2765-45f6-a9bf-ade2aea363c9, for example, would result in 100 messages dispatched on the lineitem.processing queue. Each message would have its MULE_CORRELATION_ID set to 6ed49087-2765-45f6-a9bf-ade2aea363c9 and its MULE_CORRELATION_GROUP_SIZE
set to 100.
Now let’s see how to handle the LineItems once they’ve been processed.
5.4.2. Aggregating messages
Often a message is split and its constituent parts processed without bearing a result, or a result is produced that’s meaningless in aggregate. Other groups of messages, as in the Prancing Donkey use case we’re exploring in this section, need to be reassembled. Message aggregators are used for this assembly. Mule aggregators use the MULE_CORRELATION_ID and MULE_CORRELATION_GROUP_SIZE to reassemble a split message.
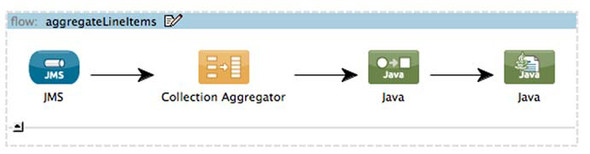
The following listing demonstrates how Prancing Donkey is using a collection aggregator to reassemble the List of LineItems broken up using the splitter in listing 5.15 (see figure 5.17).
Figure 5.17. Aggregating line items
Listing 5.16. Aggregating line items
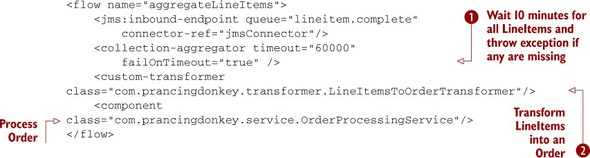
The collection aggregator ![]() will wait until its timeout is reached for the amount of LineItems equal to the MULE_CORRELATION_GROUP_SIZE for a MULE _CORRELATION_ID. Using the numbers from earlier, if 100 LineItems aren’t received by the collection aggregator within 10 minutes, then an exception is thrown. Setting failOnTimeout to false disables this behavior. This can be useful if the entire set of messages isn’t critical for processing to continue. This
obviously isn’t the case for order data, but it could be true for some kinds of analytics or media payloads that can tolerate
lost messages.
will wait until its timeout is reached for the amount of LineItems equal to the MULE_CORRELATION_GROUP_SIZE for a MULE _CORRELATION_ID. Using the numbers from earlier, if 100 LineItems aren’t received by the collection aggregator within 10 minutes, then an exception is thrown. Setting failOnTimeout to false disables this behavior. This can be useful if the entire set of messages isn’t critical for processing to continue. This
obviously isn’t the case for order data, but it could be true for some kinds of analytics or media payloads that can tolerate
lost messages.
Now that you have the List of LineItems back, you can call a custom transformer ![]() to convert this back to an Order object. LineItemsToOrderTransformer uses the message’s MULE_CORRELATION_ID, which you explicitly set to the order’s ID, to retrieve the order data from a database
and populate it with the newly available LineItems collection. The Order is then passed to a Java component for its final processing.
to convert this back to an Order object. LineItemsToOrderTransformer uses the message’s MULE_CORRELATION_ID, which you explicitly set to the order’s ID, to retrieve the order data from a database
and populate it with the newly available LineItems collection. The Order is then passed to a Java component for its final processing.
Message aggregation can be used independently of splitting. Manually setting the MULE_CORRELATION_ID and MULE_CORRELATION_GROUP_SIZE will trigger the aggregation behavior without using a splitter. This can be useful to force Mule to process certain kinds of messages as a group, perhaps to enforce certain transaction semantics or batching.
5.4.3. Routing collections
The examples in this section have so far dealt with routing groups of messages. Mule also provides facilities to iterate over the contents of an individual message, typically its payload, and process each piece individually. This functionality is achieved using the foreach message processor, as demonstrated by the following listing. The flow accepts an XML document as a JMS payload describing an order and its constituent line items. The goal is to use an XPath expression to process each line item separately, sending line items with a HIGH priority to one Java component and all other line items to a different Java component (see figure 5.18).
Figure 5.18. Routing the line items

Listing 5.17. Routing collections

The collection expression defined at ![]() indicates how to split the message up for processing. In this case, you use an XPath expression. If the payload was an instance
of a Java collection, however, then you could simply use the payload variable as the collection for the foreach router. The choice router then makes the determination, on a per-node basis, of how to route the
message. Line items with a HIGH priority will be routed to the HighPriorityOrderProcessingService component, while all other line items will get processed by the regular OrderProcessingService.
indicates how to split the message up for processing. In this case, you use an XPath expression. If the payload was an instance
of a Java collection, however, then you could simply use the payload variable as the collection for the foreach router. The choice router then makes the determination, on a per-node basis, of how to route the
message. Line items with a HIGH priority will be routed to the HighPriorityOrderProcessingService component, while all other line items will get processed by the regular OrderProcessingService.
Now that you’re comfortable routing messages in aggregate as well as routing messages as collections, we can turn our attention to the final routing topic of this chapter: routing for reliability.
5.5. Guaranteed routing
Certain transports, like JMS, offer guaranteed delivery. Most commonly used transports, particularly HTTP, don’t feature such amenities. Decoupling such transports with something like JMS can be a good approach, but message brokers aren’t always available and, more importantly, they introduce operational overhead to an environment. Luckily, Mule supplies routers that provide the benefits of decoupling middleware without the overhead of maintaining a messaging infrastructure.
Let’s start by looking at the routers that can introduce resiliency for unreliable transports: first-successful and until-successful.
5.5.1. Resiliency for unreliable transports
The first-successful and until-successful routers allow you to define how Mule deals with a failure when sending a message to an endpoint. The first-successful router, illustrated next, will attempt to send a message to each endpoint until one succeeds:
<first-successful>
    <http:outbound-endpoint
              exchange-pattern="request-response"
              host="localhost" port="9091"
              path="shipping" doc:name="HTTP"/>
    <http:outbound-endpoint
              exchange-pattern="request-response"
              host="localhost" port="9091"
              path="shipping" doc:name="HTTP"/>
    <http:outbound-endpoint
              exchange-pattern="request-response"
              host="localhost" port="9091"
              path="shipping" doc:name="HTTP"/>
</first-successful>
The until-successful router, contrasted with the first-successful router, will continue to retry delivery to an endpoint until it succeeds. Here’s an example that retries an HTTP endpoint for an hour, waiting five minutes between retry attempts.
Listing 5.18. Reliability routing with the until-successful message processor

The until-successful router is an example of the “store and forward” pattern. As such, an object store is needed to persist
the request. For the purposes of this example, we’re using an in-memory object store that’s configured at ![]() . The until-successful router
. The until-successful router ![]() will attempt delivery to the outbound endpoint for an hour, waiting five minutes between each redelivery attempt.[2]
will attempt delivery to the outbound endpoint for an hour, waiting five minutes between each redelivery attempt.[2]
2 The until-successful router is currently asynchronous only.
Now let’s see how to handle the LineItems once they’ve been processed.
5.5.2. Defining failure expressions
In both previous examples, any exception thrown by invoking the outbound endpoint would trigger the resiliency behavior. In the case of the first-successful router, it would cause delivery to be attempted to the next message in the chain. For the until-successful router, it would trigger a retry attempt. By setting the failureExpression attribute on either router, you can control what Mule perceives as an error.
Listing 5.19 demonstrates configuring the until-successful router to only fail on SocketTimeoutExceptions. The rationale behind this is that you only want to attempt redelivery if there’s some sort of network problem or outage on the remote system. This goes a step towards avoiding the poison pill problem, in which a message is repeatedly delivered that will never succeed, taking up resources on the remote system.
Listing 5.19. Failure expressions and the until-successful router
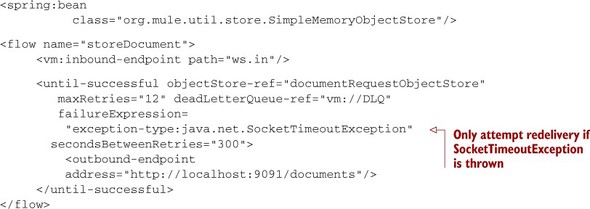
In this case, you use the exception-type expression evaluator to see if the exception payload is an instance of SocketTimeoutException. Assuming that it is, Mule will attempt to send the message to the endpoint in five minutes. If another type of exception is thrown, then the retry attempts will be cancelled, and the message will be sent to the DLQ.
5.6. Summary
In this chapter, we explored Mule’s routing capabilities. You saw how routing message processors control how data moves back and forth from remote systems. We took a look at Mule’s filtering capabilities and how they apply to routing. We examined some of Mule’s core filters in depth, and saw examples of each at work. Perhaps most importantly, you may have noticed that we didn’t have to implement any custom code to perform the routing.
Some of the examples in this chapter and the previous one demonstrated routing messages to Java service classes. Let’s now take a formal look at how to integrate business logic in Mule applications with components.