
Chapter 12. Developing with Mule
- The Mule context in depth
- How to interact with Mule from code
- Mule’s internal API
- Testing tools and practices
- Debugging tools and practices
The previous 11 chapters of this book should’ve convinced you that there’s a lot that can be achieved with Mule with minimal coding, or at least without writing any Mule-specific code. For example, you’ve seen that Mule goes to great lengths to let you reuse your existing business logic as-is. This is great news because no one wants to write code that’s coupled to a particular framework, as it creates a potential implementation lock-in and weakens the code by making it sensitive to API changes.
But there are times when it’s worth considering the trade-off between the disadvantages of framework coupling and the advanced features it offers. Using Mule’s API allows you to implement advanced behaviors that are cumbersome or even impossible to roll out when staying away from the framework. In fact, since Mule is a lightweight messaging framework and highly distributable object broker, staying away from its API would amount to denying half of its nature.
Because there are more than 2500 classes in Mule, this chapter can by no means be an exhaustive tour of all of them; instead, it will give you the necessary pointers you need to approach Mule’s API in an efficient and productive manner. Instead of considering the API as a static resource, we’ll look at it as a gateway to Mule’s live moving parts. You’ll see how Prancing Donkey makes good use of the API to implement behaviors in their applications that couldn’t be implemented by configuration alone. Indeed, as an expert Mule user, Prancing Donkey uses most of the internal API-related features we’ll cover in this chapter, from message interception to notification listening. Learning how they implement such advanced features will give you a better and deeper insight into how things work inside of Mule.
As your familiarity with the Mule API grows, you’ll start producing more complex applications, increasing your need to apply to your Mule projects all the tools and practices you’re using in your standard software development projects. This is why we’ll also focus, in the second part of this chapter, on development-related activities. You’ll see how to perform integration and load testing with Mule using the JUnit test framework, Mule’s Test Compatibility Kit, and the JMeter load-testing tool. We’ll conclude by taking a look at some debugging techniques you can use while developing your applications.
This chapter is one of the most in-depth of the book; it will take time for its content to sink in, and you’ll surely come back to it several times to fully grok it. Because it covers everything development with Mule, it may feel like a mixed bag of concepts, and to some extent that’s what it is. But as you progress in your understanding of Mule internals and capacities, you’ll progressively realize that all the concepts covered here are tightly intermingled. With this said, let’s start by discovering the Mule context, a useful part of the API that you’ll happily start mining soon!
12.1. Understanding the Mule context
In previous chapters of this book, you’ve read about the Mule context. You’ve certainly understood that it’s an in-memory handle to a running Mule application. As figure 12.1 shows, each Mule application that runs is assigned a Mule context.
Figure 12.1. Each Mule application has a specific Mule context.

The Mule context that’s used by a Mule application is created when it’s bootstrapped. Mule supports multiple bootstrapping options (as discussed in chapter 8), which include these:
- The application deployer of the Mule standalone server
- The Mule servlet context listener of a WAR-packaged Mule application
- Custom Java bootstrapping code
- A functional test case (see section 12.4)
- The application launcher of Mule studio
Once there was a singleton
In the versions of Mule before 3, the Mule context was a singleton. With the introduction of the Mule application model (see section 8.1) in Mule 3, the Mule context couldn’t be a singleton anymore in order to support multiple applications in the same JVM.
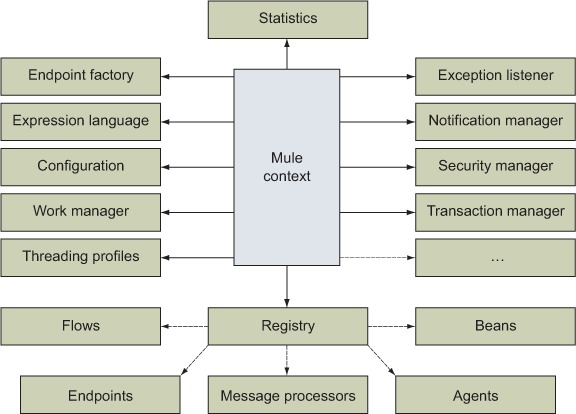
Figure 12.2 is a partial dependency graph that represents some of the Mule moving parts you can reach from the Mule context. As you can see, once you get ahold of the Mule context, it’s party time: all of Mule’s internals become accessible! This figure is far from a complete representation of the reality; if you look at the Javadoc of the org.mule.api.MuleContext interface and follow some of the classes it links, like the registry, you’ll find far more objects than are represented here. Nevertheless, for the purpose of this discussion, we’ll focus on a few significant aspects and let you explore the rest of the context on your own.
Figure 12.2. The Mule context gives access to a Mule application’s internals.
But before we dig deeper into the Mule context, we need to answer this crucial question: how can one get access to this treasure trove?
12.1.1. Accessing the Mule context
The Mule context is accessible in several ways:
- Create it— You can create a Mule context by using a factory and loading a specific configuration in it. This was demonstrated in section 8.4.
- Get it from the client— If you use the client to bootstrap a Mule instance, you can ask it for the context it has created behind the scenes. We’ll use this approach in listing 12.12.
- Get it from the event context— Components implementing org.mule.api.life-cycle.Callable receive an event context that, among other things, gives direct access to the Mule context (see section 6.1.1).
- Receive it by injection— If you write a custom class that implements org.mule.api.MuleContextAware and is instantiated by Spring or Mule, you’ll receive a reference to the current Mule context before it gets initialized (see section 12.3.1). Alternatively, you can also have the context injected by annotating an org.mule.api.MuleContext field with either @Inject (standard JSR 330 annotation) or @Lookup (Mule annotation).
- Get it from the servlet context— When running Mule deployed as a web application (see section 8.2), the Mule context is accessible in a servlet context attribute named mule.context.
- Use it as a script variable— Mule binds the context in the evaluation context of all the scripts it evaluates under the name muleContext.
If at all possible for your particular use case, prefer receiving the Mule context by injection.
What about MEL
The Mule context isn’t directly accessible in MEL, but much of the configuration information it contains and the registry are bound as context objects. Check out appendix A to find out more about these objects.
Let’s now review some of the actions you can perform once you have a reference to the context.
12.1.2. Using the Mule context
In this section, we’ll review four actions that the Mule context allows you to perform:
- Controlling a Mule instance
- Getting the active configuration of a Mule application
- Accessing the application’s statistics
- Looking up objects in the registry
Let’s start with controlling a Mule instance.
Controlling a Mule instance
The primary function of the context is to control the overall lifecycle of a Mule instance. Consequently, if you create a context using the factory, you need to call the following method after loading your configuration file(s):
muleContext.start();
Similarly, when you want to cleanly terminate a Mule instance, you need to execute the following:
muleContext.dispose();
Suspended animation
The context also offers a stop() method that can be used to suspend a Mule instance, which can be resumed with a subsequent call to start().
Reading the configuration
The Mule context holds a reference to an object that details the system configuration of the instance. This object, which is immutable after the instance is started, is an object of type org.mule.api.config.MuleConfiguration. Though the vast majority of all configuration values you’ll handle will come from XML or properties files and will be directly injected into your objects, some values are computed by Mule itself and made available via the configuration object.
If you don’t name your instance, Mule generates a unique name for it on the fly. Because the configuration object allows you to get this ID, if you have access to the Mule context you can build MBean names that are guaranteed to work whether you name your instance or not. This is illustrated in the next listing.
Listing 12.1. Using the Mule context to access the system configuration
String serverId = muleContext.getConfiguration().getId();

ObjectName listenerObjectName = ObjectName
        .getInstance(JmxSupport.DEFAULT_JMX_DOMAIN_PREFIX + "."
               + serverId + ":"
               + JmxServerNotificationAgent.LISTENER_JMX_OBJECT_NAME);
Accessing statistics
Mule keeps detailed statistics for all its moving parts. In an instance with numerous flows, these statistics are a convenient means to keep track of the activity of a Mule application. Prancing Donkey uses a custom component to regularly dump the full statistics of an application into XML files. The logic inside this component, which is shown in the next listing, is simple thanks to the supporting classes offered by Mule.
Listing 12.2. Using the Mule context to access the global statistics
final AllStatistics allStatistics = muleContext.getStatistics();

allStatistics.logSummary(new XMLPrinter(xmlStatisticsWriter));
Looking up the registry
One of the richest objects the context gives you access to is the registry, where, as its name suggests, all of Mule’s moving parts are registered and accessible via getters or lookup methods. When using a Spring XML configuration, the registry is created and populated for you. In that case, it’s composed of a Mule-specific transient registry that delegates to a read-only Spring bean factory. This means that you can access all Mule moving parts and your own Spring beans through the registry.
In terms of software design, dependency injection should be preferred to registry lookups; this is why most of the time you’ll directly inject the necessary dependencies into your custom objects. Lookups become relevant when the required resource is only known at runtime and hence can’t be statically configured. This is the case for the XML statistics component at Prancing Donkey. As we said before, this component can output the whole of the statistics of an application, but it can also do it for only one flow, if its name has been sent to the component. Because of the dynamic nature of this behavior, you can use the registry to look up the flow by name and then render its statistics, as shown next.
Listing 12.3. The registry gives access to all Mule’s moving parts.
final FlowConstruct flow = muleContext.getRegistry()
                     .lookupFlowConstruct(flowName);

FlowConstructStatistics flowStatistics = flow.getStatistics();
new XMLPrinter(xmlStatisticsWriter)
        .print(Collections.singleton(flowStatistics));
There’s another situation in which you would prefer lookup over injection: when no configuration element can be referenced (or injected). Let’s consider the jmx-default-config configuration element that automatically configures a bunch of agents. This element doesn’t give you a handle for each agent it creates, so if you need to reach one of these agents, as shown in the following listing, you’d need to perform a registry lookup.
Listing 12.4. JMX agents can be looked up in the registry.
JmxAgent jmxAgent = (JmxAgent) muleContext.getRegistry()
        .lookupAgent("jmx-agent");

MBeanServer mBeanServer = jmxAgent.getMBeanServer();
As suggested by figure 12.2, the Mule context gives access to the innards of the whole application. The few examples we’ve just gone through should have whetted your appetite for more. We can’t possibly fully explore the Mule context in this book, as we may end up putting the whole Javadoc API in print, but we believe the pointers we’ve given you will allow you to find your way.
It’s possible to store your own objects in the registry with the registerObject method and to retrieve them with lookupObject. You can also register objects from the XML configuration using the global-property element.
Though thread-safe, the registry shouldn’t be mistaken for a general-purpose object cache. If that’s what your application needs, you’d do better to use a dedicated one (like Ehcache or Hazelcast) and have it injected into your components or transformers.
It’s also possible to access in the registry the ApplicationContext that’s created behind the scenes when you use the Spring XML configuration format:
ApplicationContext ac =
      (ApplicationContext) muleContext.getRegistry()
             .lookupObject(SpringRegistry.SPRING_APPLICATION_CONTEXT);
This application context contains not only your Spring beans but also all of Mule’s moving parts configured in the XML file.
With the Mule context in hand, you can do many things, such as interacting with a Mule application using the Mule client. But what is the Mule client? Let’s learn more about it.
12.2. Connecting to Mule
As you’ll see in the coming sections, the main purpose of the Mule client is to allow you to interact with a Mule instance, whether it’s local (running in the same JVM) or remote (running in another JVM). We’ll also look at how the client can bootstrap and shut down an embedded Mule instance for you, and that instance can be used to directly tap into the transports infrastructure of Mule.
The Mule client provides a rich messaging abstraction and complete isolation from the transports’ particularities. The client supports the three main types of message interactions that are supported by Mule (refer to section 2.2 for the complete list of interactions):
- Send message— A synchronous operation that waits for a response to the message it sent (relies on the message dispatcher infrastructure). This corresponds to the request-response message exchange pattern (MEP).
- Dispatch message— An asynchronous operation that expects no response for the message it dispatched (also relies on the message dispatcher infrastructure). This corresponds to the one-way MEP.
- Request message— An operation that doesn’t send anything, but synchronously consumes a message from an endpoint (relies on the message requester infrastructure).
All these interactions are offered under numerous variations that allow you, for example, to directly target a component instead of an inbound endpoint, receive a future[1] message, or disregard the response of a synchronous call.
1 As in java.util.concurrent.Future, i.e., the pending result of a computation that can be waited on or polled regularly for a result.
Transactional client
It’s possible, but not trivial, to involve several operations of the Mule client in a single transaction, provided that the transports used are transactional. This is seldom necessary and won’t be detailed here. You can study org.mule.test.integration.client.MuleClient-Transaction-TestCase for more information.
Depending on the way you gain access to the Mule client, you will work with either of these:
- An instance of the org.mule.api.client.MuleClient interface
- An instance of the org.mule.module.client.MuleClient class, which doesn’t implement the org.mule.api.client.MuleClient interface, but offers the same API
Let’s start by discovering how the client can be used to interact with a local Mule instance.
12.2.1. Reaching a local Mule application
The most common usage of the Mule client is to interact with an already running local Mule application, that is, an application that runs within the same JVM. This is illustrated in figure 12.3.
Figure 12.3. The client is a convenient way to reach a Mule application within the same JVM.

In-memory calls from the client to a local Mule application are common in integration testing (see the discussion in section 12.2). The majority of the examples that accompany this book use the Mule client, for that matter. Listing 12.5 shows an excerpt of a method that Prancing Donkey uses to run integration tests on a flow that attaches PDF files to a Mule message (we talked about this in section 2.3.3).
Listing 12.5. The client facilitates testing by granting access to a Mule application.
MuleClient muleClient = muleContext.getClient();

MuleMessage result = muleClient.send("vm://add-attachments.in",
    TEST_PAYLOAD,
    Collections.<String,Object>singletonMap(
        "pdfFilePath",
        usageReportPdfFilePath));

assertThat(
    result.getInboundAttachmentNames().contains(TEST_USAGE_REPORT_PDF),
    is(true));
Because this test runs in a class in which the Mule context is available, you retrieve an instance of the Mule client directly from the context. In this particular case, you use an instance of org.mule.api.client.MuleClient that’s provided by the Mule context (it’s an instance of org.mule.api.client.LocalMuleClient, which extends org.mule.api.client.MuleClient with a few methods).
You may have noticed that in listing 12.5 you send a message to a VM transport URI. You may wonder if you’re constrained to only use the VM transport when the client is connected to a local Mule instance. This isn’t the case, and to illustrate that, we’ll look at the test code used to exercise the flow shown in listing 2.11. Notice in listing 12.6 how you send over HTTP a message to the URI that the flow you want to test listens to.
Listing 12.6. Flows can be reached over any protocol via the Mule client.
MuleMessage result = muleClient.send("http://localhost:8080/json/data",
    TEST_PAYLOAD, null);
assertThat((String) result.getInboundProperty("Content-Type"),
    is("application/json"));
You’ve discovered how the Mule client facilitates connectivity with a local application running in the same JVM. What if the Mule application you want to connect to runs in another JVM? What if it runs in a remote server? The Mule client can be used in this case as well, as you’ll now see.
12.2.2. Reaching a remote Mule application
The Mule client can connect to a remote application and use the same richness of interaction it does with a local one. For this to work, a specific remote dispatcher agent must be configured in the Mule application that the client wants to connect to, as illustrated in figure 12.4. Because the dispatcher agent is a particular consumer for a standard endpoint, any protocol that supports synchronous communications can be used. On top of this protocol a configurable (and customizable) format is used for the representation of the data that’s sent over the wire in both directions (the client request to Mule and its response).
Figure 12.4. Using the client to send messages to a remote Mule application via a dedicated dispatcher agent

Listing 12.7 shows the configuration of a Mule application that’ll accept client connections over TCP using the default wire format. Note that the remote dispatcher agent is provided by the mule-module-client module. Technically, the standard wire formats are pairs of round-trip transformers that take care of transforming Mule-Messages (payload and properties) to and from byte arrays. The default wire format relies on standard Java serialization and hence can only carry serializable payloads.
Listing 12.7. A remote dispatcher agent using the default wire format over TCP
<client:remote-dispatcher-agent>
    <client:remote-endpoint
            address="tcp://localhost:5555"
            exchange-pattern="request-response" />
</client:remote-dispatcher-agent>
Only at home
Expose the remote dispatcher agent over TCP only in a secure and trusted environment, as it allows you to completely control your Mule instance without enforcing any security.
Once the remote dispatcher agent has been configured, it’s possible to connect to it and then, through this connection, access all the messaging infrastructure of the remote Mule application. The client you’ve seen so far isn’t able to do this directly, but must be used to spawn a specific client for the remote dispatcher agent (shown in the next listing).
Listing 12.8. The client is the factory for creating remote dispatchers.

In this case, you work with an instance of the org.mule.module.client.MuleClient class that’s instantiated directly at ![]() . The client for the remote dispatcher agent, which is an instance of org.mule.module.client.RemoteDispatcher, is created at
. The client for the remote dispatcher agent, which is an instance of org.mule.module.client.RemoteDispatcher, is created at ![]() . This object is thread-safe.
. This object is thread-safe.
In this example, you perform an asynchronous send to an endpoint named clientServiceChannel with a client ID as the message payload and no properties. Note that the sendAsyncRemote method does the same thing as sendAsync of the local Mule client. Other methods have slightly different names; for example, the methods that send directly to a component are suffixed with ToRemoteComponent instead of Direct.
Notice at ![]() how you create a Mule client without providing it a context (nor a configuration file to load) and asking it, with the true parameter, to start the empty context it will create. Because you’re only interested in the remote Mule you connect to, there’s
no reason for the Mule client to try to interact with a local application.
how you create a Mule client without providing it a context (nor a configuration file to load) and asking it, with the true parameter, to start the empty context it will create. Because you’re only interested in the remote Mule you connect to, there’s
no reason for the Mule client to try to interact with a local application.
Once you’re done using the remote dispatcher, you can get rid of it by disposing of the Mule client that created it:
muleClient.dispose();
Note that disposing of a Mule client terminates all the remote dispatchers it could have created.
We’ve mentioned that the default wire format is based on standard Java serialization. This implies that you can only send serializable objects to a remote Mule instance. If this limitation is an issue for you, or if sending binary content over the wire isn’t an option, then you can consider using the XML wire format. This format relies on XStream, which is able to serialize any Java object to an XML representation. Listing 12.9 presents this wire format option combined with an HTTP endpoint. With this configuration, your client and the remote Mule instance will communicate with XML over HTTP, something that might be more palatable for a firewall than the raw binary over TCP of the previous example.
The remote dispatcher is a convenient way to reach a remote Mule application through a feature-rich back door. Should it be the only way? Of course not! It’s still valid to use any relevant transport to reach flows hosted on Mule. For example, you can still use an HTTP API to form a request to a flow hosted on Mule and exposed over HTTP. Or you can still use a JMS client to send to a destination consumed by a Mule flow.
Consequently, if you contemplate using the Mule client, take into account its footprint in terms of transitive dependencies and the tight coupling between your client code and Mule that its usage induces. You’ll also want to assess your need for the messaging abstraction the Mule client proposes.
Listing 12.9. A remote dispatcher agent using the XML wire format over HTTP
<client:remote-dispatcher-agent>
    <client:remote-endpoint ref="remoteDispatcherChannel" />
    <client:xml-wire-format />
</client:remote-dispatcher-agent>

<http:endpoint name="remoteDispatcherChannel"
               host="localhost"
               port="8080"
               path="_remoting"
               exchange-pattern="request-response" />
You surely observed in listing 12.9 how you create a global HTTP endpoint and reference it from the remote dispatcher agent. This is by no means a requirement; you could declare the HTTP endpoint on the remote-endpoint element, as in listing 12.7. The idea was to demonstrate that the remote dispatcher agent uses the standard transport infrastructure of the Mule instance that hosts it.
Now look at listing 12.10, which demonstrates how you create a client for this HTTP remote dispatcher agent. Except the URI that’s changed, there isn’t much difference from the previous code; where is the configuration of the XML wire format? It’s nowhere to be found because the client doesn’t decide the wire format—it’s imposed on it by the distant Mule instance during the initial handshake that occurs when the remote dispatcher is created.
Listing 12.10. Creating a remote dispatcher to connect to a distant Mule over HTTP
MuleClient muleClient = new MuleClient(true);
RemoteDispatcher remoteDispatcher =
     muleClient.getRemoteDispatcher("http://localhost:8080/_remoting");
If none of the existing wire formats satisfy your needs, you can roll your own by creating a custom implementation of org.mule.api.transformer.wire.WireFormat.
Yes, we referred to the remote dispatcher agent as a back door to a running Mule instance because this is what it is. This should naturally raise some legitimate security concerns. As of this writing, the remote dispatcher agent doesn’t support security during the handshake phase, so it’s not possible to secure the endpoint it uses.
This said, it’s possible to secure the flows hosted by the remote Mule instance, as detailed in section 10.1.3. If you follow that path, you’ll need to pass a username and a password to the remote dispatcher when it’s created:
RemoteDispatcher remoteDispatcher =
    muleClient.getRemoteDispatcher(
        "http://localhost:8181/_remoting",
        username,
        password);
These credentials will then be used for the subsequent remote calls sent through it.
You now have a new power tool in your box: the remote dispatcher. It’s a convenient means for sending messages to any remote Mule application that has a corresponding agent enabled, but its usage must be considered with circumspection as it has security and coupling trade-offs.
If you find the messaging abstraction offered by the client to be seductive, then the next section will be music to your ears. In it, you’ll learn how to use the client to benefit from Mule’s messaging infrastructure without even configuring it.
12.2.3. Reaching out with transports
In the opening discussion of this section, we said that the client is able to bootstrap a Mule application if no context is passed to it. This capability can be used to exploit Mule’s transports by bootstrapping an empty instance and using the messaging abstraction directly offered by the client. This approach, illustrated in figure 12.5, truly promotes Mule as an integration framework on which an application can lean to connect to remote flows without having to deal with the particulars of the protocols involved.
Figure 12.5. The client can bootstrap a minimal Mule instance to use its transport layer.
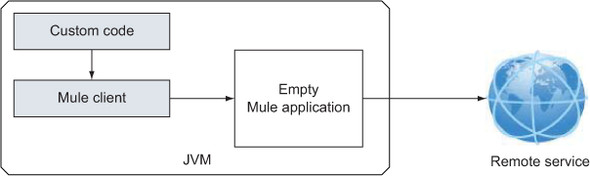
Listing 12.11 shows the code that makes this happen. The client is started without providing it with a Mule context or configuration, so it bootstraps an empty application. This empty application can be used from the client to reach any URI whose related transport library is available in the classpath. It will also use any module that’s available in the classpath. In the case of this example, the HTTP transport and the WSDL connector of the CXF module are used in order to call a web service that performs currency conversions.
Listing 12.11. Bootstrapping an empty Mule application with the client

Such a simple setup is possible because neither the HTTP transport nor the CXF module needed specific configurations for them to work. Should the transport you plan to use need to be configured, you’ll have to create a minimal Mule configuration and load it from the client. For example, this would be required if you use the JMS transport, as shown in listing 12.12. The raw-jms-muleclient-config.xml configuration file[2] still doesn’t contain any flow.
2 Available in the book’s source code.
Listing 12.12. Using Mule’s transports and messaging layers via an empty application

Because there’s no constructor of the Mule client that loads a configuration and starts it, you have to do it explicitly at
![]() . As we showed before, you define the connector name you want to use in the request URI
. As we showed before, you define the connector name you want to use in the request URI ![]() . This would allow you to configure several connectors in the same Mule configuration and select the one you want to use in
the client code. The same way you start the instance explicitly, you have to dispose of it
. This would allow you to configure several connectors in the same Mule configuration and select the one you want to use in
the client code. The same way you start the instance explicitly, you have to dispose of it ![]() before terminating the client.
before terminating the client.
Mule started with the approach shown in listing 12.12 is functional but doesn’t offer its full features. For example, handling classes that have Mule annotations won’t be supported with this approach. As an example, if you’d like to have support for Mule annotations, you’d need to start it this way:
List<ConfigurationBuilder> configurationBuilders =
  Arrays.<ConfigurationBuilder>asList(
    new AnnotationsConfigurationBuilder(),
    new SpringXmlConfigurationBuilder("raw-jms-muleclient-config.xml"));

MuleContextBuilder muleContextBuilder = new DefaultMuleContextBuilder();
MuleContextFactory muleContextFactory = new DefaultMuleContextFactory();
MuleContext muleContext =
  muleContextFactory.createMuleContext(
    configurationBuilders,
    muleContextBuilder);
muleContext.start();

MuleClient muleClient = muleContext.getClient();
As you’ve seen, directly tapping Mule’s transports is made easy thanks to the client. This approach brings the power of Mule’s connectors, adaptors, and transformers to any of your applications. By delegating all transport-handling aspects to Mule, you can build communicating systems on top of a neat messaging abstraction layer.
By now, the Mule client has become an important tool in your Mule toolbox, as it’s a convenient gateway to a Mule application, whether this application is running locally or in a remote JVM.
Let’s continue our exploration of Mule internals, and see how advanced operations can be achieved by getting closer to the metal.
12.3. Using the Mule API
As an integration framework, Mule exposes a rich internal API that can be coded to in order to implement custom behaviors. Though throughout the book we advocated against that approach, there are times when tying into Mule is necessary. In this section, we’ll focus on the following features for which coding to Mule’s API is a must:
- Lifecycle events— The API allows you to use lifecycle events that occur from startup time, when moving parts get instantiated, configured, and put into service, to shut down time, when they’re transitioned back to oblivion.
- Interceptors— The API allows you to elegantly inject cross-cutting logic on top of the normal processing of messages by using component interceptors.
- Notifications— Any significant operation or event that happens in Mule ends up in a notification being fired, which the API allows you to listen to.
- Data persistence— Some Mule components need to persist data in the course of their normal activity; Mule defines an internal API that allows plugging in any persistence mechanism to store this data.
We won’t look into creating custom message sources and processors (introduced in sections 2.2.1 and 2.2.2, respectively) by hand because it’s a much better approach to generate such Mule extensions by using the DevKit, which we’ll discuss in chapter 13. That said, as you’ll see in this section, creating interceptors will expose you to the manual creation of an InterceptingMessageProcessor, which is both a message source and processor!
How much coupling is enough
Deciding to couple your application to the Mule API shouldn’t be taken lightly, as is true with any framework. As a general rule, code to Mule’s API only when it’s necessary and not as a default way of building Mule applications. Use Mule-unaware POJOs as much as possible, and configure Mule to use them as-is instead of modifying them to fit in Mule.
Let’s start by looking at the lifecycles of the main moving parts that constitute a Mule configuration and how your custom implementations can become aware of their own lifecycles.
12.3.1. Being lifecycle aware
Between the time you bootstrap a Mule application and the time it’s up and ready, many things happen (as testified to by the numerous log file entries). Moving parts are created and made ready for service. These moving parts are configured and transitioned through lifecycle phases, which technically amounts to calling specific methods in a predefined order. The same happens when you shut down a Mule application; all moving parts are transitioned to their ultimate destruction through another series of lifecycle method calls.
You’ll remember from our discussion in section 6.1.7 that your own custom components can benefit from these configuration and lifecycle method calls the same way Mule’s do. This applies not only to components, but to all sorts of custom moving parts you can create and configure in Mule. Table 12.1 gives an overview of the methods that are called and the order in which this happens for the main types of custom objects you can create. On top of the four standard Mule lifecycle methods (initialise,[3] start, stop, dispose), this table also shows the custom properties setters, the Mule-specific setters (context and flow construct injection), and the Spring-specific lifecycle methods.
3 British English courtesy of Ross Mason, Mule’s father!
Table 12.1. Configuration and lifecycle methods are honored differently depending on the object type.
|
Configuration and lifecycle methods |
Prototype component (for each instance) |
Singleton component |
Spring Bean component |
Any Spring Bean |
Transformer |
Filter |
Custom message processor |
|---|---|---|---|---|---|---|---|
| Custom properties setters | |||||||
| Mule context setter | |||||||
| Spring init method | n/a | n/a | n/a | n/a | |||
| Mule flow construct setter | n/a | ||||||
| initialise | |||||||
| start | |||||||
| stop | |||||||
| dispose | |||||||
| Spring destroy method | n/a | n/a | n/a | n/a |
Repeated calls
As of this writing, Mule happens to invoke setMuleContext twice in some circumstances, such as when initializing transformers. Therefore, don’t place any logic except standard variable assignments in this setter if you want to avoid running it more than once.
How does Mule decide if it should call a particular lifecycle method or setter on a custom object? It looks for particular interfaces that the custom object must have implemented. Here’s the list of the four standard lifecycle interfaces:
org.mule.api.lifecycle.Initialisable
org.mule.api.lifecycle.Startable
org.mule.api.lifecycle.Stoppable
org.mule.api.lifecycle.Disposable
One interface to rule them all
If your custom object needs to implement the four standard lifecycle interfaces, you can save yourself a lot of typing by implementing org.mule.api.lifecycle.Lifecycle, which extends the four standard ones.
And here are the interfaces for the Mule-specific setters:
org.mule.api.context.MuleContextAware
org.mule.api.construct.FlowConstructAware
We mentioned implementing MuleContextAware in section 12.1.1 as a convenient way to get ahold of the Mule context. Flow construct awareness allows a component to access the flow element it’s hosted by and all its internals: state, statistics, message source, and message processors.
Started but not ready
When your components are started, don’t assume that the whole Mule instance is up and running. Starting happens long before the complete boot sequence is done. If your component needs to actively use Mule’s infrastructure, it should wait until it’s ready. The best way to achieve this is to listen to notifications, as you’ll see in section 12.3.3.
You’re now able to make custom logic execute when lifecycle events occur in Mule. Let’s discuss how to attach cross-cutting logic to components.
Extends over implements
Always check if an abstract implementation is provided for a Mule interface; extending provided abstract classes will future-proof your application, as any interface change will be accounted for in the provided abstract class.
12.3.2. Intercepting messages
Components encapsulate standalone units of work that get invoked when events reach them. In any kind of component-oriented framework, the question of sharing transversal behavior is inevitable. Mule’s components don’t escape this question. Though it’s possible to follow object-oriented approaches (composition and inheritance) with Mule components, the most satisfying solution to the problem of implementing cross-cutting concerns comes from aspect-oriented software development (AOSD; see http://mng.bz/w8o5).
To this end, Mule supports the notion of component interceptors, which represent only a small subset of aspect-oriented programming (AOP), but still offer the capacity to attach common behaviors to components. A component interceptor, which is an implementation of org.mule.api.interceptor.Interceptor, receives an org.mule.api.MuleEvent destined to the component it’s attached to and has all the latitude to decide what to do with it. For example, it can decide not to forward the event to the component or, to be more accurate, to the next interceptor in the stack, as interceptors are always members of a stack (the last member of the stack is the component itself).
Besides stopping further processing, an interceptor can also perform actions around the invocation of the next member of the stack, while keeping its own state during the life of its own invocation. This is, for example, what the timer-interceptor does: it computes the time spent in the rest of the interceptor stack by storing the time before passing to the next member, and comparing it with the time when the execution flow comes back to it.
To intercept or not?
Harness Mule’s interceptors for implementing messaging-level, cross-cutting concerns, if you need to run before/after actions around the rest of the flow or if you want the ability to conditionally stop a flow mid-course.
Mule also comes with an abstract interceptor implementation named org.mule.api.interceptor.EnvelopeInterceptor whose bahavior is limited to adding behavior before and after the invocation of the next member of the stack, but without the ability to control this invocation itself. It’s more suited for interceptors that don’t need to maintain some state around the invocation of the next interceptor in the stack. The logging-interceptor is built on this principle; it logs a message before forwarding to the next one, and another message after the execution flow comes back to it.
If you’re a savvy Spring user, you might be interested in using your Spring AOP skills with Mule. Using Spring AOP can indeed allow you to go further than where the Mule interceptors can take you, as it’s a full-fledged, aspect-oriented programming framework. This said, be aware that it requires a great deal of knowledge on both Mule and Spring sides. For example, a Spring autocreated AOP proxy can confuse the entrypoint resolver mechanism of Mule, as the proxy will expose different methods than what your original object was exposing, leading to confusing errors in Mule. This is particularly true for plain POJO components that don’t implement org.mule.api.lifecycle.Callable. Therefore, it’s entirely possible that advising[4] components can lead you to rework part of your configuration.
4 From AOP’s “advice.”
Listing 12.13 shows the interceptor stack that Prancing Donkey uses in front of components that are costly to call and whose results can be cached.[5] The stack first defines the standard timer-interceptor that’s used to record how efficiently the custom-interceptor is configured after it. The cache is provided by Ehcache (http://ehcache.sourceforge.net), itself configured and injected into the interceptor by Spring.
5 Note that, as of this writing, an independent caching module exists for Mule but isn’t part of the standard distribution. Prancing Donkey will switch from their custom caching interceptor to a standard one when Mule provides it out of the box.
Listing 12.13. Prancing Donkey’s caching interceptor stack defines two interceptors.
<interceptor-stack name="PayloadCacheInterceptors">
  <timer-interceptor />
  <custom-interceptor
    class="com.prancingdonkey.interceptor.PayloadCacheInterceptor">
     <spring:property name="cache" ref="ehCache" />
  </custom-interceptor>
</interceptor-stack>
Note that an org.mule.api.interceptor.Interceptor is an org.mule.api.processor.InterceptingMessageProcessor, which itself is both an org.mule.api.processor.MessageProcessor and an org.mule.api.source.MessageSource (concepts that were introduced in section 2.2). Being a message source is necessary for the interceptor to be able to stop further processing; it can do that by not calling the next interceptor in the chain, for which it acts as a message source. Other than that, the PayloadCacheInterceptor implementation itself is fairly trivial,[6] as shown in the following listing. The implementation is concise because all of the heavy lifting is done by Ehcache.
6 Multithread-minded readers will notice that no effort is made to ensure that only a single thread ever invokes the next interceptor; this is acceptable in Prancing Donkey’s usage scenarios, but may need to be enforced in other ones.
Listing 12.14. The cache interceptor uses Ehcache to store and replay payloads.

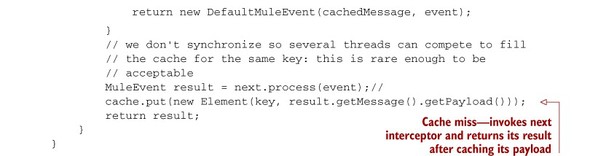
Notice at ![]() that in case of a cache hit, you do return the cached payload, but you keep the incoming message as the previous one when
instantiating the response message. This is because you want to preserve all the preexisting properties and other extra message
context alongside the new payload.
that in case of a cache hit, you do return the cached payload, but you keep the incoming message as the previous one when
instantiating the response message. This is because you want to preserve all the preexisting properties and other extra message
context alongside the new payload.
Abstract parent, less work
To write a little less code, you could have extended org.mule.processor.AbstractInterceptingMessageProcessor (while still implementing org.mule.api.interceptor.Interceptor). Doing so would have provided you with a ready-made message source implementation, leaving the implementation of process() to be done, while offering a convenient processNext() method to call in order to forward the event to the next interceptor.
Prancing Donkey’s file-hasher component is a perfect candidate for this interceptor stack. Indeed, it receives a message whose payload is a filename and returns a message whose payload is the MD5 hash of the file’s content. Because the considered files don’t change in content, you can then use the filename as the key and the MD5 hash as the value in a standard cache. Adding this interceptor stack to your existing file-hashing service (discussed in section 6.1.5) is a no-brainer, as shown in this configuration excerpt:
<pooled-component>
    <interceptor-stack ref="PayloadCacheInterceptors" />
    <prototype-object
        class="com.prancingdonkey.component.Md5FileHasher">
The following console transcripts clearly show the efficiency of the payload cache interceptor, as reported by the timer-interceptor:
12-Sep-2012 5:34:14 PM org.mule.interceptor.TimerInterceptor intercept
INFO: Md5FileHasher took 21ms to process event [25e11b6f-a488-11dd-a659
-2f0fd1014e82]
12-Sep-2012 5:34:24 PM org.mule.interceptor.TimerInterceptor intercept
INFO: Md5FileHasher took 1ms to process event [25e5884c-a488-11dd-a659-
2f0fd1014e82]
12-Sep-2012 5:34:34 PM org.mule.interceptor.TimerInterceptor intercept
INFO: Md5FileHasher took 0ms to process event [25e5fd85-a488-11dd-a659-
2f0fd1014e82]
Thanks to the interceptor framework, you’re now able to share transversal logic across components and flows in an elegant and efficient manner. This allows you to enrich the message process flow with your own custom code. But what if you want to execute some logic only when particular events occur in Mule? This is when you’ll need to tap into the notification framework that we’ll detail now.
12.3.3. Listening to notifications
Notifications are generated whenever a specific event occurs inside Mule, such as when an instance starts or stops, when an exception has been caught, or when a message is received or dispatched.
There’s much you can do by directly tapping into the notification framework. For this you need to write custom classes that can receive notification events. Figure 12.6 shows an overview of the notification types, which are all descendants of Server-Notification. Each notification type also defines actions that further specify the context in which they happen.
Figure 12.6. The family of Mule server notifications is rich and diverse.
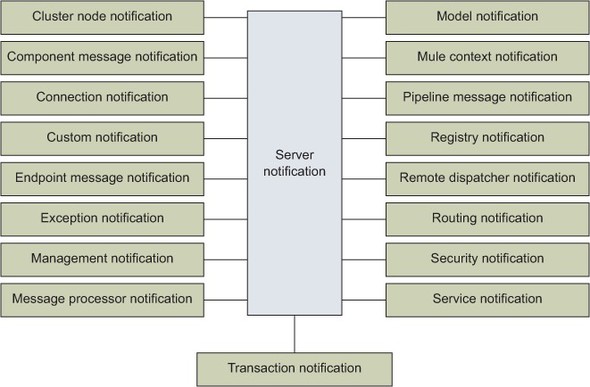
For example, let’s create a listener that can be notified of routing problems that occur when messages don’t get correlated on time in an aggregator router. When this happens, a routing notification is broadcast. The next listing shows part of the implementation of this correlation timeout notification listener.
Listing 12.15. A custom class can be created to receive specific notifications.

Notice at ![]() how you programmatically narrow the scope of the notification received to the correlation timeout action only. You do this
because routing notifications encompass more types of events than correlation timeouts. Because of the way the notification
listener API is designed, notice also that this listener, like all listeners, receives instances of org.mule.api.context.notification.ServerNotification. A cast to the particular type of notification object your listener can receive is required if you need to access one of
its specific methods. For example, you could cast the received notification to org.mule.context.notification.RoutingNotification in this example.
how you programmatically narrow the scope of the notification received to the correlation timeout action only. You do this
because routing notifications encompass more types of events than correlation timeouts. Because of the way the notification
listener API is designed, notice also that this listener, like all listeners, receives instances of org.mule.api.context.notification.ServerNotification. A cast to the particular type of notification object your listener can receive is required if you need to access one of
its specific methods. For example, you could cast the received notification to org.mule.context.notification.RoutingNotification in this example.
For such a listener to start receiving notifications, you need to register it with Mule and activate the notification family it’s interested in, as shown in the configuration fragment of the next listing.
Listing 12.16. A custom object can be registered with Mule to receive notifications.

The activation of the notification family is done at ![]() and the registration of the listener at
and the registration of the listener at ![]() . The instantiation and initialization of this listener shown at
. The instantiation and initialization of this listener shown at ![]() is by no means normative; an object doesn’t need to be a Spring-handled bean to be able to listen to notifications, as the
upcoming example will demonstrate.
is by no means normative; an object doesn’t need to be a Spring-handled bean to be able to listen to notifications, as the
upcoming example will demonstrate.
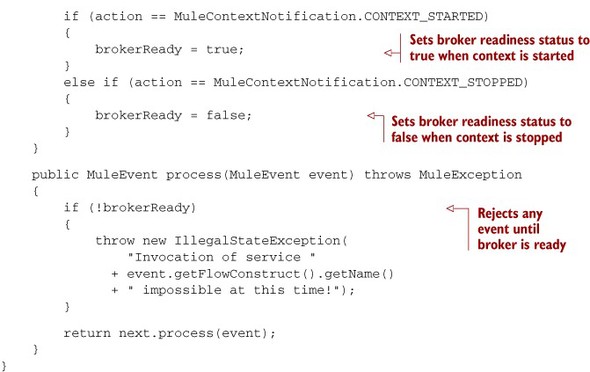
The following demonstrates an advanced usage of notifications in an example that combines several of the concepts you’ve learned in this chapter.[7] Some of Prancing Donkey’s services aren’t able to process any event until the Mule instance they run into is fully initialized (because they dispatch messages to other flows that may not themselves be ready). To prevent an incoming event from reaching the component of these sensitive flows, you create an interceptor that rejects any traffic until the whole Mule instance is fully initialized. The next listing shows the full code of this interceptor.
7 Context injection, interceptor, and notification listener.
Listing 12.17. Interceptor that rejects events until the context is initialized
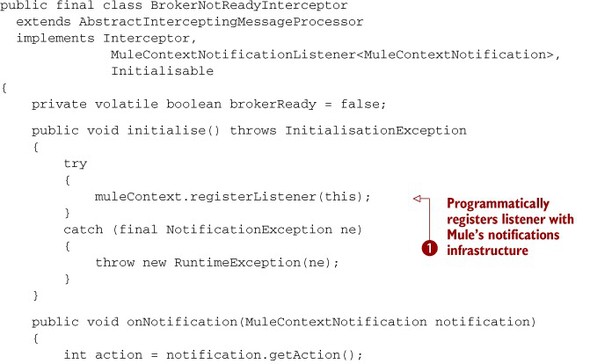
Did you notice how you apply our previous suggestion and extend Abstract-InterceptingMessageProcessor to have less code to write in the interceptor?
Because a custom interceptor configuration element doesn’t expose an ID that you could use to register it with Mule’s notifications
infrastructure, you have to perform this registration programmatically ![]() .
.
This interceptor is configured using the custom-interceptor element, as you saw in the previous section. Again, notice how there’s no ID attribute that could allow you to register it as a notification listener by configuration:
<custom-processor
    class="com.prancingdonkey.interceptor.BrokerNotReadyInterceptor" />
Therefore, the notification configuration related to this interceptor consists only of the activation of the context family of events:
<notifications>
    <notification event="CONTEXT" />
</notifications>
Mule’s notification framework offers advanced features:
- Associating a custom subinterface of org.mule.api.context.notification.ServerNotificationListener with an existing event family
- Disabling standard listeners to receive events from the family they naturally listen to (for example, preventing all implementations of org.mule.api.context.notification.RoutingNotificationListener from receiving routing events)
- Creating custom notifications (as represented in figure 12.6), listening to them, and broadcasting them programmatically
Mule’s extensive notification framework can help you graft advanced event-driven behavior to your applications. But not everything that flows in Mule is as ephemeral as events; some information needs to be persisted. Let’s now discover how Mule manages its own persistence needs.
12.3.4. Configuring Mule data persistence
Have you ever wondered where the messages in a persistent VM queue are stored? Or where Mule keeps track of unique IDs in an idempotent message filter? Indeed, Mule has to manage state for many of the moving parts that you can use in a configuration. This state is managed independent of whatever transports or modules you’re using in your configuration. It’s persisted with an internal framework called the object store. It’s important to know about it so that you can understand where Mule’s state data is going and how to configure and customize its persistence.
Take a look at the configuration shown in listing 12.18, which consists of a bridge that receives messages on a VM channel, filters out the ones it has already processed, and attempts dispatching to a proxied service until successful.
Listing 12.18. A flow that relies heavily on Mule’s internal object store
<spring:bean name="untilSuccessfulStore"
        class="org.mule.util.store.PartitionedInMemoryObjectStore" />

<vm:connector name="vmConnector">
    <vm:queue-profile>
        <default-persistent-queue-store />
    </vm:queue-profile>
</vm:connector>

<flow name="idempotent-bridge">
    <vm:inbound-endpoint path="ib.in" />
    <idempotent-message-filter>
        <simple-text-file-store name="ib.idem" />
    </idempotent-message-filter>
    <until-successful objectStore-ref="untilSuccessfulStore" >
        <outbound-endpoint ref="proxiedService" />
    </until-successful>
</flow>
The idempotent-bridge flow shown in this example relies on Mule’s internal persistence to store the state of three of its moving parts:
- The persistent inbound VM queue uses the default-persistent-queue-store to store the messages pending delivery.
- The idempotent filter uses a simple-text-file-store named ib.idem to store the unique identifier of each message it processed.
- The until-successful routing message processor uses a Spring-configured object store to accumulate messages pending outbound dispatch.
At first glance, it seems that these three configuration mechanisms are quite different, but they all rely on the same internal object store API. Figure 12.7 shows the hierarchy of interfaces that compose Mule’s internal object store API. There are many classes that implement these interfaces, and numerous XML configuration elements that allow for their configuration; this figure only lists (in notes) the ones that are in use in listing 12.18.
Figure 12.7. The interfaces of the object store API and some elements or classes using them

By default, the file-based persistent object stores save data under the Mule work directory,[8] in a structure of subdirectories that’s created on the fly. For the previous example, you’d find these subdirectories: /queuestore/ib.in and /objectstore/ib.idem.dat, respectively used for the data of the persistent queue and the idempotent filter.
8 Typically a directory named .mule located at the root of the execution directory.
Database persistence
If you want to use a database to persist Mule data, look no further than the org.mule.transport.jdbc.store.JdbcObjectStore, an object store that, behind the scenes, uses the standard JDBC transport of Mule. It works by using custom queries that you craft to provide the basic CRUD operations needed by the object store.
Prancing Donkey has developed a great deal of experience with Ehcache, so they’ve decided to create a custom object store implementation that uses Ehcache as its back-end storage. They’ll implement it as an org.mule.api.store.ListableObjectStore (which will cover the needs of until-successful and idempotent-message-filter) and will use the org.mule.util.store.QueueStoreAdapter to adapt it as an org.mule.api.store.QueueStore so it can be used for VM queue persistence. They’ll also extend org.mule.util.store.AbstractObjectStore to have a big part of the implementation done for them already.
Listing 12.19 shows the implementation in all its gory glory! There’s not much to say about it except that it delegates all operations to the Ehcache instance that’s been provided by injection. There’s some general impedance mismatch between the object store API and standard caches; for example, the object store API expects exceptions to be thrown in many circumstances in which a typical cache wouldn’t report any problem (like when overriding a key). The mismatch is visible in the doRemove() method, in which you jump through hoops to return the last value of a key you delete from the store.[9]
9 This implementation is far from perfect; the value may have changed between the retrieve and remove operations.
Listing 12.19. An Ehcache-backed listable object store
public class EhCacheObjectStore<T extends Serializable>
        extends AbstractObjectStore<T>
        implements ListableObjectStore<T>
{
    private Ehcache cache;

    public void setCache(final Ehcache cache)
    {
        this.cache = cache;
    }

    public boolean isPersistent()
    {
        return cache.getCacheConfiguration().isDiskPersistent();
    }

    public void open() throws ObjectStoreException
    {
        // NOOP
    }

    public void close() throws ObjectStoreException
    {
     // NOOP
    }

    @SuppressWarnings("unchecked")
    public List<Serializable> allKeys()
                    throws ObjectStoreException
    {
        return cache.getKeys();
    }

    @Override
    protected boolean doContains(Serializable key)
                    throws ObjectStoreException
    {
        return cache.isKeyInCache(key);
    }

    @Override
    protected void doStore(Serializable key, T value)
                    throws ObjectStoreException
    {
        cache.put(new Element(key, value));
    }

    @SuppressWarnings("unchecked")
    @Override
    protected T doRetrieve(Serializable key)
                    throws ObjectStoreException
    {
        Element element = cache.get(key);
        return element == null ? null : (T) element.getValue();
    }

    @Override
    protected T doRemove(Serializable key)
                    throws ObjectStoreException
    {
        T removedValue = doRetrieve(key);
        if (removedValue == null) {
            throw new ObjectDoesNotExistException();
        }
        boolean removed = cache.remove(key);
        if (!removed) {
            throw new ObjectDoesNotExistException();
        }
        return removedValue;
    }
}
With this implementation in hand, you can now reconfigure the previous example in such a way that different Ehcache caches are used for each of the configuration elements that need persistence. Listing 12.20 shows this new configuration. The configuration of each individual Ehcache cache (vmEhCache, idempotentEhCache, and untilSuccessfulEhCache) isn’t shown; Spring or Ehcache’s own configuration mechanisms could be used for that. Remember how we mentioned that you would use a QueueStoreAdapter to fit an Ehcache object store into a configuration element that takes a queue store? You can see it done in the configuration of the Spring bean named vmQueueStore.
Listing 12.20. Using custom Ehcache-backed persistence
<spring:beans>
    <spring:bean name="vmStore"
        class="com.prancingdonkey.objectstore.EhCacheObjectStore"
        p:cache-ref="vmEhCache" />

    <spring:bean name="vmQueueStore"
        class="org.mule.util.store.QueueStoreAdapter"
        c:store-ref="vmStore" />

    <spring:bean name="idempotentStore"
        class="com.prancingdonkey.objectstore.EhCacheObjectStore"
        p:cache-ref="idempotentEhCache" />

    <spring:bean name="untilSuccessfulStore"
        class="com.prancingdonkey.objectstore.EhCacheObjectStore"
        p:cache-ref="untilSuccessfulEhCache" />
</spring:beans>

<vm:connector name="vmConnector">
    <vm:queue-profile>
        <queue-store ref="vmQueueStore" />
    </vm:queue-profile>
</vm:connector>

<flow name="idempotent-bridge">
    <vm:inbound-endpoint path="ib.in" />
    <idempotent-message-filter>
        <spring-object-store ref="idempotentStore" />
    </idempotent-message-filter>
    <until-successful objectStore-ref="untilSuccessfulStore">
        <outbound-endpoint ref="proxiedService" />
    </until-successful>
</flow>
Mule’s internal persistence mechanism no longer has any secrets for you. Indeed, you should now be able to configure Mule’s persistence to fit your needs and constraints.
Clustering for EE
The Enterprise Edition of Mule provides a clustered object store that can be used to perform distributed deployments of Mule applications and have their state transparently shared across a cluster.
In this section, we’ve reviewed how using Mule’s internal API can allow you to use lifecycle events, intercept messages, and listen to notifications in order to implement advanced behavior in your applications. You’ve also learned how to configure and customize Mule’s data persistence.
Now you’re at the tipping point of your learning journey. You’ve learned a lot about how to build applications with Mule, from the simplest to the most complex ones. It’s now time to address the crucial point of testing: how can you test all this great stuff that you’re building with Mule? Read on to find out!
12.4. Testing with Mule
Mule provides rich facilities to test your integration projects. We’ll start off by seeing how to use Mule’s functional testing capabilities to perform integration tests of your Mule configurations. We’ll then take advantage of Mule’s test namespace to use the test component to stub out component behavior. We’ll wrap up by taking a look at JMeter, an open source load-testing tool, to load-test Mule endpoints.
12.4.1. Functional testing
One way to perform integration testing on a Mule project is to manually start a Mule instance, send some messages to the endpoint in question, and do some manual verification that it worked. During development this can be an effective technique to explore potential configurations. This process should ultimately be automated, allowing you to automatically verify the correctness of your projects. The FunctionalTestCase of Mule’s Test Compatibility Kit (TCK) can be used for this purpose. The TCK can be used to test various aspects of Mule projects. The FunctionalTestCase allows you to bootstrap a Mule instance from a TestCase and then use the MuleClient to interact with it.
To demonstrate Mule’s functional testing capabilities, let’s start with a simple flow used by Prancing Donkey to asynchronously transform XML messages from one format to another. The configuration in listing 12.21 shows this flow, which accepts a JMS message off a queue, processes it with an XSLT transformer, and then sends it to another JMS queue.
Listing 12.21. A flow used to asynchronously transform XML messages

You want to be able to test this flow independently of any JMS provider. This means that you’ll have to configure the Mule application differently for functional tests and deployment. This is achieved by externalizing the connectors’ configuration in a separate file and having two versions of this file: one for tests and one for deployment. The flows will be in another file, which will remain the same for all environments. When running functional tests, you’ll then need to start a JMS provider before the tests start, and stop it after they’re done. For this you’ll use an in-memory, nonpersistent JMS provider, as shown in the next listing.
Listing 12.22. A connector’s configuration file used during functional tests
![]()
This configuration is fairly straightforward. One thing to note is the use of the ActiveMQ connector ![]() . By default, this creates an in-memory ActiveMQ broker that lives for the duration of the functional test.
. By default, this creates an in-memory ActiveMQ broker that lives for the duration of the functional test.
In-memory infrastructure providers
Use in-memory Java providers to test endpoints that typically require enterprise infrastructure like JMS, JDBC, SMTP, or POP3/IMAP. Popular options include ActiveMQ’s in-memory transient (nonpersistent) broker, Apache Derby or HSQL in-memory databases, and GreenMail in-memory mail server.
Let’s write a functional test for this configuration. The goal is to start Mule, send a JMS message to the messages.v1 queue, and then consume a message off the -messages.v2 queue and confirm that the transformed payload is present. Use the FunctionalTestCase along with the MuleClient to get this done, as illustrated in the following listing.
Listing 12.23. A functional test case that exercises a flow with JMS endpoints

You start off by specifying the locations of the Mule configuration files. Load side-by-side functional-test-connectors.xml, which contains the in-memory JMS connector, and jms-transforming-bridge.xml, which contains the flow to be tested. Typically the test configuration files would be located in src/test/resources and the deployable files in src/main/app or src/main/resources, depending on the deployment you target (see chapter 8).
The test method is annotated with a standard JUnit 4 @Test annotation. In it, you get the MuleClient ![]() from the muleContext present in the org.mule.tck.junit4.FunctionalTestCase superclass.
from the muleContext present in the org.mule.tck.junit4.FunctionalTestCase superclass.
You’re sending a JMS message to a one-way endpoint, so you don’t expect a synchronous response (hence the use of the dispatch method of MuleClient to send a test payload to the messages.v1 queue). The message will now be sent to the in-memory ActiveMQ broker configured in listing 12.22. At ![]() , you request a message off of the JMS messages.v2 queue with a timeout equal to the maximum possible timeout for a functional test.[10] Use the maximum possible timeout because there’s no way to know beforehand what could be a reasonable wait time; using a
too-small timeout can lead to a test that is intermittently failing, something that can be tricky to figure out. In practice,
this timeout will never be reached, and the rest of the test will be executed as soon as a message arrives in the messages.v2 queue.
, you request a message off of the JMS messages.v2 queue with a timeout equal to the maximum possible timeout for a functional test.[10] Use the maximum possible timeout because there’s no way to know beforehand what could be a reasonable wait time; using a
too-small timeout can lead to a test that is intermittently failing, something that can be tricky to figure out. In practice,
this timeout will never be reached, and the rest of the test will be executed as soon as a message arrives in the messages.v2 queue.
10 The default value is 60 seconds. This is configurable via the mule.test.timeoutSecs Java system property.
Assuming everything went well, the transformed message with transformed payload should be waiting for you patiently on the
messages.v2 queue. If you don’t receive a message off the queue in that time frame, the test will fail. Assuming a message has been received,
you perform your test assertion ![]() and ensure the payload has been transformed appropriately.
and ensure the payload has been transformed appropriately.
Transformer testing
The org.mule.transformer.AbstractTransformerTestCase can simplify (and speed up) transformer testing.
Listing 12.23 used Mule to dispatch a test message over JMS. This is convenient, but has the drawback that Mule is used on both sides of the test; it’s good practice to write tests that resemble real use cases. This means that if Mule isn’t involved in the client side of the real use case, it’s better not to use it as a client in tests. There are numerous Java libraries that can help you with that. For example, the Apache HttpClient (http://hc.apache.org/httpcomponents-client-ga) would be perfect for testing HTTP endpoints. What about JMS? Let’s rewrite the preceding test without Mule as client and find out!
Listing 12.24. Using pure JMS to test a flow with inbound and outbound JMS endpoints

Listing 12.24 shows the test rewritten using standard JMS client code to interact with the JMS provider to which Mule is connected when the test is run. As you can see, the code is more involved than when Mule is used to produce and consume the source and result messages, which says a lot about the heavy lifting Mule is doing behind the scenes! In practice, you’d most likely share this JMS code in a utilities class or use a ready-made client, like Spring’s JmsTemplate.
The FunctionalTestCase is capable of great things but is complete when it’s working with its sidekick: the FunctionalTestComponent. Let’s learn more about it.
12.4.2. Behavior stubbing
Another important item in your Mule testing toolbox is a component that manifests itself as the <test:component /> configuration element and the FunctionalTest-Component class. This component allows you to
- Log details about the message it processes
- Set the current message payload to a configured String value or the content of a file
- Append a string to the payload of the message it processes
- Slow down a flow execution by making the current thread sleep for a while
- Break the flow execution by throwing a configured exception
- Capture messages that flow through it
- Invoke a custom callback when it receives a message
You can use the functional test component in any flow you like. Because it’s preferable to use the same flows in test and deployments, you likely won’t use this component in flows that end up deployed in production. Where this component truly shines is for stubbing out the behavior of external systems that your flows interact with. Let’s see how.
Test in production
If you end up shipping flows that contain the test component in production configuration, prevent its execution by wrapping it with a choice router or a filter router. Then use a message property to flag test-grade messages that will be the only ones allowed to hit the test component.
Let’s functionally test an integration flow that you’ve seen before; listing 12.25 comes straight from section 2.2.3. As you can see, this flow interacts with a remote web service over HTTP. How can you test this without calling this remote service?
Listing 12.25. A flow that interacts with a remote service
<flow name="acmeApiBridge">
    <vm:inbound-endpoint path="invokeAcmeAmi" />
    <jdbc:outbound-endpoint queryKey="storeData" />
    <http:outbound-endpoint address="http://acme.com/api" />
</flow>
You start by externalizing the endpoint definition in its own configuration file, turning it into a global endpoint, and referring to it from the flow. That’s what you see in the next listing.
Listing 12.26. A flow that interacts with a remote service via a global endpoint
<flow name="acmeApiBridge">
    <vm:inbound-endpoint path="invokeAcmeAmi" />
    <jdbc:outbound-endpoint queryKey="storeData" />
    <http:outbound-endpoint ref="acmeApiEndpoint" />
</flow>
Notice how the HTTP outbound endpoint now references a global endpoint named acmeApiEndpoint. With this in place, you can now create a test configuration file that contains a global HTTP endpoint named acmeApiEndpoint but that doesn’t interact at all with a remote service. You’ll provide a stub of the remote service in the same test configuration file, using a standard flow to implement it. This flow will use the functional test component to simulate the remote service behavior (including potential failures) and, more generally, instrument the service stub. The following listing shows this test configuration file.
Listing 12.27. A test configuration file with in-memory transports and service stubs
<spring:beans>
    <spring-jdbc:embedded-database id="jdbcDataSource" type="HSQL">
        <spring-jdbc:script location="classpath:test-ddl.sql" />
    </spring-jdbc:embedded-database>
</spring:beans>

<http:endpoint name="acmeApiEndpoint"
               address="http://localhost:${port}/api"
               exchange-pattern="request-response" />

<flow name="acmeApiStub">
    <inbound-endpoint ref="acmeApiEndpoint" />
    <object-to-string-transformer />
    <test:component>
      <test:return-data>{"result":"success"}</test:return-data>
    </test:component>
</flow>
Notice that, following the advice in the previous section, you use an in-memory database (HSQL, a.k.a. HyperSQL) to support the testing of this flow, which also interacts with a JDBC endpoint. You don’t need to provide a global endpoint here because the connection factory is the natural seam you use to replace the database with an in-memory one during testing.
You’re most likely wondering where the ${port} value comes from. Hold tight, we’ll look into this in a second. The way you use this test configuration file is similar to what was discussed in the previous section; you’ll load it side by side with the configuration containing the deployable flow. This means you’ll load functional-test-stubs.xml and acme-api-bridge.xml in your functional test case, shown in the following listing.
Listing 12.28. A functional test that uses a stubbed-out HTTP service


Notice how you receive a port by injection ![]() ? That’s how the ${port} value gets generated and how you could use it in your test, if needed. Mule will look for an available port (in the 5000–6000
range) and will assign it to your test. Should you want to interact with the open port from your code, you could call port.getNumber() to find out what value has been assigned. You can have as many dynamic ports as you need and use whatever field names you
want, as long as each of them is annotated with @Rule. This is extremely convenient for running functional tests on a continuous integration server without messing with other
tests or with the host server itself.
? That’s how the ${port} value gets generated and how you could use it in your test, if needed. Mule will look for an available port (in the 5000–6000
range) and will assign it to your test. Should you want to interact with the open port from your code, you could call port.getNumber() to find out what value has been assigned. You can have as many dynamic ports as you need and use whatever field names you
want, as long as each of them is annotated with @Rule. This is extremely convenient for running functional tests on a continuous integration server without messing with other
tests or with the host server itself.
Dynamic ports rule
Use dynamic ports in functional test cases to make them play well on developers’ workstations and continuous integration servers.
Why the call to Thread.sleep()![]() ? The reason is that without it, your assertions would run before anything has been dispatched by Mule. Why is that? Look
again at the flow you’re testing; its message source is a VM inbound endpoint, which is one-way by definition. This means
that after dispatching the test message to the VM endpoint
? The reason is that without it, your assertions would run before anything has been dispatched by Mule. Why is that? Look
again at the flow you’re testing; its message source is a VM inbound endpoint, which is one-way by definition. This means
that after dispatching the test message to the VM endpoint ![]() , the execution will immediately proceed to the next step, exposing you to the likely scenario in which you would run assertions
while Mule is, behind the scenes, still routing the message.
, the execution will immediately proceed to the next step, exposing you to the likely scenario in which you would run assertions
while Mule is, behind the scenes, still routing the message.
Using Thread.sleep() to wait for the messages to have been dispatched is naive because there’s no way to figure out a sleep time that will work well in all circumstances. Make it too short, and it won’t wait long enough on a busy continuous integration server; make it too long, and running the tests on a developer’s workstation would be excruciating.
Let’s fix that now. You’ll use a latch to hold the test execution until the dispatched message hits the functional test component in the remote service stub. For this, you’ll instrument the functional test component with an event callback that will release the latch. The code in next listing shows the test method now relieved of its naive Thread.sleep().
Listing 12.29. A latch suspends the test execution until a message is received

Await, don’t sleep
Avoid using Thread.sleep() in functional tests to wait for dispatch operations in Mule. Instead, use event listeners and concurrency primitives to control the test execution.
You could decide to test your flow to ensure it behaves correctly if the remote service returns an error. For this, you could configure the functional test component differently in another stubbing configuration file, as shown in the next listing.
Listing 12.30. Using the test component to simulate exceptions
<test:component throwException="true"
                exceptionToThrow="java.lang.RuntimeException" />
You could also test your flow’s behavior in case of slowness from the remote service by using again a specific feature of the functional test component, shown in the next listing.
Listing 12.31. Using the test component to simulate slowness
<test:component waitTime="15000">
  <test:return-data>{"result":"success"}</test:return-data>
</test:component>
By now you should be comfortable writing functional tests with Mule and mocking component behavior using the test component. You’ll now see how you can perform load tests on a running Mule instance.
12.4.3. Load testing
Extensive functional tests coupled with automated integration testing should provide you with a fair bit of reassurance that your Mule projects will run correctly when deployed. The real world, however, might have different plans. Perhaps Prancing Donkey’s asynchronous message transformation service shown in listing 12.21 will have to deal with unexpected peak loads during Black Friday.
Unaware of the demand for such a simple service, you deployed Mule on a spare blade server loaned to you by a colleague in operations. Mule performs admirably on this blade, easily processing a hundred or so messages every minute. Suddenly, however, you notice the service is crawling, and the load on your lowly spare blade server is through the roof. You check with Prancing Donkey’s JMS administrator and realize that thousands of messages are being sent to the messages.v1 queue every minute. Deciding it’s time to gain deployment flexibility, you deploy Mule to the cloud, automatically provisioning Mule instances to consume messages when the message volume becomes too high. To do this, however, you need to determine how many messages the transformation service deployed on a single Mule instance can handle.
Apache JMeter is an open source Java load-generation tool that can be used for this purpose. JMeter allows you to generate different sorts of load for a variety of services, including JMS, HTTP, JDBC, and LDAP. You can use these facilities to load test Mule endpoints that use these transports. In this section, you’ll see how to use JMeter with JMS as you load test the service you performed integration testing on previously.
To start off, you’ll need to download JMeter from http://jmeter.apache.org/download_jmeter.cgi. The example in this section will test JMS, so you need to provide your JMS provider’s client libraries to JMeter before you start it up. This can be done by copying the appropriate JAR files to the lib/ subdirectory in the root of the JMeter distribution.[11] Once this is done, you can start JMeter from the bin/ subdirectory, either by double-clicking on the JMeter JAR file or by running the appropriate shell script for your platform. If all of this went correctly, you should see a screen resembling figure 12.8.
11 Prancing Donkey uses ActiveMQ, so we dropped activemq-all-5.6.0.jar in the lib/ directory.
Figure 12.8. Starting JMeter for the first time
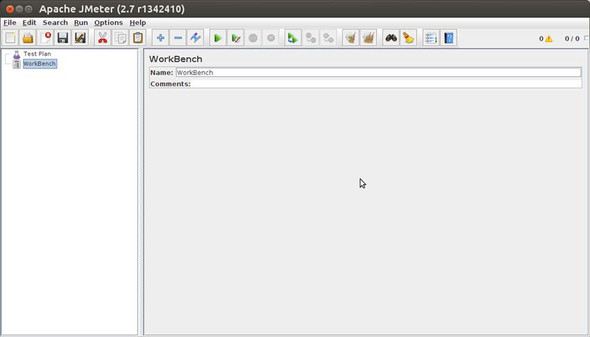
Start by specifying a test plan for a load test. Do this by right-clicking on the Test Plan icon, selecting Add, and then selecting Thread Group. The thread group is what you’ll use to control the amount and concurrency of the JMS messages you’ll send and receive. After talking to Prancing Donkey’s JMS administrator a bit more, you manage to nail down the load problems starting to occur with five concurrent producers sending about 20 messages each and a similar number of consumers. You figure this is as good a baseline as any to begin your load-testing experiments, so you set their values in JMeter, as illustrated in figure 12.9.
Figure 12.9. Specifying a thread group to simulate 5 concurrent JMS producers sending 20 messages

Set the name and (if you want any) comments. You want your tests to continue if there are any errors along the way. This could allow you to detect and debug failures in the JMS infrastructure itself, for example. Selecting Stop Thread here will cause the thread that encountered the error to exit and not send any more messages. Stop Test would cause the entire test to stop when an error is encountered in any thread. The number of threads/users is then set to 5. The ramp-up period indicates the amount of time to delay starting each thread. In this case, you want all five threads to start at the same time, so you set the value to 0. The loop count indicates the number of messages you want each thread to send. In this case, you want each user to send 20 messages, and then stop. Clicking Forever here will cause each user to send messages indefinitely.
You now need to add a JMS sampler to the load test. In JMeter, a sampler is responsible for generating the traffic used for the test. Set up a JMS sampler by right-clicking on JMS Test, selecting Add, selecting Sampler, and then selecting Publisher. The Publisher sampler indicates that you want to generate data for a JMS queue. This should lead to a screen that allows you to configure the details of your JMS broker and specify the messages.v1 queue as the destination for the test messages. Figure 12.10 illustrates the configuration for Prancing Donkey’s staging ActiveMQ broker.
Figure 12.10. Configuring a JMS Publisher sampler with JMeter

Similarly, you need to configure a JMS Subscriber sampler to consume the transformed messages that have been sent to the messages.v2 queue. Figure 12.11 shows this configuration screen.[12] You don’t add any particular assertion to check the content of the transformed messages because you already test this behavior with function tests, and you don’t expect to receive garbled messages even under load (it’s all or nothing with JMS). If you had a doubt about potential corruption under load, you would need to add an XML assertion node to your JMeter test plan.
12 ActiveMQ binds dynamic queues in JNDI under the dynamicQueues/ root.
Figure 12.11. Configuring a JMS Subscriber sampler with JMeter

With this in place, you’re almost ready to start your load test. You could start the test now, but you’ll want to collect some data as you run the tests. This is accomplished by adding listeners to the thread group. Right-click on the thread group, select Add, select Listener, and select a listener you’d like to use to interpret the test results. For this case, let’s add the Aggregate Graph listener. You can now run the test and view the results. Click on the Run menu and select Start. You should see a green light on the upper right-hand side of the screen as the test runs.[13]
13 If your test fails to run, or if any failures occur during it, you can view them in the jmeter.log file located in the bin subdirectory you used to launch JMeter.
If you click on any of the listeners as the test is running, you should see the results being populated. This should resemble figure 12.12.
Figure 12.12. Examining results of a JMeter listener

The listener results will be appended as subsequent tests are run. This will allow you to trend things like throughput as you increase the load of your tests. You can now use this test to load test the message transformer on the Mule instance. By examining the message throughput as you increase the number of threads and messages they send, you should be able to identify the point at which performance begins to drop off. You can then use the techniques you learned about in chapter 11 to try to squeeze more performance out of the Mule instance. Ultimately, you should be able to get a good idea of how many messages the given Mule instance on the given platform can handle, allowing you to make intelligent scaling decisions.
We’ve only scratched the surface of the capabilities of JMeter. As mentioned in the introduction, JMeter can test transports other than JMS, like HTTP or even plain TCP. You can even implement your own samplers if there isn’t a presupplied one for the endpoint you wish to test. Test automation is also available, allowing you to integrate load tests into your build processes or IDE. Full documentation is available from the JMeter site (http://jmeter.apache.org/usermanual/).
By now you should be comfortable testing your Mule projects. You saw how Mule’s Test Compatibility Kit facilitates functional testing of your components, transformers, and Mule configurations. You then saw how JMeter, an open source load-testing framework, can be used to load test your Mule endpoints.
As you’ll see by developing your Mule applications, the need to grasp what’s happening inside Mule at runtime will become more present; this is when debugging will become necessary. Let’s now look at this final aspect of developing with Mule.
12.5. Debugging with Mule
Sometimes things don’t happen as you expected; a flow doesn’t behave the way you initially designed it to. How do you find out why? Or you may need to know all the specific message properties a transport has created on the messages it gives to your flows; because they’re not fully documented online, where can you look to find them? If you’re asking yourself these questions, it’s time for you to learn a few debugging techniques with Mule.
Enterprise debugging
The Enterprise Edition of Mule comes complete with an advanced console, the Mule Management Console (MMC), which provides, among other things, a set of tools that can be used for debugging (like the Flow Analyzer). Mule EE being beyond the scope of this book, we’ll focus exclusively on what you can do with the Community Edition of Mule and open source tools.
The Mule Studio visual debugger (see the note “Visual flow debugger”) is a convenient tool for inspecting messages that flow through a Mule application running in this IDE. The techniques described in this section are applicable even if the Mule application runs on the standalone broker. They also allow you to get closer to the Mule code if the issue you’re investigating can’t be resolved by the surface-level inspection provided by the visual debugger.
Visual flow debugger
Since version 3.4, Mule Studio offers a visual debugger that allows step debugging of the execution of flows, with each step being each message processor in the flow. This debugger, shown in figure 12.13, supports conditional breakpoints and allows a deep inspection of the in-flight message. As of this writing, it’s not possible to visually debug a flow started from a functional test.
Figure 12.13. The Mule Studio visual debugger

The first technique we’ll look at is as unsophisticated as the good old print statements you used to add to trace your program’s execution (don’t deny it, we’ve all done it!).
12.5.1. Logging messages
Logging messages is a simple and effective manner to gain good insight into what’s happening in a Mule application. To circle back to one of the questions raised at the beginning of this section, listing 12.32 shows how you would log all the message meta information (properties, payload type, exception payload) of messages received by the HTTP endpoint in your flow.
Listing 12.32. A flow that logs all message meta information
<flow name="BeersService">
    <http:inbound-endpoint address="http://localhost:${port}/api/beers"
                           exchange-pattern="request-response" />
    <logger level="INFO" />
    <!-- SNIP -->
</flow>
By default, the logger message processor outputs all the message meta information at the configured log level (refer to section 8.1.3 for more information about logging configuration). When an HTTP GET request hits the flow in the previous listing, the log output will look like the following:
12:42:25,124 INFO  connector.http.mule.default.receiver.02
  [org.mule.api.processor.LoggerMessageProcessor]
org.mule.DefaultMuleMessage
{
  id=45dac564-1aee-11e2-84ca-4d33fec1ed8d
  payload=java.lang.String
  correlationId=<not set>
  correlationGroup=-1
  correlationSeq=-1
  encoding=UTF-8
  exceptionPayload=<not set>

Message properties:
  INVOCATION scoped properties:
  INBOUND scoped properties:
    Connection=false
    Host=localhost:5281
    Keep-Alive=false
    MULE_ORIGINATING_ENDPOINT=endpoint.http.localhost.5281.api.beers
    MULE_REMOTE_CLIENT_ADDRESS=/127.0.0.1:45782
    User-Agent=Jakarta Commons-HttpClient/3.1
    http.context.path=/api/beers
    http.context.uri=http://localhost:5281/api/beers
    http.headers={Host=localhost:5281,
                  User-Agent=Jakarta Commons-HttpClient/3.1,
                  Keep-Alive=false,
                  Connection=false}
    http.method=GET
    http.query.params={}
    http.query.string=
    http.relative.path=
    http.request=/api/beers
    http.request.path=/api/beers
    http.version=HTTP/1.1
  OUTBOUND scoped properties:
    MULE_ENCODING=UTF-8
  SESSION scoped properties:
}
Notice how the properties scopes are clearly represented. With this information in hand, you can start doing smart things based on the message properties, like routing messages that have a specific http.context.path inbound message property to a specific message processor with a choice router. As you can also see, the full payload is not logged. This is a smart default behavior; some payloads can be big or confidential, so logging them could be an issue. Moreover, if the payload is an instance of a java.io.InputStream (as is the case for HTTP POST requests), logging the payload would require deserializing the stream, preventing downstream message processors from working in a streaming manner.
Target category
By default, the logger message processor logs under the org.mule.api.processor.LoggerMessageProcessor category. You can change that to any value you want by using the category attribute of the logger XML element.
But what if you need to log the payload? The best way to do so is to use MEL to log the payload rendered as a String. Mule will use its autotransformation capacity (discussed in section 4.3.6) to find the best transformer(s) for rendering the payload as a String. If the payload is streaming, it will be replaced by a deserialized form (for example, byte[]). The following configuration snippet shows how to configure the logger message processor to log the current message payload. And yes, if you want to log both the payload and the meta information, you’ll have to use two loggers:
<logger message="#[message.payloadAs(java.lang.String)]"
        level="INFO" />
Logging message payload and meta information will help you to gain insight into what’s happening within your flows. Sometimes, a finer-grained approach to troubleshooting is needed; this is when step debugging comes in handy.
12.5.2. Step debugging a Mule application
Step debugging in Mule is easy to set up but can be hard to use, and this is because of the long chains of class extensions on which most moving parts rely. Said differently, if you place a breakpoint in a generic abstract class used by many moving parts of Mule, you’ll end up breaking the execution constantly without clearly knowing where you stand. Another complication with step debugging in Mule comes from its heavily multithreaded nature; the execution may at some point in time escape your step debugging session because it’s been handed off to a different thread.
Without further ado, let’s start step debugging a Mule application. This is initiated differently depending on the way you’re running Mule:
- Inside your IDE— In this case, start in debug mode using your IDE-specific command. This applies to Mule Studio as well.
- Deployed in a web container— For this situation, refer to the “Remote debugging” section of your web container’s user guide.
- Using the standalone distribution— Enable remote debugging by adding the -debug parameter to the start command.
By default, Mule shortens stack traces logged when exceptions occur. If you want to go for the full monty, start Mule with the mule.verbose.exceptions system property set to true. With Mule standalone, this is done by adding a -M prefixed parameter to the start command:
./bin/mule -M-Dmule.verbose.exceptions=true
For this discussion, we’ll consider remote step debugging Mule standalone with Eclipse IDE. When started with the -debug parameter, Mule standalone listens for remote debugging connections on port 5005. Figure 12.14 shows how to connect Eclipse to Mule by creating a remote debug configuration.
Figure 12.14. Connecting Eclipse to Mule standalone for remote debugging

In order to step debug in Mule’s code, you need to have the Mule source code available to Eclipse. If your project is built with Maven, the Mule source code is most likely attached to your Eclipse project already. Otherwise, you can find it in the /src/mule-x.y.z-src.zip archive provided with the Mule standalone distribution.
We’ve previously warned you about placing breakpoints in counterproductive locations, so what are good places for breakpoints? The following list should give you an idea:
- Terminal Mule moving parts— Classes that are at the bottom of class hierarchies, such as, transformers
- POJO components— Your own classes that are used as flow components
- Custom message processors— Your own custom implementations, including specific interceptors
One powerful debugging tool to consider is conditional breakpoints. Consider the case where you have multiple first-successful routing message processors (discussed in section 5.5.1) used in several flows, and you want to suspend the execution only when one of them gets used in a particular flow. This is when you’ll need a conditional breakpoint. Figure 12.15 shows you how to set a breakpoint in the source code of org.mule.routing.FirstSuccessful that will be triggered only when it’s used in a flow named orderDeliveryFlow.
Figure 12.15. Setting a conditional breakpoint in a generic Mule class
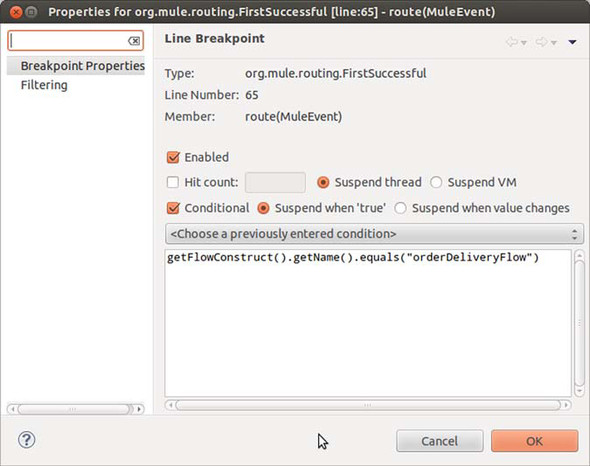
Get out of my script!
Scripted components and transformers are convenient, but be aware that you won’t be able to put breakpoints in the scripts, and this is true for whatever scripting language you use (MEL, Groovy, or any other ones supported by Mule). This warning should serve as a reminder that scripts must be kept short; if your scripts turn into classes in disguise, rewrite them as Java classes and unit test them properly. The added bonus will be the ability to step debug them!
Conditional breakpoints are the way to go when you want to suspend execution in Mule classes that are used over and over. With the debugging tools we’ve covered in this section in hand, you should be able to gain a deep insight into what’s happening when Mule runs your applications.
12.6. Summary
The Mule API is a rich and comprehensive gateway to all moving parts of the ESB. Though using the API creates coupling between your code and Mule itself, we’ve explored a wealth of scenarios in which the drawbacks of such a coupling are overcome by its benefits.
You saw in this chapter how it’s possible to use this API to perform actions of all kinds, including exploring the inner parts its context gives access to, communicating with a running Mule instance, intercepting messages, and listening to internal events. You also learned how to customize Mule’s own data persistence. Finally, you discovered how to test Mule applications, from both functional and performance standpoints, and how to debug them.
We haven’t covered using the Mule API for creating new connectors, and this is for a reason; Mule offers a specific code generation tool, DevKit, that allows for the creation of new connectors by writing annotated POJOs! This is what we’ll cover in the next chapter.