
Chapter 6. Working with components and patterns
This chapter covers
- How to use a Mule component
- Simplifying projects using configuration patterns
If you’ve been around for a little while in the happy field of software development, you’ve surely been exposed to different flavors of component models. CORBA, EJB, JavaBean, and SCA have all helped to familiarize developers with the notion of a component. You understand that components represent entities that can perform specific operations, with well-defined interfaces and an emphasis on encapsulation.
Unsurprisingly, Mule supports its own component model. More surprisingly, it’s often difficult to decide when to use or create a component in Mule. This difficulty stems from the extensive capacities of the routing, filtering, and transforming infrastructure that surrounds the components. The previous chapters have explored these capacities; you’ve discovered that you can achieve many complex integration scenarios without the need for any particular component. Why bother about components? In this chapter, we’ll start by answering that question. Then you’ll learn how to reuse your existing components, how to use component annotations, and how to use scripting languages to write components. We’ll also look closely at Prancing Donkey’s requirements for a shipping cost calculator using lifecycle methods and the addition of an MD5 signature to messages using scripting components.
As soon as you learn how to use components, you will—by using the knowledge acquired in the previous chapters—be able to connect to external systems, route, transform, enrich, and even apply business logic. With all this power you can start writing full-fledged Mule applications, but beware; Mule applications are usually XML-based and can be verbose if they’re not handled with care. To help you to keep your applications as small and maintainable as possible, Mule provides configuration patterns, specialized processors for the more common tasks in Mule: bridging, proxying, validating, and servicing. We’ll study them in the second half of this chapter. We’ll also cover examples of how each of the patterns can help Prancing Donkey.
Now let’s jump into the world of business logic by learning how to use Mule components.
6.1. Using Mule components
To incorporate your business logic in your Mule application, you might want to use Mule to integrate the logic by using SOAP or REST; in that case, you probably aren’t interested in Mule components. But if instead you plan to host your components alongside your Mule application, Mule components are your best shot to incorporate loosely coupled logic in your application. Mule invites you to write your business logic in a loosely coupled fashion and then wrap it in a component. You’ll learn in the next section how to use components to execute business logic, but let’s first figure out if you have the need for components.
As you’ve learned in previous chapters, transformers and routers already provide many message processing capacities, such as splitting or enrichment. Where do components fit in this scheme? There are no hard rules, but the following are a few use cases and guidelines to help you better understand:
- Some message-related operations don’t conceptually fit anywhere else. For example, a transformer wouldn’t be the best place for executing business logic or logging messages.
- Unlike other Mule moving parts, components don’t mandate the implementation of a specific interface. This enables the use of any existing business logic POJO directly as a Mule component.
- Components can reify a preexisting business interface, defined, for example, with a WSDL in a contract-first approach.
- Components offer features that other Mule entities do not. For example, you can pool components to handle heavy concurrent workloads only by means of configuration.
- As a rule of thumb, a transformer shouldn’t have state; for the same input it should produce the same output. Therefore, if there is state, a component should be used.
- Exceptions thrown at the component level don’t have the same semantics as exceptions thrown elsewhere. If your custom code executes business logic, throwing an exception from a transformer or a router wouldn’t be interpreted and reported the same way by Mule as it would if you were throwing it from your component.
To component or not? That’s a question you should start to feel more confident answering.
If you’re still hesitant, don’t despair! The rest of the chapter will help you grok components. Let’s start with learning how to run logic within Mule itself.
6.1.1. Executing business logic
Suppose you have existing Java classes that can execute some business logic you want to use internally in your Mule instance. You might also want to expose this logic using one of the many transports of Mule. What would it take to use these classes within Mule?
The answer is, not much. Mule doesn’t mandate any change to your existing code; using it is a matter of configuration. This is great news because the industry was not in need of yet another framework. Once-bitten, twice-shy developers have become leery of platforms that force them to depend on proprietary APIs. Aware of that fact, Mule goes to great lengths to allow you to use any existing class as a custom service component. Mule also allows you to use (or reuse) beans that are defined in Spring application contexts as custom components.
Best practice
Strive to create components that are independent from Mule’s API at compile time. Importantly, this approach will allow you to unit test your component code independently of the Mule container.
This said, there are times when you’ll be interested in being coupled with Mule’s API. One is when your component needs awareness of the Mule context. By default, a component processes the payload of a Mule message. This payload is pure data and is independent of Mule. But sometimes you’ll need to access the current event context to access, for instance, message properties.
At this point, you’ll preferably use Mule annotations, such as those we’ll cover in section 6.1.4, by defining properties or arguments and then annotating them. Alternatively, you’ll make your component implement org.mule.api.lifecycle.Callable. This interface defines only one method: onCall(eventContext). From the event-Context object, it’s possible to do all sorts of things, such as retrieving the message payload, applying inbound transformers, or looking up other moving parts via the Mule registry.
Another reason to be coupled with the Mule API is to receive by dependency injection references to configured moving parts such as connectors, transformers, or endpoint builders. We’ll look at such a case in the configuration example of section 6.1.5.
Two mechanisms—the annotations and the Callable interface—will couple you to the Mule API, but using annotations is considered the more favorable solution given that they’re less intrusive; they don’t force the class to use specific method signatures, and they let the methods be injected with more atomic data instead of the whole context. You’ll see this in an example in section 6.1.4 in which you annotate specific parameters instead of passing the whole Mule context.
By now, you’re certainly wondering, how does Mule take care of instantiating your objects before calling the right method on them? Unless you decide to pool these objects, which is discussed in section 6.1.5, there are three main possibilities:
- Let Mule create a unique instance of the object and use it to service all the requests.
- Let Mule create one new object instance per each request it’s servicing. This is done by using the prototype-object element or the short syntax in which a class name is defined on the component element itself.
- Let Spring take care of object instantiation. In this case, Spring’s concept of bean scope will apply.
Granted, creating custom components mostly amounts to creating standard business logic classes, but there are technical aspects to consider when it comes to configuring these custom components. Indeed, because Mule doesn’t force you to fit your code into a proprietary mold, all the burden resides in the configuration itself. This raises the following questions that we’ll answer in the upcoming sections:
- How does Mule locate the method to call—a.k.a. the entry point—on your custom components?
- What are the possible ways to configure these components?
- Why and how should you pool custom components?
- How do you compose service components?
- What are the benefits of an internal canonical data model?
Component versus component
If you’ve looked at Mule’s API, you might have stumbled upon the org.mule.api.component.Component interface. Is this an interface you need to implement if you create a custom component? No. This interface is mostly for Mule’s use only. It’s implemented internally by Mule classes that wrap your custom components. We conjecture that this interface has been made public because Java doesn’t have a “friend” visibility specifier.
Let’s start with the important notion of entry point resolution.
6.1.2. Resolving the entry point
As you’ve discovered, Mule components can be objects of any type. This flexibility raises the question, how does Mule manage to determine what method to call on the component when a message reaches it? In Mule, the method that’s called when a message is received is poetically named an entry point. To find the entry point to use, Mule follows a strategy that’s defined by a set of entry-point resolvers.
Figure 6.1 depicts this strategy. Entry-point resolver sets can be defined at model level or at component level, with the latter overriding the former. If none is defined, Mule uses a default set. As you can see, if the strategy doesn’t find exactly one suitable entry point, an exception will be thrown.
Figure 6.1. The component entry-point resolution strategy (EPRS) used by Mule

Mule offers a great variety of entry-point resolvers that you can use to ensure that messages reach the intended method on your components. Table 6.1 gives you a list of the available resolvers.
Table 6.1. Available entry-point resolvers
|
Entry-point resolver name |
Behavior |
|---|---|
| array-entry-point-resolver | Selects methods that accept an array as a single argument. The inbound message payload must be an array. |
| callable-entry-point-resolver | Selects the onCall(eventContext) method if the component implements org.mule.api.lifecycle.Callable. This resolver is always in the default set that Mule defines. |
| method-entry-point-resolver | Selects the method that’s configured in the resolver itself. |
| no-arguments-entry-point-resolver | Selects a method that takes no argument. Consequently, the message isn’t passed to the component. |
| property-entry-point-resolver | Selects the method whose name is found in a property of the inbound message. The message property name to look for is defined on the resolver itself. |
| reflection-entry-point-resolver | Selects the method by using reflection to find the best match for the inbound message. If the message payload is an array, its members will be used as method arguments (if you want to receive an array as an argument, you must use the array-entry-point-resolver). If the message has a null payload, the resolver will look for a method without an argument. |
| custom-entry-point-resolver | In the rare case in which these resolvers can’t satisfy your needs, you can roll out your own implementation. It’s preferable to subclass org.mule.model.resolvers.AbstractEntryPoint-Resolver rather than implement org.mule.api.model.EntryPointResolver from scratch. |
Each resolver supports different attributes and child elements, depending on its own configuration needs. The following attributes are shared across several resolvers:
- acceptVoidMethods— A component method is usually expected to return something. This attribute tells the resolvers to accept void methods.
- enableDiscovery— Asks a resolver to look for the best possible match (based on the message payload type), if a method name hasn’t been explicitly provided.
- transformFirst— Automatically applies the transformers defined on the inbound endpoint to the message before trying to resolve the entry point.
If you remember the discussion at the beginning of chapter 4, you should remember that we said it’s up to the component to decide to apply it or not. Now you understand that the reality is slightly more complex: it’s up to the entry-point resolver or the component to transform the inbound message with the configured transformers, if need be.
Here are the child elements that are commonly available to resolvers:
- exclude-object-methods— This unique empty element instructs the resolver to ignore the standard Java object methods, such as toString() or notify(). It’s the default behavior of all resolvers, but bear in mind that this default behavior is turned off if you use the following child element.
- exclude-entry-point— This repeatable element defines a single method name that the resolver must ignore. Caution: As soon as you use one exclude-entry-point element, you disable the intrinsic exclusion of the Java object methods. If messages are at risk of dispatch to these undesired methods, use the exclude-object-methods element.
- include-entry-point— This repeatable element is used to strictly specify method names that the resolver must consider. If you specify several names, the resolver will use the first method with a matching name. This allows you to define a model-wide resolver that’s applicable to several components.
At this point, you might feel overwhelmed by the versatility of the entry-point resolution mechanism. The best hint we can give you at this point is not to overengineer your configuration with armies of finely tuned entry-point resolvers. Rely first on the default set that Mule uses, and add specific resolvers only if it’s not able to satisfy your needs.
As of this writing, the default set of entry-point resolvers contains the following:
- A property-entry-point-resolver
- A callable-entry-point-resolver
- A reflection-entry-point-resolver configured to accept setter methods (they’re normally excluded)
- A reflection-entry-point-resolver configured to accept setter methods and with transformFirst disabled
It sure looks like a byzantine set of resolvers, but there’s a reason for this. The default entry-point resolver set is equivalent to the legacy-entry-point-resolver-set, which performs all these contortions in order to be compatible with the behavior of Mule 1.
Let’s look at a simple example. Listing 6.1 shows a bare-bones random integer generator service (we’ll detail the component-configuration side of things in the next section). The response to any message sent to its inbound router will be the value returned by a call on the nextInt() method of the random object. We use a no-arguments-entry-point-resolver configured to precisely pick up the nextInt() method.
Listing 6.1. A random integer generator service

Best practice
Adapt Mule to your components, not the other way around. If necessary, use a transformer before the component to adapt the payload.
You’ve learned how to “direct” messages to the desired entry point on a service component object. We’ll now look at the different available options for configuring component objects.
6.1.3. Configuring the component
There are two main ways to configure a custom component:
- Using Mule objects— This approach is the simplest, though it offers the capacity to inject all sorts of dependencies, including properties and Mule moving parts. Its main drawback is that the component declaration is local to the service and hence not reusable.
- Using Spring beans— This is convenient if you have existing Spring application context files that define business logic beans. You can then use these beans as service components. Another advantage is the lifecycle methods Spring can call on your beans when the host application starts up and before it terminates.
To illustrate these two different approaches, you’ll configure a simple random integer generator using the stock JDK random class. You’ll set its seed to a predetermined configured value (don’t try this in your own online casino game).
Property resolution challenges
There are cases in which you’ll have to use Spring instead of Mule for configuring a component. Mule uses property resolvers that sometimes get confused by the mismatch between the provided and the expected values. For example, if you try to set a byte array to a java.lang.Object property of a component, you’ll end up with a string representation of this array (that is, the infamous [B.. string) instead of having the value correctly set. This doesn’t happen if you use Spring to configure this component.
Listing 6.2 shows this service with its component configured using a Mule object. Notice how the seed value is configured using a property placeholder. Notice also that, like Spring, Mule supports the notion of singleton and prototype objects. Because java.util.Random is thread-safe, you only need a unique instance of this object to serve all the requests coming to the service. This is why you can use the singleton-object configuration element.
Listing 6.2. A fixed-seed random integer generator service

There are cases in which using a single component instance to serve all the service requests isn’t desirable. For example, this is the case if the component depends on thread-unsafe libraries. In that case, if the cost of creating a new component instance isn’t too high, using a prototype object can be an option. For this, the only change consists of using the prototype-object configuration element instead of the singleton-object one. We’ll come back to this subject in the next section.
Stateful objects can’t be safely shared across threads unless synchronization or concurrent primitives are used. Unless you’re confident in your Java concurrency skills and have a real need for that, strive to keep your components stateless.
Despite reducing local concurrency-related complexity, another advantage of stateless components is that they can be easily distributed across different Mule instances. Stateful components often imply clustering in highly available deployment topologies (this is further discussed in chapter 8).
Now let’s look at the Spring version of this random integer generator service. As listing 6.3 shows, the main difference is that the service component refers to an existing Spring bean instead of configuring it locally. The bean definition can be in the same configuration file, in an imported one, or in a parent application context, which allows reusing existing Spring beans from a Mule configuration.
Listing 6.3. A Spring-configured, fixed-seed, random integer generator service

Depending on your current usage of Spring and the need to share the component objects across services and configurations, you’ll use either the Mule or the Spring way to configure your custom service component objects.
Now you know how to properly configure a component. Let’s look at how to receive context information using Mule annotations in the next section.
6.1.4. Annotating components
Since version 1.5, Java supports annotations. At the same time, one of the leitmotifs of the third major version of Mule is to reduce the amount of XML and Java necessary to write a Mule application. Therefore, the marriage of Mule 3 and annotations probably shouldn’t surprise you.
Annotations will let you perform a fine-grained injection in your components. The classic counterpart, the Callable interface, will force you to implement one method that will receive the whole Mule context; you’ll see this approach in action in listing 6.9. Callable adds some boilerplate to the Java code to extract the required parts. Mule offers a plethora of annotations to do this work in a less-coupled and more fine-grained way; in appendix B, we’ll cover most of the available annotations, but given that you’re learning about components, let’s first deal with how to use the more common annotations for components here:
- @InboundHeaders and @OutboundHeaders pass to the annotated object inbound or outbound properties as a single object, a list of values, or a map of values depending on whether the annotated object is a regular argument, a List, or a Map. It will accept a value to filter the headers that should be passed. That value can be a single header name, a wildcard expression (covered previously in section 4.3.3)—for example, X-*—or a comma-separated list of values—for example, Content-Type, Content-Length.
- @Payload will inject the message payload into the annotated parameter. If the type of the message payload is different than the type of the parameter, Mule will do its best to transform the message payload to the parameter type, as you learned in section 4.3.6.
Parameters: annotate all or none
You should take into consideration that Mule has to figure out what to pass for each of the arguments. That was simple with the Callable interface, but with annotations Mule won’t know what to do if there’s a non-annotated argument. If you want to use annotated arguments, you should annotate all of them.
Prancing Donkey needs to calculate the taxes that should be applied to the shopping cart of the users depending on the state from which they’re making their purchases. This sounds like a great opportunity to put annotated components to work by creating a tax calculator component.
Listing 6.4. A method of a component making use of annotations

Annotations aren’t specifically for components; other Mule elements, such as transformers, can benefit from them. We’ll cover many other useful annotations that are available in Mule, from the injection of the result of the execution of expressions to attachment injection in appendix B.
Let’s now look at advanced configuration options that can allow you to control the workload of your components.
6.1.5. Handling workload with a pool
Mule allows you to optionally pool your service component objects by configuring what’s called a pooling profile. Pooling ensures that each component instance will handle only one request at a time. It’s important to understand that this pooling profile, if used, influences the number of requests that can be served simultaneously by the service. The number of concurrent requests in a service is constrained by the smallest of these two pools: the component pool and the thread pool (refer to chapter 11 for more on this subject).
When would using a pooled component make sense? Here are a few possible use cases:
- The component is expensive to create— It’s important that the total number of component object instances remains under control.
- The component is thread-unsafe— It’s essential to ensure that only one thread at a time will ever enter a particular instance of the component.
By default, if no component object instance is available to serve an incoming request, Mule will disregard the maximum value you have set on the polling profile and create an extra component instance to take care of the request. You can change this and configure the pooling profile to wait (for a fixed period of time or, unwisely, forever) until a component instance becomes available again. You can also define that new requests must be rejected if the pool is exhausted. For example, the following pooling profile sets a hard limit of 10 component objects and rejects incoming requests when the pool is exhausted:
<pooling-profile
    maxActive="10" exhaustedAction="WHEN_EXHAUSTED_FAIL"/>
To illustrate pooled components, we’ll look at a service used by Prancing Donkey to compute the MD5 hash code of files they receive from their clients. The service performs this computation on demand; it receives a message whose payload is the file name for which the hash must be calculated, performs the calculation, and returns the computed value. This is an important feature in validating that they’ve received the expected file and that they can proceed with it (like pushing it to their client’s server farm in the cloud).
Because this computation is expensive for large files, they’ll use pooled components. Listing 6.5 demonstrates the configuration for this service. The pooling profile element is self-explanatory: one instance of the com.prancingdonkey.component.Md5FileHasher component object will be created initially in the pool and a maximum of five active ones will exist at any point in time. They don’t expect this service to receive heavy traffic, but should this happen, they allow a maximum of 15 seconds of waiting time in the event that the component pool becomes exhausted.
Listing 6.5. Service limits its resource usage thanks to a pooled component

Notice how in listing 6.5 you inject a reference to a Mule file connector instance. Indeed, you use the file connector to read from a particular directory. One could wonder why you’re doing that, because it’s a trivial task to read a file using plain Java code. In fact, using the Mule connector provides you with all the statistical, exception handling, and transformation features of Mule. In case you’re curious, here’s the declaration of NonDeletingFileConnector:
<file:connector name="NonDeletingFileConnector" autoDelete="false" />
Similarly, you can inject global transformers and even global endpoints in your component. Doing so couples your component with the API of Mule.
You can use the pooling component configuration with Spring beans too. For this, use a spring-object reference element, as you saw in listing 6.3, and you’re done. Bear in mind that you’ll have to define the scope of the bean to factory so that Mule will be able to populate the component pool with different object instances.
Before we close this section on pooling, here’s a little piece of advice: Don’t go overboard with pooling. Use it judiciously. Most of the time, nonpooled component objects will do the trick for you. Using pooling indiscriminately oftentimes amounts to premature optimization.
The last feature we’ll cover will allow your components to reach out and touch...other services.
6.1.6. Scripting components
You might find yourself in a situation in which you want to add simple component logic to a service but don’t want to go through the hassle of developing a Java class, packaging it, and deploying it to Mule. Embedding a script in Mule’s configuration can be an attractive option in a case like this. Let’s assume you want to add a property to messages as they pass through a service. Perhaps you want to do an evaluation of a message’s payload and, based on that, set a property header stating what the message’s priority is. This property could subsequently be used by selective consumers to determine whether to accept the message or not. The following listing illustrates how this might be accomplished by using a JavaScript component.
Listing 6.6. Using a JavaScript component to enrich a message

By using the scripting namespace, you can begin to inline scripts into your Mule configuration. You first configure a scripting component ![]() , telling Mule that the component logic will be using a JSR 223–compliant scripting engine. Mule will subsequently spin up
an appropriate environment for the script to execute it, with common Mule references defined in the script’s context, as you’ll
see in a moment. Because the logic for this component is fairly straightforward, you choose to inline the script directly
in the XML configuration.
, telling Mule that the component logic will be using a JSR 223–compliant scripting engine. Mule will subsequently spin up
an appropriate environment for the script to execute it, with common Mule references defined in the script’s context, as you’ll
see in a moment. Because the logic for this component is fairly straightforward, you choose to inline the script directly
in the XML configuration. ![]() indicates the start of the inlined script along with the scripting engine to use. Every JSR 223–compliant scripting engine[1] will declare a name, which is set at
indicates the start of the inlined script along with the scripting engine to use. Every JSR 223–compliant scripting engine[1] will declare a name, which is set at ![]() . In this case, you have it set to javascript, indicating your script is written in JavaScript and will be executed using Rhino. The script itself begins at
. In this case, you have it set to javascript, indicating your script is written in JavaScript and will be executed using Rhino. The script itself begins at ![]() , where you’re searching the payload variable for the presence of the specified expression. You might be wondering where you defined the payload variable; you haven’t, Mule has. Mule will prepopulate the script’s context with the variables you’re most likely to need.
This saves you the hassle of obtaining a reference to the MuleContext. These variables are listed in table 6.2.
, where you’re searching the payload variable for the presence of the specified expression. You might be wondering where you defined the payload variable; you haven’t, Mule has. Mule will prepopulate the script’s context with the variables you’re most likely to need.
This saves you the hassle of obtaining a reference to the MuleContext. These variables are listed in table 6.2.
1 Make sure the engine you intend to use is available on Mule’s classpath. If you’re using Rhino or Groovy, you shouldn’t need to do anything. Using a scripting engine not included in the JDK or Mule distribution will require you to place the appropriate JAR files in $MULE_HOME/lib/user or in your application server’s classpath, depending on how you’ve deployed Mule.
Table 6.2. Variables made available to a scripting context
|
Variable name |
Description |
|---|---|
| message | The current message being processed |
| payload | The payload of the current message |
| originalPayload | The original payload of the current message, before any transformation |
| muleContext | A reference to the MuleContext |
| eventContext | A reference to the EventContext |
| id | The ID of the current event |
| result | A variable to explicitly set the result of a script |
You use the message variable ![]() to set the PRIORITY message property (header) to HIGH. The component then exists, and the modified message is sent out through the outbound endpoint.
to set the PRIORITY message property (header) to HIGH. The component then exists, and the modified message is sent out through the outbound endpoint.
Embedding a script in your Mule configuration can be convenient when the script is small enough, but managing larger scripts in the context of a Mule XML configuration can quickly become unwieldy. As such, it’s possible to reference a script stored in an external file. In listing 6.5, you implemented a component that took the MD5 hash of a specified file. Let’s take a variation of this functionality and see how it can be implemented using an external script. You’ll implement a Rhino script that will take the MD5 hash of the payload of a message and attach it as a property of that message. This property can then be used to ensure the payload of a message hasn’t changed when processed by future services. The following listing illustrates a Rhino script external to the Mule configuration to accomplish this.
Listing 6.7. An external Rhino script to add an MD5SUM property to a message
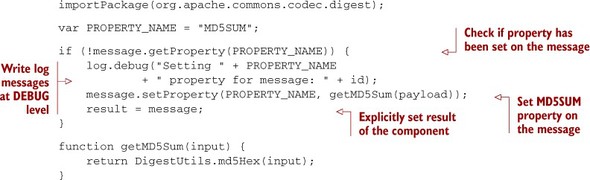
This script is pretty similar to that of listing 6.6. You have a bit more ceremony in listing 6.8, however, so it seems more natural to store it externally to the Mule configuration. This will also give you the flexibility to change the script as Mule’s running, as you’ll see in a bit. The Mule configuration to load the externally defined script is illustrated in the next listing.
Listing 6.8. Using an externally defined Rhino script to add an MD5 property

By setting the file parameter ![]() , you can set the location of the script relative to Mule’s CLASSPATH. You may have noticed that we’ve dropped the engine parameter. When this value is missing, Mule will try to infer the appropriate engine using the script’s extension. In this case, because the script ends with a .js extension, Mule will run the script using the Rhino engine.
, you can set the location of the script relative to Mule’s CLASSPATH. You may have noticed that we’ve dropped the engine parameter. When this value is missing, Mule will try to infer the appropriate engine using the script’s extension. In this case, because the script ends with a .js extension, Mule will run the script using the Rhino engine.
Using expressions to create components
Scripting can be simpler than Java but isn’t necessarily the simplest method. Because you learned how to implement full-blown components with Java and easily embeddable scripting components, you might have figured that there’s still room for an easier kind of component that, even when doing business logic, still doesn’t need all the power of Java or the scripting languages.
For that reason, Mule provides an expression-component using the ubiquitous Mule Expression Language that provides the easiest (and not the slowest) way to implement a component. You’re probably familiar with MEL; Mule intentionally uses it almost everywhere, so you can use and reuse your knowledge about it to create useful expressions. The expression component is no exception in regard to using MEL.
To understand how the expression-component works, let’s visit an expression-component that stamps the payload with the time and date the message is processed:
<flow name="process-stamp">
  <inbound-endpoint address="vm://process-stamp.in"
    exchange-pattern="request-response" />
  <expression-component>
    message.payload.processedTime = new Date();
  </expression-component>
</flow>
Here you find the use of the special variable message. Similar to scripting components for which Mule offered the variables you saw in table 6.2, the expression component has available some top-level objects and functions. In appendix A, there’s a comprehensive list of them.
The expression-component is also capable of using files instead of embedded expressions, like you saw in listing 6.7. Whether to use a file to store the expressions or not is up to you; there will be no significant differences in the execution time. Let’s see how to configure an expression-component using a file:
<flow name="external-process-stamp">
  <inbound-endpoint address="vm://external-process-stamp.in"
    exchange-pattern="request-response" />
  <expression-component file="stamp.txt" />
</flow>
The file parameter sets the location of the expression file in Mule’s CLASSPATH. To be equivalent to the listing using an embedded expression shown previously, the contents of the file should be the same as the body defined in the expression-component in that listing.
Best practice
Choose your approach to configuring components wisely. As a rule of thumb, you should use a full-blown component for complex matters, scripting components for tasks that don’t have dependencies or the need for unit testing, and for simple tasks—expressions.
6.1.7. Component lifecycle
Between the time you bootstrap a Mule component and the time it’s up and ready, many things happen, to which the numerous log file entries can attest. Moving parts are created and made ready for production. These moving parts are configured and transitioned through lifecycle phases, which technically amount to calling specific methods in a predefined order. The same happens when you dispose of a Mule component: all moving parts are transitioned to their ultimate destruction through another series of lifecycle method calls.
Your components can benefit from these configuration and lifecycle method calls the same way Mule’s do. Table 6.3 gives an overview of the interface or annotated methods that are called and the order in which this happens for the component you create.
Table 6.3. Interfaces and annotations for the configuration of lifecycle methods
|
Configuration and lifecycle methods |
Interface |
JSR 250 annotation |
|---|---|---|
| initialise | org.mule.api.lifecycle.Initialisable | javax.annotation.PostConstruct |
| start | org.mule.api.lifecycle.Startable | |
| stop | org.mule.api.lifecycle.Stoppable | |
| dispose | org.mule.api.lifecycle.Disposable | javax.annotation.PreDestroy |
One interface to rule them all
If your custom object needs to implement the four standard lifecycle interfaces, you can save yourself a lot of typing by implementing org.mule.api.lifecycle.Lifecycle, which extends the four standard ones.
Started but not ready
When your components are started, don’t assume that the whole Mule instance is up and running. Starting happens way before the complete boot sequence is done. If your component needs to actively use Mule’s infrastructure, it should wait until it’s ready. The best way to achieve this is to listen to notifications, as you’ll see in section 12.3.3.
You can either implement the desired interfaces or use the PostConstruct or Pre-Destroy annotations in a method. Sadly, there are no equivalents to the JSR 250 annotations for the startable and stoppable lifecycle interfaces.
The initialise phase is invoked when all the properties of the component have been set, meaning that all injectors on the component have already been called. Once every single moving part of Mule is ready to go, the start lifecycle will be invoked.
When shutting down, the stop phase will first be called, letting the component free any allocated resources. Right before the component is completely disposed of, the dispose phase will be invoked.
The code shown in listing 6.9 demonstrates how Prancing Donkey’s client validation service (introduced in the previous section) is configured and initialized. Note that they have implemented the initialise method to be idempotent: should Mule call it several times, it will perform the initialization sequence only once.[2] The initialise method will be called because the ClientValidatorService component implements the org.mule.api.lifecycle.Initialisable interface.
2 You may notice that the initialise method isn’t designed with thread-safety in mind. This is acceptable because, though it may be called several times, these calls will happen sequentially and not simultaneously.
Listing 6.9. Prancing Donkey’s shipping cost calculator component

The configuration of the component itself is trivial:
<flow name="random-integer">
    <inbound-endpoint address="vm://calculateShippingCost.in"
        exchange-pattern="request-response" />
    <component>
        <singleton-object
            class="com.prancingdonkey.component.ShippingCostCalculator">
                  <property key="errorProcessorChannel"
                    value-ref="ErrorProcessorChannel" />
        </singleton-object>
    </component>
</flow>
In this configuration, you inject a reference to a global endpoint named Error-ProcessorChannel in the designated setter method. As you’ve seen in listing 6.9, what you inject is a reference to an endpoint builder, from which you derive an outbound endpoint. This makes sense when you take into account that a global endpoint can be referred to from both inbound and outbound endpoints.
Decoupling the lifecycle
The same way entry-point resolvers (see section 6.1.2) allow you to target component methods without implementing a Mule interface, it’s also possible to create custom lifecycle adapters[3] that will take care of translating Mule lifecycle methods into any methods on your objects. Whether or not creating such an adapter is worth the effort for creating Mule-free components is a moot point, because it’s also possible to rely on the non-invasive Spring lifecycle methods. Our own experience is that this is more than enough.
3 Namely, custom implementations of org.mule.api.component.LifecycleAdapterFactory and org.mule.api.component.LifecycleAdapter.
You’re now able to use components alongside of the rest of Mule’s moving parts: transports, routers, transformers, and so on. With the exception of Mule’s fine-tuning, security, and other fine arts that you’ll learn soon, you now have Mule’s reins in your hands. You’ll find soon that there are many tasks for which you’re repeating almost identical pieces of configuration or configuring your Mule flows with too much detail. To simplify the processing of the information and the configuration files, Mule provides configuration patterns. Let’s explore how to use them.
6.2. Simplifying configuration with configuration patterns
Mule has the capacities of routing, filtering, transforming, and processing with components. Each of those capacities entail a large quantity of fine-grained processors. The configuration file of a Mule application that combines those elements can end up being big.
While writing Mule applications, you might find that sometimes you’re doing repetitive work. Don’t repeat yourself is not only a phrase that deserves to be on a T-shirt, it’s also a basic principle of software development. Mule helps you to reduce the noise in your projects by offering the Mule configuration patterns. There’s no new functionality in these patterns, and you can replicate the behavior of the patterns with a combination of other Mule message processors. They’re a simpler and more readable way of expressing common configurations that you will probably need. In this section, we’ll review the usage of each of the configuration patterns provided by Mule:
- Simple service pattern— A clean way to expose a service in an endpoint
- Bridge— Directly connects an inbound endpoint to an outbound endpoint
- Validator— Validates input received in the inbound endpoint against a filter, handling ACK/NAK responses and the routing of the valid or invalid messages
- HTTP proxy— Bypasses the HTTP requests received in the HTTP inbound endpoint to a different HTTP outbound endpoint
- WS proxy— Links the SOAP request received in the inbound endpoint to a different SOAP outbound endpoint handling the required WSDL transformation
Let’s visit them one by one in the following sections. We’ll start with the simple service pattern.
Configuration patterns and Studio
Currently there isn’t support for the configuration patterns in Mule Studio. You’ll need to rely on the XML configuration when using configuration patterns in your Mule applications.
6.2.1. Using the simple service pattern
All the orchestration in the world amounts to nothing without the business logic. Sometimes you might need to expose to the world the business logic that resides in your Mule application to create real value.
The simple service pattern can expose to the world Mule components or services implemented in some of the most common technologies for services:
- Mule components— Studied earlier in this chapter; they represent the classic Mule way to implement logic
- JAX-RS— The Java API for RESTful web services; thanks to them you’ll be able to create REST-based services
- JAX-WS— The Java API for XML web services; they give support for SOAP-based services
This configuration pattern uses the word simple in its name, and that’s risky (even if it’s related not to the pattern but to the service). Let’s check how appropriate the use of that word is in the next listing by exposing in an endpoint one of the components used in the previous section.
Listing 6.10. Simple service
<pattern:simple-service
    name="recicling-service"
    address="vm://recicledCount.in"
    component-class=
        "com.prancingdonkey.reciclingplant.RecicledCountComponent"/>
That was simple! You set the name for the service, a request-response address, and the component class that will handle the request, et voilà! A component is facing the world. But you passed a component class and an address instead of a reference to an endpoint or the component.
All the Mule configuration patterns are flexible in terms of what they accept; you’ll find this now for the simple service and later on for the rest. For most of the accepted values, it will also accept references. But let’s not cross that bridge before we come to it. The following listing defines a simple service using a global endpoint and a component reference.
Listing 6.11. Simple service using a global endpoint
<spring:bean id="recicledCountComponent"
  class="com.prancingdonkey.reciclingplant.RecicledCountComponent" />

<endpoint name="recicledCountServiceEndpoint"
    address="vm://recicledCount.in" />

<mulexml:xml-to-dom-transformer
    name="xmlToDom"
    returnClass="org.w3c.dom.Document" />

<mulexml:xpath-extractor-transformer
    name="countExtractor"
    expression="//count" />

<pattern:simple-service
    name="recicling-service"
    endpoint-ref="recicledCountServiceEndpoint"
    component-ref="recicledCountComponent"
    responseTransformer-refs="xmlToDom countExtractor"/>
Here you create an equivalent to the previous example, but using a global endpoint instantiated with Spring and a component reference instead of an address and a component-class. Although you added a slight modification, you set a chain of response transformers to modify the response. This can be useful if the response of the component/service is not exactly the response you want to send back to the requestor.
Given that you can set the component as component-class or component-ref and the component entry point as address or endpoint-ref, it’s not difficult to figure out that you could also set them as child elements, as shown in the next listing.
Listing 6.12. Simple service using child elements
<mulexml:xml-to-dom-transformer
    name="xmlToDom"
    returnClass="org.w3c.dom.Document" />

<mulexml:xpath-extractor-transformer
    name="countExtractor"
    expression="//count" />

<pattern:simple-service
    name="recicling-service" >

    <inbound-endpoint address="vm://recicledCount.in"
        exchange-pattern="request-response">
        <response>
          <transformer ref="xmlToDom" />
          <transformer ref="countExtractor" />
        </response>
    </inbound-endpoint>

    <component class=
      "com.prancingdonkey.reciclingplant.RecicledCountComponent"/>
</pattern:simple-service>
Now that you know how to configure a service using a good old Mule component, you’re ready to start studying how to expose REST services in the next section.
Configuring a simple service pattern with JAX-RS
JAX-RS is the Java API for RESTful web services. You might remember JAX-RS from section 3.3.2; there you configured a small service to provide a JSON representation of the brew catalog.
Here you’ll create exactly the same service, but you’ll configure it by the use of a simple service pattern that will comprise the processors configured in section 3.3.2 in one element. The following listing reviews the service you’re exposing.
Listing 6.13. Service class to be exposed
package com.prancingdonkey.service;

import java.util.List;

import javax.ws.rs.GET;
import javax.ws.rs.Path;
import javax.ws.rs.Produces;

import com.prancingdonkey.model.Brew;

@Path("/brews")
public class BrewServiceImpl implements BrewService {

    @GET
    @Produces("application/json")
    @Path("/list")
    public List<Brew> getBrews() {
        return Brew.findAll();
    }
}
Now you’ll put the magic of the configuration pattern in practice. In order to do it, you’ll set up a simple service similar to the ones you’ve already seen using Mule components. But this time you’ll add a type attribute to identify the service as jax-rs (shown in the next listing).
Listing 6.14. Simple service using JAX-RS
<pattern:simple-service name="brewServiceRest"
  address="http://localhost:6099/rest"
  component-class="com.prancingdonkey.service.BrewServiceImpl"
  type="jax-rs" />
That’s it! You have a working JAX-RS–based web service working. You can check it with curl in the same way you did in section 3.3.2. That should do the trick for those who love the flexibility of REST. For those who prefer the contract-first approach, we’ll cover JAX-WS in the next section.
Configuring a simple service pattern with JAX-WS
In a way similar to how JAX-RS provides annotations to create REST services, JAX-WS does so for SOAP services. Remember section 3.3.2, in which you saw how to expose a SOAP service with Mule and its support for Apache CXF?
Now you’ll simplify the configuration needed to create a SOAP service by using the simple service pattern. Like you did in section 3.3.2, you’ll expose the same service you already exposed in the previous section but using JAX-WS annotations; the next listing shows what the service annotated with JAX-WS looks like.
Listing 6.15. Service class to be exposed
package com.prancingdonkey.service;

import java.util.List;

import javax.ws.rs.GET;
import javax.ws.rs.Path;
import javax.ws.rs.Produces;

import com.prancingdonkey.model.Brew;

@Path("/brews")
public class BrewServiceImpl implements BrewService {

    @GET
    @Produces("application/json")
    @Path("/list")
    public List<Brew> getBrews() {
        return Brew.findAll();
    }
}
Nothing new under the sun; you already know what a JAX-WS looks like. To see how the simple service patten helps you to simplify the configuration, you’ll have to declare it (see the following listing).
Listing 6.16. Simple service using JAX-WS
<pattern:simple-service name="brewWS"
    address="http://localhost:8090/soap"
    component-class="com.prancingdonkey.service.BrewServiceImpl"
    type="jax-ws" />
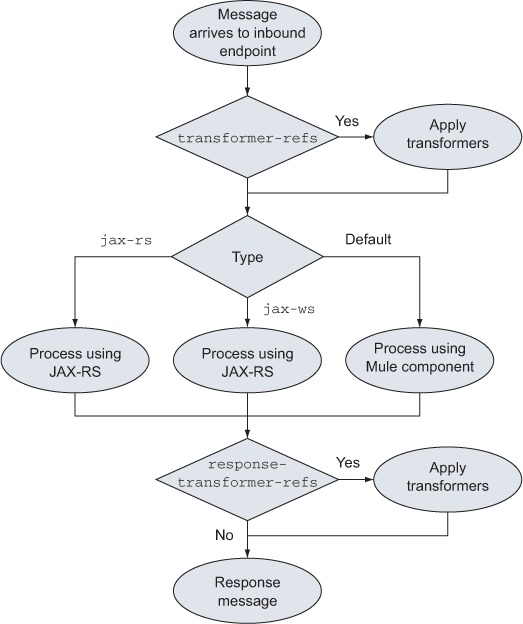
Now we’re talking! See how you set the type to jax-ws; the rest is in essence the same as JAX-RS. With this, you’re ready to expose a service to the world in a few lines. You can see this behavior in figure 6.2. Now let’s see how to bridge a request to an already existent service using the bridge configuration pattern.
Figure 6.2. Behavior of the simple service pattern
6.2.2. Using the bridge
You’ve learned how to build services. It’s just a matter of time before you need to connect two endpoints to share services; for example, you might need to create an API layer to expose internal services to the world, like the ones you created. Or perhaps you might want to wrap a legacy CSV service for JSON support by adding some transformation and adaptation to the bridge.
To simplify the connection of systems, Mule 3 introduced the bridge pattern. The name can’t be more explicit: It’s a bridge that connects an inbound endpoint to an outbound endpoint. No more, no less.
The simplest form of bridge that configures the name, inboundAddress, and outboundAddress will set a request-response conduit and will behave synchronously between its endpoints; any response coming from the outbound endpoint will be routed back to the inbound endpoint. The following listing illustrates such a synchronous bridge.
Listing 6.17. Synchronous bridge
<pattern:bridge name="a-simple-bridge"
    inboundAddress="http://localhost:8888"
    outboundAddress="vm://my-local-service.in" />
Here you expose, using a single element, a synchronous service that’s listening to the inboundAddress and bridging the requests to the outboundAddress. The same response obtained from the outboundAddress will be sent back to the requestor at the inboundAddress.
Sometimes, however, you may have no need to send a response back, having effectively an asynchronous behavior. You won’t be surprised to discover that this is defined like in any other Mule processor, by setting the exchange-pattern to one-way, shown next.
Listing 6.18. Asynchronous bridge
<pattern:bridge name="a-simple-async-bridge"
    exchange-pattern="one-way"
    inboundAddress="http://localhost:8888"
    outboundAddress="vm://my-local-service.in" />
The real world usually won’t make things as simple as this; you did some adaptation by coupling two disparate protocols like HTTP and JMS, and that’s something, but you might need more. For instance, you may need to wrap a legacy CSV service for JSON support. Or even more difficult, Prancing Donkey wants to have their legacy order status system exposed to their website using JSON. You need to receive a JSON request, transform it to a legacy payload before the request is bridged to the order status system, and then transform the CSV response to JSON again, so that the website provides and receives JSON, as shown in the next listing.
Listing 6.19. Bridge using transformers
<pattern:bridge name="a-simple-bridge"
    inboundAddress="http://localhost:8888"
    outboundAddress="vm://my-local-service.in"
    transformer-refs=
        "jsonToObjectTransformer objectToXmlTransformer"
    responseTransformer-refs=
        "xmlToObjectTransformer objectToJsonTransformer" />
You’re already familiar with most of the configuration here, with the exception of the transformer-refs attribute that will convert the JSON request to a legacy format and the responseTransformer-refs attribute that will convert CSV to JSON. Both attributes are space-separated references to global transformers like those you studied in section 4.2. You can find the behavior of the exchange-pattern and the transformers and response transformers defined in figure 6.3.
Figure 6.3. Behavior of the bridge pattern

You’ve learned how to expose services and discovered how to bridge services with a configuration pattern. Now let’s explore some defensive techniques to prevent the processing of malformed messages using yet another configuration pattern: the validator.
6.2.3. Using the validator
Let’s face it: the real world is error prone. Perhaps because of a copy-and-paste error in the documentation, you might find yourself receiving the wrong message in a REST endpoint. Or you could receive JSON instead of your desired XML because of a small misconfiguration in the accept header of your front-end web server.
Although the developer is supposed to be generous on input, strict on output, there’s a line between generous, with messages that you can handle but that are not totally correct, and the suicidal tendency to accept messages that the application won’t understand at all. To reduce the number of lines needed to write a validation, Mule provides the validator pattern.
The validator needs a few Mule expressions to build acknowledgement and rejection messages and a filter to set the conditions for a message to be valid. Let’s play with a simple validator that will only validate integer payloads, shown in the following listing.
Listing 6.20. Basic validator
<pattern:validator name="integer-validator"
    inboundAddress="vm://service.in"
    ackExpression="#['Message accepted.']"
    nackExpression="#['Message rejected.']"
    outboundAddress="vm://real-service.in">
    <payload-type-filter expectedType="java.lang.Integer" />
</pattern:validator>
Here you can easily recognize that you’re instructing Mule to accept messages from an endpoint defined with the inboundAddress attribute. Then if the request payload isn’t an integer, the response will be “Message rejected,” and nothing else will happen. But if the request payload is an integer, “Message accepted” will be the response and the message will be sent an endpoint defined with the outboundAddress attribute. But it will be sent asynchronously.
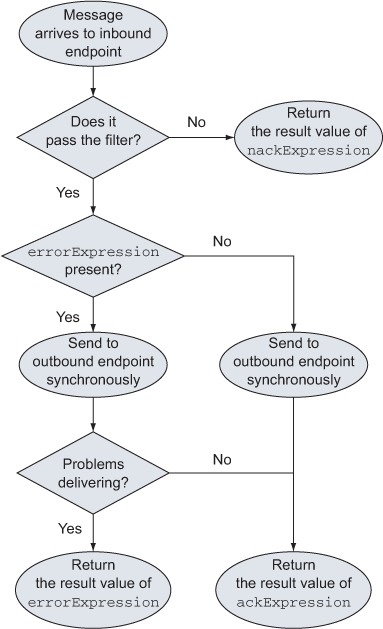
To send to the outbound endpoint asynchronously means not only that the requestor doesn’t have to wait for the delivery of the message, but also that the requestor won’t be aware of a potential problem in that delivery. This is not necessarily a problem, but you might have different needs. To address the possible scenario in which the requestor has to be informed of an error after the validator, the validator pattern lets you pass the errorExpression that will disable its asynchronous behavior and will return the result of the expression to the requestor in case of error; a flow chart with this process is presented in figure 6.4. Let’s put it in action with this listing.
Figure 6.4. Behavior of the validator pattern
Listing 6.21. Validating with error expression
<pattern:validator name="integer-validator"
    inboundAddress="vm://service.in"
    ackExpression="#['Message accepted.']"
    nackExpression="#['Message rejected.']"
    errorExpression="#['Error delivering.']"
    outboundAddress="vm://real-service.in">
    <payload-type-filter expectedType="java.lang.Integer" />
</pattern:validator>
The validator pattern shares the aim of the rest of the patterns: to reduce the complexity of the Mule configuration files. Unsurprisingly, the validator pattern will let you express endpoints and the filter as references. In addition, it will let you define the inbound and outbound endpoints as child elements. Let’s put those two styles in practice in listings 6.22 and 6.23.
Listing 6.22. Validator using references
<vm:endpoint name="integer-service"
    path="integer-service.in"
    exchange-pattern="request-response" />

<vm:endpoint name="real-integer-service"
    path="real-integer-service.in"
    exchange-pattern="request-response" />

<payload-type-filter name="integer-filter"
    expectedType="java.lang.Integer" />

<pattern:validator name="integer-service-validator"
    ackExpression="#['Message accepted.']"
    nackExpression="#['Message rejected.']"
    inboundEndpoint-ref="integer-service"
    outboundEndpoint-ref="real-integer-service"
    validationFilter-ref="integer-filter">
</pattern:validator>
Listing 6.23. Validator using child elements
<pattern:validator name="integer-service-validator"
    ackExpression="#['Message accepted.']"
    nackExpression="#['Message rejected.']"
    outboundAddress="vm://real-integer-service.in">

    <vm:inbound-endpoint path="integer-service.in"
        exchange-pattern="request-response" />

    <payload-type-filter expectedType="java.lang.Integer" />

</pattern:validator>
You’ve now acquired enough knowledge about simplifying your validation configuration with the validator pattern. In the next section, we’ll take a look at the WS proxy to be able to wrap the services with traversal functionality.
6.2.4. Using the HTTP proxy
Since its creation in 1990, HTTP has been one of the most widely used protocols on the internet. If this were not enough to guarantee it first-class support in Mule, HTTP is also the basis or main transport of dozens of other technologies such as REST and SOAP. You won’t be surprised to discover that in the same manner as there’s a specialized form of bridge for WS-*, the WS proxy, Mule also has a specialized proxy for HTTP, the http-proxy.
Like the WS proxy, the HTTP proxy can be used, thanks to its middleman nature, in a myriad of scenarios—from the simplest one in which it will proxy the request, to a more sophisticated scenario in which you need the modification of the request itself by using transformers. To see it in action, let’s create a simple proxy in the next listing for the Google REST search API.
Listing 6.24. Basic HTTP proxy
<pattern:http-proxy name="ajaxSearchProxy"
    inboundAddress="http://localhost:8888"
    outboundAddress=
        "http://ajax.googleapis.com/ajax/services/search/web" />
With this simple element you connect any HTTP request to the inboundAddress to the specified outboundAddress. The same response obtained from the outboundAddress will be sent back to the requestor at the inboundAddress.
At this point it’s probably needless to say that, like you learned with the rest of the configuration patterns, http-proxy also accepts global endpoints. Let’s configure the same proxy created in the last listing, but this time using global endpoints instead of addresses.
Listing 6.25. HTTP proxy using references
<pattern:http-proxy name="ajaxSearchProxy"
    inboundEndpoint-ref="ajaxSearch"
    outboundEndpoint-ref="ajaxSearchReal" />
Notice the change to the inboundAddress and outboundAddress attributes, with inboundEndpoint-ref and outboundEndpoint-ref making use of global endpoints. Now that you know how to reference global endpoints, you can continue learning how to apply transformers to the proxy.
The request proxied to the outbound endpoint doesn’t necessarily have to be an exact copy of the original request; you might need to convert it before passing it, or you may need to convert the response before sending it back to the original requester. You’ve seen the attributes to enable these transformations in section 6.2.2; if you’ve already practiced with it, you’ll soon discover that the HTTP proxy has similar configuration and behavior.
Prancing Donkey is an environmentally friendly company. They not only believe in recycling, they are absolutely proud of it. To show that pride to the world, Prancing Donkey wants to show on their website how many beer bottles have been recycled in the last 24 hours. Thankfully, they have a REST service in the software of the recycling plant that, given an XML search document, will return that data also in XML. To pass it to the JavaScript counter of Prancing Donkey, they’ll need to convert a JSON request to XML and then vice versa for the response, as shown in this listing.
Listing 6.26. HTTP proxy using transformers and response transformers
<pattern:http-proxy name="ajaxSearchProxy"
    inboundAddress="http://localhost:8888"
    outboundAddress=
        "http://127.0.0.1:9999/rest/recicledCount"
    transformer-refs=
        "jsonToObjectTransformer objectToXmlTransformer"
    responseTransformer-refs=
        "xmlToObjectTransformer objectToJsonTransformer" />
There’s nothing new here; you’ve already seen the transformer-refs and responseTransformer-refs attributes in other patterns. They’re passed as a space-separated list of transformers. The attribute transformer-refs configures the transformers to be applied to the original request before passing them to the outbound endpoint, and the attribute responseTransformer-refs configures the transformers for the response of the outboundEndpoint before it’s proxied back to the original requestor.
The features of the HTTP proxy don’t end here. The HTTP proxy also supports the use of a caching strategy to provide cached access to the proxied resource. The next listing shows how to provide a cachingStrategy to the HTTP proxy configuration pattern so the requests are effectively cached (illustrated in figure 6.5).
Figure 6.5. Behavior of the HTTP proxy

Listing 6.27. HTTP proxy using cache
<pattern:http-proxy name="ajaxSearchProxy"
   inboundAddress="http://localhost:8888"
   outboundAddress="http://ajax.googleapis.com/ajax/services/search/web"
   cachingStrategy-ref="cache" />
HTTP is one of the more important protocols out there, but it’s not the only one. Let’s find out how to create a proxy with specific features for the WS-* services.
6.2.5. Using the WS proxy
We already covered WS-* SOAP services in section 3.3.2. They’re pretty common services and have been a strong standard for years. Many organizations use them, and you’ll need to integrate with them sooner or later. You already know how to expose JAX-WS services using Mule; let’s see how to proxy a WS-* service in a simple manner thanks to Mule’s WS proxy configuration pattern.
The WS proxy is a middleman, so it may be used in many scenarios; you might proxy the request or modify the behavior of the request in a transparent (for the requestor) way. Let’s put it in practice in the next listing by configuring the simplest form of WS proxy configuration pattern that will proxy the service created in listing 6.16.
Listing 6.28. WS proxy pattern
<pattern:web-service-proxy name="weather-forecast-ws-proxy"
    inboundAddress="http://localhost:8080/prancingServices"
    outboundAddress="http://localhost:8090/soap" />
There’s more magic here than what may appear at first sight. The WS proxy will not only proxy the requests received to the service, but will also provide a WSDL in the address plus /?wsdl that will be the original WSDL with the addresses rewritten to point to the proxy address.
Sometimes you might need to modify the request or the response; with the same attributes that you learned in sections 6.2.2 and 6.2.4, transformer-refs and responsetransformer-refs, you can modify the request or the response respectively. As you’re already familiar with them, let’s jump straight into this listing.
Listing 6.29. WS proxy using transformers
<pattern:web-service-proxy name="weather-forecast-ws-proxy"
    inboundAddress="http://localhost:8080/prancingServices"
    outboundAddress="http://localhost:8090/soap"
    transformer-refs="add-credentials-transformer"
    responseTransformer-refs="amount-to-words-transformer"
    wsdlFile="localWsdl.xml" />
The WS proxy makes an assumption that is usually true: The WSDL file is located at the same address as the service plus wsdl in the query string ?wsdl. But the real world has plenty of uncommon practices, so what happens when the WSDL file is not in the common location or, even worse, isn’t available online at all? You can pass the wsdlLocation attribute to indicate an alternative location or wsdlFile to use a locally stored file (illustrated in figure 6.6).
Figure 6.6. Behavior of the WS proxy

Listing 6.30. WS proxy using a different WSDL file
<pattern:web-service-proxy name="weather-forecast-ws-proxy"
inboundAddress="http://localhost:8080/prancingServices"
outboundAddress="http://localhost:8090/soap"
wsdlFile="localWsdl.xml" />
This is the last of the configuration patterns available in Mule. With it you can create WS proxies with added value like security, auditioning, or transformation. It shares a style and features with the rest of the configuration patterns.
6.2.6. Reusing common configuration elements
The Mule configuration patterns are about real life, and sometimes real life is about multiple messy scenarios with almost but not quite the same requirements. If not handled with care, those many similar use cases can end up leading to a big Mule configuration file that only holds similar lines. To alleviate this problem, the Mule configuration patterns support inheritance.
What does inheritance mean for the configuration patterns? The concept of inheritance in the Mule configuration files is similar to the programming paradigm, but here it’s only applied to reuse of configuration elements. If you have a few patterns that are similar, you could set a parent abstract pattern and then create the patterns with a parent attribute pointing to the abstract one that holds all the shared configuration.
In this way you’d save lines in your configuration files and, at the same time, you’d reduce complexity by configuring the shared parts once and minimizing potential typos in an eventual evolution of the configuration file.
Now let’s see how to put inheritance into action.
Prancing Donkey needs two similar validations, one checking that the payload is valid XML and the other checking that the payload is a String. For both, they want to share the same expressions. You can see how to configure this inheritance in the following listing.
Listing 6.31. Validator inheritance
<pattern:validator name="abstract-parent-validator"
    abstract="true"
    ackExpression="#['Message accepted.']"
    nackExpression="#['Message rejected.']" />

<pattern:validator name="integer-service-validator"
    parent="abstract-parent-validator"
    inboundAddress="vm://integer-service.in"
    outboundAddress="vm://real-integer-service.in">
    <payload-type-filter expectedType="java.lang.Integer" />
</pattern:validator>

<pattern:validator name="string-service-validator"
    parent="abstract-parent-validator"
    inboundAddress="vm://string-service.in"
    outboundAddress="vm://real-string-service.in">
    <payload-type-filter expectedType="java.lang.String" />
</pattern:validator>
Here you can see that you share the expressions defined in the abstract parent of both children configuration patterns by setting the parent attribute. This effectively makes a cleaner configuration than fully configuring both pattern elements. The benefits increase potentially with the number of children.
Keep in mind that inheritance is supported in all the configuration patterns. Using it where necessary will boost the simplicity of your configuration files and will definitely make the eventual maintenance tasks easier.
6.3. Summary
Components are first-class citizens of a Mule configuration. They can be discreet (but efficient) and they can also encompass custom business logic under the form of standard Java objects, JSR 223 scripts, and the Mule Expression Language. You’ve also learned about the numerous options Mule provides you with when it comes to running your own business logic in custom components.
You’ve discovered that Mule offers, for the more common tasks, a wealth of configuration patterns that allow you to connect to external systems, route, transform, enrich, and even expose the components to the world.
At this point, we’ve covered the configuration mechanisms of Mule and its main moving parts. By now, you should be able to create nontrivial integration projects, as you’ve learned to tap the extensive capacities of Mule’s transports, routers, transformers, components, and configuration patterns. In part 2, we’ll look at more advanced topics such as integration architecture and transaction management. We’ll also look at deployment and monitoring strategies to ensure that Mule plays its prime role in your IT landscape in the best possible conditions.