
Chapter 10. Securing Mule
- Securing Mule with Spring Security
- Securing HTTP using SSL
- Using SOAP’s WS-Security
- Encrypting messages with Mule
Security is a challenge in application development and deployment—a challenge that’s exacerbated by application integration. Single sign-on (SSO) technologies like OpenAM, CAS, and LDAP minimize these burdens, but it’s an unlikely scenario that every application in your environment supports the SSO technology at hand. Even if this is the case, all bets are off when you’re integrating with applications outside of your company’s data centers. Thankfully, Mule employs the same architectural principles you saw in part 1 to handle security. This gives you the opportunity to decouple your security concerns from your routing, transformation, and components.
You’ll see in this chapter how Mule’s security architecture will enable you to quickly simplify what would otherwise be complex security tasks. These simplifications will cross-cut your authentication, authorization, and encryption concerns. You’ll see how Prancing Donkey makes use of Mule’s security features to perform authentication on endpoints, authorize users, and encrypt payloads. We’ll also demonstrate how Mule enables you to pull this all together to intelligently and quickly secure your integration infrastructure.
10.1. Spring Security 3.0 and Mule
Mule’s security functionality is supplied to components, endpoints, and transformers by security managers. Security managers implement an interface, org.mule.api.security.SecurityManager, which abstracts the details of an underlying security mechanism. The password-encryption-strategy, Mule’s default security manager, provides support for basic security functionality, such as password and secret key–based encryption. Mule provides additional SecurityManager implementations that support more sophisticated security implementations such as Spring Security, JAAS, and PGP.
As you’ve seen, user authentication and authorization is handled by a security manager as well. This is done with the help of a Mule security provider. A security provider is an implementation of an interface, org.mule.api.security.Security-Provider, that’s responsible for authenticating and authorizing a message. Mule provides security managers and security providers for common back-end authentication schemes, such as Spring Security and JAAS.
In this section, we’ll take a look at how to use Spring Security’s security managers and security providers to secure your Mule services. We’ll examine authenticating users against in-memory and LDAP user databases. Spring Security, formerly known as Acegi Security, is the officially supported security product of the Spring Portfolio. Using Spring Security with Mule follows the pattern we described previously. After defining your Spring Security configuration, which you’ll see how to do shortly, you define Mule Spring Security providers and managers that can be used on your endpoints.
Mule uses the security manager to broker authentication to the security provider and the back-end security resource, such as a database of user accounts or an LDAP directory. A bit confusingly, Mule’s Spring Security provider delegates to a Spring Security manager. The Spring Security manager then delegates to back-end authentication schemes, such as LDAP or an in-memory database of usernames. Figure 10.1 illustrates this relationship.
Figure 10.1. Delegation between Mule Spring Security and Spring Security

The additional level of indirection serves a purpose: it allows Spring Security to attempt multiple authentication mechanisms when authenticating users. This is useful when authentication data is spread across multiple data sources, such as LDAP and a database. You may want to try LDAP authentication first and, if that fails, try authentication against a database.
Let’s take a look at two ways in which you can configure Spring Security with Mule. First we’ll look at using an “in-memory” DAO to authenticate and authorize users. We’ll then turn our attention to using Spring Security with an LDAP directory.
10.1.1. User security with an in-memory user service
For simple applications, testing, and experimentation, it can be useful to use a static database for user information. Spring Security provides such a mechanism through its user-service. The user-service maintains a static map of users, passwords, and roles in memory. Listing 10.1 demonstrates configuring the user-service, along with a Spring Security manager and provider.
Listing 10.1. Defining an in-memory user service for endpoint authentication

The Mule Spring Security manager is defined at ![]() . The security provider is then configured
. The security provider is then configured ![]() to delegate to the Spring Security manager defined at
to delegate to the Spring Security manager defined at ![]() . The manager will implicitly use the Spring Security authentication-provider defined at
. The manager will implicitly use the Spring Security authentication-provider defined at ![]() , which is configured with an in-memory user-service
, which is configured with an in-memory user-service ![]() . The definitions for the user-service start at
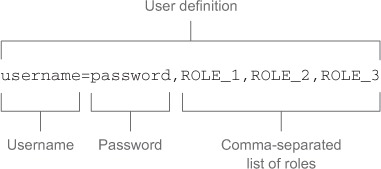
. The definitions for the user-service start at ![]() . The format used to define a user is shown in figure 10.2.
. The format used to define a user is shown in figure 10.2.
Figure 10.2. File format for using the Spring user service
Although the in-memory user-service is a powerful tool for testing and simple authentication, you’ll likely be facing more complex authentication schemes in your environment. One such authentication scheme is provided by an LDAP directory, such as OpenLDAP, Apache Directory Server, or Microsoft’s Active Directory. Let’s look at how to use Spring Security’s LDAP support to authenticate against an LDAP directory.
10.1.2. User security with LDAP
LDAP has emerged as a common directory implementation in many organizations, as is evident from the popularity of products such as OpenLDAP and Active Directory. Because it’s common to store authentication data alongside organizational data in a directory, it’s important for a security framework to support LDAP as an authentication and authorization mechanism. Spring Security is no exception and as such provides rich support for LDAP directories. Let’s look at how to configure Mule to use Spring Security to authenticate against an OpenLDAP directory. Listing 10.2 defines a security manager and provider that authenticate off of Prancing Donkey’s OpenLDAP server.
Listing 10.2. Defining an LDAP directory for endpoint authentication
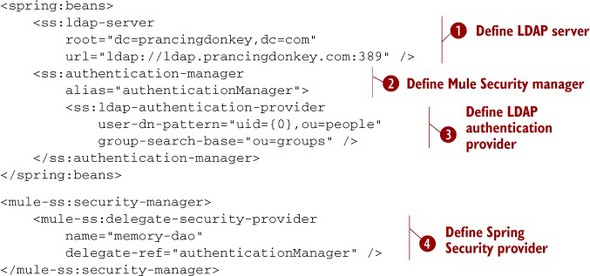
Prancing Donkey’s LDAP server is defined at ![]() . Define the URL of the server along with the root distinguished name (DN) you want to query from. The Spring Security LDAP authentication provider is then defined at
. Define the URL of the server along with the root distinguished name (DN) you want to query from. The Spring Security LDAP authentication provider is then defined at ![]() . Define two dn-patterns, one for user lookups and another for group lookups. The user-dn-pattern tells Spring Security how to look up usernames from the directory. The {0} here will be filled in with the MULE_USER property as defined when a user attempts authentication on an endpoint. The group-search-base tells Spring Security where to begin searches for authority data, which is usually defined by groups the user is a member
of in LDAP. Groups the user is a member of are capitalized and prepended with the string ROLE_. For instance, a user in the LDAP group admin would have the ROLE_ADMIN authorities assigned to them when they’re authenticated. The Spring Security authentication-manager is defined at
. Define two dn-patterns, one for user lookups and another for group lookups. The user-dn-pattern tells Spring Security how to look up usernames from the directory. The {0} here will be filled in with the MULE_USER property as defined when a user attempts authentication on an endpoint. The group-search-base tells Spring Security where to begin searches for authority data, which is usually defined by groups the user is a member
of in LDAP. Groups the user is a member of are capitalized and prepended with the string ROLE_. For instance, a user in the LDAP group admin would have the ROLE_ADMIN authorities assigned to them when they’re authenticated. The Spring Security authentication-manager is defined at ![]() and finally referenced by the Mule Spring Security manager
and finally referenced by the Mule Spring Security manager ![]() . Endpoints referencing this security-manager will now use Prancing Donkey’s LDAP server for authentication.
. Endpoints referencing this security-manager will now use Prancing Donkey’s LDAP server for authentication.
We’ve only touched on the flexibility Spring Security offers in this section. You’re encouraged to check out the official documentation (see http://projects.spring.io/spring-security/) for more info. Now that you’re comfortable with configuring Spring Security for both in-memory and LDAP authentication scenarios, let’s add authentication to the HTTP transport using security filters.
10.1.3. Securing endpoints with security filters
Security filters allow you to control access, authorization, and encryption on your endpoints. In this section, we’ll cover how to filter HTTP inbound endpoints using Spring Security and the http-security-filter.
Let’s start our discussion on security filtering by looking at securing an HTTP inbound endpoint with the http-security-filter. The http-security-filter will attempt to authenticate every HTTP request it receives using HTTP basic authentication. Requests that don’t contain a basic authentication header or whose header doesn’t pass validation by the relevant security-manager aren’t passed by the filter. In the following listing, you’ll see how to configure an http-security-filter using Spring Security and an in-memory user-service.
Listing 10.3. Defining a basic HTTP security filter on an HTTP inbound endpoint
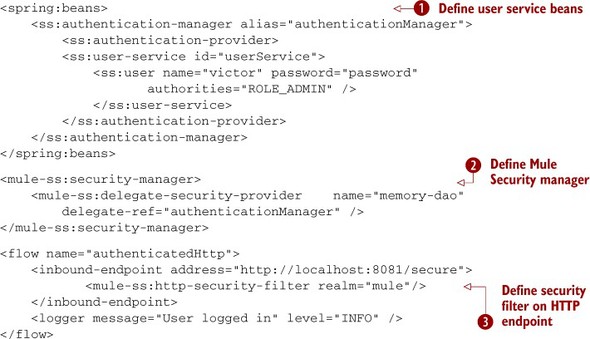
The in-memory user-service is defined by the beans ![]() , which are delegated to by the Mule security-manager defined at
, which are delegated to by the Mule security-manager defined at ![]() . Now you’ll see where these come into play. The http-security-filter
. Now you’ll see where these come into play. The http-security-filter ![]() , defined inside the HTTP inbound endpoint, will require a client to supply HTTP basic authentication credentials before accepting the message. These credentials are then
passed to the Mule Security manager for authentication. Remember that you can swap out the authentication mechanism, say from
in-memory DAO to an LDAP directory, by changing the delegate reference inside the security-manager. No changes need to be made to the security-filter.
, defined inside the HTTP inbound endpoint, will require a client to supply HTTP basic authentication credentials before accepting the message. These credentials are then
passed to the Mule Security manager for authentication. Remember that you can swap out the authentication mechanism, say from
in-memory DAO to an LDAP directory, by changing the delegate reference inside the security-manager. No changes need to be made to the security-filter.
We’ve talked about security filters, Spring’s authentication mechanisms, and how to combine them. They’re mainly oriented toward credential checking. There are other forms of security; the transport-level security is particularly useful in many cases. Let’s find out how to implement transport-level security using SSL.
Best practice
Change the delegate reference in a security-manager to swap out authentication mechanisms.
10.2. Securing HTTP using SSL
In section 3.3.1, we used the HTTP transport to send and receive data. We passed clear data through the network, and it worked. Sadly, the high security standards of Prancing Donkey won’t allow sending or receiving sensitive data without protection. HTTPS comes in handy here.
The Hypertext Transfer Protocol Secure (HTTPS) is a protocol that combines HTTP with SSL/TLS, giving to the widespread HTTP the security capabilities it lacks. HTTPS differs from HTTP not only in the URL scheme and port, but also by adding a whole new layer of security by encryption. Unfortunately, this layer also brings more complexity. If you want to use HTTPS, you have to deal with certificates: either having one to serve or adding external certificates to your key ring to make requests.
Let’s start with HTTPS by looking at how to set up a server.
10.2.1. Setting up an HTTPS server
To serve content, the HTTPS connector requires a keystore. A keystore contains the private key and any certificates necessary to complete a chain of trust and establish the trustworthiness of the primary certificate.
Before you start using the HTTPS connector, you should create a self-signed certificate in a keystore or import a certificate into a keystore from a certificate authority. Thankfully, Java comes with the keytool command that lets you create keystores. If you have the Java bin directory in your PATH, you’re ready to use it; otherwise, look for it in your Java installation directory:
keytool -genkey -alias prancingdonkey -keyalg RSA
          -keystore keystore.jks -keysize 2048
After responding to a few questions, this command will generate a file called keystore.jks that’s ready to be used with the HTTPS connector. It will contain a self-signed certificate. Keep in mind the passwords you passed to keytool; they’ll be necessary later.
If you plan to use a certificate from a certificate authority, the process is a bit longer, as you’ll have to create a certificate signing request (CSR) that might differ between the different certificate authorities. Please refer to the Java keytool instructions of your certificate authority.
Once you have your keystore ready, you need to tell the HTTPS connector how to use it; you’ll do so by passing a tls-key-store to the HTTPS connector:
<flow name="expenseReportSecureCallback">

  <https:inbound-endpoint host="127.0.0.1"
    port="8443" path="expenseReportCallback" method="POST"
    exchange-pattern="one-way" connector-ref="httpsServerConnector" />

  <file:outbound-endpoint path="/tmp"
    outputPattern="#[java.util.UUID.randomUUID().toString()].xml" />

</flow>
With the connector already configured, you need to set up an inbound HTTPS endpoint in a way similar to how you did it for HTTP. The only outstanding part is that you’ll point the connector-ref attribute to the connector you configured.
Listing 10.4. Using an HTTPS server in a flow

With a few steps, you set up an HTTPS service. Now it’s time to learn how to create an HTTPS client at the other end of the pipe.
10.2.2. Setting up an HTTPS client
Prancing Donkey’s commitment to security isn’t only related to the received data; when sending data over the internet, the same security standards should be applied. You may recall that when we studied the HTTP connector in section 3.3.1, we created a postExpenseReports flow that uploaded XLS expense reports to Arnor Accounting’s web service. Expense reports are sensitive information, so it was decided to switch from HTTP to HTTPS.
When connecting to an HTTPS server, you need to validate the server’s certificate against a trusted root certificate or against your keystore. If the certificate can be validated against the trusted root certificates, the configuration needed in Mule to connect to that server is straightforward. Let’s find an endpoint by using GET against Google:
<flow name="getGoogle">
  <vm:inbound-endpoint address="vm://getGoogle.in"
    exchange-pattern="request-response" />

  <https:outbound-endpoint host="www.google.com"
    port="443" path="/"
    method="GET" />

  <object-to-string-transformer />
</flow>
As you can see, when you connect to servers with certificates signed by a trusted root certificate, the HTTPS client looks similar to the HTTP equivalent. But what happens when you have to use self-signed certificates?
Java is shipped with a few trusted root certificates. If you want to list the trusted certificates in your Java installation, use the following command:
keytool -keystore "$JAVA_HOMEjrelibsecuritycacerts"
  -storepass changeit -list
When connecting to an HTTPS server with a self-signed certificate, use a keystore with the certificates you trust. Prancing Donkey trusts Arnor Accounting, so what they need is a trust store with Arnor Accounting’s public key. In order to create it, fetch the certificate from the server using openssl:
openssl s_client -showcerts -connect
          api.accounting.com:443 >arnor.pem </dev/null
Sadly, openssl will export not only the certificates but also some extra information that keytool won’t be happy to receive, so you’ll need to edit the file arnor.pem with your favorite editor to remove anything above BEGIN CERTIFICATE and below END CERTIFICATE, to effectively have something similar to this Google certificate:
-----BEGIN CERTIFICATE-----
MIIDIzCCAoygAwIBAgIEM... UzEXMBUGA1UEChMOVmVyaVNpZ24...
bGljIFByaW1hcnkgQ2Vyd... MDAwWhcNMTQwNTEyMjM1OTU5WjB...
d3RlIENvbnN1bHRpbmcgK... QTCBnzANBgkqhkiG9w0BAQEFAAO...
PKzMyGT7Y/wySweUvW+Au... 5/OIty0y3pg25gqtAHvEZEo7hHU...
3nWhLHpo39XKHIdYYBkCA... A1UdDwQEAwIBBjARBglghkgBhvh...
BgNVBAMTEFByaXZhdGVMY... L2NybC52ZXJpc2lnbi5jb20vcGN...
AQUFBzABhhZodHRwOi8vb... BwMBBggrBgEFBQcDAgYJYIZIAYb...
BQUAA4GBAFWsY+reod3Sk... q3J5Lwa/q4FwxKjt6lM07e8eU9k...
bcV0oveifHtgPHfNDs5IAn8BL7abN+AqKjbc1YXWrOU/VG+WHgWv
-----END CERTIFICATE-----
Once the file’s ready, you can create a trust store using the following command:
keytool -importcert -alias arnor -keystore
          truststore.jks -file arnor.pem
Now you’re ready to configure the HTTPS connector. The result will be similar to the connector you configured for the server in the previous section, with the exception that the tls-key-store will now become tls-client:
<https:connector name="httpsClientConnector">
  <https:tls-client path="clientkeystore.jks"
    storePassword="password"/>
</https:connector>
With the HTTPS connector configured, you can finally convert the insecure expense-ReportCallback created in section 3.3.1 into a secure service:
 <flow name="securePostExpenseReports">
  <file:inbound-endpoint path="./data/expenses/in"
    pollingFrequency="60000">
    <file:filename-regex-filter pattern=".*xls"
      caseSensitive="false"/>
  </file:inbound-endpoint>

  <https:outbound-endpoint host="api.accounting.com"
    port="443" path="expenseReports"
    method="POST" exchange-pattern="one-way"
    connector-ref="httpsClientConnector"/>
</flow>
Now you know how to secure the HTTP transport using SSL. Next, let’s add a security layer to SOAP.
10.3. Securing SOAP with Mule
If you recall from sections 3.3.2 and 6.2.1, you already know how to configure WS-* services using Mule. You already exposed the Brew Service thanks to the Mule support of JAX-WS through the use of Apache CXF.
In sections 3.3.2 and 6.2.1, you created naïve services that had no concerns at all about security. It’s time to build a security wall around them to let pass whom you want. To secure WS-* services, Mule allows you to use WS-Security (see http://en.wikipedia.org/wiki/WS-Security), an extension to SOAP that defines standard security headers for SOAP, by using the Apache WSS4J library (see http://ws.apache.org/wss4j/).
WSS4J has support for validating security credentials. In order to add authentication to the service, you’ll add a validator in combination with an in-memory security-manager you’ll reuse from listing 10.1. Let’s see them in action in this listing.
Listing 10.5. Setting authentication in a SOAP service
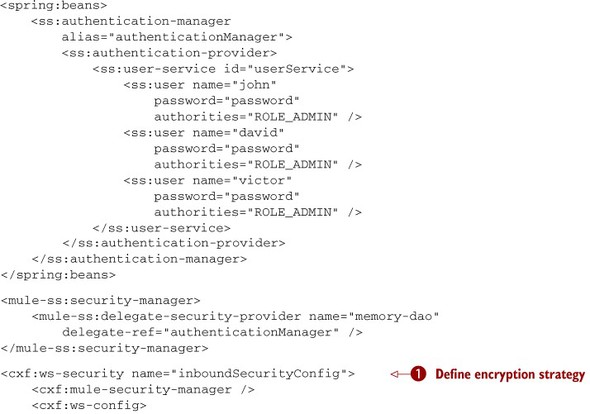
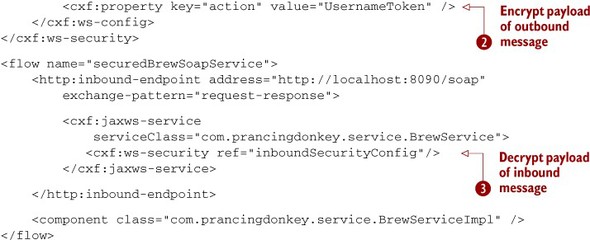
In general, this might look similar to the service you saw in section 3.3.2; the differences start at ![]() , where you configure the cxf security, establishing at
, where you configure the cxf security, establishing at ![]() that you want to check the username before letting pass the request to the component. There’s another difference compared
with section 3.3.2; there’s now a WS-Security element inside the jaxws-service at
that you want to check the username before letting pass the request to the component. There’s another difference compared
with section 3.3.2; there’s now a WS-Security element inside the jaxws-service at ![]() . With it, you’re configuring the service to use the security defined at
. With it, you’re configuring the service to use the security defined at ![]() .
.
SOAP security is a wide topic; there are other use cases such as validation using certificates and signing. The WS-Security page of the CXF site (http://cxf.apache.org/docs/ws-security.html) is probably a good starting point for finding more information. Now let’s leave behind authentication and start learning how to use encryption.
10.4. Message encryption with Mule
At Prancing Donkey, there’s recently been some concern about disquieting data entering the HTTP inbound endpoint. It seems like a malicious user is trying to get malformed data onto the JMS topic. To mitigate these concerns, in addition to the authentication you added before, you decide to force clients to encrypt the data being sent to the inbound endpoint using a key shared with the remote office.
In the next couple of sections, you’ll learn how to encrypt and decrypt messages, effectively making the Prancing Donkey website a safer place. Let’s start applying the simplest form of encryption, using a shared password.
10.4.1. Using password-based payload encryption
Prancing Donkey’s security requirements can be implemented by Mule’s security support. You’ll encrypt the payloads of JMS messages using a password. Recipients of these JMS messages would need to use the same password to decrypt the payload and process the contents. Let’s now take a look at how to perform end-to-end payload encryption of a message, with both encryption and decryption. Listing 10.6 illustrates a service that accepts a JMS message off a queue, encrypts it, and sends it to another JMS queue, which decrypts the message and forwards it on.
Listing 10.6. Encrypting the payload of messages using password-based encryption

You configure the password-encryption-strategy at ![]() as you have previously. The encrypt-transformer is then used at
as you have previously. The encrypt-transformer is then used at ![]() to encrypt the outbound message payload before it’s placed on the JMS queue. When the message is received
to encrypt the outbound message payload before it’s placed on the JMS queue. When the message is received ![]() , it’s decrypted by the decrypt-transformer. Both the encrypt-transformer and decrypt-transformer refer to the encryption strategy by its name, PBE.
, it’s decrypted by the decrypt-transformer. Both the encrypt-transformer and decrypt-transformer refer to the encryption strategy by its name, PBE.
In addition to message-level encryption, Mule offers SSL and TLS versions of some of the transports we discussed in chapter 3. Here are some of the transports that support SSL or TLS:
- HTTPS
- IMAPS
- POP3S
- XMPPS
- SMTPS
These transports generally require you to supply information about your certificate keystores. The online Mule documentation will instruct you how to do this for the transport in question.
10.4.2. Decrypting message payloads with PGP
You’ve seen how to use password-based encryption to transparently encrypt message payloads. The main flaw with this sort of encryption is that the password must be shared between both parties wishing to exchange messages. As you share the password with more parties, the risk of it becoming compromised grows. This is a major motivation for the popularity of public key encryption. Public key encryption uses key pairs rather than shared keys. The strength of public key encryption relies on the fact that each user has a closely guarded private key and a widely distributed public key. When a user wants to send a message, that user can encrypt the message using the recipient’s public key. The recipient is then able to decrypt the message using their own private key. The sender is also able to “sign” a message using their private key. The recipient can subsequently verify this message using the sender’s public key to guarantee the authenticity of the message.
Robust public key implementations are readily available. Mule uses the Cryptix library’s PGP support to perform decryption and signature verification of messages. In addition to this, GNU Privacy Guard (GnuPG) and OpenPGP are popular client-side alternatives. Using public key encryption securely, however, takes more than software. As public key encryption relies on the authenticity of public keys, having trustworthy processes and policies to disseminate and verify public keys is crucial. This infrastructure is referred to as PKI, or public key infrastructure. For a small organization, this might consist of the hand-delivery of public keys to individuals on CD-ROM to ensure authenticity. For a larger organization, the challenge of key distribution becomes more complex. Implementing a robust PKI is beyond the scope of this book, but numerous dedicated resources, both online and in print, can guide you in the right direction.
Best practice
Implement a robust PKI to facilitate the sharing of public keys.
PGP is a popular protocol for performing public key encryption. Mule’s PGP module supplies an inbound security-filter that can be used to verify the signatures of and decrypt messages. Let’s take a look at using a PGP security-filter to only accept PGP messages that you can decrypt and on which you can perform successful signature verification. The following listing illustrates how to do this.
Listing 10.7. Decrypting PGP-encrypted JMS payloads using a PGP security-filter

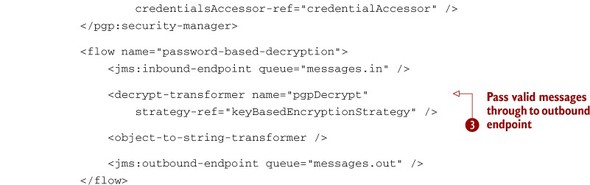
Start off by defining a key-manager to handle the details required for PGP ![]() . Specify the location of your key rings, the key alias, and the secret password. The credential accessor is defined at
. Specify the location of your key rings, the key alias, and the secret password. The credential accessor is defined at ![]() . This instructs Mule how to infer the user who encrypted or signed the payload from the message. In this case, use the MuleHeaderCredentials-Accessor, which will have Mule use the MULE_USER message property for identification of who encrypted or signed the message. The decryption and signature verification occur
at
. This instructs Mule how to infer the user who encrypted or signed the payload from the message. In this case, use the MuleHeaderCredentials-Accessor, which will have Mule use the MULE_USER message property for identification of who encrypted or signed the message. The decryption and signature verification occur
at ![]() . Messages that can’t be decrypted or verified are handled by the exception-strategy for the service. Messages whose payloads can be decrypted and verified are passed.[1]
. Messages that can’t be decrypted or verified are handled by the exception-strategy for the service. Messages whose payloads can be decrypted and verified are passed.[1]
1 You’ll need a PGP implementation to generate a key pair and encrypt messages. Good options include Cryptix (www.cryptix.org/) for programmatic manipulation and GNU Privacy Guard (www.gnupg.org/) for manipulation via the command line.
PGP and the Sun JVM
If you’re using a Sun JVM, you’ll most likely need to install the Unlimited Strength Jurisdiction Policy Files to use Mule’s PGP support. These are available on the Java SE downloads page for the Java version you’re using. The Java 7 Unlimited Strength Jurisdiction Policy Files, for instance, are located at http://mng.bz/sz1g. Installation instructions are included in the archive.
In this section, you saw how to use public key encryption to securely decrypt and verify the payloads of Mule messages.
10.5. Summary
In this chapter, you saw how Mule simplifies security for integration projects. This simplification is hopefully evident from our discussion of security managers and security providers. You learned how to use a security manager such as Spring Security to independently provide security services for endpoint filters. You saw how to use endpoint filters to provide basic authentication for HTTP endpoints. We showed how to create HTTPS servers and clients and how to secure SOAP using WS-Security. Finally, we demonstrated how to encrypt payloads using PGP.
Now that you’re comfortable with security in Mule, we’ll talk about two other cross-cutting concerns in many integration scenarios: transactions and monitoring.