
Chapter 3. Working with connectors
This chapter covers
- Using Mule connectors to integrate with disparate protocols
- Consuming APIs with Mule cloud connectors
- Integrating with SaaS APIs
Moving data around is the crux of integration. Precious time spent authoring WSDLs, writing JMS consumers, or struggling with a vendor’s obtuse API paradoxically contributes little value to an application. It instead has the opposite effect: burning you out writing code that doesn’t contribute to solving the business issue at hand. Even when such code is trivially developed, implementations will still differ across projects and between teams. This increases the difficulty when bringing developers up to speed or when developers move between teams. Developers must be careful that their transport code is thread-safe, handles errors correctly, and updates as protocols and APIs change.
Let’s revisit the concrete, but relatively simple, example of accepting an HTTP request and sending the content of the request to a JMS queue, which we implemented using Mule in chapter 1 of this book. This is conceptually a fairly simple scenario, but manually implementing the same application without an integration framework like Mule would require the following steps:
- Setting up a web server to accept the request
- Transforming the HTTP request into a JMS message
- Obtaining and properly managing all the resources to send the JMS messages (connection factories, sessions, and so on)
- Properly dealing with concurrency issues, logging, scaling, security, and so on
Writing this code may or may not be difficult, depending on your skill and how well you know some third-party frameworks that simplify the implementation. Regardless, is this code you (or your team) is willing to develop, test, document, and maintain?
As moving data around is such an integral piece of using Mule, expect to make heavy use of the techniques in this chapter. After all, you’ll need to get data into and out of Mule before you can do anything useful with it!
The examples in this chapter will focus on Prancing Donkey’s integrations with Arnor Accounting and Frozen North Freezing, Inc. Arnor Accounting is a small, forwardthinking startup with an SaaS-based accounting application.
Frozen North Freezing is an established provider of smart cooling products. Many of their products feature integration points to interact with other systems, typically for monitoring, as you’ll see later on.
3.1. Understanding connectors
Connectors are Mule’s abstraction for sending data, receiving data, and interacting with different APIs. The most common form of connector you’ll use in Mule is called a transport. Transports provide an adaptation layer for a protocol, like HTTP or JMS. Transports provide sources and sinks for data. They’re used to get data into and out of flows. A source of data for a flow is called an inbound endpoint. A sink, or destination for data, is called an outbound endpoint. The first part of this chapter will cover some of Mule’s more prominent transports.
The other kind of connector is called a cloud connector. Cloud connectors are typically used to interact with an API. Initially these were cloud-based APIs (hence the name) such as those provided by Twitter or Salesforce. The definition has been muddied a bit, as you’ll see later in this chapter, to include other sorts of APIs like MongoDB. Cloud connectors don’t typically offer endpoints, but rather have message processors that map to operations defined in the API. Cloud connectors encapsulate the operations of an API, greatly reducing the initial friction for a developer to come up to speed when using it.
This distinction between transports and cloud connectors is admittedly blurry. Typically, however, transports provide protocol support while cloud connectors facilitate interaction with an API.
3.1.1. Configuring connectors with XML
Your Mule configuration will very often contain one or several connector configuration elements. Each transport will contribute its own connector element with specific attributes. For example, here’s the configuration for a file connector:
<file:connector name="fileConnector" autoDelete="false"/>
And here’s a secure proxied HTTP connector configuration:
<http:connector name="HttpConnector"
proxyHostname="${proxyHostname}"
proxyPort="${proxyPort}"
proxyUsername="${proxyUsername}"
proxyPassword="${proxyPassword}" />
Connector elements contain a name attribute that you’ll use to uniquely identify the connector in endpoints. This allows you to configure multiple connectors for a single transport, with different configuring parameters for each.
It’s absolutely possible, and even common, to have a configuration that doesn’t contain any connector definitions. Why is that? If Mule figures out that one of your endpoints needs a particular connector, it will automatically instantiate one for you, using all the default values for its different configuration parameters. This is a perfectly viable approach if you’re satisfied with the behavior of the connector when it uses its default configuration or the HTTP one.
When you have only one connector for a particular protocol, whether it’s a default connector automatically created by Mule or one that you have specifically configured, you don’t need to add a reference to the connector name in your endpoint for that transport. But as soon as you have more than one connector for a particular protocol, any endpoint that uses this protocol will prevent Mule from loading your configuration, and an exception containing the following message will be thrown: “There are at least two connectors matching protocol [xyz], so the connector to use must be specified on the endpoint using the connector property/attribute.” The message is self-explanatory and the remedy trivial: simply add a reference to the particular connector name on each endpoint that uses the concerned protocol. For example:
<vm:endpoint
        connector-ref="myVmConnector" name="LoanBrokerQuotes"
        path="loan.quotes"/>
For transports, a connector provides the infrastructure to communicate to a particular protocol. An endpoint sends and receives messages on a specific channel using the infrastructure provided by the connector. A JMS connector, for example, is responsible for managing the connection to the JMS broker, handling the authentication and reconnecting in the event of a communication failure. A JMS endpoint, on the other hand, is responsible for sending and receiving messages on queues and topics. Endpoints are the cornerstone of IO with transports in Mule; they’re the tools you’ll use to get data into and out of your flows.
Endpoints come in two different flavors, inbound and outbound. Inbound endpoints are used as message sources; outbound endpoints are used to send data. An inbound endpoint can do things like receive JMS messages, read file streams, and pull down email messages from a mail server. An outbound endpoint can do things like dispatch JMS messages, insert rows into a database table, and send a file to an FTP server. You’ll use inbound and outbound endpoints to communicate between components and flows inside Mule as well as with the outside world.
You’ll quickly notice that all endpoints offer an address attribute. Why is that? This allows for the configuration of a generic endpoint using a URI-based destination address instead of the dedicated attributes of the specific endpoint element. There are three cases where this is useful:
- An address can be used in place of individual attributes on an endpoint. Endpoints using the HTTP transport, for instance, can be configured explicitly with the full address to listen on as opposed to individually setting the host, port, and path.
- When using MuleClient, which you’ll see in chapter 12, addresses are used to send messages to and receive them from Mule applications.
- While not common, generic endpoints that aren’t prefixed with a transport’s namespace can be used. This might be useful if you want to use a different transport depending on the environment (for example, using the VM transport instead of the JMS transport depending on where the app is deployed).
3.1.2. Configuring connectors with Mule Studio
Configuring connectors and endpoints is very similar, and much easier in Mule Studio than with XML. Simply right-click on an endpoint and select Properties, as illustrated in figure 3.1.
Figure 3.1. Selecting endpoint properties

Figure 3.2 shows the configuration panel for an HTTP endpoint. You can define an HTTP connector by clicking on the References tab and then clicking on the Plus button next to Connector Reference. After you add the connector, it will be available on the drop-down list in the References tab, as illustrated by figures 3.3 and 3.4.
Figure 3.2. Selecting the Endpoint Properties panel
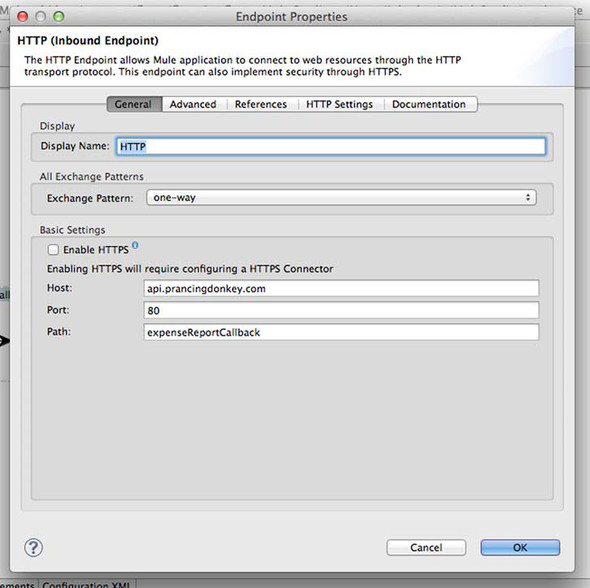
Figure 3.3. Explicitly adding a connector

Figure 3.4. Editing the connector

Now that you’re comfortable configuring connectors and endpoints both with XML and in Mule Studio, let’s dive in and start looking at some of Mule’s built-in transports. Here are the transports and cloud connectors we’ll look at in this chapter:
- File transport— Read and write data to and from local and network filesystems.
- HTTP transport— Send and receive HTTP requests, and expose and consume web services.
- JMS transport— Dispatch and receive JMS messages on queues and topics.
- Email transport— Receive email from an IMAP server, and send emails with SMTP.
- FTP transport— Poll and send files to and from an FTP server.
- JDBC transport— Read and write to and from relational databases with JDBC.
- MongoDB cloud connector— Write and read data to and from MongoDB.
- VM transport— Use the virtual memory transport to implement reliability patterns.
- Twitter cloud connector— Interact with the Twitter API.
We’ll demonstrate these transports in the context of Prancing Donkey’s integration efforts with Arnor Accounting and Frozen North Freezing, starting off with the file transport.
3.2. Using the file transport
Reading and writing file data is often the easiest way get data into and out of applications. In this section, you’ll see how to use Mule’s file transport to read, write, move, and delete files.
During the course of this book, you’ll see certain configuration properties that look like this:
host="${imap.host}"
These are property placeholders that are used to avoid hardcoded, environmentspecific variables in Mule configurations. The location of the properties files is configured as follows in the Mule configuration:
<context:property-placeholder location="/mule.properties"/>
Some of the configuration properties for the file transport are listed in table 3.1. You can see that they govern which directories files are read from, whether or not they’re deleted, how often a directory is polled, and the patterns to use when moving files.
Table 3.1. Configuring the file transport
|
Property |
Type |
Target |
Required? |
Default |
Description |
|---|---|---|---|---|---|
| writeToDirectory | String | Connector, outbound endpoint | No | The target directory for file output | |
| readFromDirectory | String | Connector, inbound endpoint | No | The source directory for file input | |
| autoDelete | Boolean | Connector, inbound endpoint | No | true | Whether or not to delete the source file after it has been read |
| outputAppend | Boolean | Connector, outbound endpoint | No | false | Specifies that the output is appended to a single file instead of being written to a new file |
| pollingFrequency | long | Connector, inbound endpoint | No | 0 | Specifies the interval in milliseconds at which the source directory should be polled |
| moveToDirectory | String | Connector, inbound endpoint | No | The directory to move a file to once it has been read—if this and autoDelete are unset, the file is deleted | |
| moveToPattern | String | Connector, inbound endpoint | No | The pattern used to indicate what files should be moved to the moveToDirectory—files not matching this pattern are deleted | |
| outputPattern | String | Connector, outbound endpoint | No | The pattern used when creating new files on outbound endpoints—discussed in detail later |
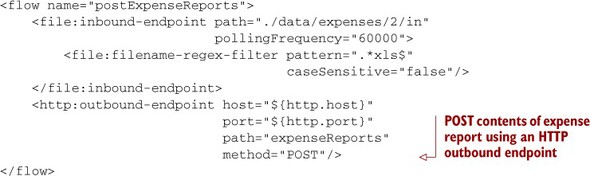
Some of Prancing Donkey’s employees still use Excel spreadsheets to track their expenses. This is particularly frustrating to Prancing Donkey’s developers, who want to take full advantage of the REST API provided by Arnor Accounting. To make matters worse, employees have been emailing the expense sheet directly to the accounting department. The accounting staff have taken matters into their own hands, tired of sifting through emails to find expense report attachments, and have created a network share for reports to be dropped into. This has been somewhat successful, but naming of the expense report files has been inconsistent. Let’s look at a flow that can poll an incoming folder for new expense reports and copy them to another folder while normalizing the name along the way (see figure 3.5).
Figure 3.5. copyExpenseReports flow in Mule Studio

Listing 3.1. Using the file transport to move files from one directory to another

The message source of this flow is the file inbound endpoint, configured at ![]() to poll the /data/expenses/1/in directory once a minute for new files. The filename-regex-filter defined at
to poll the /data/expenses/1/in directory once a minute for new files. The filename-regex-filter defined at ![]() instructs the endpoint to only accept files that end in .xls and to ignore the case. Finally, the outbound endpoint
instructs the endpoint to only accept files that end in .xls and to ignore the case. Finally, the outbound endpoint ![]() uses the Mule Expression Language to normalize the filename with the timestamp and the file’s original name. To obtain the
latter, you reference the originalFilename header populated by the file inbound endpoint.
uses the Mule Expression Language to normalize the filename with the timestamp and the file’s original name. To obtain the
latter, you reference the originalFilename header populated by the file inbound endpoint.
A file inbound endpoint will, by default, remove the file from the source directory it’s read from when it’s passed to an outbound endpoint. You can override this behavior by setting the autoDelete property on the file connector to false. Be careful when doing this, however, as it will cause the file to be repeatedly read by a file inbound endpoint until it’s removed from the source directory.
The fileAge parameter allows you to read files that are older then a certain age in milliseconds. Setting this value to 5000, for instance, would cause a file inbound endpoint to only process files older than 5 seconds.
You’ll see strategies in chapter 8 for deploying the same Mule application to multiple Mule instances. Care must be taken in such scenarios when an application on each instance attempts to poll the same directory on a network share, such as SMB or NFS. Typically state between the Mule nodes needs to be coordinated to ensure the same file isn’t being read, deleted, or moved at the same time (usually more is required than the locking semantics offered by the underlying protocol).
Mule EE’s clustering feature will automatically coordinate and distribute activity between Mule applications using the file transport.
In this section, you saw how the Mule file transport can be used to selectively move file data through Mule flows. You saw how Prancing Donkey uses this functionality to normalize the submission of expense reports to a shared folder.
Now let’s look at something a little more interesting: Mule’s support for HTTP and web services.
3.3. Using the HTTP transport
In this section, we’ll look at Mule’s support for HTTP and web services. We’ll start off by looking at the HTTP transport, which makes it easy to send and receive data from websites and applications. We’ll then look at Mule’s support for JAX-RS and JAX-WS, which provide support for REST and SOAP APIs over HTTP.
3.3.1. Sending and receiving data using HTTP
The HTTP transport allows you to send and receive data using the HTTP protocol. You can use HTTP’s POST method to send data through an outbound endpoint or the GET method to return data from a request-response inbound endpoint. Table 3.2 enumerates some of the common configuration elements of the HTTP connector and endpoints.
Table 3.2. The HTTP transport lets you specify typical client-side properties.
|
Property |
Type |
Target |
Required? |
Default |
Description |
|---|---|---|---|---|---|
| host | String | Inbound endpoint, outbound endpoint | No | false | The host to either receive requests (inbound) or send requests (outbound) |
| port | int | Inbound endpoint, outbound endpoint | No | 80 | The port to bind to for inbound endpoints, and the port to send to for outbound endpoints |
| method | String | Inbound endpoint, outbound endpoint | No | false | HTTP method to use (GET, POST, PUT, DELETE, OPTIONS, HEAD, PATCH, TRACE, or CONNECT) |
| path | String | Inbound endpoint, outbound endpoint | No | false | The URI path |
| proxyHostname | String | Connector | No | false | The proxy hostname—this lets you use a web proxy for requests |
| proxyPort | String | Connector | No | false | The proxy port |
| proxyUsername | String | Connector | No | false | The proxy username |
| proxyPassword | String | Connector | No | false | The proxy password |
| enableCookies | Boolean | Connector | No | false | Enable cookies |
| user | String | Outbound endpoint | No | false | The username for the remote URL |
| password | String | Outbound endpoint | No | false | The password for the remote URL |
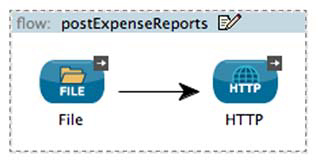
Let’s see how you can use an HTTP outbound endpoint to POST data to a URL. The developers at Arnor Accounting have graciously agreed to allow Prancing Donkey to upload expense reports that are XLS files. If they weren’t already using Mule, this might be a big problem. Their developers would need to rip out the piece of code that copies the file to the accountant’s directory and replace it with code to POST the file contents to the remote URL. Using Mule, they simply need to change the outbound endpoint, as illustrated in the next listing, and illustrated in figure 3.6.
Figure 3.6. postExpenseReports flow in Mule Studio
Listing 3.2. Posting data with the HTTP transport
Replace the file:outbound-endpoint with an http:outbound-endpoint and voilà! The data is no longer being written to a file, but is instead posted to the remote web application.
Using HTTP as a message source is just as easy. Since parsing and processing the expense spreadsheets takes some time, the SaaS application processes the spreadsheets asynchronously. The ever-accommodating developers at Arnor Accounting have added a feature that will POST a notification to a specified URL after the report has been processed. For now, Prancing Donkey wants to receive these notifications and write them to the filesystem, where they can be parsed by a monitoring system for errors (you’ll see how this can be improved when we discuss JMS in section 3.4.) The next listing illustrates how to do this, and figure 3.7 shows it.
Figure 3.7. expenseReportCallback flow in Mule Studio

Listing 3.3. Using an HTTP inbound endpoint to POST data to a file
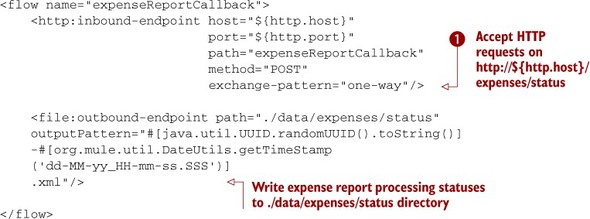
The HTTP inbound endpoint configured at ![]() accepts HTTP POST requests that will contain the status notifications. The payload of these posts will be written to the
configured directory. Note that the previous flow and this flow both use one-way exchange patterns. This allows you to simulate
asynchronous requests over HTTP, which is a synchronous protocol. In this case, Mule will return a 200 OK response to the
client unless there’s an exception thrown in the flow. You’ll see how to handle exceptions in chapter 9.
accepts HTTP POST requests that will contain the status notifications. The payload of these posts will be written to the
configured directory. Note that the previous flow and this flow both use one-way exchange patterns. This allows you to simulate
asynchronous requests over HTTP, which is a synchronous protocol. In this case, Mule will return a 200 OK response to the
client unless there’s an exception thrown in the flow. You’ll see how to handle exceptions in chapter 9.
HTTPS
All the HTTP examples you’ll see will make use of the default, unencrypted HTTP transport. We’ll cover HTTPS and SSL in chapter 10.
The ability to asynchronously handle HTTP requests is a useful tool in your arsenal of integration techniques. It allows you to implement a messaging API over HTTP. More often than not you’ll want to deal with HTTP in a request-response fashion. Let’s see how to do that using Mule’s support for web services.
3.3.2. Using web services with Mule
Prancing Donkey has a service class, called BrewService, that they’d like to expose for external clients to consume. This service currently has a single method, getBrews(), that returns a list of the current beers in their catalog. This method returns a List of Brew instances, a part of their domain model. Listings 3.4, 3.5, and 3.6 detail the BrewService interface and implementation and the domain model class for Brew.
JAX-RS and JAX-WS
The examples in this section will make use of the JAX-RS and JAX-WS standards, a full discussion of which is out of the scope of this book. For a detailed treatment of each, including how to annotate your domain models to control serialization, please see http://jersey.java.net and http://cxf.apache.org/.
Listing 3.4. The BrewService interface
package com.prancingdonkey.service;

public interface BrewService {
    List<Brew> getBrews();
}
Listing 3.5. The BrewService implementation
package com.prancingdonkey.service;

public class BrewServiceImpl implements BrewService {
    List<Brew> getBrews() {
        return Brew.findAll();
    }
}
Listing 3.6. The Brew domain model
package com.prancingdonkey.model;

public class Brew implements Serializable {

    String name;

    String description;

    public Brew(String name, String description) {
        this.name = name;
        this.description = description;
    }

    public String getName() {
        return name;
    }

    public void setName(String name) {
        this.name = name;
    }

    public String getDescription() {
        return description;
    }

    public void setDescription(String description) {
        this.description = description;
    }

    static public List<Brew> findAll()
    {
        // Returns a List of Brews
        return ...
    }

}
We’ll now look at how to expose the getBrews() method to external users using REST and SOAP.
REST with JAX-RS
JAX-RS is the Java API for RESTful web services. Mule’s support for Jersey, the JAX-RS reference implementation, allows you to develop RESTful web services using JAX-RS annotated classes in your Mule flows. Let’s annotate BrewServiceImpl to return a JSON representation of the brew catalog.
Listing 3.7. The JAX-RS annotated BrewService

The @Path annotation ![]() specifies the root URI of all methods you expose in this class (you can also specify the @Path annotations on methods to further qualify the path). The @GET annotation
specifies the root URI of all methods you expose in this class (you can also specify the @Path annotations on methods to further qualify the path). The @GET annotation ![]() specifies that this method will only respond to HTTP GET requests. The @Produces annotation
specifies that this method will only respond to HTTP GET requests. The @Produces annotation ![]() indicates that you’ll be returning JSON as your response.
indicates that you’ll be returning JSON as your response.
Now that you have BrewServiceImpl properly annotated, let’s wire it up in a flow. The following listing illustrates how to do this (see figure 3.8).
Figure 3.8. brewRestService flow in Mule Studio

Listing 3.8. Expose the brew listing over REST using JAX-RS
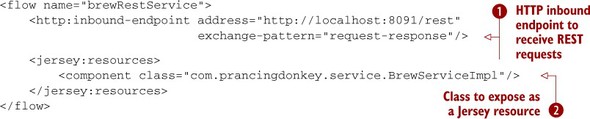
The http:inbound-endpoint ![]() sets up the HTTP plumbing around the RESTful request. The jersey:resources and component class
sets up the HTTP plumbing around the RESTful request. The jersey:resources and component class ![]() expose the JAX-RS class annotated in listing 3.7. You can now start Mule and execute your request. Let’s invoke the service with curl and see what happens.
expose the JAX-RS class annotated in listing 3.7. You can now start Mule and execute your request. Let’s invoke the service with curl and see what happens.
Listing 3.9. Using curl to invoke the web service
% curl
http://api.prancingdonkey.com/rest/brews/list
[ {"name":"Frodo's IPA", "description":"Indian Pale Ale" }, {
"name":"Bilbo's Lager", "description":"Indian Pale Ale" }, {
"name":"Gandalf's Barley Wine", "description":"Indian Pale Ale" } ]
The curl request against the rest/brews/list URI returns the method’s response, a List of Brew classes, serialized as JSON. You can customize how the JSON is generated by annotating your domain model with JAXB. Now let’s see how you can use Mule’s support for JAX-WS to expose the same service using SOAP.
Tools to consume REST services
Curl is a popular command-line tool that can be used to interact with RESTful services. It can be downloaded from http://curl.haxx.se/. Another great tool for consuming RESTful services is REST Console for Google’s Chrome web browser. It can be installed by pointing Chrome at http://restconsole.com.
SOAP with JAX-WS and Apache CXF
JAX-WS is the Java API for XML web services. JAX-WS provides a set of annotations to simplify the development of SOAP-driven web services. Mule supports JAX-WS via Apache CXF. To expose BrewService via SOAP, you’ll need to annotate the implementation class, BrewServiceImpl, just as you did with JAX-RS. You’ll also need to extract and annotate an interface, BrewService.
Apache CXF
Apache CXF is an open source framework for building web services. Mule delegates much of its SOAP support to Apache CXF. CXF is a very powerful, but complex, piece of software whose complete coverage is beyond the scope of this book. The reader is encouraged to consult the Apache CXF User Guide here for detailed coverage: http://cxf.apache.org/docs/index.html.
The interface is used by CXF to generate the WSDL for the web service. This is the contract that consumers will adhere to.
Listings 3.10 and 3.11 show how you’ll annotate BrewService and BrewService-Impl to generate the WSDL along with the corresponding annotation on the implementation class.
Listing 3.10. The JAX-WS annotated BrewService interface
package com.prancingdonkey.service;

@WebService
public interface BrewService {
    List<Brew> getBrews();
}
Listing 3.11. The JAX-WS annotated BrewService implementation
package com.prancingdonkey.service;

@WebService(endpointInterface =
            "com.prancingdonkey.service.BrewService",
            serviceName = "BrewService")
public class BrewServiceImpl implements BrewService {

    List<Brew> getBrews() {
        return Brew.findAll();
    }

}
You’re now ready to wire up the SOAP service to Mule. As you can see in the following listing, this is similar to the configuration with Jersey. See figure 3.9.
Figure 3.9. brewSoapService flow in Mule Studio

Listing 3.12. Expose the brew listing over SOAP using CXF
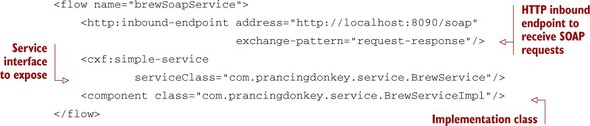
The WSDL for this service will be available on http://api.prancingdonkey.com/soap?wsdl. Let’s point SoapUI, a popular SOAP client, at the WSDL, generate a request, and look at the response in figure 3.10.
Figure 3.10. Using SOAP UI to invoke the SOAP service

The pane on the left shows the operations from the WSDL, which in this case only consists of the getBrews operation. Thankfully, SOAP UI generates sample operations for you from the schema, so simply clicking on getBrews will generate the sample request in the middle column. Clicking on the green Run icon will send the request to Mule and show the response on the right-hand side.[1]
1 SOAP UI is an invaluable tool for testing web services.
JAXB
You can control how your domain model is serialized by CXF and Jersey by using JAXB annotations. More details are here: http://jaxb.java.net/tutorial/.
CXF can also be used to consume web services. Let’s assume that Arnor Accounting offers a WSDL describing their SOAP API. You can modify the flow from listing 3.1 to submit expense reports via this mechanism, as illustrated in the next listing.
Listing 3.13. Submit expense reports using SOAP

Once you generate a client class using CXF’s wsdl2java, you can consume the web service from Mule. This generated class is configured at ![]() . The WSDL port and location are defined at
. The WSDL port and location are defined at ![]() and
and ![]() . The operation to invoke is set at
. The operation to invoke is set at ![]() .
.
In this section, you learned how to use HTTP to exchange data. You saw how Mule’s HTTP transport enables you to send and receive messages over HTTP, as well as how to asynchronously handle HTTP requests. You looked at using Mule’s support for JAX-RS and JAX-WS to allow you to expose your data using REST and SOAP. You also saw how to use WSDLs to consume SOAP services on endpoints.
The simple service pattern
You’ll see in chapter 6 how the simple service pattern can be used to expose some POJOs via SOAP and REST with just one line of configuration. This approach might make more sense if your services are simple, or you don’t need to standardize them with JAX-WS and JAX-RS.
HTTP is an extremely popular way to do data exchange, but there are more robust options available, especially when you have control over the applications in question. In the next section, we’ll consider how you can use JMS to do reliable messaging.
3.4. Using the JMS transport
The prevalence of HTTP makes web services an attractive alternative for integration outside of the firewall. Unfortunately, HTTP wasn’t designed as an integration mechanism, and it fails to provide guarantees about delivery time, reliability, and security. The WS-* specifications attempt to make headway in these areas, but they’re complicated, and their domain is limited to SOAP. Fortunately, the JMS protocol is an attractive alternative for integration inside the firewall. Let’s take a look at Mule’s JMS support.
If you’re working in a Java environment and have control over the network between your applications, using JMS can make a lot of sense; it’s asynchronous, secure, reliable, and often very fast. It also gives you the ability to work with arbitrary data payloads, and you can even pass around serialized objects between JVMs.
In this section, we’ll explore Mule’s support for JMS, starting off by seeing how you can send messages to and from queues and topics. We’ll then look at how you can use filters to be selective about the JMS messages you receive and send. Finally, you’ll see how to use JMS messages, which are normally asynchronous, to perform synchronous operations on endpoints.
The JMS transport can be used to send and receive JMS messages on queues and topics, using either the 1.0.2b or 1.1 versions of the JMS spec. Mule doesn’t implement a JMS server, so you’ll use the JMS transport in conjunction with a JMS implementation like ActiveMQ, HornetQ, or Tibco EMS.
Configuring JMS with your broker can sometimes be a tricky proposition. As such, Mule provides a wealth of options for JMS connectors and endpoints to play nicely with the JMS implementation at hand. Table 3.3 lists some of these.
Table 3.3. Common configuration properties for the JMS transport
|
Property |
Type |
Target |
Required? |
Default |
Description |
|---|---|---|---|---|---|
| queue | String | Inbound endpoint, outbound endpoint | Either queue or topic must be set | The queue to send to; can’t be used in conjunction with topic | |
| topic | String | Inbound endpoint, outbound endpoint | Either queue or topic must be set | The topic to send to; cannot be used in conjunction with queue | |
| persistent-Delivery | Boolean | Connector | No | false | Toggle persistent delivery for messages |
| acknowledgement-Mode | String | Connector | No | AUTO_ACKNOWLEDGE | Set the acknowledgement node: AUTO_ACKNOWLEDGE, CLIENT_ACKNOWLEDGE, or DUPS_OK_ACKNOWLDGE |
| durable | Boolean | Connector | No | false | Toggle durability for topics |
| specification | String | Connector | No | 1.0.2b | Specify which JMS specification to use, either 1.1 or 1.0.2b |
| honorQosHeaders | String | Connector | No | false | Specify whether or not to honor quality-of-service headers |
3.4.1. Sending JMS messages with the JMS outbound endpoint
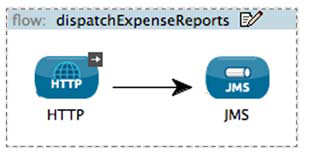
Let’s send some messages to a queue using a JMS outbound endpoint. Recall that listing 3.3 set up a flow to accept notifications from Arnor Accounting when an expense report’s processing has been completed. That flow accepts the notifications and saves them to a file. A more realistic use case is to take the notifications and dispatch them to a JMS topic to which interested parties can subscribe and be notified as expense reports are finalized, as illustrated in the following listing (see figure 3.11).
Figure 3.11. dispatchExpenseReports flow in Mule Studio
Listing 3.14. Publish expense reports to a JMS topic

JMS brokers typically require slightly different configuration options. As such, you need to explicitly configure the connector
for your broker. You’re doing this for an external ActiveMQ instance at ![]() . The broker’s URL is being set to the value of the ${jms.url} property. The JMS specification is declared here as well. If you wanted to use the 1.0.2b spec, you’d simply change 1.1 to 1.0.2b. The HTTP inbound endpoint configured at
. The broker’s URL is being set to the value of the ${jms.url} property. The JMS specification is declared here as well. If you wanted to use the 1.0.2b spec, you’d simply change 1.1 to 1.0.2b. The HTTP inbound endpoint configured at ![]() remains unchanged. The JMS outbound endpoint is defined at
remains unchanged. The JMS outbound endpoint is defined at ![]() . The string from the inbound endpoint will be sent to the expenses.status topic as a JMS TextMessage.
. The string from the inbound endpoint will be sent to the expenses.status topic as a JMS TextMessage.
The JMS transport will create the specific type of JMS message based on the source data. A byte array will be instantiated as a BytesMessage, a map becomes a MapMessage, an input stream becomes a StreamMessage, an object becomes an ObjectMessage, and a String becomes a TextMessage, as you’ve just seen.
Sending messages to a queue is just as easy. You simply change the topic attribute to the queue attribute in the JMS outbound endpoint configuration to look like this:
<jms:outbound-endpoint queue="expenses.status"/>
Messages now sent through this endpoint will be placed in a queue called expenses.status.
Specifying JMS connectors on endpoints
If you’re specifying the JMS destinations using the URI notation (for example, jms://expenses.status), you can identify the connector to use for the endpoint by appending ?connector-ref=connector-name. For instance, the outbound endpoint’s URI for the previous example would look like this: jms://expenses.status?connector= jmsConnector. This syntax is necessary when more than one connector is configured for a transport.
3.4.2. Receiving JMS messages with the JMS inbound endpoint
Let’s look at receiving JMS messages on an inbound endpoint. Listing 3.15 subscribes to the topic you’re publishing to (see previous listings) and logs that an expense report has been processed (see figure 3.12).
Listing 3.15. Logging JMS messages published to a topic

Figure 3.12. logExpenseReports flow in Mule Studio
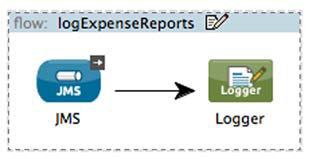
The inbound endpoint is configured at ![]() ; it will consume messages off the expenses.status topic. The logger message processor is used to log messages via Mule’s logging facilities. We’ll talk more about logging
in chapter 8.
; it will consume messages off the expenses.status topic. The logger message processor is used to log messages via Mule’s logging facilities. We’ll talk more about logging
in chapter 8.
You also have the ability to make a topic subscription durable on an inbound endpoint. This is accomplished by configuring the connector for durability, as follows:
<jms:activemq-connector
        name="jmsConnector" specification="1.1"
        brokerURL="tcp://mq.prancingdonkey.com:61616" durable="true" />
Now the JMS transport will treat all topic-based inbound endpoints as durable.
3.4.3. Using selector filters on JMS endpoints
Filters can be used on JMS endpoints to be selective about the messages they consume. JMS inbound endpoint filters use the JMS selector facility to accomplish this. Let’s modify the JMS inbound endpoint from listing 3.15 to only accept notifications created after midnight on January 1, 2012. You can see this in the following listing.
Listing 3.16. Using a JMS selector filter to choose the messages an endpoint receives
![]()
You can use JMS selectors in this manner on any header property. You might be wondering what the > characters are all about at ![]() . This is the XML escape sequence for >, the greater-than character. Failing to escape characters like > in your Mule configurations
will produce XML parsing errors when Mule starts.
. This is the XML escape sequence for >, the greater-than character. Failing to escape characters like > in your Mule configurations
will produce XML parsing errors when Mule starts.
3.4.4. Using JMS synchronously
As JMS is inherently asynchronous in nature, you’ll usually use JMS inbound endpoints with one-way message-exchange patterns—sending messages and not waiting around for a response. Sometimes, however, you’ll want to wait for a response from a message you’re sending. You can accomplish this by setting the exchange pattern on a JMS inbound endpoint to request-response.
Let’s demonstrate this by invoking Brew-ServiceImpl’s getBrews() method using JMS in the following listing (see figure 3.13).
Figure 3.13. brewJmsService flow in Mule Studio

Listing 3.17. Synchronously invoke a component using JMS

The request-response exchange pattern on the JMS inbound endpoint indicates that a response is expected. To facilitate this, the JMS transport will create a temporary queue for the response data and set the queue name as the Reply-To property of the responding JMS message.
Synchronous JMS and non-Mule clients
Synchronous JMS may seem deceptively useful; note that it has its disadvantages. It will work out of the box with other Mule instances as well as MuleClient, but will require manually dealing with the reply-to header and temporary queue when implementing non-Mule callers. In general, you should avoid using JMS in this manner when integrating with non-Mule clients unless you have the ability to manually set the reply-to header on the non-Mule end.
The ability to use JMS with Mule is an important part of your integration tool belt. You just learned how to send and receive messages with JMS endpoints using queues and topics.
JMS and reconnection strategies
An important facet of working with JMS is dealing with situations in which the JMS servers are unavailable. In chapter 9 we’ll examine how to use a reconnection strategy in concert with the JMS transport. This will allow your Mule instances to tolerate the failure of a JMS server without losing messages.
You saw how to use filters on JMS endpoints to be picky about the messages you send and receive. Finally, we looked at how to use Mule’s request-response support with JMS endpoints to perform synchronous operations over asynchronous queues. Let’s take a further look at Mule’s transport options, continuing with sending and receiving email.
3.5. Using email
While its tempting to think of email as primarily for person-to-person communication, it’s often used for more than a mechanism of conversation. Email messages relay monitoring alerts, send order receipts, and coordinate scheduling. This is evident from the automated emails you receive when you sign up with a website, order a book from Amazon, or confirm a meeting request.
In this section, we’ll investigate how to use the email transports to act on and generate these messages. First we’ll take a look at receiving email with the IMAP transport. Then we’ll look at sending email with the SMTP transport.
3.5.1. Receiving email with the IMAP transport
The IMAP connector allows you to receive email messages from a mail server using IMAP. IMAP, the Internet Message Access Protocol, is the prevailing format for email message retrieval, supported by most email servers and clients. IMAP can be a convenient means of interacting with applications that don’t supply more traditional integration mechanisms. An example is a legacy application that generates periodic status emails, but doesn’t offer any sort of programmatic API. Email can, at other times, be a preferred means of application interaction. You may need to programmatically react to email confirmations, for instance. In that case, using an IMAP endpoint is a natural fit.
Table 3.4 lists some of the more common configuration properties of the IMAP transport.[2]
2 POP3 support is also available and functions similarly to the IMAP transport.
Table 3.4. Common configuration properties of the IMAP transport
|
Property |
Type |
Target |
Required |
Default |
Description |
|---|---|---|---|---|---|
| mailboxFolder | String | Connector | No | The IMAP folder to read messages from | |
| backupFolder | String | Connector, inbound endpoint | No | If backupEnabled is true, the directory to back up mail messages to | |
| backupEnabled | Boolean | Connector, inbound endpoint | No | false | Whether or not to store copies of read email messages |
| deleteReadMessages | Boolean | Connector | No | true | Whether or not to delete messages from the mail server once they have been read; if false, the messages are marked as SEEN on the mail server |
| checkFrequency (ms) | Integer | Connector | No | 60000 ms (1 minute) | Interval at which to poll the server for new messages |
Prancing Donkey recently purchased a new cooling system, manufactured by Frozen North Freezing, Inc., for their brewery. The cooling system has a feature that enables it to send an email to a specified address when certain environmental thresholds are exceeded. Prancing Donkey wants to use these emails to drive some ancillary functionality. For instance, they want their maintenance staff to receive SMS messages when these events occur. They also want to push the data into a complex event processing system so they can possibly infer when a catastrophic failure might be imminent. To accomplish this, they’re going to use the IMAP transport in conjunction with a JMS topic and the file transport, as shown in the next listing (see figure 3.14).
Figure 3.14. dispatchCoolingAlerts flow in Mule Studio

Listing 3.18. Dispatch cooling emails to a JMS topic

The all router lets you dispatch the same message to multiple endpoints and will be considered in depth in chapter 5. For now you’ll use it to save an attachment on the email (in this case a PDF of the cooling report) to an archive directory, and then send the content of the email to a JMS topic. Certain transports, like SOAP and HTTP with SOAP, support attachments. When this is the case, you can use the attachments evaluator, like we do in listing 3.18, to gain access to the attachments.
As the requested changes are only allowed on an IMAP connector, you need to explicitly define one ![]() . Set the checkFrequency to an hour (in milliseconds). Since Mule is the only client of this folder, you’re also setting the deleteReadMessages property to true. This will remove messages from the server as they’re read, conserving disk space and making the mail provider happy. Note
the use of the email namespace
. Set the checkFrequency to an hour (in milliseconds). Since Mule is the only client of this folder, you’re also setting the deleteReadMessages property to true. This will remove messages from the server as they’re read, conserving disk space and making the mail provider happy. Note
the use of the email namespace ![]() . The email namespace contains message processors, like the email-to-string transformer you see here, to simplify working with mail messages.
You’ll see more about transformers in chapter 4.
. The email namespace contains message processors, like the email-to-string transformer you see here, to simplify working with mail messages.
You’ll see more about transformers in chapter 4.
Best practice
Be cautious when using the backupFolder and backup-Enabled properties. Mule will create a file for each email message it processes. This can quickly lead to filesystem issues such as inode exhaustion in mail-heavy environments.
Now that you’ve seen a few examples of how to read email messages, let’s see how you can send them using the SMTP transport.
3.5.2. Sending mail using the SMTP transport
The SMTP transport lets you use an outbound endpoint to send email messages. This is useful in a variety of situations. You’ve already seen how Prancing Donkey’s cooling system uses SMTP to send alert data. You’ve also no doubt received automated emails confirming purchases, forum subscriptions, and so on. Sending email is also useful to perform notification of the completion of some long-running process—such as a notification that a backup was successful. Let’s take a look at how to configure SMTP connectors and endpoints.
Table 3.5 lists the common properties for configuring SMTP. In particular, the properties allow you to configure how the headers of the outbound emails are generated.
Table 3.5. Common configuration properties of the SMTP transport
|
Property |
Type |
Target |
Required? |
Description |
|---|---|---|---|---|
| subject | String | Connector, outbound endpoint | No | The default message subject |
| from | String | Connector, outbound endpoint | No | The from address |
| replyToAddresses | String | Connector, outbound endpoint | No | A comma-separated list of reply-to addresses |
| ccAddress | String | Connector, outbound endpoint | No | A comma-separated list of bcc addresses |
Let’s revisit the Arnor Accounting example from earlier in this chapter. If you recall, you modified listing 3.14 to dispatch a JMS message whenever an HTTP callback was received from the Arnor Accounting application. In listing 3.15, you added a subscriber to this topic that would log these events. Let’s add an additional subscriber that sends an email to Prancing Donkey’s accountant to give her a heads-up when expense reports are processed (see figure 3.15).
Figure 3.15. sendExpenseReportEmails flow in Mule Studio

Listing 3.19. Using an SMTP endpoint to send an email

The JMS inbound endpoint configured at ![]() will pick up the notifications as they’re published to the expenses.status topic. The payloads of these messages will be converted to emails and sent through the SMTP outbound endpoint to [email protected].[3]
will pick up the notifications as they’re published to the expenses.status topic. The payloads of these messages will be converted to emails and sent through the SMTP outbound endpoint to [email protected].[3]
3 Since you’re using topics, messages published to expenses.status will arrive for all listeners, including the logging flow from listing 3.15. If you were using queues, then the inbound endpoints would compete for messages. This can be used to horizontally load-balance messages across consumers.
We just looked at how to receive email messages with the IMAP transport and send email messages with the SMTP transport. You saw how to augment the example from the beginning of this chapter to control how messages are downloaded from an IMAP server. You also saw how to use an SMTP endpoint in conjunction with a file endpoint to automatically send emails as new files are created in a directory.
Now that you’re comfortable sending and receiving emails with Mule, let’s turn our attention to a old but venerable transport protocol: FTP.
3.6. Using the FTP transport
If you’ve been involved in anything internet-related for a while, you surely remember the reign of FTP. Before HTTP and SSH, FTP was the de facto way to move files around between computers. While FTP’s popularity has waned in recent years due to the rise of HTTP, SCP, and even BitTorrent, you’ll occasionally encounter an application that necessitates its use.
In this section, we’ll take a look at using the FTP transport to send and receive data. First we’ll look at how you can poll a remote FTP directory. We’ll then show how you can send data to a remote FTP site using an outbound endpoint.
Configuring the FTP transport is similar to configuring an FTP client, as you can see in table 3.6.
Table 3.6. The FTP transport’s configuration, very similar to that of a typical FTP client
|
Property |
Type |
Target |
Required? |
Default |
Description |
|---|---|---|---|---|---|
| pollingFrequency (ms) | long | Connector, inbound endpoint | No | 0 | For inbound endpoints, the frequency at which remote directory should be read |
| outputPattern | String | Connector, outbound endpoint | No | Specify format of files written by outbound endpoints | |
| binary | Boolean | Connector, inbound endpoint, outbound endpoint | No | true | Use binary mode when transferring files |
| passive | Boolean | Connector, inbound endpoint, outbound endpoint | No | true | Use passive mode when transferring files |
| user | String | Connector, inbound endpoint, outbound endpoint | No | The username to use when connecting to remote FTP server | |
| password | String | Inbound endpoint, outbound endpoint | No | The password to use when connecting to remote FTP server | |
| host | String | Inbound endpoint, outbound endpoint | No | The host of remote FTP server | |
| port | int | Inbound endpoint, outbound endpoint | No | 21 | The port of remote FTP server |
3.6.1. Receiving files with inbound FTP endpoints
Certain merchants only support FTP as an integration mechanism to supply sales data to Prancing Donkey. To receive this data, Prancing Donkey is using Mule to poll the remote FTP server and save the data to a filesystem for manual processing later on. The next listing illustrates how they’ve accomplished this (see figure 3.16).
Figure 3.16. retrieveSalesStatistics flow in Mule Studio

Listing 3.20. Polling a remote FTP directory every hour for new files

The inbound endpoint is configured at ![]() . You specify the user, password, host, port, path, and polling frequency for the remote server. The FTP transport will establish
a connection to this endpoint every hour and pass each new file over to the file outbound endpoint defined at
. You specify the user, password, host, port, path, and polling frequency for the remote server. The FTP transport will establish
a connection to this endpoint every hour and pass each new file over to the file outbound endpoint defined at ![]() . The outbound endpoint will write the file to the ./data/sales/statistics directory using the same filename as on the server.
. The outbound endpoint will write the file to the ./data/sales/statistics directory using the same filename as on the server.
Best practice
Always consider using the file transport in conjunction with FTP inbound endpoints. While you can stream FTP data through a flow, issues can arise if the files are large. Some FTP servers, for instance, have aggressive timeouts that can bite you if you’re processing many files as you download them. A better option is to send the FTP files to a file outbound endpoint, and perform your processing from there.
3.6.2. Sending files with outbound FTP endpoints
Sometimes you’ll need to send a file to a remote FTP server. The same retailer as in the last example has requested that Prancing Donkey send a subset of their product catalog periodically via FTP. To facilitate this, Prancing Donkey has set up a shared folder to drop these files into that Mule will poll and periodically send over FTP, illustrated in the next listing (see figure 3.17).
Figure 3.17. ftpProductCatalog flow in Mule Studio
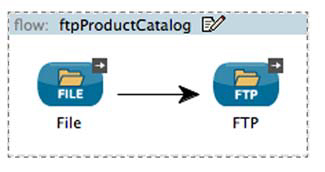
Listing 3.21. Sending a file to a remote FTP server

The file inbound endpoint is configured at ![]() . As files are placed into the ./data/in directory, they’ll be passed to the FTP outbound endpoint
. As files are placed into the ./data/in directory, they’ll be passed to the FTP outbound endpoint ![]() . This will place the file into the /data/prancingdonkey/catalog directory of the FTP server.
. This will place the file into the /data/prancingdonkey/catalog directory of the FTP server.
You just saw how to configure Mule to poll and submit files via FTP. We’ll now take a look at how you can use the JDBC transport to get data into and out of a database.
3.7. Using databases
Databases are, often unfortunately, the implied means of integration between applications. Every mainstream development platform provides rich support for database interaction. Because of this, it’s not uncommon for databases to outlive the applications they were originally implemented to support. If you’re working with an existing Java application, odds are you’re using a database abstraction layer (perhaps implemented with Hibernate or the Spring JDBC template). In that case, it usually makes sense to use these libraries within your components to perform database access. If you’re working with legacy databases or integrating with an application that doesn’t provide native Java access, the JDBC transport is an attractive means of getting data into and out of the database.
A recent trend in database technology dubbed NoSQL offers alternative data solutions that are nonrelational. Such technologies often make use of the prevalence of cloud and distributed computing infrastructures to facilitate easy horizontal scaling and the ability to work with tremendous sets of data.
In this section, we’ll start off by looking at the JDBC transport. First you’ll see how to use a JDBC inbound endpoint to perform queries. Then we’ll take a look at using JDBC outbound endpoints to perform insertions. We’ll then take a look at MongoDB: a document-oriented, NoSQL database.
3.7.1. Using a JDBC inbound endpoint to perform queries
Let’s look at how to configure the JDBC transport. Table 3.7 shows some common configuration properties. The dataSource-ref in particular is important; this is the reference to the configured data source you’ll use to access the database. This is typically configured as a Spring bean or a JNDI reference.
Table 3.7. Configuring the JDBC transport’s dataSource reference, pollingFrequency, and queryKey
|
Property |
Type |
Target |
Required? |
Description |
|---|---|---|---|---|
| dataSource-ref | String | Connector | Yes | The JNDI or bean reference of the dataSource |
| pollingFrequency | long | Connector, inbound endpoint | No | How often the query is executed |
| queryKey | String | Connector, inbound endpoint, outbound endpoint | No | Specify the query to use (see how to define queries ahead) |
You’ll use the JDBC inbound endpoint to perform queries against a database. This will generate data you can pass to components and outbound endpoints. Let’s see how this works.
Prancing Donkey uses MySQL as the database for their web store. Web orders fulfillment goes through a third-party fulfillment service. Prancing Donkey periodically polls this service’s API and updates their MySQL database with the status of the order. Sometimes orders don’t get fulfilled in a timely fashion. When this happens, someone from Prancing Donkey needs to get in touch with the fulfillment service and figure out why the order is stuck. To alert Prancing Donkey operations when this happens, they’ve implemented a Mule flow that polls the database for orders that have been unfulfilled for more than a day, and then sends an alert to a JMS topic, as illustrated in this listing (see figure 3.18).
Figure 3.18. pollForStuckOrders flow in Mule Studio

Listing 3.22. Querying a table every hour and sending the results to a JMS topic

We’ll start by examining ![]() . This configures a Spring datasource with the details of the MySQL database read from a properties file. You reference this
datasource on the JDBC connector defined at
. This configures a Spring datasource with the details of the MySQL database read from a properties file. You reference this
datasource on the JDBC connector defined at ![]() . The actual query used is defined at
. The actual query used is defined at ![]() . If you look closely, you’ll notice you’re escaping out the less-than sign in the query to avoid XML parsing issues when
Mule starts up. This query will return a row for every stuck order inserted into the database in the last hour. Each member
of the result set will be sent as an individual message to the JMS topic.
. If you look closely, you’ll notice you’re escaping out the less-than sign in the query to avoid XML parsing issues when
Mule starts up. This query will return a row for every stuck order inserted into the database in the last hour. Each member
of the result set will be sent as an individual message to the JMS topic.
The payloads of the messages are java.util.Map instances. The Map representations can be transformed to other object types, like POJOs or XML, using transformers that we’ll cover in chapter 4. The map’s keys are the column names of the result set. The key values are the row values for each result.
Let’s see how you can insert rows into a database with a JDBC outbound endpoint.
3.7.2. Using a JDBC outbound endpoint to perform insertions
The JDBC transport allows you to insert rows into a table using an outbound endpoint. Recall that listing 3.21 used an FTP outbound endpoint to send product data to a retailer. Let’s modify this flow to additionally insert the product data into the database. This will give Prancing Donkey a single point of entry from which to load product data from the filesystem.
Listing 3.23. Using a JDBC outbound endpoint to insert rows into a table
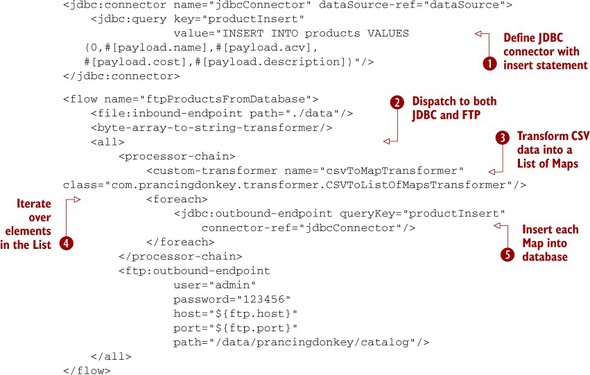
You define your insert statement at ![]() . This is expecting a Map payload, which you reference by key with MEL. An all router is being used at
. This is expecting a Map payload, which you reference by key with MEL. An all router is being used at ![]() to dispatch the product data to both the JDBC outbound endpoint and the FTP outbound endpoint. We’ll discuss routing further
in chapter 5. The product data is in CSV format, so you have to reference a transformer
to dispatch the product data to both the JDBC outbound endpoint and the FTP outbound endpoint. We’ll discuss routing further
in chapter 5. The product data is in CSV format, so you have to reference a transformer ![]() to convert the CSV to a List of Map instances. We’ll discuss transformers in depth in chapter 4. The foreach message processor, which we’ll discuss in depth in chapter 5, iterates over each element of the list
to convert the CSV to a List of Map instances. We’ll discuss transformers in depth in chapter 4. The foreach message processor, which we’ll discuss in depth in chapter 5, iterates over each element of the list ![]() and invokes the JDBC outbound endpoint to insert each Map using the query defined at
and invokes the JDBC outbound endpoint to insert each Map using the query defined at ![]() .
.
Batch inserts
Mule Enterprise Edition allows you to batch database operations. If you were using the EE version of the JDBC transport, then you could simply pass the List of Maps to the JDBC endpoint. The entire list would be inserted in a single batch, and you could avoid having to use the foreach processor. This also allows you to perform the insert within a single transaction.
Now that you’re comfortable retrieving and inserting data with a relational database, let’s take a look at MongoDB.
3.7.3. NoSQL with MongoDB
MongoDB is a leading NoSQL database. It exposes data as JSON documents in collections, and also uses JSON for querying. MongoDB makes it easy to achieve horizontal scalability on commodity or cloud infrastructures. In addition to its facilities as a document store, MongoDB also offers a solution for distributed file storage via GridFS. In this section, we’ll look at the MongoDB connector for Mule. You’ll see how to insert documents into collections as well as how to execute a query against a collection over HTTP.
The MuleSoft Connectors Library
A wealth of community-contributed extensions for Mule are available from the MuleSoft Connectors Library: www.mulesoft.org/connectors. In chapter 13, you’ll see how Mule’s DevKit will enable you to author your own extensions to Mule.
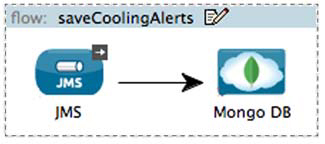
Let’s start by implementing another subscriber to the cooling.alerts topic. The following listing illustrates how Prancing Donkey stores their cooling alert data in a MongoDB collection (see figure 3.19).
Figure 3.19. saveCoolingAlerts flow in Mule Studio
Listing 3.24. Save cooling alerts to a MongoDB collection

You might notice that the MongoDB operations look a lot different from the inbound/outbound endpoint configurations we’ve been working with so far in this chapter. This is because MongoDB support in Mule is implemented as a cloud connector, which we discussed at the beginning of this chapter. These differ from transports in that they expose the individual methods of an API rather than a messaging channel to get data into and out of flows.
Because the MongoDB cloud connector exposes the methods of the MongoDB Java driver, you need to ensure your message payload is in a format that API expects. For this case, you need to use the json-to-dbobject transformer to convert the JSON payload to an instance of com.mongodb.DBObject before you can invoke the insert-object message processor. Now let’s see how you can query documents in a MongoDB collection (see figure 3.20).
The following listing defines a flow that allows a user to supply a JSON query in a URL to receive back the matching documents from the configured MongoDB collection (see figure 3.20).
Figure 3.20. queryCoolingAlerts flow in Mule Studio

Listing 3.25. Query a MongoDB collection over HTTP

The HTTP inbound endpoint ![]() allows a client to submit queries to return a set of documents from the cooling_alerts collection encoded as JSON. A wealth of other operations are available from the Mule MongoDB module. The full listing can
be found here: www.mulesoft.org/muleforge/mongodb-connector.
allows a client to submit queries to return a set of documents from the cooling_alerts collection encoded as JSON. A wealth of other operations are available from the Mule MongoDB module. The full listing can
be found here: www.mulesoft.org/muleforge/mongodb-connector.
You saw in this section how databases, both relational and NoSQL, can be used with Mule. We demonstrated how the JDBC transport can be used as a message source, allowing you to repeatedly generate Mule messages from database queries. You also saw how to insert data into tables using a JDBC outbound endpoint. Finally, we looked at how to insert and query documents in MongoDB, an attractive NoSQL contender.
Let’s now switch gears and take a look at a slightly different sort of transport: the VM transport.
3.8. Using the VM transport
The VM transport is a special kind of transport that you’ll use to send messages inside the JVM in which the Mule instance is running. Messages sent over VM endpoints can be made transactional and persisted to disk. This enables you to layer-in reliability and decouple your flows without the need for an external messaging broker. We’ll take a look at how to do that in this section. We’ll revisit implementing reliability patterns with the VM transport in chapter 9, when we discuss Mule’s support for transactions.
Table 3.8 shows some of the properties you can set for the VM transport.
Table 3.8. Configuring the VM transport
|
Property |
Type |
Target |
Required? |
Description |
|---|---|---|---|---|
| path | String | Endpoint | Yes | The name of the VM queue |
| queueTimeout | long | Connector | No | How often queued messages are expunged |
3.8.1. Introducing reliability with the VM transport
You saw in listing 3.2 how Prancing Donkey posts expense reports to a URL provided by Arnor Accounting. The approach they came up with read expense reports off a shared directory in the filesystem and subsequently posted the spreadsheet to the URL. Since neither the filesystem nor HTTP are transactional resources, however, a failure in either operation could result in a lost expense report. As such, let’s take the first step in making this flow reliable by decoupling each endpoint with VM endpoints, illustrated in the following listing (see figure 3.21).
Figure 3.21. VM flows in Mule Studio

Listing 3.26. Using VM endpoints to implement reliability patterns

This approach is analogous to using a JMS queue to decouple the flows. The benefit here is that you don’t incur the administrative and performance overheads of running a JMS broker to reap the benefits of durable, asynchronous messaging. The message being passed over the expenses queue will be persisted to disk, so in the event of a Mule shutdown or failure it will still be delivered to the HTTP outbound endpoint. In chapter 9 you’ll see how to make the dispatch and reception of the message transaction, facilitating true reliability between both flows.
VM queues and flows
Using VM queues was a common way to compose services together in Mule 2. The introduction of flows in Mule 3 and their supporting functionality, like flow refs and subflows, makes the use of the VM transport less useful in this context. They do, however, provide a foundation for reliability patterns, which we’ll discuss in chapter 7.
The characteristics of how the VM transport stores its messages can be configured by defining the queue profile as a child of a VM connector. Some properties of the queue store are shown in table 3.9.
Table 3.9. Configuring a queue store for the VM transport
|
Property |
Type |
Target |
Description |
|---|---|---|---|
| persistent | Boolean | queue-profile | Whether or not messages are persisted to disk; default is true true |
| maxOutstandingMessages | long | queue-profile | The maximum number of undelivered messages to keep on the queue |
Listing 3.27 demonstrates a queue profile configuration that turns off persistence (all messages kept in memory) and limits the number of messages to 1000. Turning off persistence can be useful if you can tolerate message loss and are interested in maximizing throughput over the VM queues.
VM transport exchange patterns
The VM transport supports the request-response exchange pattern and behaves much like the JMS transport in this respect.
Listing 3.27. Explicitly configuring a VM queue profile

The VM transport will deliver messages as fast as it gets them, which can be considerably faster than JMS. Keep this in mind
when you tune your flows and components; it’s very easy to overload a flow with VM queues. The maxOutstandingMessages attribute ![]() tells the VM transport to buffer up to 1000 messages if they’re arriving too quickly to be processed by the flow on demand.
Messages arriving after the buffer has been filled will be lost. We’ll discuss tuning in detail in chapter 11.
tells the VM transport to buffer up to 1000 messages if they’re arriving too quickly to be processed by the flow on demand.
Messages arriving after the buffer has been filled will be lost. We’ll discuss tuning in detail in chapter 11.
Using the VM transport gives you some of the benefits of decoupling middleware without the overhead of administering a broker. You saw in this section how the VM transport facilitates the implementation of reliability patterns—techniques you can use to make unreliable transports, like file or HTTP, reliable. You also saw how to configure VM queue stores, which let you override the default queuing and persistence behaviors of the VM transport.
Now that you’ve seen a solid selection of Mule’s transports and connectors, we’ll take a look at a special kind of connector, the cloud connector, which facilitates API integration.
3.9. Using the Twitter cloud connector
The API explosion of recent years is probably evident to most readers of this book. It’s become the exception for applications, of almost every variety, to not offer some kind of public API to facilitate external integration. This is great in principle, but in practice it introduces the same challenges we discussed at the beginning of this chapter. Even when strict standards are adopted, like SOAP, client code still needs to be either generated or written before the APIs can be consumed. Then, of course, the developers are forced to deal with the inevitable bugs, tuning, peculiarities, and so on that come with each API.
Mule’s cloud connectors attempt to solve these problems by offering prepackaged integration with various APIs that integrate fully with Mule’s XML configuration as well as Mule Studio. As of this writing, cloud connectors currently exist for Facebook, SAP, Twitter, Salesforce, Twilio, and eBay. Let’s take a look at how Prancing Donkey uses the Twitter cloud connector to help in its marketing activities.
3.9.1. Twitter
It’s hard for anyone to be unaware of the success of Twitter, the immensely popular microblogging service. Prancing Donkey, like most companies, makes extensive use of Twitter as part of its marketing strategy. They’ve gone as far as automating some of their status updates, including publishing their new brews as they’re added to the system. The next listing illustrates how they do this (see figure 3.22).
Figure 3.22. tweetNewBrews flow in Mule Studio

Getting Consumer Keys
Before you can use the Twitter connector, you’ll need to register your forthcoming Mule application to obtain consumer keys. Apps can be registered via https://dev.twitter.com. Note that you’ll need a Twitter account to register an application.
Listing 3.28. Publishing Twitter status updates from a JMS topic

This flow subscribes to the JMS topic brews.new and uses the message payload, which is a Map in this case, to update prancingdonkey’s Twitter status. The Twitter connector exposes most methods of the Twitter API. The following example illustrates how to subscribe to a subset of the Twitter public status updates (see figure 3.23). Some of Prancing Donkey’s more ambitious marketing personnel might use this to gauge public sentiment prior to launching a new brew.
Figure 3.23. samplePublicStatusUpdates flow in Mule Studio

Listing 3.29. Sampling the Twitter public status update stream

This listing uses the Quartz transport, which we’ll cover in depth in chapter 14, to generate an event every minute. This event will trigger the Twitter get-public-timeline message processor, which will return a collection of status updates. You pass this to a collection splitter, which we’ll cover in chapter 5, which splits the collection into individual messages. Each of these is subsequently sent to the JMS topic tweets for consumption by interested parties.
3.10. Summary
In this chapter, you’ve seen how you (and Prancing Donkey) can use Mule’s transports and cloud connectors to move data between applications. You’ve become familiar with connectors and endpoints, which provide a common abstraction for working with disparate communication protocols. You’ve seen how they allow you to focus on solving integration problems and letting Mule handle the underlying plumbing.
While transport functionality is critical, moving data into and out of Mule is only one piece of the integration puzzle. In the next chapter, you’ll see how to use Mule’s transformation capabilities to convert data coming from endpoints to different formats.