
Chapter 8. Deploying Mule
This chapter covers
- Deploying standalone Mule applications
- Deploying Mule to a web container
- Embedding Mule into an existing application
- Deploying Mule for high availability
You may have reached this chapter following the natural order of the book: you’ve learned how to configure Mule and have seen a few samples running. At this point, you might be wondering how to move from a “works on my machine” situation to a “Mule running in production” one.
You may also have directly jumped to this chapter because your main concern is to figure out if and how Mule will fit into your IT landscape. You may have concerns about what you will end up handing off to your production team. They may have operational or skill constraints that you must absolutely comply with. You might also be wondering about the different deployment topologies Mule can support.
In the upcoming sections, you’ll come to realize that Mule is incredibly flexible and can adapt to your needs. In this respect, Mule differs from many of its competitors, which often mandate a specific way of doing each of these deployment-related activities. This diversity of choice can be overwhelming at first, but you’ll soon realize that your needs and constraints will guide you in picking what’s best for your project. At that point, you’ll be glad that Mule is such a versatile platform.
If you’ve already dealt with other ESBs, you probably had to use an installer of some sort in order to deploy the ESB application. After that, the ESB was ready to be configured, either via a GUI or by directly creating configuration files.
Mule differs from this shrink-wrapped-application approach because of its dual nature. Mule is a lightweight messaging framework and a highly distributable object broker,[1] which means that it supports more deployment strategies and greater flexibility than a traditional ESB does. As an object broker, Mule can be installed as a standalone server pretty much like any application server. As a messaging framework, Mule is also available as a set of libraries[2] that you can use in any kind of Java application.
1 Don’t confuse messaging framework (Mule, Camel, Spring Integration) with messaging middleware (HornetQ, RabbitMQ).
2 More specifically, a set of Maven artifacts.
This flexibility leaves you with a choice to make as far as the runtime environment of your Mule project is concerned. Like most choices, you’ll have to base your decision on your needs and constraints. For example, you might need to connect to local-only services in a particular server, or the standard production environment in use in your company might constrain you to a particular web container.
No strings attached
Deciding on one deployment strategy doesn’t lock you into it. With a few variations in some transports, such as the HTTP one, there’s no absolute hindrance that would prevent you from migrating from one deployment strategy to another.
In the following sections, we’ll detail the five different deployment strategies that are possible with Mule and present you with their pros and cons. You’ll discover that Mule is a contortionist capable of extremes such as running as a standalone server or being embedded in a Swing application. This knowledge will allow you to make an informed decision when it’s time to decide which deployment strategy you’ll follow.
8.1. Deploying standalone Mule applications
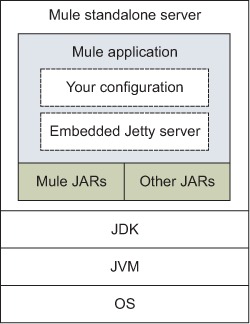
The most simple (yet still powerful) way to run Mule is to install it as a standalone server. This is achieved by downloading the complete distribution and following the detailed installation instructions available on the MuleSoft website (www.mulesoft.org/documentation/ display/MULE3INSTALL/). When deployed this way, Mule relies on the Java Service Wrapper from Tanuki Software to control its execution. Figure 8.1 shows a conceptual representation of this deployment model.
Figure 8.1. Conceptual deployment model of Mule standalone server

The wrapper is a comprehensive configuration and control framework for Java applications. By using it, Mule can be deployed as a daemon on Unix-family operating systems or as a service on Microsoft Windows. The wrapper is a production-grade running environment: It can tell the difference between a clean shutdown and a crash of the Java application it controls. If the application has died in an unexpected manner, the wrapper will restart it automatically.
The following is the command line supported by the wrapper:
mule [console|start|stop|restart|status|dump] [-app appName]
If no particular action is specified, console is assumed; the instance will be bound to the terminal from which it’s been launched. If no application name is specified, Mule will start every single application located in the apps directory. The startup script supports several other optional parameters including -debug (to activate the JVM’s remote debugging; see section 12.5) and -profile (to enable YourKit profiling; see chapter 11).
The mule command line supports the standard System V commands. If your Unix init daemon is compatible with System V, and the odds are definitely in your favor, you can symlink the Mule startup script in /etc/init.d and use it as any other System V service. Follow your Unix distribution manual for more information on how to install services, or refer to the Java Service Wrapper site (http://wrapper.tanukisoftware.com/doc/english/launch.html).
If you’re using Windows instead, the commands mule install and mule remove will install and uninstall Mule as a Windows service.
Often you’ll need to pass some parameters to your Mule configuration by using Java system properties (for example, to provide values for properties placeholders in your configuration file). Because of the wrapping nature of the wrapper, the system properties you’ll try to set with the classic -Dkey=value construct will be applied on the wrapper itself. They won’t be set on the Mule instance that’s wrapped. The solution is to use a specific construct such as this one: -M-Dkey=value. For example, the following code will set the key=value system property on the Mule instance:
mule [-app appName] -M-Dkey=value
The Java Service Wrapper, and therefore Mule, has a configuration file in conf/wrapper.conf that contains the information necessary to launch a JVM instance and the different wrapper configuration properties. To learn more about the contents of this file, you can refer to the Tanuki Software Wrapper site (http://wrapper.tanukisoftware.com/doc/english/properties.html). Using an approach similar to the one you learned before, you can pass configuration properties to the wrapper by using the Wkey=value construct. The key/value pair passed is equivalent to appending a line at the end of the conf/wrapper.conf file, following the same rules and semantics:
mule [-app appName] -W-Dkey=value
Figure 8.2 presents the structure created after the installation of Mule’s complete distribution. The top-level structure presents no particular surprise. For example, bin is where to go to find the control scripts for the different operating systems, as expected. We’ve expanded the lib subdirectory so you can see the structure in which the different types of libraries Mule depends on are stored.
Figure 8.2. Directory structure of Mule standalone server
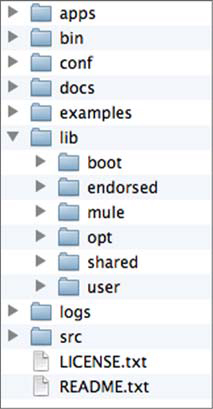
There are three notable directories here. The user directory is the first one. This is where you can drop any extra library you’d like Mule to be able to use. Common libraries that could be deployed here are JDBC and JMS drivers. The lib/user directory is also the destination for patches, as its content is loaded before what’s in the mule directory. Last but not least we have the apps directory, which is where Mule applications should be deployed. We’ll study how to deploy to this directory in section 8.1.2.[3]
3 Mule needs to be restarted to pick up any JAR that you would drop in this directory.
The other outstanding directory is shared. When sharing common libraries between applications, it’s not uncommon to find that you need to have two different versions of the same library for two different groups of applications. You can have two different domains and place the common libraries in the corresponding shared library directory. Each domain will correspond to a subdirectory of shared named with the domain name. The reasoning behind this behavior is described shortly in the sidebar, “The hierarchical classloader.” You’ll learn how to assign the domain of an application in the next section.
In a production environment, there’s a slight drawback to dropping your own libraries in the user directory. By doing so, you make it harder for your operation team to switch between Mule versions, as they’ll have to do some tweaking of the server to deploy your libraries. If you run several differently configured Mule instances in the same server, the problem might even become more acute: different instances might have different, if not conflicting, libraries.
If you’re placing common dependencies in lib/user, those dependencies will be automatically present on the deployed application’s classpath. Those libraries therefore should be considered as provided in the dependency management system of your Mule applications. For instance, if you place the hornetq-jms-client library in lib/user and you’re using Maven, you should mark the scope as follows:
<dependency>
    <groupId>org.hornetq</groupId>
    <artifactId>hornetq-jms-client</artifactId>
    <version>2.2.21.Final</version>
    <scope>provided</scope>
</dependency>
Mule has a hierarchy of classloaders, similar to what you can find in most application containers, to allow different library domains and each of the deployed Mule applications to have access to different classes and resources.
Classloaders are responsible for locating class containers and libraries, gathering their contents, and loading the contained classes. Classloaders are distributed in a hierarchical tree. When a class is requested to a classloader, it usually will delegate to its parent. This’ll happen recursively until the root classloader is reached. A classloader will only try to load a class locally when its corresponding parent can’t find the class.
At Mule’s startup, a hierarchy of classloaders is created with the distribution in figure 8.3. The Java bootstrap classloader will load the classes present in the JDK. Its child, the Mule system classloader, is responsible for the libraries placed in lib/mule and lib/opt.
Figure 8.3. The Mule’s hierarchy of classloaders

Continuing down, the shared domain classloader will load the libraries present in each of the domains used in the applications; in the case shown in the figure, lib/ shared/default and lib/shared/custom. Finally the application classloader will load the libraries and plugins bundled with each application.
Table 8.1 recaps the pros and cons of the standalone server deployment option.
Table 8.1. Pros and cons of the standalone server deployment option
|
Pros |
Cons |
|---|---|
| Install a standard Mule distribution, and you’re ready to go. | Can be an unfamiliar new piece of software for operations. |
| Proven and solid standalone, thanks to the wrapper. | Must take care of file and directories organization. |
| Well suited for ESB-style deployment. | Not suited for a “Mule as a messaging framework” approach. |
| Direct support for patch installation. | Resources such as JDBC connection pools aren’t shared across applications. |
Now you know the structure of a Mule standalone server. Let’s now look at how to package a Mule application to be deployed inside one.
8.1.1. Packaging a standalone Mule app
In chapter 1, we went through the creation process of a Mule project using Maven. The last thing we did was export the application as a ZIP file. Now let’s focus on the format of that Mule application deployment unit.
A Mule application can be deployed either as a ZIP file or as a regular directory that will contain exactly the same contents a Mule app ZIP file would contain, but exploded. You’re probably used to this behavior if you’ve ever deployed artifacts to containers such as Tomcat or JBoss. Let’s visit the structure of a Mule application deployment unit in the following listing.
Listing 8.1. Directory structure of an application that uses the Mule standalone server

Typically the classes directory ![]() will contain resources of the application that aren’t packaged as part of the JAR files, such as secondary Mule config files,
logging configuration files, and application properties files. The lib directory
will contain resources of the application that aren’t packaged as part of the JAR files, such as secondary Mule config files,
logging configuration files, and application properties files. The lib directory ![]() instead contains the JAR libraries used by the Mule application. The mule-config.xml file
instead contains the JAR libraries used by the Mule application. The mule-config.xml file ![]() is the principal configuration file and entry point of the Mule application; usually from here you’ll include other Mule
configuration files present in the classes directory.
is the principal configuration file and entry point of the Mule application; usually from here you’ll include other Mule
configuration files present in the classes directory.
The mule-app.properties file ![]() is a standard properties file used to modify Mule’s registry. We won’t work with the registry until section 12.1; at the moment you need to understand that the pairs of values present in the properties file will be inserted into the Mule
registry.
is a standard properties file used to modify Mule’s registry. We won’t work with the registry until section 12.1; at the moment you need to understand that the pairs of values present in the properties file will be inserted into the Mule
registry.
Finally, the mule-deploy.properties file ![]() , also known as Mule’s deployment descriptor, is a standard properties file used to control how a Mule application should
be deployed, configuring, for instance, whether hot redeployment should be enabled or which packages should be scanned for
annotations. Let’s review the more relevant configuration properties it supports:
, also known as Mule’s deployment descriptor, is a standard properties file used to control how a Mule application should
be deployed, configuring, for instance, whether hot redeployment should be enabled or which packages should be scanned for
annotations. Let’s review the more relevant configuration properties it supports:
- domain— Default value is default. Domain is used to load shared libraries in $MULE_HOME/lib/shared/domain, where domain is the value passed into the configuration property.
- config.resources— Default value is mule-config.xml. There’s a comma-separated list of configuration files for this application. It’s common to use this configuration property to avoid the use of imports in mule-config.xml.
- redeployment.enabled— Default value is true. When activated, the mule-config.xml file or the files passed into config.resources will be monitored for changes to trigger a redeployment.
- encoding— Default value is UTF-8. It sets the default encoding for this Mule application. This is important for string-related transformers, as you learned in chapter 4, in our discussion of transformers and encoding.
- scan.packages— Empty by default. Before Mule 3.1, the whole classpath was scanned for annotations. If you use annotations that need to be scanned, you can use this comma-separated list of packages.
Now that you understand the format of the Mule application deployment unit, we can jump to the creation of one unit. The building process will depend on how you’re building your application. To build a unit using a Maven project created with a Mule Maven archetype, you need to execute the following command in the directory containing the Project Object Model (pom.xml):
mvn package
This’ll trigger the packaging of the application into a ZIP file. You’ll find this file in the target directory with the name of the project as the filename and zip as the extension:
[INFO] Building zip: /Users/mia/product-registration-application
/target/productregistrationapplication-1.0-SNAPSHOT.zip
[INFO] --------------------------------------------------------------
[INFO] BUILD SUCCESS
[INFO] --------------------------------------------------------------
[INFO] Total time: 15.866s
[INFO] Finished at: Sat Dec 29 13:51:08 CET 2012
[INFO] Final Memory: 8M/81M
[INFO] --------------------------------------------------------------
If you’ve chosen to use the Mule Studio to drive your application build process, to create a Mule application deployment unit for your project you should, from the Mule perspective, right-click the project name in the package explorer pane, and then select Export.... From the export destination dialog, select Mule and then Mule Studio Project to Mule Deployable Archive (Includes Studio Metadata), as shown in figure 8.4.
Figure 8.4. Export dialog of Mule Studio

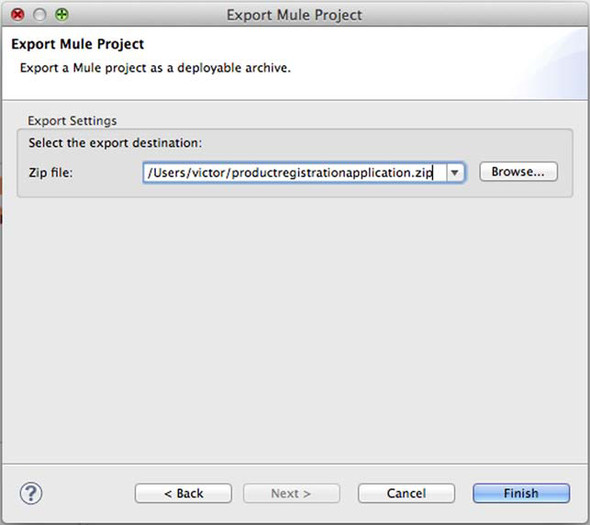
Click the Next button and you’ll find a dialog requesting the export file destination, in which you should type or browse to the desired destination file path, as shown in figure 8.5. Once you click Finish, the file will be created.
Figure 8.5. Export Mule Project dialog of Mule Studio
You’ve learned how to create a Mule application deployment unit; now it’s time to learn how to deploy your application in a Mule standalone server.
8.1.2. Deploying applications to Mule
Mule applications can be deployed by copying either the zipped or exploded deployment unit into the apps directory of the Mule distribution. This mechanism is similar to the deployment method of the most popular application containers that have their own webapps or apps directory.
At Mule’s startup, if the application was zipped, it’ll be uncompressed into a directory with the same name as the ZIP file minus the extension. The original ZIP file will also be removed. Again, this is similar to what other containers do; for instance, Tomcat behaves almost identically with its WAR files.
Right before starting the deployment, Mule will create an anchor file. This file is monitored by Mule to trigger a clean shutdown when deleted. To undeploy an application, you should remove this anchor file. After a few seconds, Mule will undeploy the application and completely remove the application directory. This method will prevent any interference with the hot deployment system and any potential problems with file locking or missing resources.
A correct Mule application deployment will follow these steps:
1. If the Mule application is a ZIP file, uncompress the application deployment unit into a directory named the same way as the file minus the extension; that is, the productregistrationapplication.zip file will become the productregistrationapplication directory.
2. If a Mule application is a ZIP file, delete the ZIP file.
3. Create the anchor file, appending -anchor.txt to the directory name.
4. Run the application.
In the next section, you’ll learn how to configure the logs. But at this point it’s useful to note that only the fourth point is logged to your application log file, that is, logs/ productregistrationapplication.log, whereas all four are logged to the general Mule log file, logs/mule.log. If there’s some kind of problem before the application starts, you might need to take a look at the general log file instead of the application-specific one.
Mule applications can be hot deployed. This means that any deployment or redeployment can be made with the server running instead of requiring a container restart. Thanks to the hot deployment feature of Mule, you can do these things:
- Automatically deploy exploded or ZIP-compressed Mule applications placed in the apps directory
- Redeploy applications when an updated ZIP-compressed Mule application is deployed in the apps directory
- Redeploy exploded applications when the mule-config.xml file or the first entry of the list of resources specified in the mule-deploy.properties file as config.resources is updated
Therefore, the procedure to hot deploy applications to Mule is the same as normal deployment, but with Mule running. In addition, Mule will monitor the mule-config.xml file and the first config.resources entry in the mule-deploy.properties file for changes, and will redeploy the application if there are any modifications.
Once you’re able to deploy your application, you’ll need to properly configure the logging so that you can monitor the proper functioning of your application and the Mule standalone server itself. Let’s configure the logs in the next section.
8.1.3. Configuring logs
We’ve spent a lot of time discussing different ways to deal with errors that crop up in Mule deployments. One of the most common ways you’ll deal with errors and other diagnostic events, however, is by logging them. Mule uses the SLF4J logging facade (http://www.slf4j.org/) to allow you to plug and play logging facilities into Mule. By default, Mule ships with the popular log4j logging library, which SLF4J will use without any intervention on your part. You’ll see later how you can change this behavior to allow Mule to use other logging implementations such as java.util.logging. Let’s start off by looking at how logging works in a freshly installed, standalone Mule instance.
Mule uses log4j as its default logging implementation. Log4j is a robust logging facility that is commonly used in many Java applications. Full documentation for using log4j is available on the project’s website at http://logging.apache.org/log4j/. Mule provides a default log4j configuration in the $MULE_HOME/conf/log4j.properties file. The following listing shows the default log4j.properties file.
Listing 8.2. The default log4j.properties file

If you’ve ever worked with log4j, this should seem familiar to you. Log4j supports the concept of log levels for packages.
The log levels available are DEBUG, INFO, WARN, ERROR, and FAIL, in ascending order of severity. The default log level is
specified at ![]() , which is logging messages of level INFO to the console. The format of the log output is specified at
, which is logging messages of level INFO to the console. The format of the log output is specified at ![]() . You can tweak this to customize how logging is output (see the log4j documentation for more information on how to do this).
The log definitions on a per-package basis start at
. You can tweak this to customize how logging is output (see the log4j documentation for more information on how to do this).
The log definitions on a per-package basis start at ![]() , where the libraries for the org.apache project (which are used extensively by Mule and Spring) are set at a logging level
of WARN. The logging level for the Mule packages is specified next
, where the libraries for the org.apache project (which are used extensively by Mule and Spring) are set at a logging level
of WARN. The logging level for the Mule packages is specified next ![]() . The default level is INFO, but you’ll soon find it’s convenient to set this to DEBUG for troubleshooting and general insight
into how Mule is behaving. Finally, you can change com.mycompany to your company’s package prefix in order to set the debugging
level for your custom components, transformers, routers, and so on. For instance, in order to set DEBUG logging for Prancing
Donkey’s custom classes, you’d change
. The default level is INFO, but you’ll soon find it’s convenient to set this to DEBUG for troubleshooting and general insight
into how Mule is behaving. Finally, you can change com.mycompany to your company’s package prefix in order to set the debugging
level for your custom components, transformers, routers, and so on. For instance, in order to set DEBUG logging for Prancing
Donkey’s custom classes, you’d change ![]() to this:
to this:
log4j.logger.com.prancingdonkey=DEBUG
By default, Mule will write one general log file, mule.log, with all the container-level information, and one more file per application named with the application name plus the log extension. These files are located in $MULE_HOME/logs. You can change this location by editing the wrapper.logfile variable in $MULE_HOME/conf/wrapper.conf. Mule will write 1 MB worth of data to the log files before automatically rotating them. It will archive up to 10 rotations with the stock configuration. This behavior is configured in wrapper.conf as well, by tuning the wrapper.logfile.maxsize and wrapper.logfile.maxfiles variables.
You occasionally need to gather debugging information from log4j itself. This can be accomplished by setting the log4j.debug property. Do this by appending the string -M-Dlog4j.debug to the end of the command to launch Mule. Here’s what it looks like:
mule -M-Dlog4j.debug
Now that you’ve seen how to configure log4j and SLF4J, you’ve reached the point at which you can completely deploy and review the execution of your Mule applications. A Mule standalone server usually contains more than one Mule application, and it’s a matter of time until you need some kind of inter-application communication. Let’s take a look at how you can perform this in the next section.
Using a different logger
You might want to use a logger other than log4j with Mule. This is an easy task provided you’re using a logging implementation supported by SLF4J. SLF4J supports JDK 1.4 logging, Logback, and the Apache Commons Logging project. Download the SLF4J implementation your version of Mule is using, and place the appropriate SLF4J bridge in $MULE_HOME/lib/user. On your next restart, Mule should be logging using the new implementation.
8.1.4. Inter-application communication with Mule
When deploying multiple Mule applications to a single Mule standalone server, it’s a common pitfall to believe that Mule applications are somehow connected because they reside on the same server. The reality is the opposite of the common perception; Mule does its best to keep the applications isolated as much as possible, such as by using a different classloader for each application (as you learned earlier).
Thanks to this behavior, Mule applications hide their internals and are forced to communicate through well-defined transports. Among other benefits, this lets Mule applications be deployed, undeployed, started, or stopped independently without affecting other apps; they can also be used in a cluster or on a single server without making any changes related to interactions with other apps. It also allows for different versions of dependencies without inducing classpath hell (see http://en.wikipedia.org/wiki/Classloader#JAR_hell).
The “VM” part of VM transport mistakenly suggests virtual machine. Given that many Mule applications can run in the same Mule standalone server, and therefore in the same Java Virtual Machine, you may think that you can use VM endpoints to communicate with applications in the same server. But you would be wrong.
The VM transport is an in-memory transport, and therefore each application has a different set of VM endpoints that are completely local to that application.
If Mule works hard to make your different apps as isolated as possible, how should you implement inter-application communication? You’ll have to treat these communications as if they were communications between applications running on different servers. You could use any Mule transport suitable for communication with external services, as you learned in chapter 3.
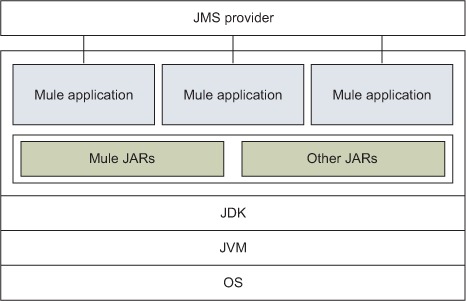
Some of the more common approaches to communicating between Mule applications include using an external message broker such as a JMS server, as you can see in figure 8.6, and using protocol formats such as XML, JSON, or the Google protocol buffers. Let’s see how you can use these approaches for your purposes.
Figure 8.6. Mule applications communicating using JMS
You may remember we created a shipping cost calculator in section 6.1.7. We exposed it using a VM endpoint. The VM transport isn’t suitable to perform inter-application communications, but you want to be able to call this service from other applications. In order to do so, you’ll expose it in a JMS queue using XML. You can find the new shipping cost calculator flow in the next listing.
Listing 8.3. Flow exporting a service for inter-application communication
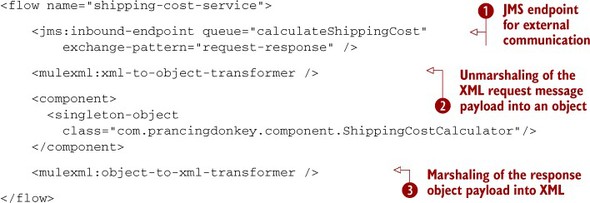
You’ve moved from the service in section 6.1.7 that accepts POJOs to the new service in listing 8.3 that works with XML and JMS. The outstanding points in this evolution are therefore the inclusion of XStream marshalers (![]() and
and ![]() ) and the use of a JMS inbound endpoint instead of the VM inbound endpoint
) and the use of a JMS inbound endpoint instead of the VM inbound endpoint ![]() . The JMS endpoints won’t work with object references because the messages are intended to be sent to different virtual machines.
Therefore the marshalers allow you to communicate using XML messages instead of Java object references.
. The JMS endpoints won’t work with object references because the messages are intended to be sent to different virtual machines.
Therefore the marshalers allow you to communicate using XML messages instead of Java object references.
At this point, you can use the calculate shipping cost service from a different flow. You know you have to send a message
to the JMS queue defined at ![]() , using the XML format defined by a shared class. In the following listing, let’s call the service from a different Mule application
to retrieve the shipping cost of a purchase.
, using the XML format defined by a shared class. In the following listing, let’s call the service from a different Mule application
to retrieve the shipping cost of a purchase.
Listing 8.4. Flow requesting information in an inter-application communication

You start from a payload with an object that represents a shipping cost calculator service request. In practice, this is an
instance of a class that can be marshaled using XStream, as you may recall from chapter 4. This object is marshaled into XML before you send it ![]() . Then the request is performed using a JMS outbound endpoint
. Then the request is performed using a JMS outbound endpoint ![]() . This will return an XML response. You’ll want to transform this response back into an object to continue your work. You
do this transformation at
. This will return an XML response. You’ll want to transform this response back into an object to continue your work. You
do this transformation at ![]() , doing the inverse of what you did before, transforming an XML payload into an object.
, doing the inverse of what you did before, transforming an XML payload into an object.
In this section, you’ve learned how to use the techniques you already visited in chapters 3 and 4, with a special emphasis on how to use them for inter-application communication. You also learned you shouldn’t use local transports like the VM transport for this kind of communication. Now let’s see how a Mule application can also be a web application container using Jetty.
8.1.5. Embedding web applications in Mule
We’ve studied how to deploy Mule applications to a Mule standalone server. Now we’ll go deeper: imagine an M.C. Escher lithograph in which you follow a path. After some time, it seems that you’re back at the starting point. That’s how you may feel knowing that not only can Mule applications be deployed in a web application container, as you’ll learn in section 8.2, but they can also act as containers of Java EE web applications through the use of Jetty. You’ll start by learning how to configure an embedded Jetty server in Mule, as illustrated in figure 8.7.
Figure 8.7. Conceptual deployment model of Mule standalone server with Jetty embedded in an app
Mule’s Jetty connector offers a lightweight but full-fledged web application container for Mule. Why is this useful? Sometimes you may need to serve small web applications to use your AJAX endpoints, or perhaps you have to serve some static content and you don’t want more complexity in your architecture. If you need it for any reason, Mule is ready to act as a web application container.
Mule provides two different namespaces for Jetty, the plain HTTP one and the HTTPS one. Let’s start by configuring an HTTP-based embedded Jetty server in the next listing.
Listing 8.5. Configuring an embedded Jetty server

In the previous example, you configure an embedded Jetty server using the Jetty connector. It’ll serve the web applications stored in the path specified in the attribute directory using the TCP port passed with the attribute port.
This’ll expose a web application using HTTP, an unsafe protocol in terms of security. To use the Security Sockets Layer (SSL) over HTTP (and therefore obtain HTTPS), you should use a different namespace; let’s do that in the next listing.
Listing 8.6. Configuring an embedded Jetty SSL server
<jettyssl:connector name="jettySslConnector">
    <jettyssl:tls-key-store path="keystore.jks"
        keyPassword="password" storePassword="password" />
    <jettyssl:webapps directory="${app.home}/webapps"
        port="${jettySslPort}"/>
</jettyssl:connector>
You use a different namespace and pass the new element tls-key-store. This element adds a key store to Jetty to be able to communicate using HTTPS. The transport security configuration of the Jetty SSL namespace is intentionally similar to the configuration HTTPS. You’ll learn how to configure an HTTPS server in chapter 10; all the elements you’ll use for SSL on HTTP can be used to configure SSL for Jetty.
Jetty is known for being lightweight, but that doesn’t mean it’s not powerful. You can configure some of the basic options of Jetty using Mule XML elements. If you need advanced features, you can pass a Jetty configuration file to the connector, as shown next.
Listing 8.7. Configuring an embedded Jetty using a config file
<jetty:connector name="jettyConnectorWithConfigFile"
    configFile="${app.home}/jetty-conf.xml" />
Given that Mule itself doesn’t necessarily have to be a container and that it can be deployed to other containers, let’s see now how you can accomplish the opposite of what you just learned: how to embed Mule in web applications to be deployed inside web containers.
8.2. Deploying Mule to a web container
For the same reasons stated at the beginning of the previous section, you might be interested in embedding Mule in your web application. This approach used to be popular in the Mule 2.x days, but now it’s superseded by the deployment to a standalone server, as we discussed in section 8.1.
Mule provides all that you need to hook it to your favorite servlet container. Why is this desirable? The main reason is familiarity. It’s more than likely that your support team is knowledgeable about a particular Java web container. Deploying Mule in such a well-known application environment context gives you the immediate support of operations for installing, managing, and monitoring your instance.
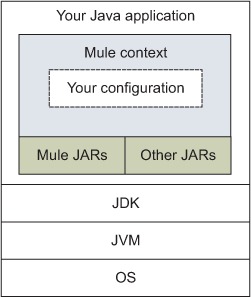
When Mule is embedded in a web application, as shown in figure 8.8, you need to make sure the necessary libraries are packaged in your WAR file. If you use Maven, this packaging will be done automatically, including for the transitive dependencies of the different Mule transports or modules you could use.
Figure 8.8. Conceptual deployment model of Mule embedded in a web application
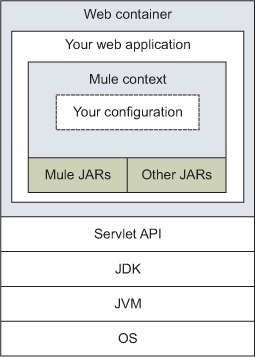
The Mule instance embedded in your web application is bootstrapped by using a specific ServletContextListener. This conveniently ties Mule’s lifecycle to your web application’s lifecycle (which itself is bound to the web container’s one). The following demonstrates the entries you would need to add to your application’s web.xml to bootstrap Mule:
<context-param>
 <param-name>org.mule.config</param-name>
 <param-value>my-config.xml</param-value>
</context-param>
<listener>
 <listener-class>
  org.mule.config.builders.MuleXmlBuilderContextListener
 </listener-class>
</listener>
Needless to say, this context listener also takes care of shutting Mule down properly when the web application is stopped. Notice how the configuration of the Mule context listener is done by using context-wide initialization parameters.
Starting Mule is a great first step, but it’s not sufficient: you need to be able to interact with it. From within your own web application, this can be achieved by using the Mule client. Because the context listener took care of starting Mule, you have no reference to the context, unlike the case in which you bootstrap Mule yourself. This is why the Mule client is instantiated with a context retrieved from the servletContext:
muleContext = (MuleContext) getServletContext()
    .getAttribute(MuleProperties.MULE_CONTEXT_PROPERTY);

client = muleContext.getClient();
There’s another great benefit to this deployment model, which is the capacity to tap the servlet container directly for HTTP inbound endpoints. In a standalone server or standard Java application deployment scenario, your inbound HTTP endpoints rely on either the stock HTTP transport or the Jetty one. But this doesn’t need to be the case when you deploy in a web container. This container already has its socket management, thread pools, tuning, and monitoring facilities. Mule can use these if you use the servlet transport for your inbound endpoint.
The servlet transport only works in coordination with a servlet configured in your web.xml. This servlet takes care of receiving the messages and sending them to the inbound endpoint that can accept them. Here’s an example of how to configure this servlet:
<servlet>
 <servlet-name>muleServlet</servlet-name>
 <servlet-class>
  org.mule.transport.servlet.MuleReceiverServlet
 </servlet-class>
 <load-on-startup>1</load-on-startup>
</servlet>
<servlet-mapping>
  <servlet-name>muleServlet</servlet-name>
  <url-pattern>/services/*</url-pattern>
</servlet-mapping>
With this configuration in place, the following inbound endpoint can be used:
<servlet:inbound-endpoint address="servlet://target">
A Mule service using such a configuration will be accessible to the outside world with a URI following this pattern:

The payload of the message that will be received in the service will depend on the HTTP method used by the caller.
Serving REST inside a web container
Mule ships with another servlet that’s more oriented toward REST-style services. Named org.mule.transport.servlet.MuleRESTReceiverServlet, this other servlet can be used in lieu of or conjointly with the standard receiver servlet. Refer to the Mule servlet transport documentation for more information on this.
Table 8.2 shows a list of pros and cons for the web application–embedded deployment option of Mule.
Table 8.2. Pros and cons for embedding Mule in a web application
|
Pros |
Cons |
|---|---|
| Can tap your well-known servlet container | Must manage Mule’s libraries yourself |
| Benefits from the web application lifestyle events | No direct support for scripted configurations |
| Familiar deployment platform for operations | Possible pesky classloading issues on some web containers |
| Resources like JDBC connection pools can be shared across applications |
Embedding Mule in a web application is a popular and powerful way to deploy Mule. Should you need easier integration with the cloud, particularly for Software-as-a-Service (SaaS) integration, the next deployment strategy that we’ll look at is for you.
8.3. Deploying applications to CloudHub
In July 2012, MuleSoft rebranded its integration platform as a service from Mule iON to CloudHub. Since the announcement of the first release, CloudHub has gained more and more momentum in the cloud integration industry. CloudHub offers a platform to deploy Mule applications that can use features like real-time message visibility, message replay, root-cause analysis, and multitenancy. For a full description and more details about CloudHub, you can refer to the CloudHub site (www.cloudhub.io).
Although this book is primarily focused on the community edition of Mule, you’ll learn how to deploy packaged Mule application deployment units to CloudHub, as it represents the natural cloud platform for Mule. To start the process, sign up in the CloudHub site (www.cloudhub.io) as a developer. Once the registration is completed, you should see a console similar to that in figure 8.9.
Figure 8.9. CloudHub management console
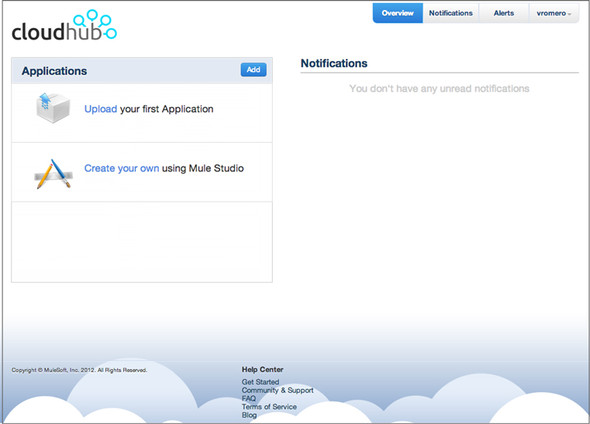
At this point, you can add your application. Click Add to get a dialog box, as shown in figure 8.10.
Figure 8.10. CloudHub’s New Application dialog
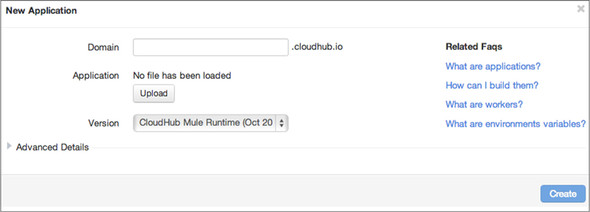
At this point, upload the Mule application deployment unit by clicking on the file selector button next to the Application field. You should select a unique subdomain name for your application. If your application exposes any endpoint, the indicated full domain name will represent the host name you’ll use to reach the endpoint. The drop-down next to the Version field will let you choose the Mule version that’ll be used to run this Mule application.
If you intend to deploy your application in CloudHub, you may need to make some small adjustments to your software.
For instance, the servlet transport is not allowed. Instead you should use the HTTP transport, and when using it the variables ${http.port} and ${https.port} will define the HTTP and HTTPS ports you’ve assigned to your application. The outside world will always see your application running at yoursubdomain.cloudhub.io at port 80 for HTTP and 443 for HTTPS, but internally you should use those variables.
For further information about potential adjustments in your application, visit Mule-Soft’s CloudHub documentation at http://mng.bz/yjyG.
Once you’ve clicked the Add Application button and the Mule Application deployment unit is uploaded, the application deployment will automatically start, and your browser will be pointed to the log view of the CloudHub console. Once you get a log line showing Successfully deployed [your application name], you’ll know your application’s been successfully deployed. Table 8.3 shows the pros and cons for CloudHub deployment.
Table 8.3. Pros and cons for CloudHub deployment
|
Pros |
Cons |
|---|---|
| Extremely easy management Enterprise Edition features Great scalability and availability | More expensive than the community edition, but probably less expensive than the Enterprise Edition, which has a fee associated |
| Good for integrating cloud services | Not suitable for applications with special legal requirements |
Easily test Mule enterprise features in CloudHub
CloudHub features some exciting capabilities only present in the Enterprise Edition of Mule, such as clustering support and Insight, a useful tool to, among other things, analyze the root cause of failures.
CloudHub represents the natural cloud evolution of Mule. It’s not only a great platform for deploying Mule applications, but also an excellent playground for testing features. Now let’s leave behind all kinds of application containers to look at how you can use Mule in an existing application.
8.4. Embedding Mule into an existing application
If you’ve built applications that communicate with the outside world, you’ve ended up building layers of abstractions from the low-level protocol to your domain model objects. This task was more or less easy depending on the availability of libraries and tools for the particular protocol. If at one point you had the need to compose or orchestrate calls to different remote services, things started to get a little more complex. At this point, using Mule as the “communicating framework” of your application could save you a lot of hassle.
Embedding Mule in an application is a convenient way to benefit from all the transports, routers, and transformers discussed in part 1 of the book. Besides, your application will benefit from the level of abstraction Mule provides on top of all the different protocols it supports.
As shown in figure 8.11, Mule can be embedded in a standard Java application. This makes sense if the application’s not destined to be run as a background service; in that case, you’d be better off using the standalone server deployment we talked about in section 8.1.
Figure 8.11. Conceptual deployment model of Mule embedded in a standard Java application
In the embedded mode, it’s up to you to put on the classpath of your application all the libraries that will be needed by Mule and the underlying transports you’ll need. Because Mule’s built with Maven, you can benefit from its clean and controlled dependency management system by using Maven for your own project.[4]
4 Ant can also pull dependencies from Maven repositories thanks to a specific task. We still strongly encourage you to use Maven (if you don’t already).
Bootstrapping Mule from your own code is easy, as illustrated in the following code snippet that loads a Spring XML configuration named my-config.xml:
DefaultMuleContextFactory muleContextFactory =
  new DefaultMuleContextFactory();

SpringXmlConfigurationBuilder configBuilder =
  new SpringXmlConfigurationBuilder("my-config.xml");

MuleContext muleContext =
  muleContextFactory.createMuleContext(configBuilder);

muleContext.start();
It’s important to keep the reference to the MuleContext object for the lifetime of your application, because you’ll need it in order to perform a clean shutdown of Mule, as illustrated here:
muleContext.dispose();
The MuleContext also allows you to instantiate a client to interact with the Mule instance from your application. The following code shows how to create the client out of a particular context:
MuleClient muleClient = muleContext.getClient();
The previous example shows how Mule leads the dance relative to Spring; it’s Mule that takes the responsibility to load and bootstrap the bean factory from which your beans will be managed. But what if you have an existing Spring application with its own context (or hierarchy thereof) and you want Mule to be running within this environment and have access to its beans? In that case, you’ll have to pass your existing Spring context to the Mule configuration builder so it’ll use it as its parent. This’ll allow Mule to use beans managed in a parent context as its service components:
SpringXmlConfigurationBuilder("my-config.xml");
builder.setParentContext(parentContext);
builder.configure(muleContext);
Note that the Mule client supports other construction parameters that we’ll discuss in section 12.2.
Table 8.4 summarizes the pros and cons for embedding Mule in a standard Java application.
Table 8.4. Pros and cons for embedding Mule in a standard Java application
|
Pros |
Cons |
|---|---|
| Flexibility to deploy only what’s needed | Have to deploy what’s needed (!) |
| Well suited for “Mule as an integration framework” approach | Have to manage Mule’s lifecycle (start/stop) on your own |
| Perfect for a J2SE application such as a Swing or Spring Rich Client GUI | The high-availability Enterprise Edition feature isn’t available in embedded mode |
You now know how to make your standalone Java applications use Mule to communicate and integrate with other applications. Let’s now look at how you can deploy Mule to achieve high availability.
8.5. Deploying Mule for high availability
Being able to ensure business continuity is one of the main goals of any IT department. Your Mule-driven projects will not escape this rule. Depending on the criticality of the messages that’ll flow through your Mule instances, you’ll probably have to design your topology so it offers a high availability of service. High availability is generally attained with redundancy and indirection. Redundancy implies several Mule instances running at the same time. Indirection implies no direct calls between client applications and these Mule instances.
An interesting side effect of redundancy and indirection is that you can take Mule instances down at any time without negative impact on the overall availability of your ESB infrastructure. This allows you to perform maintenance operations, such as deploying a new configuration file, without any downtime. In this scenario, each of the Mule instances behind the indirection layer is taken down and brought back up successively.
Best practice
Consider redundancy and indirection whenever you need hot deployments.
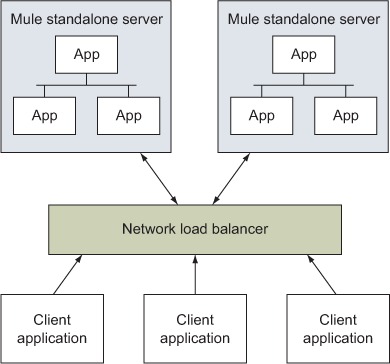
Using a network load balancer in front of a pool of similar Mule instances is probably the easiest way to achieve high availability (see figure 8.12). Obviously, this is only an option if the protocol used to reach the Mule instances can be load-balanced (for example, HTTP). With a network load balancer in place, one Mule instance can be taken down, for example, for an upgrade, whereas the client applications will still be able to send messages to an active instance. As the name suggests, using a load balancer would also allow you to handle increases in load gracefully; it’ll always be possible to add a new Mule instance in the pool and have it handle part of the load.
Figure 8.12. A network load balancer provides high availability to Mule instances
Another type of indirection layer you can use is a JMS queue concurrently consumed by different Mule instances. No client application will ever talk directly to any Mule instance; all the communications will happen through the queue. Only one Mule instance will pick up a message that’s been published in the queue. If one instance goes down, the other one will take care of picking up messages if your JMS middleware supports the competing consumers pattern (see www.eaipatterns.com/CompetingConsumers.html). Moreover, if messages aren’t processed fast enough, you can easily throw in an extra Mule instance to pick up part of the load. This implies that you’re running a highly available JMS provider that will always be up and available for client applications. The canonical ESB topology, represented in figure 8.13, can therefore be easily evolved into a highly available one.
Figure 8.13. The canonical ESB deployment topology of Mule instances relies on a central JMS provider.

If your Mule instance doesn’t contain any kind of session state, then it doesn’t matter where the load balancer will dispatch a particular request, as all your Mule instances are equal as far as incoming requests are concerned. But, on the other hand, if your Mule instance carries any sort of state (for example, idempotency, aggregators, resequencers, or components with their own state) that’s necessary to process messages correctly, load balancing won’t be enough in your topology, and you’ll need a way to share session state between your Mule instances.[5] This is usually achieved either with a shared database or with clustering software, depending on what needs to be shared and performance constraints.
5 One could argue that with source IP stickiness, a load balancer will make a client “stick” to a particular Mule instance. This is true, but it wouldn’t guarantee a graceful failover in case of a crash.
Note that as of this writing, there’s no officially supported clustering mechanism for the Mule community edition; you can work around some of the clustering limitations of the community edition using the object stores, as you’ll learn in the next section. The Enterprise Edition, however, has full-fledged support for clustering.
Using the Mule Enterprise Edition, all Mule features become cluster aware in a completely transparent fashion. A cluster of Mule Enterprise Edition servers will create a distributed shared memory, as you can see in figure 8.14, that’ll contain all the necessary shared state and coordination systems to cluster a Mule application without a specific cluster design in the Mule application. To learn more about Mule Enterprise Edition, the key differences between it and the community edition, and how it can help you with easier clusterization, you can visit the Mule Enterprise Edition site (www.mulesoft.com/mule-esb-enterprise).
Figure 8.14. Clustered and load-balanced Mule EE instances

At this point, you should have a good understanding of what’s involved when designing a topology for highly available Mule instances. This will allow you to ensure continuity of service in case of unexpected events or planned maintenance.
But it’s possible that, for your business, this is still not enough. If you deal with sensitive data, you have to design your topology for fault tolerance as well.
8.5.1. High availability via fault tolerance
If you have to ensure that, whatever happens during the processing of a request, no message gets lost at any time, you have to factor fault tolerance into your topology design. In traditional systems, fault tolerance is generally attained by using database transactions, either local or distributed (XA) ones. In the happy world of Mule, because the vast majority of transports don’t support the notion of transactions, you’ll have to carefully craft both your instance-level and network-level topologies to become truly fault tolerant.
Mule offers a simple way to gain a good level of fault tolerance via its persisted VM queues. When persistence is activated for the VM transport, messages are stored on the filesystem when they move between the different services of a Mule instance, as shown in figure 8.15. In case of a crash, these stored messages will be processed upon restart of the instance. Note that, because it supports XA, the VM transport can be used in combination with other XA-compatible transports in order to guarantee transactional consumption of messages.
Figure 8.15. Simple filesystem-based persisted VM queues are standard with Mule.

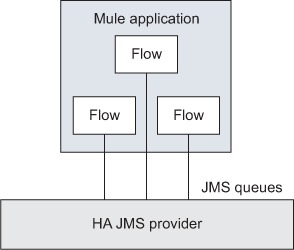
The main drawback of VM-persisted queues[6] is that you need to restart a dead instance in order to resume processing. This can conflict with high-availability requirements you may have. When this is the case, the best option is to rely on an external, highly available JMS provider and use dedicated queues for all intra-instance communications. This is illustrated in figure 8.16.
6 Other than forcing you to move around serializable payloads only.
Figure 8.16. An HA JMS provider can host queues for all communications within a Mule application.
Clustering internal state using object stores
Using the aforementioned mechanisms, you can reach a certain level of fault tolerance with regard to message delivery. But you must be aware that certain moving parts of Mule have an internal state that’s necessary to process messages correctly. This state is persisted with an internal framework that’s called the object store. The object stores of your application play a key role in the application design, as they contain data that probably should be shared in a clustered application.
This internal state can exist in different moving parts of Mule, such as in the idempotent receiver, which must store the messages it’s already received. You may recall using an object store in section 5.2.5, when you were introduced to the idempotent filters. There you learned how to configure an idempotent filter to discard duplicated orders. You can see how it interacts with an object store in figure 8.17.
Figure 8.17. Behavior of an idempotent filter

The community version of Mule offers a set of object stores:
- in-memory-store— A nonclustered object store that stores the contents in local memory
- simple-text-file-store— Stores String objects by key to a text file; only suitable for storing string key/values
- custom-object-store— Used to refer to custom implementations of the object store; see how to develop your own object stores in section 12.3.4
- managed-store— Gets an “object store inside an object store” by getting a partition of a ListableObjectStore retrieved from the Mule registry
- spring-object-store— Represents a reference to a Spring-managed object store
None of those object stores are inherently clustered. You can use JVM-level clusterization in conjunction with the in-memory-store or an NFS shared mount point with the simple-text-file-store, but that would be complex at minimum. Therefore, we’ll turn our attention to one of the contributed modules of Mule, the Redis connector (see www.mulesoft.org/extensions/redis-connector).
Redis (http://redis.io/) is an open source, networked, in-memory, key/value data store with optional durability. Its design renders Redis specially suitable to be used as a Mule object store, and by using the Redis connector, the usage of Redis as a Mule object store is straightforward.
Given that Redis will represent an external highly available object store, you can include it in the previous design of our application (in figure 8.16) to store the internal state of your Mule moving parts, as you can see in figure 8.18.
Figure 8.18. An HA JMS provider can host queues for all communications within a Mule instance.

The Prancing Donkey commitment to high availability is unavoidable. They’ve decided to use a highly available configured Redis server to store the internal state of some moving parts of Mule. Start the high-availability implementation by configuring the connectivity with Redis:
<redis:config name="localRedis" />
This will configure a local nonpassword-protected Redis instance running on the standard port, so it should connect straight to a brand-new Redis installation. The server in production will be placed in a different host and will be strengthened with a password. You’ll eventually use the host, port, and password attributes to connect to the server.
Now you’re ready to use the Redis connector to store the internal state of your processors. Configure the previously mentioned idempotent filter to use Redis as an object store, as in the next listing.
Listing 8.8. Configuring an idempotent filter to use Redis as an object store

Here you declare an idempotent filter almost identical to the one configured in section 5.2.5. The only exception is found at ![]() , where you instruct the filter to use the object store with an ID equal to localRedis, which you declared before.
, where you instruct the filter to use the object store with an ID equal to localRedis, which you declared before.
Redis isn’t the only option that implements an object store; another available extension is, for instance, the MongoDB connector. The Mule Enterprise Edition supplies a myriad of other options such as JDBC or Spring cache-based object stores. But not every possible solution is covered as a Mule connector or as an Enterprise Edition feature. You’ll learn how to implement your own object store in section 12.3.4.
You’ve seen that shooting for fault tolerance can be achieved in different ways with Mule, depending on the criticality of the data you handle and the availability of transactions for the transports you use.
8.6. Summary
We’re done with our exploration of Mule deployment topologies. If there’s one concept you need to take away from this rather disparate chapter, it’s that there’s no prescriptive way to deploy Mule in your IT landscape. Mule is versatile enough to be deployed in a topology that best fits your needs. We’ve given you a few patterns and practices to look at but, once again, Mule will go where you need it to.
You’ve also learned how to design your application for high availability. We’ll continue this subject, learning how to react to errors and how to use transactions, in the next chapter.