
Chapter 13. Writing custom cloud connectors and processors
This chapter covers
- Building a cloud connector
- Rendering a cloud connector configurable
- Understanding connection management for a cloud connector
- Creating Mule’s moving parts within a cloud connector
- Integrating a cloud connector with Studio
You can imagine Mule living on an idyllic Tuscan hill, a place full of tradition that you feel you completely understand. But sooner or later, Mule will need to cross tundra and jungles. The internet state of the art is continuously evolving, leaving behind well-known technologies and stepping into the wild jungle.
Following this evolution, you’ve seen cloud computing become one of the most relevant technological trends in recent years. New cloud services emerge on a daily basis, providing all kinds of functionalities: social network updates, stock trading, payments, voice calls and SMS, document-oriented databases, and so on. At the same time, your company may be using several internal protocols that Mule may not support out of the box.
Mule already has a good set of connectors for the most popular cloud services; we discussed them in chapter 3. But it doesn’t matter how many Mule provides or how fast the Mule community publishes new ones in the MuleForge. The tsunami of IT evolution will always be faster than the efforts to keep the Mule repository of connectors updated. Instead of how many transports or modules Mule provides, the question probably should be how adaptable to change is Mule?
As Leon C. Megginson said when paraphrasing Charles Darwin, “It is not the strongest of the species that survives, nor the most intelligent that survives. It is the one that is the most adaptable to change.”[1]
1 Leon C. Megginson, “Lessons from Europe for American Business,” Southwestern Social Science Quarterly (1963) 44(1): 3-13, at p. 4.
Not wishing to disappoint the British naturalist, Mule not only tries to be strong and intelligent; it also tries hard to be easily adaptable. Mule 3 has been delivered with the Anypoint Connector DevKit, an annotation-processing tool created to boost developer productivity by automatically generating the boilerplate code and the XML schemas needed to create Mule modules. With the exception of a few annotations, modules created using the DevKit are POJOs.
In this chapter, we’ll briefly discuss how DevKit simplifies Mule module development and how to write new Mule modules using the cloud connector DevKit. At the end, we’ll create a cloud connector to use the BreweryDB cloud service inside Mule.
13.1. Simplifying Mule development with the DevKit
Mule stands on a solid base: the Spring Framework and its extensible XML authoring. They give Mule a powerful but sometimes complex extension mechanism. All core Mule modules use this mechanism, which usually requires creating the following:
- An XML schema that will most often extend abstract types of Mule
- A namespace handler for the specific namespace of your module
- A bean definition parser for the namespace handler that will parse the schema elements
- Customized connectors or message processors
Some of these tasks are not trivial and require a deep knowledge of the Mule and Spring internals. They also require you to extend Mule or Spring classes, making your code more tightly coupled.
In Java 5, a pluggable annotation processor for the compiler was introduced for the first time. Thanks to this, annotations can be processed at compile time by plug-ins that can generate new code or resources, modify the annotated classes, do additional checks, and so on. DevKit (www.mulesoft.org/documentation/display/current/Mule+DevKit) is one of those annotation processing tools that autogenerates the Mule- and Spring-specific code required to write Mule modules, effectively reducing your module to simple POJOs. You can find this process graphically described in figure 13.1.
Figure 13.1. A diagram of the relations of DevKit’s annotation parsers

The traditional extension mechanism for Mule isn’t deprecated by DevKit. All the moving parts included in the Mule core are done this way. But using DevKit is the preferred way to write extensions.
Even if there’s a small subset of situations where it would make sense to write an extension, such as for transaction support and automatic reconnection of message sources, this will lead the extension to a Mule Studio dead end, as it isn’t supported.
You can see that the annotation parser will read the POJO, looking for classes marked with the DevKit set of annotations. Then it’ll generate the Spring extension modules that will provide your Mule applications with the different elements you created. The only code you should write here is your annotated POJO. Mule will continue to apply the best practice of trying to keep your code as decoupled as possible.
The DevKit annotation parser, like other standard Java annotation processors, is usually executed at build time (more specifically in the generate-sources phase). Depending on how you build your projects, you’ll have to choose between these options:
- The standard Java command apt if you’re using Java 1.5 or 1.6, or the javac command if you’re using Java 1.7 or any newer version. You’ll have to run it manually or include it in your build scripts.
- The annotation parser support in your favorite IDE.
- A Maven plugin that automates the process. This is by far the most recommended choice. If you bootstrap your projects using the Maven archetype, as you’ll learn in the next section, all the Maven configuration is done automatically. At the moment, this option requires Java 1.6.
At the end of the process of annotation parsing, you’ll get all Spring extension-specific parts (XML schema, namespace handler, bean definition parsers) automatically generated and ready for use. This will effectively create message processors and sources. They will have the form of your own namespace, such as google-tasks, with custom processors or sources like google-tasks:get-task-list and google-task:delete-task-from-list.
To better understand what a cloud connector can provide to your Mule application, let’s take a look at some of the processors of the Mule Git Connector (https://github.com/mulesoft/git-connector), a connector for interacting with Git[2] repositories that has been built using this technique:
2 Git is a free, open source, distributed version control system.

Now you understand how the DevKit’s annotation parser helps to simplify the development of a cloud connector. Next, let’s see how to write a cloud connector.
13.2. Introduction to authoring cloud connectors
Mule cloud connectors are POJOs. What makes these objects special are the annotations that will mark some parts of your code (classes, methods, and members) to be treated in a special way by the annotation processor.
Let’s get in touch with a couple of annotations that could be applied to your class:
- @Module— Used to provide transformers, filters, routing, custom business logic, and sessionless endpoints. If you’re writing a JSR 303 validator, you should use this annotation.
- @Connector— Adds out-of-the box connection and session management to the features of @Module. @Connector would be the right annotation to create an Infinispan transport.
Although @Module annotates a Java class to export its functionality as a Mule module, activating the annotation parser for further annotations inside the class, @Connector also forces the class to implement some methods that should maintain a permanent connection. In listings 13.1 and 13.2, you can see examples of how to use them.
Listing 13.1. Class annotated to create a Mule cloud connector

Listing 13.2. Class annotated to create a Mule module

Both annotations will let the annotation parser know that the class should be inspected for more annotations. Both annotations have in common some useful attributes:
- name— Defines the name the module or connector will have. In the previous examples, the connector namespace will look like <myConn:processor attribute="value"> and the module like <myMod:processor attribute="value">.
- description— Used in places where extended information is required, such as documentation.
- friendlyName— Sets the name that Mule and Mule Studio will use for labels when a human-friendly name should be shown.
- minMuleVersion— Establishes the minimum Mule version required for this module or connector to work.
- configElementName— You’ll find out how later how to set the configuration parameters of a connector or module; this attribute will set the element name that’ll be used to generate the configuration that is, by default, config.
- namespace— Defines the URI for the namespace of the connector or module; by default it’s http://www.mulesoft.org/schema/mule/${name}, in which ${name} represents the value passed in the name attribute.
- schemaLocation— Defines the location of the schema file that will describe the namespace. By default, it’ll be http://www.mulesoft.org/schema/mule/${name}/schemaVersion/mule-${name}.xsd.
To write an extension for Mule without custom message sources, processors, or transformers would probably make no sense. Now that you know how to annotate your class for the basic definition of a module or connector, you’ll learn how to annotate your methods to handle connections, to create transformers or custom message processors, or to specify how the extension should be configured:
- Connector-related annotations (@Connect, @Disconnect, @ValidateConnection, @ConnectionIdentifier, and @InvalidateConnectionOn) are used to generate the connection management using a few POJO methods.
- The @Processor annotation can mark a method to be used to generate a general-purpose message processor.
- Argument-passing annotations (@Payload, @InboundHeaders, @InvocationHeaders, and @OutboundHeaders) can mark arguments for receiving the payload, headers, or flow variables.
- REST endpoint annotations (@RestCall and @RestHeaderParam) are used for easier creation of message processors that will perform REST calls.
- The @Transformer annotation identifies a method that will become a Mule transformer.
- The @Configuration annotation sets the arguments that will configure the connection or module to be created.
- Message source annotations (@Source) create a message source that will pass to an inbound endpoint received or generated event.
You’ve learned how to take the first step toward creating your Mule extension. Now let’s see how to make the extension configurable.
13.2.1. Rendering extensions configurable
Probably one of the main reasons for writing a Mule extension is reusability. For better reusability, any value susceptible to being changed in the different uses the extension could have should be configurable.
As with every other mechanism in the Mule cloud connector DevKit, configuration is driven through annotations. Any class member annotated with @Configurable will be considered parameterizable and will be available in the config element. For instance, let’s add two configurable values to this connector:
@Configurable
private String parameterOne;

@Configurable
private String parameterTwo;
For these parameters, once the constructor is built, the config element would look like this:
<myconn:config
    parameterOne="valueOne"
    parameterTwo="valueTwo"/>
When the connector is configured with this element, the members parameterOne and parameterTwo of your POJO will be populated with the values valueOne and valueTwo. It’s worth remembering that if you prefer for any reason to change the name of the config element instead of using the member name, you can pass the attribute configElementName to the Connector annotation.
We’ll now take a look at how DevKit helps you simplify connection management.
13.2.2. Managing connections
If you’re writing a Mule extension for a connection-oriented protocol, you’ll probably be writing a Mule connector. If this is the case, you may need some annotated methods to manage the connections.
Connection handling is a complicated task when you have to deal with pools of connections in a SEDA architecture. Thankfully, Mule will simplify the task by providing your Mule connector with a few annotations that will reduce the required work to the bare minimum. Let’s start with the two most relevant annotations:
- @Connect— Can be applied to only one publicvoid method that throws org.mule.api.ConnectionException. Will be invoked when the connection manager needs to open a new connection.
- @Disconnect— Applied to only one publicvoid method with no parameters. Will be called to dispose of a connection.
Let’s put them in context in an example connector.
Listing 13.3. Using @Connect and @Disconnect

The connect method, annotated with @Connect at ![]() , will be in charge of the creation of a connection when required. At the same time, you mark the opposite operation for disconnection
at
, will be in charge of the creation of a connection when required. At the same time, you mark the opposite operation for disconnection
at ![]() . You can find in the connect method the arguments username and password. The connect arguments are a special case. They can be passed as if they were @Configurable annotated members (as in listing 13.4) and as if they were arguments of the different processors present in the connector (as in listing 13.5).
. You can find in the connect method the arguments username and password. The connect arguments are a special case. They can be passed as if they were @Configurable annotated members (as in listing 13.4) and as if they were arguments of the different processors present in the connector (as in listing 13.5).
Listing 13.4. Using connection arguments in the config element
Listing 13.5. Using connection arguments as processor attributes
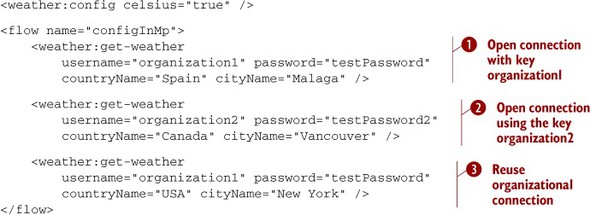
<weather:config celsius="true"
    username="xxx" password="yyy"/>

<flow name="normalConfig">
    <weather:get-weather
        countryName="Canada" cityName="Vancouver" />
    <weather:get-weather
        countryName="Spain" cityName="Malaga" />
    <weather:get-weather
        countryName="USA" cityName="New York" />
</flow>
You may have realized that in listing 13.3 there’s an outstanding annotation in the construction arguments: @ConnectionKey. When designing a Mule cloud connector, you should keep in mind that the POJO you’re writing is used by DevKit; it doesn’t
represent a connector by itself. Instead, the DevKit connection manager will maintain a pool of instances of this class. To
know when one of these instances can be reused, DevKit has to be able to identify the elements in the pool, and this is where
the @ConnectionKey becomes useful. It’ll let DevKit identify each member of the pool, reusing when possible. For instance, in listing 13.4, you start requesting the weather of Malaga at ![]() . At this point, an instance is created with the pool key organization1. The same will happen with organization2 and Vancouver at
. At this point, an instance is created with the pool key organization1. The same will happen with organization2 and Vancouver at ![]() . But in the third call at
. But in the third call at ![]() , the organization1 pool member is already present, and therefore the original connection will be reused.
, the organization1 pool member is already present, and therefore the original connection will be reused.
Configuring reconnection strategies for Mule extensions
The reconnection strategies we studied in section 9.1.1 can be included in the connector’s config element. Unfortunately, as of this writing, the message sources we’ll create in section 13.2.7 won’t be able to benefit from the reconnection strategies.
This pool can be configured for performance tuning. In each of the DevKit-created cloud connectors, you can find the element connection-pooling-profile with four attributes:
- maxActive— Sets the maximum number of connections allowed at the same time. When set to -1, there won’t be a limit.
- maxIdle— Establishes the maximum number of idle connections there can be at the same time. If set to -1, there won’t be a limit.
- maxWait— When exhaustedAction (see next) is set to WHEN_EXAUSTED_WAIT, sets the number of milliseconds to wait for a connection.
- exhaustedAction— Defines how the connector will react when the maximum number of active connections is reached. The possible values are these:
- WHEN_EXHAUSTED_FAIL— Instructs Mule to throw a NoSuchElementException when the limit for maxActive connections is reached.
- WHEN_EXHAUSTED_WAIT— Establishes that Mule will wait for a connection for the time set in maxWait; if in that time an available connection isn’t found, the same behavior as WHEN_EXHAUSTED_FAIL should be expected. A negative value will set an infinite wait for an available connection.
- WHEN_EXHAUSTED_GROW— This configuration will create a new connection each time the limit of connections is reached, ignoring the maxActive value. This is the default behavior.
Connection validation (assertion that a connection is alive) and invalidation (establishes the need for reconnection) are handled using the annotations @Validate-Connection and @InvalidateConnectionOn. Although the first one is applied to a method that will return a Boolean if the connection is valid, the second one is applied to methods that are already annotated with @Processor or @Source and if a matching exception is thrown, the connection will be invalidated. Put them in practice in a small weather connector:
@Processor
@InvalidateConnectionOn(exception=WeatherException.class)
public Weather getWeather (String countryName, String cityName) {
    return myExternalApi.getWeather
            (sessionId, celsius, countryName, cityName);
}

@ValidateConnection
public boolean isConnected() {
    return myExternalApi.isConnected();
}
You learned the mechanisms of connection management to create Mule extensions for connection-oriented protocols. Now let’s see how to create processors that can use those connections to invoke logic.
Mixing content in extensions
In the next sections, we’ll cover the creation of processors, REST endpoints, transformers, and message sources one by one. This doesn’t mean that a connector or module can’t have any combination of these. Feel free to mix and match at will.
13.2.3. Creating message processors
The most common use scenario when designing Mule extensions is to create custom message processors. As with the rest of the DevKit, the creation of processors makes use of annotations for a loose coupling between the module’s code and Mule.
The methods of your extensions can be designed to be processors by marking them with the annotation @Processor. For instance, let’s mark a method without parameters to be a processor:
@Processor
public void myMethod() {
    // business logic
}
This will let you call the business logic in myMethod from Mule as a message processor of your extension:
<myConn:myMethod />
Calling methods without arguments can be useful only up to a certain point. DevKit is capable of discovering the arguments of a method and automatically configuring the processor to be able to accept them as attributes. It also provides two useful annotations that can be used when an argument is optional: @Optional, which will mark the argument as optional, and @Default, which, if set, will set the default value:
@Processor
public void myMethodWithDefaultArg(
    String requiredParam,
    @Optional @Default("1") int optionalParam) {
    // business logic
}
Note that the return type of the method is void. That means that the message won’t alter the payload of the message. If you want to alter the message, you need to set a return type, and the result of the method will become the value of the payload:
@Processor
public String myMethodSetPayload() {
    return "I'm a String that will become payload";
}
Processor attributes can also be marked to pick up variables, properties, or the payload itself. To pass variables, you should use @InvocationHeaders, session properties, and @SessionHeaders, and to pass inbound and outbound properties, @InboundHeaders and @OutboundHeaders, respectively.
@InvocationHeaders, @SessionHeaders, and @InboundHeaders have in common the value attribute. It’s used to define what properties will be injected. The acceptable values are as follows:
- A single named property—@InvocationHeaders("myHeader") String faz will find and inject the property to the argument and will throw an exception if it’s not found. Optionally, all named properties can be followed by the sign ?, which will instruct DevKit not to throw the exception if it can’t find the header.
- A comma-separated list of header names—@InboundHeaders("myHeader, myOtherHeader?") Map<?, ?> myHeaders.
- A wildcard expression—@SessionHeaders("MULE_*") Map<?, ?> myHeaders will inject any property whose name matches the wildcard expression.
- A comma-separated list of wildcard expressions—@SessionHeaders("MULE_*", "HTTP_*").
To obtain the payload as an argument of the method, the annotation @Payload should be used. Let’s put together a method with the payload and some headers as arguments:
@Processor
public String myMethodSetPayload() {
   @Payload String payload,
   @InboundHeaders("MULE_*") Map<?,?> muleHeaders,
   @InvocationHeaders("header1, optionalHeader2?")
   Map<?,?> otherHeaders) {

    return "I'm a String that will become payload";
}
Now that you’re comfortable managing connections and creating message processors, let’s look at a special use case: the intercepting message processors.
13.2.4. Creating intercepting message processors
Recall the intercepting message processors from section 12.3.2. You learned in that section when they’re useful and how they can decide whether the flow should continue or not. In addition, you implemented an interceptor that stores and replays payloads for similar incoming messages.
For DevKit, the intercepting message processors are a special type of message processor that should have a parameter of type org.mule.api.callback.SourceCallback and the attribute intercepting set to true in the Processor annotation.
Listing 13.6. The cache interceptor using DevKit

In the method signature at ![]() , you can find the return value of the message that will represent the output payload and a SourceCallback argument, indispensable for an intercepting processor. At
, you can find the return value of the message that will represent the output payload and a SourceCallback argument, indispensable for an intercepting processor. At ![]() , you call the next element in the chain to get the result payload. For more information on intercepting message processors,
refer to section 12.3.2.
, you call the next element in the chain to get the result payload. For more information on intercepting message processors,
refer to section 12.3.2.
We’ve finished looking at the creation of plain message processors. Now let’s take a look at the creation of REST consumers, using a specialized form of message processor.
13.2.5. Creating simple REST consumers
You’ve learned how to create custom message processors with DevKit. The possibilities for the processors are endless, but when writing Mule extensions, one of the more common scenarios will be to write connectors for REST services.
In order to simplify this common case, Mule’s DevKit provides a set of annotations that will ease the creation of REST-based connectors. These annotations will be applied to abstract methods whose code will be generated by DevKit, leaving to the developer the task of defining where and how the processor should perform the request, and leaving the dirty work of writing the boilerplate code to the annotation parser.
WS-* and specialized annotations
Given the complex nature of WS-* in comparison with REST, this kind of annotation isn’t available for WS-*. To write a Mule extension using WS-*, you should rely on the standard @Processor annotation.
The main annotation behind this functionality is @RestCall. With it, you can define parameterizable calls to REST services like this:
@Processor @RestCall(uri =
    "https://www.googleapis.com/language/translate/v2" +
    "?key={apiKey}&source={sourceLang}&target={destLang}" +
    "&q={text}",
    method = HttpMethod.GET,
    contentType ="application/json")
public abstract Object translate(
    @RestUriParam("apiKey") String apiKey,
    @RestUriParam("sourceLang")    String sourceLang,
    @RestUriParam("destLang") String destLang,
    @RestUriParam("text") String text)
    throws IOException;
You apply @RestCall to an abstract method to indicate to the DevKit that it has to generate code to realize it. Note that the uri attribute of the @RestCall has some parts parameterized: key, sourceLang, destLang, and text. These parts will be replaced with the values of the arguments marked with the corresponding @RestUriParam annotation in the method arguments. At the same time, you request DevKit to return a Java data structure from the @RestCall with the attribute contentType = "application/json". This frees your Mule app from the need to use a json-to-object-transformer right after the message processor.
Sometimes, you’ll find that there are arguments that are shared by many processors. This is the case of the key parameter in the previous example that represents the Google API key. If you have more than one message processor, it’s beneficial to configure it once for all the processors. How can you do that?
OAuth support
Mule’s DevKit features support for OAuth and OAuth2; visit the DevKit documentation site at www.mulesoft.org/documentation/display/current/Authentication+and+Connection+Management.
The answer is related to what you learned in section 13.2.1 about the @Configurable annotation. You can mark a member annotated with @Configurable with a @Rest-UriParam annotation. With this, you’ll be able to use the configured value in the REST URLs:
@RestUriParam("apiKey")
@Configurable
private String apiKey;
Other possibilities could be considered, like @RestHeaderParam that’ll define a parameter that will be passed as a header of the requests, and @RestPostParam that’ll be used to replace parts of the payload with the marked values.
Configuring parameters for all endpoints
When configuring parameters for every single endpoint of your module, you can annotate class-level members with @RestHeaderParam or @RestQueryParam.
One you have a REST processor like this working flawlessly, you have to be prepared for the opposite. You should be able to react to errors. To accomplish this, the @RestCall annotation lets you pass the argument exceptions that accepts an array of @RestFailOn. This annotation, in turn, will accept an expression argument with a MEL expression. If the result of this expression is true, an exception will be thrown. Let’s clarify this dense explanation with an example:
@Processor
@RestCall(uri =
       "https://www.googleapis.com/language/translate/v2" +
       "?key={apiKey}&source={sourceLang}&target={destLang}" +
       "&q={text}", method = HttpMethod.GET,
       exceptions=
       @RestExceptionOn(
               exception = TranslateException.class,
               expression = "#[header:http.status != 200]"))
This processor will throw a RuntimeException if the resulting status of the call is not 200. If you don’t want to throw a runtime exception but another expression, you can use the exception attribute:
@Processor
@RestCall(uri =
    "https://www.googleapis.com/language/translate/v2" +
    "?key={apiKey}&source={sourceLang}&target={destLang}" +
    "&q={text}", method = HttpMethod.GET,
    exceptions=
    @RestExceptionOn(
        exception = TranslateException.class,
        expression = "#[header:http.status != 200]"))
These annotations will let you handle most of the possible scenarios when writing REST extensions for Mule. But if you need to program a special behavior for an endpoint, Mule offers yet another annotation to mark the HttpClient the module will use. This way, you avoid creating multiple clients and have the opportunity to perform your own calls or to configure the HttpClient to fulfill special needs:
@RestHttpClient
HttpClient client = new HttpClient();
Now let’s see how to use the annotation that will let you create transformers.
13.2.6. Creating transformers
We studied transformers in chapter 4. You know that they change the format or representation of a message’s payload. The cloud connector DevKit allows you to write transformers that will be available to you as message processors and that will be also registered in Mule with the rest of the transformers; therefore, they can be used automatically by Mule, such as in autotransformers.
To create a transformer, you need a static public method in your Mule extension that doesn’t return Object. These constraints are the result of the internal nature of Java and Mule itself. Once you have the method, you need to annotate it with the @Transformer annotation. The arguments can be annotated with the same annotations for injection we studied in section 13.2.3 for message processors.
Let’s annotate a method to convert from array to List:
@Transformer(sourceTypes = { Object[].class })
public static List transformArrayToList(@Payload Object[] payload) {
    return Arrays.asList(payload);
}
In this example, you require Mule to pass as a payload an object with a specific type. If you want to support multiple input types—for instance, if you want two specific types of fruit—you can use the sourceTypes argument of the @Transformer annotation:
@Transformer(sourceTypes = { Apple.class, Banana.class })
public static FruitBowl transformFruitToBowl(@Payload Fruit payload) {
    FruitBowl bowl = new FruitBowl();
    bowl.addFruit(payload);
    return bowl;
}
If instead of enforcing source types what you want is to receive any kind of object, you could set the type of the payload argument to Object and not use the sourceTypes attribute of the transformer.
This is the last of the sections covering how to manipulate messages. Now let’s create messages by annotating methods to create message sources.
13.2.7. Creating message sources
You’ve learned so far how to create custom processors, simple REST consumers, and transformers. There’s one point they have in common: they all perform tasks with existing messages. Message sources will instead generate messages. This is easy to understand once you realize that you used message sources all through the book in the form of inbound endpoints.
To create a message source, you’ll need a method that accepts at minimum a SourceCallback attribute. Annotate this method with @Source. Once you’ve annotated it, in the code of your method you need to call the SourceCallback whenever you want to generate a message. For example, when working with Unix sockets, the callback would be invoked when a message is received. Or when working with a custom cron implementation, the message would be generated when the timer triggers an event.
SourceCallback provides one overloaded method in three forms:
- Object process()— Will send an empty message to Mule
- Object process(Object payload)— Will send a message with the passed payload to Mule
- Object process(Object payload, Map headers)— Will send a message with the passed payload and inbound properties to Mule
Now that you know how to use SourceCallback, let’s create a message source that will generate messages every interval seconds:

This will let you effectively create inbound endpoints. This is the last of the element creation mechanisms we’ll cover before discussing how to integrate your extensions with Mule Studio.
13.2.8. Integrating Mule extensions with Mule Studio
If you want to publicly distribute your Mule extension, or if you want to have a fancy-looking extension, you’ll need to use the different visual interface customization annotations of the DevKit package: org.mule.api.annotations.display. With them, you’ll be able to customize the user experience in Mule Studio.
The available annotations work at two different levels: the extension level and the field/parameter level. Let’s first cover the extension-level annotations:
- @Category— Establishes the palette in which your Mule extension will appear
- @Icons— Sets the icon set that will be used for the connectors, endpoints, and transformers of your extension
The @Category annotation accepts two attributes: name and description. They should be values within a specific set of values; otherwise, they’ll only change the Javadoc of the extension, but not the palette in Mule Studio. The acceptable values are shown in table 13.1.
Table 13.1. Valid values for the @Category annotation
|
name |
description |
|---|---|
| Endpoints | org.mule.tooling.category.endpoints |
| Scopes | org.mule.tooling.category.scopes |
| Components | org.mule.tooling.category.core |
| Transformers | org.mule.tooling.category.transformers |
| Filters | org.mule.tooling.category.filters |
| Flow control | org.mule.tooling.category.flowControl |
| Error handling | org.mule.tooling.ui.modules.core.exceptions |
| Cloud connectors | org.mule.tooling.category.cloudconnector |
| Miscellaneous | org.mule.tooling.ui.modules.core.miscellaneous |
| Security | org.mule.tooling.category.security |
The @Icons annotation will accept large (48 × 32) and small (24 × 16) attributes for connector, transformer, and endpoint. If this annotation isn’t present, DevKit will try to find the icons in the icons directory at the root of your project, concatenating the connector or module name with the element type and the size; for example, brewerydb-connector-24x16.png or brewerydb-transformer-24x16.png. All icons should use the PNG file format.
At the configuration field or parameter level, you’ll be able to annotate with the following:
- @Password— Will mark the field or parameter as a password that should have special UI handling, such as showing asterisks instead of the real values.
- @Path— Any field or parameter marked with this annotation will have a studio file/directory chooser dialog.
- @Text— Set a field or parameter as large text. This will effectively set the input as a multiline input box in Mule Studio.
- @Summary— Add information about the field or parameter to be shown in Mule Studio as summary documentation.
It’s also worth noting that DevKit requires a correct license when building extensions. This license will be shown, and should be agreed to, when the extension is installed in Mule Studio. The steps that DevKit will perform to find the correct license for the project are the following:
1. Try to use a LICENSE.md file in the same directory as the pom.xml.
2. Check for a LICENSE.txt beside the pom.xml.
3. If the pom.xml file contains a Licenses section, try to download the licenses.
At this point, you know the more useful mechanisms for creating your Mule extensions using DevKit. Now let’s jump into the action, creating your own connector in the next section.
13.3. Creating a REST connector
Prancing Donkey, even though it’s a top-tech company in all management matters, still brews its exquisite beer with the original recipe and traditional process that has been used for generations. Over the years, this attachment to authenticity has created a wealth of truly loyal customers. But the managers at Prancing Donkey want to keep an eye out for the preferences of the new generation, and more specifically for the taste of selective customers of regional breweries.
The software architects of Prancing Donkey have decided, after evaluating different options, that the most favorable approach would be to use the information available in BreweryDB (www.brewerydb.com/), an online and API-accessible database that contains a vast amount of data about beer and breweries.
Make it pretty!
Your Mule extensions can be customized to use custom icons and friendly names, or to change the category in the palette of Mule Studio. You can find more information about this at the DevKit documentation site (http://mng.bz/cXHG).
The Prancing Donkey software architects have decided to create a Mule extension to use BreweryDB in their research. This task could potentially be completed by writing an XML schema, a namespace handler, a bean definition, and some customized message processors. Following this process can take up to a few days of work, depending on how experienced the assigned developer is with the powerful but complex Spring Framework extension mechanism.
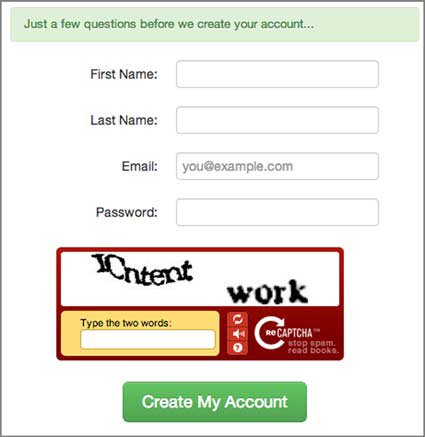
Thankfully, they were familiar with the Mule DevKit before starting to work on this project; by using it, they can complete this task in much less time. Let’s start from the beginning by signing up at BreweryDB via www.brewerydb.com/auth/signup, as in figure 13.2.
Figure 13.2. Signing up at BreweryDB
Once you’re signed up as a user, you need to register your application with BreweryDB. Register it by visiting www.brewerydb.com/developers/apps and clicking Register a New App to get a dialog like the one shown in figure 13.3.
Figure 13.3. Registering an application at BreweryDB

At the end of the process, you’ll have the API key you need to access BreweryDB using Mule. At this point, you should start to work on your Mule extension. Let’s create the skeleton with DevKit’s Maven Archetype. This will provide you with a working project that’ll be able to parse the DevKit annotation in your class and generate the subsequent boilerplate to have a full-fledged Mule extension:
mvn archetype:generate
      -DarchetypeGroupId=org.mule.tools.devkit
      -DarchetypeArtifactId=mule-devkit-archetype-cloud-connector
      -DarchetypeVersion=3.4.0
      -DarchetypeRepository=http://repository.mulesoft.org/releases/
Maven will ask a few questions at this point:
- artifactId— Use mule-module-brewerydb.
- version— The default value of 1.0-SNAPSHOT is fine, so press Enter.
- muleConnectorName— Use Brewerydb.
Don’t use paths with spaces
DevKit won’t be able to work properly on directories that contain spaces in their full path, such as C:UsersMuleteerMy Documents or /home/muleteer/My Downloads/mule-modules. It’s highly recommended to use a path without spaces in all Mule development and deployments.
The process should end with a Build Success message that will let you know that the skeleton is ready to work. What you’ve obtained is a Maven project preconfigured with some plugins to read classes in the Java directory in order to find @Connector or @Module annotations and generate the corresponding extensions for them.
You can find a sample skeleton of your connector in src/main/java under the package org.mule.modules with the class name BrewerydbConnector and an example test case in the corresponding package under src/test/java.
Now let’s take a look at the API documentation of BreweryDB (www.brewerydb.com/developers/docs). You should find the common configuration of the endpoints to establish them as @Configurable elements in your connector. It seems that the only common configuration element is the ApiKey, so create a @Configurable element in your connector for it:

At ![]() , you use the annotation we discussed in section 13.2.1 to set this property as a configurable element; at the same time, you establish that this property should be passed as a
query parameter in your REST requests, as you did in section 13.2.5.
, you use the annotation we discussed in section 13.2.1 to set this property as a configurable element; at the same time, you establish that this property should be passed as a
query parameter in your REST requests, as you did in section 13.2.5.
At this point, you’re ready to create your first endpoint. To meet the requirements of Prancing Donkey, you need an endpoint that tells you which beers are in the market. Visiting again the API documentation of BreweryDB, you can find the Get Beers endpoint (www.brewerydb.com/developers/docs-endpoint/beer_index#1), which will give you the information you need. As the endpoint is a simple REST call, call the required method with the annotation covered in section 13.2.5:
@Processor
@RestCall(uri = "http://api.brewerydb.com/v2/beers",
    method = HttpMethod.GET,
    contentType ="application/json",
    exceptions={@RestExceptionOn(
        expression=
           "#[message.inboundProperties['http.status'] != 200]")})
public abstract String getBeers(
    @Optional @RestQueryParam("p") int page,
    @Optional @RestQueryParam("ids") String ids,
    @Optional @RestQueryParam("name") String beerName,
    @Optional @RestQueryParam("abv") String abv,
    @Optional @RestQueryParam("ibu") String ibu,
    @Optional @RestQueryParam("apiKey") String glasswareId,
    @Optional @RestQueryParam("glasswareId") String srmId,
    @Optional @RestQueryParam("srmId") String availableId,
    @Optional @RestQueryParam("availableId") String styleId,
    @Optional @RestQueryParam("styleId") String isOrganic,
    @Optional @RestQueryParam("hasLabels") String hasLabels,
    @Optional @RestQueryParam("year") int year,
    @Optional @RestQueryParam("apiKey") int since,
    @Optional @RestQueryParam("status") String status,
    @Optional @RestQueryParam("order") String order,
    @Optional @RestQueryParam("sort") String sort,
    @Optional @RestQueryParam("withBreweries") String withBreweries
    ) throws IOException;
Following the BreweryDB documentation, the endpoint is marked with some optional parameters to refine the search, all of them passed as query parameters in a GET call.
At this point, you should document your connector. DevKit will try to enforce best practices at build time by checking that the Javadoc is preset for each of the members, methods, and arguments. If you want to disable this feature, you can pass -Ddevkit.javadoc.check.skip=true to the Maven command line. For instance, your get-beers processor Javadoc will look like this:
/**
  * Gets a listing of all beers. Results will be paginated with 50
  * results per page. One of the following attributes must be set:
  * name, abv, ibu, srmId, availabilityId, styleId.
  * {@sample.xml ../../../doc/brewerydb-connector.xml.sample
  *  brewerydb:get-beers}
  *
  * @param page Page Number.
  * @param ids ID's of the beers to return, comma separated.
  * @param beerName Name of a beer.
  * @param abv ABV for a beer
  * @param ibu IBUs for a beer.
  * @param glasswareId ID for glassware.
  * @param srmId ID for SRM.
  * @param availableId ID for availability.
  * @param styleId ID for style.
  * @param isOrganic Certified organic or not (Y/N).
  * @param hasLabels Has a label (Y/N).
  * @param year Year vintage of the beer.
  * @param since What has been updated since that date.
  * @param status Status of the brewery.
  * @param order How the results should be ordered.
  * @param sort How the results should be sorted.
  * @param withBreweries Include brewery information.
  * @return JSON structure with the beers in the db.
  * @throws IOException on error connecting to the api.
  */
Now you’re ready to build your connector. A simple mvn clean install should be enough to generate either a JAR file for standard Java distribution or a ZIP to distribute as a Mule Studio plugin. In order to generate an update site directory to install your plugin in Mule Studio, pass the environment property devkit.studio.package.skip to DevKit as false through Maven:
mvn -Ddevkit.studio.package.skip=false clean install package
Let’s put into practice what we covered in section 13.1 to import your recently created connector in Mule Studio. In Mule Studio, open the Install dialog (see figure 13.4) by using the Help > Install New Software... menu entry. Once there, create a new site by clicking Add and browsing the filesystem, looking in the target folder of your project for an update site. Once completed, you can select your recently created install site in the drop-down menu, select the brewerydb cloud connector, and install.
Figure 13.4. Mule Studio’s Install dialog

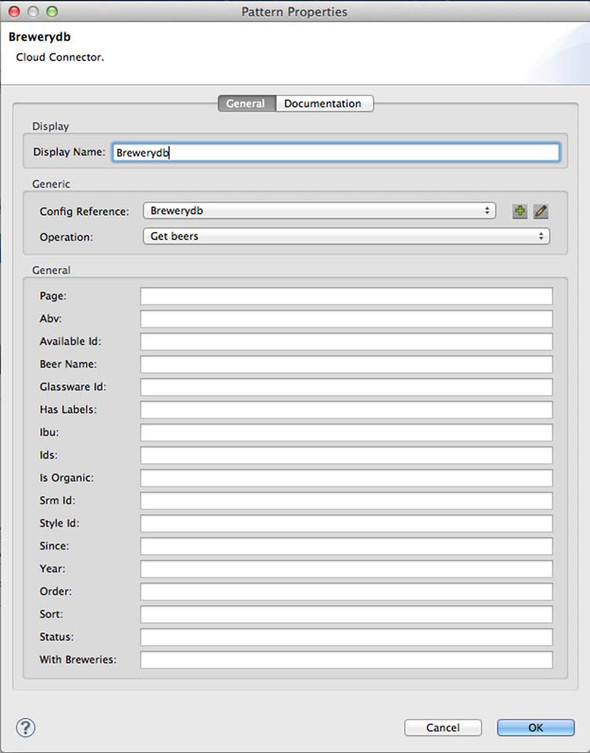
At this point, you can create a new project to use the brewerydb connector. First, create a new connector using the Mule Studio wizard. Then create a flow using your connector, which you’ll find in the Cloud Connectors category in the palette, as shown in figures 13.5 and 13.6; also, you can use it in plain XML, like this:
Figure 13.5. Mule Studio’s cloud palette

Figure 13.6. The Brewerydb connector in Mule Studio
<brewerydb:config
      name="Brewerydb" apiKey="YOURAPIKEY"/>

<flow name="getBeersFlow">
    <http:inbound-endpoint
        exchange-pattern="request-response"
        host="localhost" port="8081" />
    <brewerydb:get-beers config-ref="Brewerydb"/>
</flow>
Then you can run the project, access with a browser the address you set up in the inbound endpoint, and see your brand-new connector in action.
13.4. Summary
You saw in this chapter how Mule simplifies the creation of extensions; the different annotations available to create connectors, endpoints, processors, and transformers; and how they’re processed by the DevKit annotation parser to create a Mule extension. You learned how to create a REST-based extension for Mule for BreweryDB and how to install it in Mule Studio.
Extensibility is a key feature for any kind of framework, and in Mule it plays a first-class role. DevKit simplifies the creation of Mule extensions so much that the considerable amount of knowledge required to build an extension in the traditional way is reduced to only using a small set of annotations and a Maven plugin. Let’s now see how Mule simplifies other common integration challenges—business orchestration, event processing, rules evaluation, and scheduling.