
Chapter 4. Transforming data with Mule
This chapter covers
- How transformers behave and how you can work with them
- General-purpose transformers from Mule’s core library
- Specialized transformers from the XML module
- Transformers for JSON from the JSON module
- Custom transformers made with JVM scripting languages
Every application nowadays understands XML or JSON and uses interoperable data structures, right? If you replied yes, be informed that you live in Wonderland and, sooner or later, you’ll awake to a harsh reality! If, like most developers, you answered no, then you know why data transformation is such a key feature of an ESB.
We’re still far away from a world of unified data representation, if we ever reach that point. Unifying data requires tremendous effort. For public data models, it takes years of work by international committees to give birth to complete and complex standards. In large corporations, internal working groups or governance bodies also struggle to establish custom, unified data representations. In the meantime, the everyday life of a software developer working on integration projects is bestrewn with data transformation challenges.
When you’re done with this chapter, you’ll have a clear picture of how Mule removes data transformation millstones from your integration projects.
4.1. Working with transformers
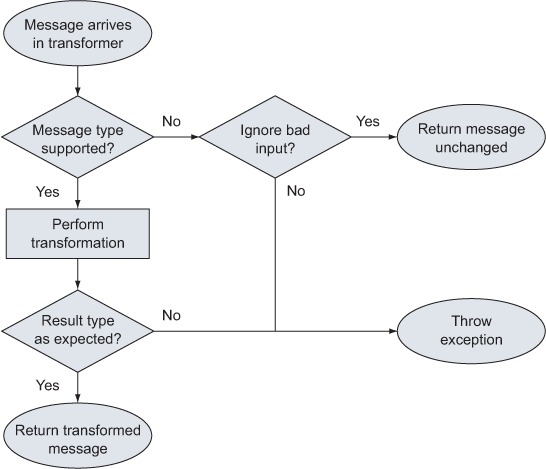
A Mule transformer has a simple behavior, as illustrated by the flow chart in figure 4.1. As this diagram suggests, a transformer strictly enforces the types of data it receives and outputs. This can be relaxed by configuration; a transformer won’t report an exception for bad input but will return the original message unchanged, without enforcing the expected result type (return class). Therefore, use this option sparingly.
Figure 4.1. The default behavior of a Mule transformer
A transformer can alter a message in different ways:
- Payload type transformation— The data type of the message payload is transformed from one binary form to another. For example, a java.util.Map is transformed into a javax.jms.MapMessage.
- Payload format transformation— The data format of the message payload is transformed from one form to another. For example, a byte array containing an XML document instance is transformed into a byte array containing a plain-text instance for logging. It’s also possible to transform from one format to the same format, such as when transforming from noncanonical to canonical XML formats.
- Properties transformation— The properties of the message are modified, whether by adding, removing, or modifying existing properties. For example, a message needs a particular property to be set before being sent to a JMS destination.
Transformers often come in pairs, with the second transformer able to undo what the first one has done. For example, compression and decompression, which are payload-format transformations, are handled by two different transformers. A transformer able to reverse the action of another one is called a round-trip transformer. Making a message go through a transformer and its round-trip one should restitute the original message.
Mule is extremely rich in available transformers; each Mule library you’ll use in your project can potentially contain transformers:
- The Mule core contains a wealth of general-purpose transformers; we’ll detail a few of them in section 4.3.
- Modules can also contain transformers; in sections 4.4 and 4.5, we’ll take a look at some of those that come with the XML module and JSON module, respectively.
- Transports and cloud connectors may provide transformers as well.
You’ve discovered the basics of message transformation in Mule. Now you need to learn the fundamentals and the subtleties of transformer configuration in order to use transformers efficiently in your own projects.
Transforming and Mule Enterprise Edition
Mule Enterprise Edition comes with a simple yet powerful graphical data-mapping and transformation system: DataMapper. It provides a graphical facility to define message and payload transformation that currently supports XML, JSON, CSV, POJO, Excel, and fixed-width files. It provides a simpler alternative to implementing either programmatic Mule transformers or complex XSLT transformations.

4.2. Configuring transformers
Before we discuss how to use transformers, we should discuss their scopes and their common configuration attributes. As with endpoints, which we discussed in chapter 3, transformers can be configured to be local or global. For instance, in listing 4.1 you can see a flow with a VM inbound endpoint declared as a local endpoint that will encode its input in Base64.
Listing 4.1. Encoding a payload in Base64
<flow name="base64-flow">
    <vm:inbound-endpoint path="base64.in"
        exchange-pattern="request-response" />
    <base64-encoder-transformer />
</flow>
This transformer is deemed local because it doesn’t have a name attribute and can’t be referenced. This kind of declaration can be a viable option for extremely short configurations. As soon as your configuration won’t fit fully on one or two screens, or whenever you have a transformer that’s shared by several flows, you might risk losing track of the different transformers you use and might miss opportunities to reuse them in different places. When your configuration starts to grow, prefer using global transformers and reference them from your endpoints. For the sake of brevity, we’ll often use local transformers in the upcoming listings.
On the other hand, the following configuration fragment shows the declaration of a global object to a byte-array transformer (discussed in section 4.3.1) named ObjectToByteArray.
<object-to-byte-array-transformer name="ObjectToByteArray" />
Now you know how to declare a basic transformer. The next natural step is to configure it. When configuring, you should consider that transformers support four, usually optional, common configuration attributes:
- ignoreBadInput— The purpose of this Boolean attribute has been demonstrated in figure 4.1. This instructs the transformer to perform no action and return the message unchanged in case its type isn’t supported.
- returnClass— This attribute allows you to configure the fully qualified name of the type of class that the transformer is expected to return. This is useful if you want to enforce a stricter type than the default one of a transformer (for example, a transformer might target java.lang.Object, whereas you want to enforce that it produces only java.util.Map objects).
- encoding— This represents the encoding that should be used for the transformer result. Setting the encoding could be useful to deal with old, non-Unicode systems. This is only useful in transformers such as the string-to-byte-array-transformer for which the output is encoded.
- mimeType— Sometimes return class and encoding might not be enough; in those cases, it might be useful to configure an exact MIME type. For instance, a String UTF-8 result potentially could be text/plain, text/tab-separated values, or something else.
It’s worth emphasizing that those aren’t the only configuration attributes a transformer supports; there could be other attributes specific to each kind of transformer. For example, the xslt-transformer accepts an xsl-file attribute, and the jaxb-object-to-xml-transformer needs a jaxbContext-ref. We’ll cover these transformers in sections 4.4.2 and 4.4.3, respectively.
Now that you know how to configure a transformer, let’s have some fun chaining a few of them. You have two choices to chain transformers: you can put them in a flow in the desired order, or you can use the transformer-refs element that will accept a whitespace-separated list of transformer references. Let’s see both styles in action in the next listing.
Listing 4.2. Two styles of references to declare a chain of three transformers
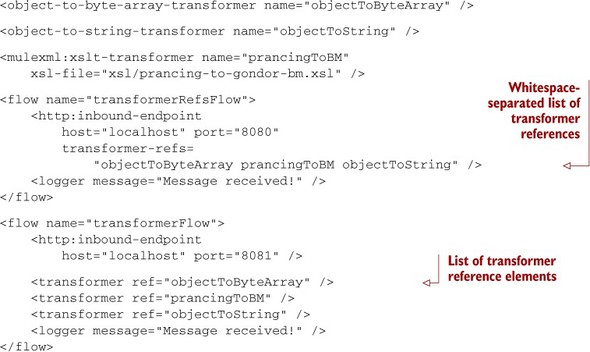
The second approach is more foolproof because individual transformer references can be checked by advanced XML editors, whereas a list of references will only be checked at runtime when Mule will try to load the configuration.
You’ve now acquired enough knowledge about using and configuring transformers. In the next sections, we’ll take a deeper look at some notable transformers picked from the core library of Mule and from the XML module and the JMS transport.
Best practice
Look for implementations of org.mule.api.transformer.Transformer in Mule’s API to discover all the available transformers.
4.3. Using core transformers
There are dozens of transformers in the core library of Mule. They all provide transport-independent transformation features such as compression, encryption, or payload-value extraction. In this section, we’ll look at six of them that illustrate common payload type and property transformations:
- Dealing with bytes— Using byte transformers to perform payload type transformation with bytes and streams
- Compressing data— Applying gzip transformation to compress or decompress a payload
- Modifying properties— Working with the transformer that fiddles with the properties of a message
- Using the expression language— Creating a new payload with a transformer that can evaluate expressions
- Enriching messages— Adding more information to your message without completely transforming it
- Automagic transformation— Automatic selection of the best transformer available to get the desired result
For our first bite at core transformers, we’ll look at a pair of them that deal with bytes.
4.3.1. Dealing with bytes
Bytes are the finer grain of data unit that’s exchanged between systems. In these systems, bytes are usually handled as streams or as arrays, with the former suited for large volumes of data and the latter for smaller chunks of information.
In Mule core, the ByteArrayTo... transformers are able to handle both arrays and streams of bytes as their input. This means that if the endpoint you’re declaring a transformer on is capable of streaming, the transformer will be able to act on the flow of data without the need to first store it in an array.
Let’s consider first the versatile byte-array-to-object-transformer. If this transformer receives a byte payload that represents a serialized Java object, the result will be an object deserialized from these bytes. If the payload isn’t a serialized object, the transformer will build a String from the bytes. The following code demonstrates this transformer, configured to deserialize byte arrays or streams into instances of java.util.Map only:
<byte-array-to-object-transformer
    name="ByteArrayToMap"
    returnClass="java.util.Map" />
If this transformer is used in an endpoint that receives anything other than serialized map objects, a TransformerException will be thrown and the processing of the message will be stopped.
Have you ever entered your accented first, last, or street name in a website and received a series of question marks in the confirmation screen in return? If so, you’ve been the victim of a developer’s assumption that there are no characters beyond the 128 defined in the US ASCII set. Whenever you transform bytes into Strings or vice versa, you must consider the encoding that will be used during the conversion. This is because the representation of a single character doesn’t always translate to a single byte; the byte representation of a character is dictated by the encoding. Note that UTF-8 is nowadays a common encoding, as it’s backwards compatible with ASCII and efficient enough for most non-Asian character sets.
In Mule, the encoding used by a transformer is determined by looking first at the encoding defined in the transformer, and then at the encoding of the message. If none is specified, the encoding defined on the inbound endpoint at which the transformation happens will be used. If the endpoint has no encoding set, then the default encoding of the platform will be used. In Mule 3, the default encoding is UTF-8. Your best option is to have the encoding specified in the message. Some transports do this automatically for you, such as the HTTP transport, which recognizes the Content-Encoding header and sets the value on the message accordingly. If this isn’t possible, then you’ll have to ensure that clients use a predefined encoding and stick to it.
The alter ego of this transformer is the object-to-byte-array-transformer. As you’d expect, it works the opposite way; it transforms Strings and streams into byte arrays and marshals serializable payloads into bytes using the standard Java serialization mechanism. Note that this transformer chokes on nonserializable payloads as it can’t possibly perform any transformation on them. The following shows the simple declaration of the transformer to copy all the bytes of an incoming input stream into an array:
<object-to-byte-array-transformer name="ObjectToByteArray" />
Hint
Sometimes you might need to have a human-readable description of an object, for example, for debugging purposes. Instead of using object-to-byte-array and obtaining bytes you need to interpret correctly, you can use instead the object-to-string transformer that will take care of the encoding automatically.
Copying a complete input stream to a byte array can have a serious, if not fatal, impact on the memory of your Mule instance. This should never be taken lightly. Why would you do something that foolish? When processing an event asynchronously, you have no guarantee that the input stream will stay open for the duration of the message processing. If the inbound endpoint decides it has received its response, it will close its connection, taking down all the open streams. Using this transformer fills the message with a payload that can be processed safely anytime after it has been received; this is a way to “detach” the message from its transport.
Best practice
Always consider the memory impact of the transformation you intend to use.
Best practice
When dealing with transient data that may not be available for the time needed to process the whole flow (for example, FTP data), consider using the file, VM, or JMS transports to send the message to a reliable outbound endpoint and perform your processing from there.
If you list all the byte-related transformers in Mule core, you’ll find a few others. We’ll quickly detail them here:
- byte-array-to-serializable-transformer and serializable-to-byte-array-transformer—These are specialized versions of the byte-array-to-object-transformer and the object-to-byte-array-transformer, which only transform to and from serialized Java objects.
- byte-array-to-hex-string-transformer and hex-string-to-byte-array-transformer—This pair of transformers isn’t related to the other ones. As their names suggest, they transform from and to hexadecimal representations of bytes.
- byte-array-to-string-transformer and string-to-byte-array-transformer— These behave like their byte counterparts, except that they rely on the current encoding to transform bytes to and from strings.
Now you have a good idea of the transformers you can use to transform your data from bytes to other forms. Let’s cover how to deflate message payloads.
4.3.2. Compressing data
Under their byte representations, messages can become big—to the point that they aren’t sent practically over the network. For example, JMS providers often discourage publishing messages with heavy payloads; when you start going beyond a hundred kilobytes, it’s usually a good time to consider compression. With XML being a common payload in messaging systems nowadays, you can expect drastic reductions of data volume, as XML is a good candidate for compression.
How do you compress data in Mule? Let’s suppose that you have to publish large strings to a JMS queue. The receiving consumer, which listens on this queue, expects you to compress the data before you send it. If you are in such a situation, the gzip-compress-transformer is the one you’re looking for. In the next listing, you’ll see how to use it.
Listing 4.3. Compressing a payload using gzip
<string-to-byte-array-transformer />
<gzip-compress-transformer />
<jms:outbound-endpoint
    queue="compressedDataQueue"
    connector-ref="dataJmsConnector"/>
Why do you use two transformers? Why can’t you just apply the gzip-compress-transformer? The reason why you use a string-to-byte-array-transformer before the gzip-compress-transformer is subtle. Because the endpoint receives a java.lang.String payload and because String implements Serializable, the natural behavior of the compressor would be to serialize the string first, and then compress it. But what you want to send to the JMS queue are the bytes that constitute the string in a compressed manner. This is why you use the string-to-byte-array-transformer first.
Conversely, if the receiving consumer was a Mule JMS inbound endpoint, you’d have to use several transformers—in fact, the round-trip twins of the ones on the outbound endpoint demonstrated previously—but in reverse order. This is demonstrated in the following listing.
Listing 4.4. Uncompressing a payload using gzip
<jms:inbound-endpoint
    queue="compressedDataQueue"
    connector-ref="dataJmsConnector"/>
<gzip-uncompress-transformer />
<byte-array-to-string-transformer />
The transformers we’ve shown so far were all performing payload-type transformations. Let’s now look at a transformer able to modify message properties.
4.3.3. Modifying properties, flow variables, and session variables
In sections 2.3.1 and 2.3.2, we discussed message properties and the different scopes they can have. Whether they were called message properties, flow variables, or session variables, you should’ve already been exposed to the notion of extra chunks of data carried alongside the main payload of a message. For example, the headers that you send with data in an HTTP POST action are the inbound properties of a message whose payload would be the body of the HTTP operation.
Adding, copying between scopes, and modifying or removing properties or variables is therefore an important aspect of dealing with messages in Mule. This is where the property transformer, the variable transformer, and the session variable transformer (as they’re known in Mule Studio) come in handy. Even if they’re shown in Mule Studio as a single transformer for simplicity (you can see the three of them chained in figure 4.2), you should know that each of them offers a set of message processors if you’re writing your Mule applications in plain XML. In table 4.1, you can find the corresponding message processor to use depending on the desired scope and operation.
Figure 4.2. A chain of a property transformer, a flow variable transformer, and a session variable transformer

Table 4.1. Transformers for properties, flow variables, and session variables
|
Operation |
Property |
Flow variable |
Session variable |
|---|---|---|---|
| Set | set-property | set-variable | set-session-variable |
| Remove | remove-property | remove-variable | remove-session-variable |
| Copy | copy-properties |
The set and remove operations are self-descriptive. They add or remove an item in the corresponding type. But what’s that copy-properties element that’s available for properties and not for variables or session variables? You may remember from section 2.3.2 that properties have inbound and outbound scopes, but variables and session variables don’t. The copy-properties element will copy a property present in the inbound scope to the outbound one. The inbound properties aren’t sent to the next endpoint, and they get lost. That’s why copy-properties can be useful if you plan to pass inbound properties to the next endpoint.
Let’s consider its different operations while looking at a few examples.
Removing properties that you don’t need is a common operation. Listing 4.5 shows a transformer that removes some properties that aren’t supposed to arrive at the next endpoint.
Listing 4.5. Removing properties
<remove-property propertyName="temp.productId" />
<remove-property propertyName="temp.customerId" />
<remove-property propertyName="prancing.totalValue" />
If the keys of the properties follow a name convention, it might be useful to delete groups of properties. The remove-property operation lets you do it easily with a wildcard or a regular expression as key, as you can see in the next listing.
Listing 4.6. Removing multiple properties

If you need to set properties that might arrive at the next endpoint, you need to use the set-property element. You can see how simple it is in this listing.
Listing 4.7. Adding properties with set-property
<set-property propertyName="Content-Type"
  value="application/vnd.ms-excel" />
<set-property propertyName="Content-Disposition"
  value="attachment; filename=stats.csv" />
You may also need to rename an existing property. Listing 4.8 demonstrates two transformers that rename a property prancing.isbn to prancing.productid.
Listing 4.8. Renaming properties
<set-property propertyName="prancing.isbn"
  value="#[message.outboundProperties['prancing.productid']]" />
<remove-property propertyName="prancing.productid" />
What happens when you need a property from one scope to be present in a different scope? For instance, you might need to copy the property PrancingDonkeyRequestId from inbound to outbound so that the requestor can have it as a response property. The solution in the following listing uses the copy-properties transformer.
Listing 4.9. Copying a property from inbound to outbound scope
<copy-properties propertyName="PrancingDonkeyRequestId" />
The elements for variables and session variables have been intentionally designed to be similar, almost identical, to the ones you learned before. In the next listing, you can see how to add a variable in the flow.
Listing 4.10. Setting a variable
<set-variable variableName="prancingVariable"
  value="Value or expression" />
Best practice
Use property transformers to deal with transport- or routing-related message metadata.
You’re now able to modify the properties of your messages, whether it’s to satisfy an internal need in your Mule instance or for an external transport or remote system. Let’s now explore a last core transformer that’s a valuable resource.
4.3.4. Transforming with expressions
In section 2.4, you learned about the support for expressions that exists in Mule. The expression-transformer is able to use these expressions to transform the payload of the message it processes. This transformer can be configured to evaluate one or several expressions. Depending on the configuration, the resulting message payload will be an object (single expression) or an array of objects (multiple expressions).
Internally, Prancing Donkey has to deal with a lot of internet addresses for such things as monitoring the activity of their clients for security and statistics. They use instances of java.net.InetAddress as the payload of administrative messages that run around in their Mule instances. Unfortunately, one of their statistics applications needs to receive only the host IP of the client, whereas the security system needs the host IP and to know whether it’s multicast or not.
To feed them the right information, you use an expression transformer returning a single value in listing 4.11 for the statistics system, whereas you return two values in listing 4.12 to extract the relevant bits for the security system.
Listing 4.11. Expression transformer returning a single element
<expression-transformer expression="message.payload.hostAddress" />
The output of the transformer present in listing 4.11, intended for the statistics system, is a string representing the host address. Notice the use of the Mule Expression Language in the next listing.
Listing 4.12. Expression transformer returning an array
<expression-transformer expression=
"{message.payload.hostAddress, message.payload.multicastAddress}"/>
To feed the security system with an array of objects, you take advantage of the capacity to return arrays of the Mule Expression Language; more on this in appendix A.
The expression transformer is so powerful that it can sometimes replace a trivial component. Therefore, before writing any code, check first if you can achieve your goal with the expression transformer.
4.3.5. Enriching messages
It’s not always about completely transforming a message of one kind into a message of another kind; what about when you want to enrich a message with a piece of additional information? Let’s see how the message enricher can help you to salt your food a bit without converting fruits into vegetables.
When a flow contains a request-response outbound endpoint, the message that comes back from this endpoint replaces whatever message was under processing in the flow before calling the endpoint. This isn’t always desirable when you have subsequent message processors that need some or all of the original message context to work properly.
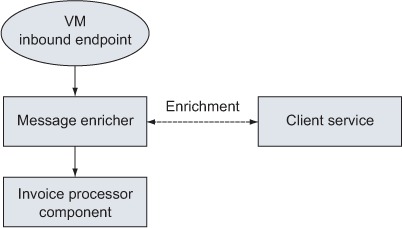
When faced with this kind of situation, what you need to use is a message enricher instead of an outbound endpoint. A message enricher is indeed a message processor that can perform a call to an outbound endpoint (or any message processor) and merge the response back to the message currently in flow. Message enrichers rely heavily on Mule expressions for handling the source data and its destination; the Mule Expression Language will be discussed in appendix A.
Figure 4.3 illustrates a flow used by Prancing Donkey for processing client invoices in which a message enricher is used to fetch the preferred currency code of a client and store it in an inbound header before calling a processor component.
Figure 4.3. A message enricher brings extra data to the main flow.
Listing 4.13 shows the configuration for this enrichment scenario. The service called by the enricher returns the client information in a hash map, where currencyCode is the key under which the client currency code is stored. See how the enricher uses two expressions (discussed in section 2.4): one for extracting the desired value from the map data it fetched from the outbound endpoint call and one for setting the value on the current message in an inbound header (that is, a message property).
Listing 4.13. Enriching a message
<flow name="invoice-processor">
    <vm:inbound-endpoint path="invoice-processor"
                         exchange-pattern="request-response" />
    <enricher source="#[message.payload.currencyCode]"
         target="#[flowVars['currencyCode']]">
        <vm:outbound-endpoint path="client.service"
             exchange-pattern="request-response" />
    </enricher>
    <component class="com.prancingdonkey.service.InvoiceProcessor" />
</flow>
Look it up
Combined with a caching message processor, an enricher can be a efficient way of fetching lookup data.
The message enricher is versatile enough to be able to perform multiple enrichment operations using the data it fetched on its message processor. Listing 4.14 shows a new version of the previous enricher that now copies over both the currencyCode and promoCode fields from the client data hash map.
Listing 4.14. The message enricher can perform multiple enrichments at once.
<enricher>
    <vm:outbound-endpoint path="client.service"
                          exchange-pattern="request-response" />
    <enrich source="#[message.payload.currencyCode]"
            target="#[flowVars['currencyCode']]" />
    <enrich source="#[message.payload.promoCode]"
            target="#[flowVars['promoCode']]" />
</enricher>
We’ve focused so far on flows and the control they give you over how messages transit within Mule. We’ll now look in detail into the message interactions Mule supports and the set of abstractions that enables these interactions.
4.3.6. Automagic transformation
Before we close this section on core transformers, let’s look at the auto-transformer. As its name suggests, this transformer is able to apply the desired transformation automatically. How does it do that? It selects the most appropriate transformer based on the return class that you specify on its declaration:
<auto-transformer
    returnClass="com.prancingdonkey.statistics.ActivityReport" />
The auto-transformer can only select transformers that are discoverable. It works better with custom objects, as shown in the example, instead of generic ones like strings or byte arrays. For the latter, there are far too many choices available for the auto-transformer to pick the right one.
You already know that Mule provides several transformers to convert between common types. Those transformers implement the interface org.mule.api.transformer.DiscoverableTransformer. That lets Mule know the possible source and destination formats the transformers support and the priority of each of them to perform transformations. With this information, Mule is capable of choosing the most appropriate transformer for an input.
In chapter 13, you’ll see how to write your own autodiscoverable transformers and how to register them in Mule for magical transformations.
When is using this transformer advisable? Mainly when a single endpoint receives a variety of different payloads and needs to transform them to a particular custom object type.
We’re now done with our quick tour of a few core transformers. You’ve learned to deal with bytes, compress them, alter message properties, and use the power of expressions. Your bag of transformation tricks already allows you to perform all sorts of message manipulations. That said, none of the transformers we’ve looked at were performing data format transformation. Because XML is particularly well suited for data format transformations, we’ll now look at some of the transformers you can find in the Mule XML module.
4.4. Using XML transformers
The XML module provides several transformers, while MEL offers a global XPath function. We’ll look at the XPath function and the two most significant transformers:
- XPath function— To query XML documents for selected parts or computed values
- XSL transformer— To transform an XML payload into another format thanks to XSLT
- XML-marshaling transformers— To marshal and unmarshal objects to and from XML
The other transformers of the XML module, not covered here, provide extra features such as transforming from and to a DOM tree or generating pretty-printing XML output.
Before we look at the XSL transformer, a quick note about the namespace prefix used for the XML module configuration elements: You’ll notice that it’s mulexml:. Why not xml:? you might ask. Because xml: is a reserved prefix that always binds to http://www.w3.org/XML/1998/namespace. Now that you won’t be surprised by this detail, let’s proceed.
4.4.1. XPath and Mule
Before we jump into the XML transformers, there’s one outstanding tool in the plethora of XML tools available: the XML Path Language, or XPath. XPath is a query language used to select nodes from an XML document. It can even do simple computations, such as summing or checking the number of children of an element. The XPath expressions are present in some of the more relevant XML tools, and they’re also useful by themselves.
The Mule approach to XPath is a Mule Expression Language function: xpath. We’ve already visited expression evaluators in section 2.4, so you should be familiar with their mechanism; we’ll put them in action one more time. Let’s say that you have this product-listing XML:
<products>
  <product>
    <id>1234</id>
    <type>Imported Beer</type>
    <name>Mordor's Pale Lager</name>
    <price>10.90</price>
  </product>
</products>
Now let’s propose a popular usage scenario; you might want to take the ID and put it into a message property for later use with a message-property transformer. In listing 4.15, you see how this can be accomplished using an XPath expression.
Listing 4.15. Using a XPath expression to add a property
![]()
The XPath expression in ![]() will extract the value of the element id inside the element product and, thanks to the message-properties transformer that we discussed in section 4.3.3, it’ll go straight to an outbound message property called productId. As you might already suspect, the XPath expression is using a Mule Expression Language function named xpath.
will extract the value of the element id inside the element product and, thanks to the message-properties transformer that we discussed in section 4.3.3, it’ll go straight to an outbound message property called productId. As you might already suspect, the XPath expression is using a Mule Expression Language function named xpath.
Sometimes you might be interested in replacing the payload in the node you selected with an XPath expression. To accomplish this, you might think of an expression transformer or an XSL transformation (which we’ll visit soon), but Mule has a more configurable and faster solution for this—the xpath-extractor-transformer:
<mulexml:xpath-extractor-transformer
    expression="/products/product[1]"
    resultType="NODESET" />
Here you instruct the xpath-extractor-transformer to replace your payload. First you set an expression with the expression attribute to extract the first product in products, and then you request it to return it as a node set with the resultType attribute. The resultType could also be configured to return Node, NodeSet, Boolean, or Number.
4.4.2. Transforming format with XSL
XSL transformation (XSLT; see www.w3.org/TR/xslt) is a powerful and versatile means to transform an XML payload into another format. This other format is usually XML too (with a different DTD or schema), but it can also be HTML or even plain text. What does it take to use this transformer? Here’s the definition of the XSL transformer that performs a transformation to convert from Prancing Donkey’s product XML to the product format required to appear in the Gondor’s Beer Magazine search engine:
<mulexml:xslt-transformer
    xsl-file="xsl/prancing-to-gondor-bm.xsl" />
This is nothing exciting; it creates a transformer that loads a specified file from the classpath. Gondor’s Beer Magazine has a bit more complex format; it might require modularized XSLTs that rely on import statements. This is common. An XSL template document often has external resources, such as other XSL files or even external XML documents. How does the XSL transformer load its main XSL and its external resources? The XSL transformer uses a file-lookup fallback strategy that consists of looking first into the filesystem and then in the classpath, and finally trying a regular URL lookup. With this in mind, you should be able to write XSL templates that work even if your Mule instance doesn’t have access to the internet.
The XSL transformer is extremely versatile as far as source and return types are concerned. Indeed, this transformer goes to great lengths to accept a wide variety of input types (bytes, strings, and W3C and dom4j elements), so you seldom have the need to perform any transformation prior to calling it. This transformer also infers the best matching return type based on the input type (or the returnClass attribute if it has been set). For example, if a W3C element is used as the input, the transformer will build a W3C node as a result.
XSL templates can receive parameters when they start processing an XML source. How do you do this in Mule? Going back to the previous example, let’s pretend that you want to change the discount offered to the magazine readers from the default value to 10%. This can be achieved by passing the appropriate parameter to the XSL transformer, as shown in the following listing.
Listing 4.16. An XSLT transformation with a parameter
<mulexml:xslt-transformer
    xsl-file="xsl/prancing-to-gondor-bm.xsl">
    <mulexml:context-property
        key="discount" value="10" />
</mulexml:xslt-transformer>
Notice how you use the repeatable mulexml:context-property element. It’s a Spring XML list entry, which means that you can also use the key-ref and value-ref attributes if you want to refer to beans in your configuration.
You might wonder if this is the best way to inject dynamic values into the XSL transformer; no, there’s a much better solution. Suppose the alignment parameter you need to pass to the XSL is defined in a property of the current message named discount. The best way to pass this value to the XSL is to use the expression language that we talked about in section 4.3.4. You can see how this works in the next listing.
Listing 4.17. Using an expression to pass a parameter to XSLT
<mulexml:xslt-transformer
    xsl-file="xsl/prancing-to-gondor-bm.xsl">
    <mulexml:context-property key="discount"
        value="#[message.inboundProperties['discount']]" />
</mulexml:xslt-transformer>
Now we’re talking! Not only will the XSL transformation work on the current message payload, but it can also work on all sorts of dynamic values that you’ll grab thanks to the expression evaluators.
If you’ve used XSLT before, you should know that it’s a pretty intense process that pounds on CPU and memory. The XSL transformer supports performance optimization parameters that allow you to fine-tune the maximum load and throughput of your transformation operations. The following shows the original example configured to have a maximum of five concurrent transformations:
<mulexml:xslt-transformer maxActiveTransformers="5"
    maxIdleTransformers="5"
    xsl-file="xsl/prancing-to-gondor-bm.xsl" />
Note that because this particular XSL is expensive to load in memory, you don’t want to dereference any transformer once it’s been created. This is why you have set the number of idle transformers to be the same as the maximum number of transformers. A lower number would have caused the potential destruction and re-creation of transformers.
This transformer uses a pool of javax.xml.transform.Transformer workers to manage the load. Without erring on the side of premature optimization, always take a little time to consider the expected concurrent load this transformer will have to deal with. If a message arrives when this transformer has exhausted its pool, it will wait indefinitely until a transformation is done and a worker is returned to the pool (where it won’t have time to chill out, unfortunately). Therefore, if you estimate that the amount of messages you’ll need to transform is likely to exceed the maximum number of active transformers, or if you don’t want to reach that limit, you might want to locate this transformer behind an asynchronous delivery mechanism. This way you’ll refrain from blocking threads in a chain of synchronous calls waiting for the workers to pick up transformation work.
You’ve learned how to transform the payload format with XSL, so let’s see another transformer from the XML module that can deal with the payload type itself.
4.4.3. XML object marshaling
If you’ve done more than trivial tasks with Java serialization, you’ve realized that it’s challenging at best...and challenged at worst. Alternative marshaling techniques have been developed, including creating XML representations of objects. The paired XML marshaler and unmarshaler from the XML module uses ThoughtWorks’ XStream (http://xstream.codehaus.org/), for that matter.
Thanks to XStream, these transformers don’t require a lot of configuration. For example, you don’t need to provide an XML schema, as is often the case with other XML data binders. Notice also how this transformer is able to marshal any object, unlike the byte array ones you’ve seen before, which were relying on Java’s serialization mechanism. The following declares an XML object marshaler:
<mulexml:object-to-xml-transformer />
Nothing spectacular, but a lot is going on behind the scenes. As a variant of the previous example, the following declares a marshaler that serializes the full MuleMessage instead of the payload:
<mulexml:object-to-xml-transformer acceptMuleMessage="true"/>
This transformer would be well suited for persisting detailed error messages in an exception strategy, as it would marshal the whole MuleMessage in XML, a format an expert user can analyze and from which you can easily extract parts for later reprocessing. It can also be useful for scenarios in which you want to send a MuleMessage over the wire without resorting to standard Java serialization.
Similarly, the declaration of the round-trip XML object unmarshaler is as trivial as this:
<mulexml:xml-to-object-transformer />
Mule also supports XStream’s concept of custom aliases. XStream will, by default, name the tag elements with the fully qualified name of the classes (for example, org.Mule.DefaultMuleMessage), and this can affect the readability of the XML. With custom aliases, you can change the element name used to marshal/unmarshal objects. Let’s see custom aliases in action:
<mulexml:object-to-xml-transformer>
    <mulexml:alias
        class="org.mule.DefaultMuleMessage"
        name="MuleMessage" />
</mulexml:object-to-xml-transformer>
When marshaling org.mule.DefaultMuleMessage, this transformer will output XML whose root element will be named MuleMessage.
As you’ve seen, the XML module contains transformers that can be useful in different scenarios even if you don’t use XML extensively.
JAXB and Mule
The out-of-the-box features of XStream (to marshal and unmarshal objects with almost no configuration) and the fact that XStream is one of the oldest players in the XML-marshaling game gave it a privileged place in the Mule XML module, where in fact it’s still the main XML marshaler.
But over the past few years, the Java Architecture for XML Binding, or JAXB (http://jaxb.java.net/), has gained some momentum thanks to its more holistic approach. Mule has similar support for JAXB as for XStream; in fact, you’ll probably find it almost identical. Let’s start discussing it with an example. The following shows an XML object marshaler that will transform its input to XML:
![]()
Here you can see a similar statement to the equivalent for XStream marshaling of an object, and the behavior is also similar.
You can spot one difference at ![]() : the reference to a jaxbContext. Although XStream figures out most of the required information, JAXB will require a context to be able to do its binding
framework operations. A JAXB context is a collection of Java packages that holds all the information and meta-information
required to marshal and unmarshal objects.
: the reference to a jaxbContext. Although XStream figures out most of the required information, JAXB will require a context to be able to do its binding
framework operations. A JAXB context is a collection of Java packages that holds all the information and meta-information
required to marshal and unmarshal objects.
The JAXB context
Usually the JAXB context packages are generated from an XML schema document; this requires a certain level of integration between your build tool and JAXB that goes beyond the scope of this book. For more information about creating the JAXB context, visit the JAXB tutorial at http://jaxb.java.net/tutorial/.
To define a JAXB context in Mule, you need to pass a list of one or more package names, separated by commas, that contain classes generated by the JAXB binding compiler or manually annotated classes. Here you can see how to define a JAXB context:
<mulexml:jaxb-context name="myJaxbContext"
    packageNames="com.prancingdonkey.model.jaxb" />
On the other hand, the round-trip transformer to convert from XML to objects using JAXB could be easily predicted and is shown here:
<mulexml:jaxb-xml-to-object-transformer
    jaxbContext-ref="myJaxbContext" />
Here we conclude the visit to the XML features of Mule, in which we reviewed data selection with XPath, transformation with XSLT, and marshaling/unmarshaling with XStream and JAXB. Now let’s study another common format: JSON.
4.5. Transforming JSON with Mule
XML has been around for more than a decade. Its predecessor, SGML, originated in the 1980s. XML has an established and well-documented toolset capable of navigation, selection, validation, and marshaling. But as XML users and Peter Parker surely know: “With great power comes great responsibility.” In this case, with great power comes great CPU consumption.
Although XML works well for a number of application scenarios, JSON has been gaining ground over the last few years. In those situations for which XML is too much, JSON is a favorable alternative. It’s not uncommon now to see big players in the cloud, such as Google or Yahoo, using JSON in some of their key services.
JSON is an open, lightweight, text-based, data-exchange format based in JavaScript. It’s human-readable, platform-independent, and enjoys a wide availability of implementations for almost all possible platforms. It’s popular in AJAX because it can easily be parsed by JavaScript, but it’s commonly used in all kinds of services and document-oriented databases.
As you might expect, Mule has first-class support for JSON. Mule is therefore able to query a JSON document and marshal between JSON and POJO. In this section, we’ll discuss these features and how they’ll help you to consume and produce JSON. Let’s start with a method to query JSON documents.
4.5.1. Querying JSON with MEL
In section 4.4.1 you saw how to query XML using the XPath language. Unfortunately, there’s no standard equivalent language for JSON. Mule fills the gap using a combination of the json-to-object-transformer, to convert the JSON to a hierarchy of objects, and the Mule Expression Language, to query it. This mechanism doesn’t have all the potential that XPath has, but it’ll probably be enough for most JSON-querying use cases.
To visit these capabilities with examples, let’s say that Prancing Donkey needs to accept stock availability requests from third parties, and as they usually use JavaScript, they want to deliver the requests in JSON.
Listing 4.18. JSON request to query stock availability
{ "requestType":"availability",
    "products":[
      { "productId":"100345", "requestedUnits":"10" }
    ]
}
Now let’s see in listing 4.19 how to query the document for the request type and the productIds and put it in message headers using the message-properties transformer we discussed in section 4.3.3.
Listing 4.19. Querying a JSON document and putting the result in headers

The syntax couldn’t be simpler; if an item of the path is an array, use [n] to index the array. Following this simple format, you can see how you select the requestType value at ![]() , and how at
, and how at ![]() you select the productId value of the first child of the products array.
you select the productId value of the first child of the products array.
Best practice
This JSON query method is a simplistic tool that doesn’t have all the features that XPath has. As it doesn’t have filtering or aggregate functions, it’ll only work well with simple scenarios. For the cases in which it doesn’t fit, you can try Groovy or JSON marshaling.
4.5.2. JSON object marshaling with Mule
In the same manner that you marshal to and from XML using the Mule transformers in section 4.4.3, you can marshal and unmarshal objects using JSON. This time, instead of XStream or JAXB, Mule is supported by the Jackson processor, a popular, high-performance, and open source JSON parser and generator (http://jackson.codehaus.org/).
To walk through the characteristics of this feature, let’s try marshaling and unmarshaling a stock item. In order to do so, you need some annotated Java classes and the JSON format. First let’s take a look in the next listing at the JSON entry that represents a provider for the Prancing Donkey business.
Listing 4.20. JSON representing a business provider of the Prancing Donkey
{ "name":"sandyman's Mill",
        "phonenumbers":[
{ "name":"pbx", "number":"555-3456-2342" } ],
        "emailaddresses":[ { "name":"office",
        "email":"[email protected]" },
{ "name":"corporative",
        "email":"[email protected]" } ] }
Now you need some Java classes that represent this JSON. You’ll need a class for the provider itself that you can find in the next listing, a class for a phone number, and finally a class for an email address.
Listing 4.21. Provider.java

You can see here a perfectly regular POJO with the exception of the annotation at ![]() . This is a Jackson annotation that will instruct the processor to autodetect getters and setters in this class. Jackson also
supports most of the JAXB annotations; as a result, you can use the same model to generate JSON and XML as you’ve already
followed in section 3.3.2. There are also other, more fine-grained annotations available in Jackson. For more information, please refer to the Jackson
documentation (http://wiki.fasterxml.com/JacksonAnnotations).
. This is a Jackson annotation that will instruct the processor to autodetect getters and setters in this class. Jackson also
supports most of the JAXB annotations; as a result, you can use the same model to generate JSON and XML as you’ve already
followed in section 3.3.2. There are also other, more fine-grained annotations available in Jackson. For more information, please refer to the Jackson
documentation (http://wiki.fasterxml.com/JacksonAnnotations).
With this POJO, you almost represent a Prancing Donkey provider, but not quite, because of the items in ![]() and
and ![]() . You can see that there are some subelements that need to be addressed as POJOs too. As with the provider, they’re going
to be simple. You can find them in listings 4.22 and 4.23.
. You can see that there are some subelements that need to be addressed as POJOs too. As with the provider, they’re going
to be simple. You can find them in listings 4.22 and 4.23.
Listing 4.22. PhoneNumber.java
@JsonAutoDetect
public class PhoneNumber
{
    private String name;

    private String email;

    // getters and setters here
Listing 4.23. EmailAddress.java
@JsonAutoDetect
public class EmailAddress
{
    private String name;

    private String number;

    // getters and setters here
Once you have the classes that represent the JSON data, you can apply a transformer to unmarshal from a JSON document to a proper Java object. In order to unleash all this magic, you’ll need to use a JSON unmarshaler transformer:
<json:json-to-object-transformer
    returnClass="com.prancingdonkey.model.json.Provider" />
After declaring this, the name of the round-trip transformer to marshal from objects to a JSON document won’t be a surprise:
<json:object-to-json-transformer />
Now you can marshal and unmarshal between JSON and annotated Java classes. But what happens when you want to use classes that can’t be annotated directly? This might happen with classes from external dependencies or with other special cases that won’t let you access the class source code. The solution is to use a mixin. A mixin is an interface or abstract class that defines methods with exactly the same signature as an original class so that they can be annotated. Later, a mixin map will be able to mix the annotations and the original class. You can see how you can define a mixin map in listing 4.25 that will use the class found in listing 4.24, and then finally reference it in a JSON transformer, as you can see in listing 4.26. Note that mixins aren’t available out of the box for XML.
Listing 4.24. Creating a mixin
@JsonAutoDetect
public abstract class ExternalItemMixin
{

    public abstract String getItemNumber();

    public abstract void setItemNumber(String itemNumber);

    @JsonIgnore
    public abstract String getUnwantedValue();

    @JsonIgnore
    public abstract void setUnwantedValue(String unwantedValue);
}
Listing 4.25. Definition of a mixin map
<json:mapper name="myMixinMap">
    <json:mixin
        mixinClass="com.prancingdonkey.model.json.ExternalItemMixin"
        targetClass="org.external.ExternalItem"/>
</json:mapper>
Listing 4.26. Referencing a mixin map
<json:json-to-object-transformer
    name="jsonToExternalItem"
    returnClass="org.external.ExternalItem"
    mapper-ref="myMixinMap" />
You learned how to deal with the two most common formats: XML and JSON. These are best used for small data retrievals or for big transformations such as marshaling and stylesheet templates. That will cover quite a few of the use cases for Prancing Donkey, but there are still areas that aren’t covered: small, special-case transformations that we’ll cover next as scripting transformers, and medium- to big-size transformation cases that will be covered in chapter 13.
4.6. Scripting transformers
In chapter 13, you’ll see how to write a custom transformer in Java for transformations that Mule doesn’t supply in its distribution, but that’s not the only way to go. Mule lets you use any JSR 223–compliant script engine such as Groovy, JavaScript, Jython, or JRuby to implement custom transformations.
Let’s start with a simple example of using a Groovy script to perform an inline payload transformation. The transformer in the following listing will uppercase the String payload sent through it.
Listing 4.27. Uppercasing a String payload using a Groovy transformer

The scripting transformer is defined at ![]() along with an inline script that’s defined at
along with an inline script that’s defined at ![]() . As you can see, the engine is set to groovy; all JSR 223 scripting languages have an engine name, such as js, ruby, or python. You set this to indicate that you want the Groovy scripting engine to execute the supplied script. The script itself is
defined at
. As you can see, the engine is set to groovy; all JSR 223 scripting languages have an engine name, such as js, ruby, or python. You set this to indicate that you want the Groovy scripting engine to execute the supplied script. The script itself is
defined at ![]() , and it’s uppercasing the payload and returning it.
, and it’s uppercasing the payload and returning it.
Let’s now consider a more complex transformation scenario and see how it’s simplified by Mule’s scripting and Groovy support. Prancing Donkey has recently decided to standardize on a canonical XML model to represent order data. The web application used to submit orders, however, is still using a legacy CSV representation. Although the web development team works on refactoring the web application to submit the order as XML data to a JMS queue, you’ve been tasked to find an interim solution. You decide to use a file inbound endpoint and implement a custom transformer to build an XML-order representation from the CSV file. Once the document has been created, it’ll be submitted to a JMS queue for further processing. The next listing shows how an example order is represented as XML.
Listing 4.28. Representing an order as XML
<orders>
  <order>
    <subscriberId>409</subscriberId>
    <productId>1234</productId>
    <status>PENDING</status>
  </order>
  <order>
    <subscriberId>410</subscriberId>
    <productId>1234</productId>
    <status>PENDING</status>
  </order>
  <order>
    <subscriberId>411</subscriberId>
    <productId>1235</productId>
    <status>PENDING</status>
  </order>
</orders>
The next listing demonstrates the legacy CSV format you need to convert from, using the same data as listing 4.28.
Listing 4.29. Representing an order as CSV
409,1234,PENDING
410,1234,PENDING
411,1235,PENDING
Start off by writing the script to transform the CSV to XML. You’ll make use of Groovy’s builder functionality to create the XML. This will most likely be a bit too verbose to include directly in the Mule config, so you’ll define it in an external file, as detailed in the next listing.
Listing 4.30. Transforming a CSV payload to XML

This short script iterates over each line of the payload and constructs the corresponding XML. It makes use of Groovy’s builder syntax to concisely create and return the XML response. Listing 4.31 illustrates how to configure Mule to load CSV data from a file, transform it to XML, and publish it to a JMS queue.
Listing 4.31. Using a Groovy transform to transform CSV to XML

The file inbound endpoint configured at ![]() is configured to wait for files to appear. The files are transformed to an Object, in this case a String, by the byte-array-to-object-transformer at
is configured to wait for files to appear. The files are transformed to an Object, in this case a String, by the byte-array-to-object-transformer at ![]() . Your scripting transformer is defined at
. Your scripting transformer is defined at ![]() . The script element is defined at
. The script element is defined at ![]() and will execute orderTransformer.groovy, whose contents are shown in listing 4.30 when invoked. This time, you leave off explicitly specifying the engine and instead let Mule infer it from the file extension.
The resultant XML is finally sent as the payload of a JMS message on the orders queue.
and will execute orderTransformer.groovy, whose contents are shown in listing 4.30 when invoked. This time, you leave off explicitly specifying the engine and instead let Mule infer it from the file extension.
The resultant XML is finally sent as the payload of a JMS message on the orders queue.
4.7. Summary
Message transformation is a crucial feature of ESBs because it allows you to bridge the gap between different data types and formats. In this chapter, you’ve learned the way transformation occurs in Mule, what it’s good for, and how to use it in your integration projects.
You’ve discovered some of the existing Mule transformers. Some of them came from the core library, and others came from specific modules or transports. Though they had different purposes, they were similar in kind. This similarity makes them easy to learn and use. It also allows you to compose them in transformation chains to perform even more advanced or specific transformation operations.
Message transformation is yet another domain in which Mule shines by its simplicity and extensibility. The several lines of code and configuration required to roll your own custom transformers hopefully convinced you of this.
In the next chapter, you’ll learn how to invoke business logic with Mule components and how to simplify your projects using configuration patterns.