
Apache Zeppelin is a nifty web-based tool that helps us visualize and explore large datasets. From a technical standpoint, Apache Zeppelin is a web application on steroids. We aim to use this application to render some neat, interactive, and shareable graphs and charts.
The interesting part of Zeppelin is that it has a bunch of built-in interpreters—ones that can interpret and invoke all API functions in Spark (with a SparkContext) and Spark SQL (with a SQLContext). The other interpreters that are built in are for Hive, Flink, Markdown, and Scala. It also has the ability to run remote interpreters (outside of Zeppelin's own JVM) via Thrift. To look at the list of built-in interpreters, you can go through conf/interpreter.json in the zeppelin installation directory. Alternatively, you can view and customize the interpreters from http://localhost:8080/#/interpreter once you start the zeppelin daemon.
In this recipe, we'll be using the built-in SparkContext and SQLContext inside Zeppelin and transform data using Spark. At the end, we'll register the transformed data as a table and use Spark SQL to query the data and visualize it.
The list of subrecipes in this section is as follows:
- Installing Zeppelin
- Customizing Zeppelin's server and websocket port
- Visualizing data on HDFS – parameterizing inputs
- Using custom functions during visualization
- Adding external dependencies to Zeppelin
- Pointing to an external Spark cluster
Zeppelin (http://zeppelin-project.org/) doesn't have a binary bundle yet. However, just as its project site claims, it is pretty easy to build from source. We just ought to run one command to install it on our local machine. At the end of this recipe, we'll take a look at how to point our Zeppelin to an external Spark master:
git clone https://github.com/apache/incubator-zeppelin.git
cd incubator-zeppelin
mvn clean package -Pspark-1.4 -Dhadoop.version=2.2.0 -Phadoop-2.2 -DskipTests

Once built, we can start the Zeppelin daemon using the following command:
bin/zeppelin-daemon.sh start

To stop the daemon, we can use this command:
bin/zeppelin-daemon.sh stop
Note
If you come across the following error, you can check with rat.txt, only to find that it complains about your data file:
Failed to execute goal org.apache.rat:apache-rat-plugin:0.11:check (verify.rat) on project zeppelin: Too many files with unapproved license: 3
Simply move your data file to a different location and initiate the build again.
Zeppelin runs on port 8080 by default, and it has a websocket port enabled at the +1 port (8081) by default. We can customize the port by copying conf/zeppelin-site.xml.template to conf/zeppelin-site.xml and changing the ports and various other properties, if necessary. Since the Spark standalone cluster master web UI also runs on 8080, when we are running Zeppelin on the same machine as the Spark master, we have to change the ports to avoid conflicts.

- For now, let's change the port to
8180. In order for this to take effect, let's restart Zeppelin usingbin/zeppelin-daemon restart
Once we start the daemon, we can point our browser to http://localhost:8080 (change the port as per your modified port configuration) to view the Zeppelin UI. Zeppelin organizes its contents as notes and paragraphs. A note is simply a list of all the paragraphs on a single web page.
Using data from HDFS simply means that we point to the HDFS location instead of the local filesystem location.
Before we consume the file from HDFS, let's quickly check the Spark version that Zeppelin uses. This can be achieved by issuing sc.version on a paragraph. The sc is an implicit variable representing the SparkContext inside Zeppelin, which simply means that we need not programmatically create a SparkContext within Zeppelin.

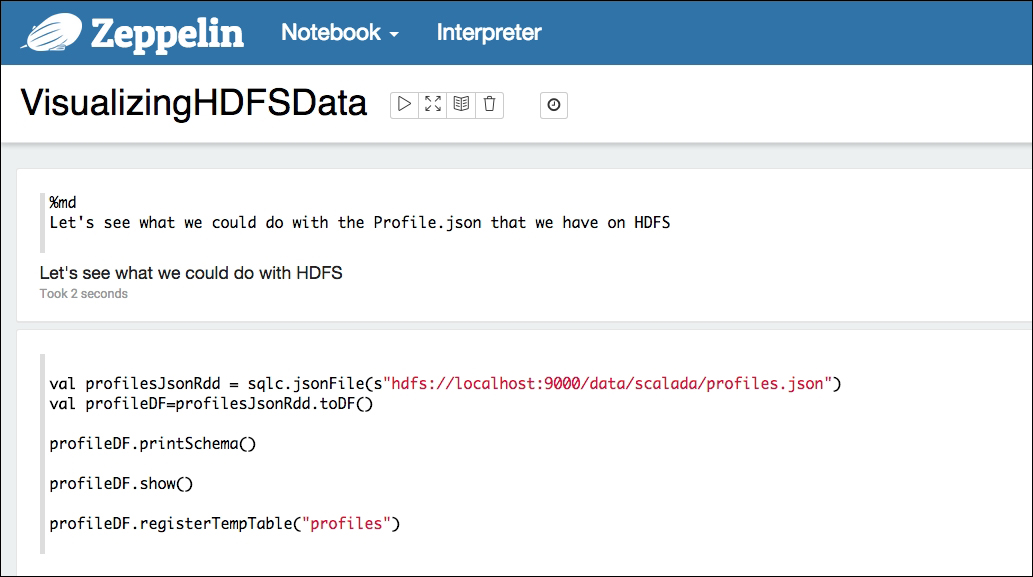
Next, let's load the profiles.json sample data file, convert it into a DataFrame, and print the schema and the first 20 rows (show) for verification. Let's also finally register the DataFrame as a table. Just like the implicit variable for SparkContext, SQLContext is represented by the sqlc implicit variable inside Zeppelin:
val profilesJsonRdd = sqlc.jsonFile("hdfs://localhost:9000/data/scalada/profiles.json")
val profileDF=profilesJsonRdd.toDF()
profileDF.printSchema()
profileDF.show()
profileDF.registerTempTable("profiles")

Let's now run a simple query to understand eye colors and their counts for men in the dataset:
%sql select eyeColor, count(eyeColor) as count from profiles where gender='male' group by eyeColor
The %sql at the beginning of the paragraph indicates to Zeppelin that we are about to execute a Spark SQL query in this paragraph.

Now, if we wish to share this chart with someone or link it to an external website, we can do so by clicking on the gear icon in this paragraph and then clicking on Link this paragraph, as shown in the following screenshot:

We can actually parameterize the input for gender instead of altering our query every time. This is achieved by the use of ${PARAMETER PLACEHOLDER}:
%sql select eyeColor, count(eyeColor) as count from profiles where gender="${gender}" group by eyeColor

Finally, if parameterizing using free-form text isn't enough, we can use a dropdown instead:
%sql select eyeColor, count(eyeColor) as count from profiles where gender="${gender=male,male|female}" group by eyeColor

While Spark SQL doesn't support a range of functions as wide as ANSI SQL does, it has an easy and powerful mechanism for registering a normal Scala function and using it inside the SQL context.
Let's say we would like to find out how many profiles fall under each age group. We have a simple function called ageGroup. Given an age, it returns a string representing the age group:
def ageGroup(age: Long) = {
    val buckets = Array("0-10", "11-20", "20-30", "31-40", "41-50", "51-60", "61-70", "71-80", "81-90", "91-100", ">100")
    buckets(math.min((age.toInt - 1) / 10, buckets.length - 1))
  }
Now, in order to register this function to be used inside Spark SQL, all that we need to do is give it a name and call the register method of the SQLContext's user-defined function object:
sqlc.udf.register("ageGroup", (age:Long)=>ageGroup(age.toInt))
Let's fire our query and see the use of the function in action:
%sql select ageGroup(age) as group,
          count(1) as total
from profiles
where gender='${gender=male,male|female}' group by ageGroup(age)
order by group
Here is the output:

Sooner or later, we would be depending on external libraries than that come bundled with Zeppelin, say for an efficient CSV import or RDBMS data import. Let's see how to load a MySQL database driver and visualize data from a table.
In order to load a mysql connector java driver, we just need to specify the group ID, artifact ID, and version number, and the JAR gets downloaded from the maven repository. %dep indicates that the paragraph adds a dependency, and the z implicit variable represents the Zeppelin context:
%dep
z.load("mysql:mysql-connector-java:5.1.35")
If we would like to point to our enterprise Maven repository or some other custom repository, we can add them by calling the addRepo method of the Zeppelin context available via the same z implicit variable:
%dep
z.addRepo("RepoName").url("RepoURL")
Alternatively, we can load the jar from the local filesystem using the overloaded load method:
%dep
z.load("/path/to.jar")
The only thing that we need to watch out for while using %dep is that the dependency paragraph should be used before using the libraries that are being loaded. So, it is generally advised to load the dependencies at the top of the Notebook.
Let's see the use in action:
- Loading the dependency:

Once we have loaded the dependencies, we need to construct the options required to connect to the MySQL database:
val props = scala.collection.mutable.Map[String,String]();
  props+=("driver" -> "com.mysql.jdbc.Driver")
  props+=("url" -> "jdbc:mysql://localhost/scalada?user=root&password=orange123")
  props+=("dbtable" -> "(select id, name, phone, email, gender from scalada.student) as students")
  props+=("partitionColumn" -> "id")
  props+=("lowerBound" -> "0")
  props+=("upperBound" -> "100")
  props+=("numPartitions" -> "2")
- Using the connection to create a DataFrame:

import scala.collection.JavaConverters._
 val studentDf = sqlContext.load("jdbc", props.asJava)
  studentDf.printSchema()
  studentDf.show()
  studentDf.registerTempTable("students")
- Visualizing the data:

Running Zeppelin with built-in Spark is all good, but in most of our cases, we'll be executing the Spark jobs initiated by Zeppelin on a cluster of workers. Achieving this is pretty simple; we need to configure Zeppelin to point its Spark master property to an external Spark master URL. We'll be looking at how to install and run a Spark cluster on AWS, or a truly distributed cluster, in a later chapter (Chapter 6, Scaling Up), but for this example, I have a simple and standalone external Spark cluster running on my local machine. Please note that we will have to run Zeppelin on a different port because of the Zeppelin UI port's conflict with the Spark standalone cluster master web UI over 8080:
For this example, let's download the Spark source for 1.4.1 and build it for Hadoop version 2.2:
build/mvn -Pyarn -Phadoop-2.2 -Dhadoop.version=2.2.0 -DskipTests clean package
Similarly, let's download the zeppelin incubator and build it, specifying the Hadoop version to be 2.2:
mvn clean install -Pspark-1.4 -Dhadoop.version=2.2.0 -Phadoop-2.2 -DskipTests -Pyarn
Let's bring up the Spark cluster. From inside your Spark source, execute this:
sbin/start-all.sh
Finally, let's modify conf/interpreter.json and conf/zeppelin-env.sh to point the master property to the host on which the Spark VM is running. In this case, it will be my localhost, with the port being 7077, which is the default master port.
- The
conf/interpreter.jsonfile:
- The
conf/zeppelin-env.shfile:
Now, when we rerun Spark SQL from Zeppelin, we can see that the job runs on the external Spark instance, as shown here:
