
Inside Car Mount
Applications
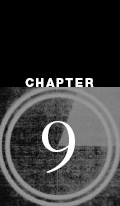
Movie footage taken from inside a car is a staple of contemporary films. Taking these car shots is problematic for guerilla filmmakers. Most car mounts are expensive, difficult to configure and use, somewhat distracting for the driver (resulting in safety issues), and may scratch the outside paint or ruin the interior. As a result, holding a camera by hand is the most commonly chosen solution. However, this method generates shaky and less than optimal footage. Using an in-car camera mount (see figure 9-1) can create ideal, smooth footage since the camera is essentially held static to the movement of the car.
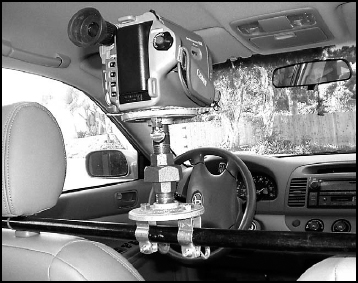
FIGURE 9.1 Completed and positioned in-car camera mount.
The in-car mount described in this chapter is simple to construct since it consists primarily of a threaded iron pipe that is attached to the bars of the headrest with standard tie-wraps. On this pipe, the same camera head you created for the hi-hat will be used to mount your camera. The head provides the ability to swivel and tilt the camera to allow nearly any capture angle.
PARTS
| Qty | Item |
| 1 | |
| 2 | |
| 2 | |
| 8 | |
| 3 | 2 |
| 1 | |
| 1 | 3 |
| 2 | |
| 8 | Plastic tie-wraps |
Whenever you’re shooting within a car, selecting a proper exposure setting is difficult. The interior and the exterior of the car will generally have extremely different lighting levels that will result in a contrast ratio far beyond the limits of most cameras. Further, if the automobile is moving, the light levels will change based on the direction of the car in relation to the current position of the sun. If the camera is shooting out the front window, you’ll need to even more precisely control the exposure.
The simplest way to dim the outside light is to affix neutral density film to the windows. This will bring the outside light levels closer to the level of the interior. Because of the brightness of daylight, usually an ND6 or an ND9 level diffusion is needed. If you’re mounting the ND film on the exterior, you’ll probably need the special ND film that has an adhesive side. It’s difficult to use snot tape to fix the ND to the exterior without wind causing sound problems or acceleration creating enough pressure to rip the ND from the outside of the window.

FIGURE 9.2 Exposure setting selected to photograph the exterior scene.
Alternately, you can use an in-car light to increase the interior light level to more closely approximate the exterior exposure. Interior lights are problematic because the amount of light required could generate a lot of heat in the small enclosed space of a car. These lights also require quite a bit of power. Interior lights (particularly portable fluorescent) are sometimes used in combination with ND gels on the windows to obtain the desired light levels.
Even with these techniques, most often you’ll have to decide whether you want to sacrifice the detail of the interior or the exterior. In figure 9-2, you can see that an exposure setting has been selected to properly photograph the exterior of the car. My reflection in the rearview mirror is underexposed to the point of being a dark gray blob. Additionally, the controls on the car dashboard are lost in shadow. Setting the exposure for the exterior can provide a very dramatic silhouette appearance of the actors inside the car.
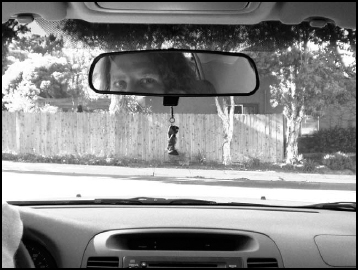
FIGURE 9.3 Exposure setting selected to properly photograph the interior of the car.
In contrast, figure 9-3 shows the exposure set to properly expose the interior of the car. In this figure, my reflection is clear and the dashboard controls (including part of the speedometer) are clearly visible. The exterior, however, is fairly blown out and lacks crisp detail.
Construction
Aside from the camera head, there is very little actual construction on the car mount. The mount is essentially a bar tie-wrapped to the headrests where it can be easily put into place and later removed. The bar can be attached to the headrests of the front or back seats. It can swivel a full 360° for flexibility to photograph the front or back seats. Make sure when you use the mount to bring a pair of scissors or wire cutters to remove it once you’re through.
Creating the mounting bar
The mounting bar will hold the camera head and will secure it to the car frame, thereby ensuring minimal jiggle in your final footage. This bar also provides the flexibility that will allow you to easily slide the camera to the left or right to dramatically change the angle that will be shot.
Before you begin construction, you’ll need to measure the distance between the headrest bars. In my car, each headrest is supported by two bars (approximately ![]() in diameter). There was a distance of 34″ between the outside bar on the driver’s side and the outside bar on the passenger headrest. This distance was perfect for a 36″ threaded steel pipe since that bar length covers the proper distance with a couple of inches to spare. If your headrest bars are farther apart (40″ is common in an SUV), you will probably need to use a coupling joint to attach two bars (say a 36″ and a 6″ bar) to extend the mounting bar to the proper length.
in diameter). There was a distance of 34″ between the outside bar on the driver’s side and the outside bar on the passenger headrest. This distance was perfect for a 36″ threaded steel pipe since that bar length covers the proper distance with a couple of inches to spare. If your headrest bars are farther apart (40″ is common in an SUV), you will probably need to use a coupling joint to attach two bars (say a 36″ and a 6″ bar) to extend the mounting bar to the proper length.
To make the mounting bar stable, screw a four-way joint onto each end of the bar. These joints will rest against the top of the back seat and will prevent the bar from tilting forward or backward. Once the four-way joints are in place, the threaded steel pipe (or camera-mounting bar) will be attached behind the headrest bars, positioned for safety. If for any reason the tie-wraps should come undone, the bar is in no danger of hitting the driver or front passenger.
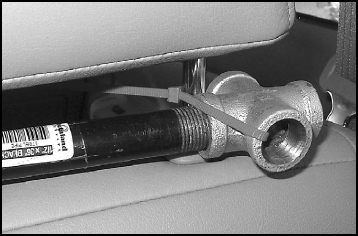
FIGURE 9.4 A tie-wrap is used to secure one end of the mounting bar to the outer headrest bar.
Raise the passenger headrest and use a tie-wrap to secure one end of the mounting bar to the outer headrest bar (see figure 9-4). Run the tie-wrap through the middle of the four-way joint and then cinch it around the headrest bar. Pull the tie-wrap tightly to minimize the amount of movement that is possible from the mounting bar.
Take another tie-wrap and secure the length of the steel bar to the inner headrest bar (see figure 9-5). The one end of the mounting bar should be fixed firmly. When you have the tie-wraps cinched tight enough, lower the headrest so it will wedge the mounting bar securely in place.
On the other side of the mounting bar, secure two tie-wraps in the same fashion (see figure 9-6). When the tie-wraps are secure, push down this headrest as well. Pull and lightly twist the bar to make certain that the entire structure is firmly in place.
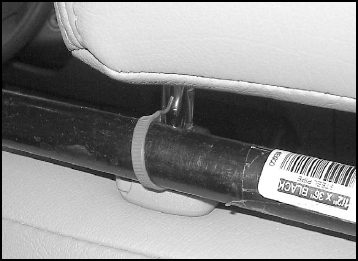
FIGURE 9.5 Another tie-wrap secures the length of the steel bar to the inner headrest bar.
| TIP | Although tie-wraps are very strong and can carry a great deal of weight, if you have a heavy camera you should use multiple wraps to ensure that the mounting bar stays in place. You don’t want to risk your expensive and fragile camera gear in order to save the pennies that an extra tie-wrap or two would cost. |
If necessary, you can secure the mount on only one of the headrests. However, this is not advisable since it will produce much shakier footage. A single headrest mount is also more likely to be unstable with a heavier camera since the mounting bar will act almost like a diving board with the camera weight at one end and no weight at the other.
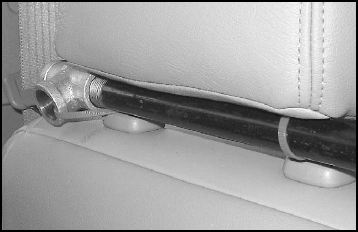
FIGURE 9.6 On the other side of the mounting bar, secure two more tie-wraps.
Creating the head
The head will match the one used for the hi-hat in Chapter 11. If you already have a hi-hat, you can simply use that head when a car mount is needed. The head uses two flanges mounted opposite to each other with a union in the middle to allow the camera to swivel 360°. The swivel flange will attach to the mounting bar with two conduit hangers. The other flange, the camera flange, will provide the platform on which the camera will sit.
Begin by gluing a non-slip pad onto the top of a flange that will be used to hold the camera. The non-slip surface will prevent the camera from moving on top of the mount. Once the glue is dry, punch a small hole on the material (see figure 9-7) where one of the flange holes is located. The camera-mounting screw will come through this hole into the bottom of the camera.
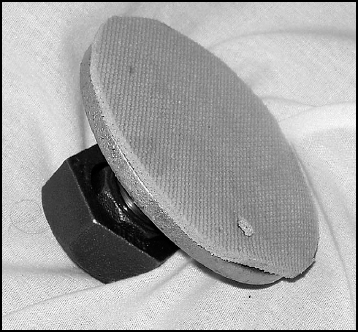
FIGURE 9.7 Punch a small hole in the non-slip material.
To begin creating the swivel flange, take a bolt and put it through one of the holes in the flange. Then take a conduit hanger and fit it onto the bolt and tighten the nut into place with your fingers. Don’t completely tighten the nut yet because you may need to align the conduit hanger in a moment. Follow the same procedure to attach the second bracket in the hole opposite the one with the first bracket (see figure 9-8).
You’ll want to replace the conduit hanger screws with eyebolts so that you can loosen or tighten the swivel at will. I’ve found that adding a nut at the top of the bolt (see figure 9-9) helps secure the bolt for better tightening.
Connect the mounting flange (the one with the non-slip surface) to the swivel flange (see figure 9-10). This connection is made by placing a union between the two flanges. The union provides a way for the camera to be panned. By simply loosened the union-connecting nut, the camera can easily be turned from side to side until the desired angle is reached.

FIGURE 9.8 Attach the second bracket in the flange hole opposite the first one.
First, screw the 1″ threaded pipe into the flange you glued the non-slide surface. The other end of the pipe screws into the top of the union. There are two threaded ends of the union, so you could use either end. However, it’s best to standardize on how the union end mounts. That way, you could unscrew the top of the hi-hat with the camera still attached and mount it on top of the tripod’s union or the camera glider or any other mount. Take the bottom part of the union and screw a 1″ threaded pipe into it. The other end of the threaded pipe is then screwed into the swivel flange.
With the eyebolts removed, bend the ends of the conduit hangers outwards enough so they may be slipped over the mounting bar. Replace the eyebolts into the holes of the conduit hangers and tighten them (see figure 9-11). The mounting bar will properly align both the conduit hangers. Now tighten the nuts and bolts on the hangers. If you can’t get a wrench inside the hanger to hold the nut steadily, simply wedge a screwdriver between the head of the nut and the side of the bracket. Then tighten the screw.
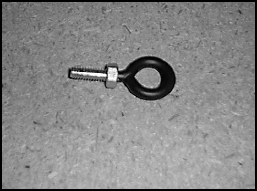
FIGURE 9.9 Add a nut at the top of the bolt to help secure the bolt.
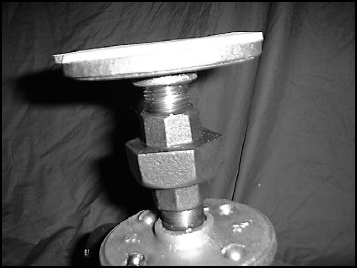
FIGURE 9.10 Connect the mounting flange to the swivel flange.
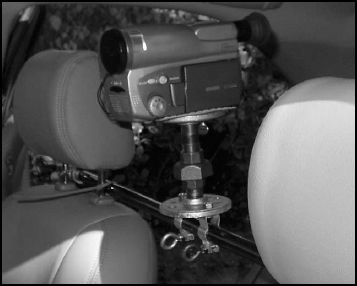
FIGURE 9.11 Place the eyebolts into the holes of the conduit hangers and tighten them.
Here are a few operating suggestions to help you get the best use from the in-car mount:
• Bring extra tie-wraps Because you cut the wraps off when you’re finished, make sure to bring extras. You may believe you’ve completed the shot, but later decide on a re-shoot.
• Set manual focus and manual exposure Automatic focus and exposure settings on a camera are excellent for home photography, but terrible for professional filmmaking. A driving car makes the camera adjust so often, the brightness fluctuates rapidly and creates unpleasant and unprofessional footage. Setting the focus and exposure manually will allow you to control how the footage will appear.
• Do a dry run To prevent wasting the actors’ time, make a dry run of the shot at the exact time of day that you plan to take principal photography. You’ll find that much of your imagined framing will have to be modified to fit the reality of the light and surrounding setting.
• Bring gaffer tape If you do any lighting inside the car, you’ll probably need to secure your fixtures in places where it won’t be convenient to use a clamp or other attaching device. Gaffer’s tape holds nicely and won’t leave much residue.