

Depth of Field Spreadsheet
Applications
For many filming setups, a cinematographer (DP) will want to decide explicitly the degree of focus necessary to tell a story with a particular shot. Deep focus may be preferred or at other times the choice is made to blur the background while the actors remain in sharp focus. Depth of field (DoF) calculations allow the DP or cameraperson to determine the size of the field of focus based on a given lens size and aperture setting.
On a professional set, you will often see the Assistant Camera people (ACs) use a tool called a Kelly Wheel (or Guild Kelly Wheel or Mark II Calculator) to determine the DoF. Unfortunately for the average filmmaker, these devices cost over $100, so they’re too expensive for easy purchase. Fortunately, many ACs find that carrying pocket-sized tables for the lenses they’ll be using is just as functional and sometime more convenient. By creating a simple spreadsheet, you can generate these tables yourself.
The DoF tables provide the hyperfocal, near-focal, and far-focal distances in both meters and feet. This information will be calculated for a given lens and aperture setting (or f/stop). Figure 18-1 shows the completed table of a 50-mm lens (listed in the top-left corner) for f/stops 2, 2.8, 4, and 5.6.
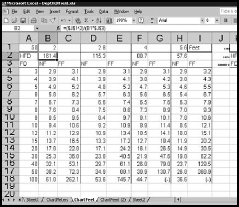
FIGURE 18.1 A completed table of a 50-mm lens for f/stops 2, 2.8, 4, and 5.6.
Once you’ve generated a set of tables, they can be easily kept in the camera pouch or your pocket for easy reference. It can also be very informative to simply study the tables and examine the way that changes in the aperture setting and distance factors affect the DoF.
| TIP | A PDA or hand-held device equipped with a spreadsheet can be used as a portable depth of field calculator. Even if your PDA doesn’t have a spreadsheet, the Internet has many DoF applications that are available for free download. These applications allow you to enter any lens focal length and will instantly make the necessary calculations. This can be especially convenient when you operate zoom lenses where the focal length can vary. Although I have a PDA with this type of program, I still prefer using my small printed tables because of convenience, unbreakability, and ease of reading even in low light conditions. |
Be aware that no table will be exact for a particular camera. While the distances presented are excellent guides for determining what image will be recorded, it is always recommended to perform camera tests before principal photography to ensure a practical understanding of the camera limitations.
| Qty | Item |
| 1 | Spreadsheet program such as Microsoft Excel or Quatro Pro |
| 2 | Sheets of paper |
| 1 | Wallet/ID card protector or laminator |
General Instructions
You undoubtedly have a general understanding of focus since you’re reading this book. However, filmmaking requires that focus be understood very precisely in relation to the image you’re trying to capture. Focus is more than a point at a set distance which is sharpest to the camera, it’s the range of distances in focus that are nearer and farther than that point.
This range of distance is called the depth of field (DoF). Objects within the DoF will appear to be nearly indistinguishable focus-wise from the object exactly at the focal point. To properly use a DoF table, you must understand how depth is affected by the various aspects of the camera and lens. Here are three general rules to help you manage DoF:
| The greater the… | ||
| focal distance, | ||
| The shorter the… | ||
| focal length, | ||
| The greater the… | ||
| f/stop number, | ||
| …the greater the depth of field |
All three of the above factors will increase DoF. Likewise the opposite of these rules will decrease the DoF. To increase the focus distance, you need to move the camera farther away from the subject (without changing the lens). If the camera is moved closer, there will be less depth of field. To decrease the focal length, a wide-angle lens (such as an 18-mm lens) will provide more depth of field than a telephoto lens (125 mm). An increase in the f/stop number (i.e. f 22) means a smaller aperture and therefore greater depth of field.
| TIP | To easily remember the last two DoF rules, think of a pinhole camera. A pinhole camera has almost unlimited DoF. The tremendous DoF is caused by the camera’s very short focal length and perhaps the smallest aperture (largest f/stop number) of all! |
Recognize that it usually isn’t practical to increase the DoF by simply changing to a lens with a smaller focal length. There is often a particular framing desired for a shot – an actor’s head, for example. If a wider lens is used, there will be more DoF. However, to get the same framing of the shot, the camera must be moved forward, eliminating the DoF gains from the lens size! The same is true if you move the camera away from the subject and cancel those gains by using a longer lens. To solve this problem, change the light level on the subject, so a specific f/stop can be used to match the desired DoF.
When there is too much depth of field, you can decrease the f/stop number to fit your needs. If the smallest f/stop number is too bright for the desired look, use a neutral density filter on the lens. This will allow you to use a smaller f/stop and achieve the limited DoF you desire.
To properly use a DoF table, you will need to have a basic understanding of four terms: near-focal distance, far-focal distance, hyperfocal distance, and circle of confusion. The near- and far-focal distances simply specify the near and far limits of the depth of field.
Hyperfocal distance is the nearest distance in sharp focus when the lens is focused on infinity. The hyperfocal distance will provide the greatest DoF for a given lens and f/stop. When focused on the hyperfocal distance, everything half the distance to the camera to infinity will be in focus. The hyperfocal distance remains the same for a given lens and f/stop setting regardless of the current focal distance setting.
The circle of confusion (CoC) defines the acceptable level of focus for a given media (35 mm negative, 16 mm negative, DV CCD, etc.). I’ve found that the easiest way to remember the meaning of CoC is to think of a point source of light traveling through the lens of the camera. The CoC value defines the out of focus limit where your eye would be confused and see the point of light as a circle on the imaging medium (negative, CCD, etc.).
To properly create a DoF table, a specific value for the CoC must be used to determine at what point an object is in or out of focus. The COC values for common camera types are listed below:
| Imaging medium | CoC value (mm) |
| 35 mm motion picture | 0.0254 |
| 35 mm still camera | 0.025 |
| 16 mm motion picture | 0.016 |
| 0.021 | |
| 0.008 | |
| 0.016 | |
| 0.011 | |
| 0.008 |
When you construct the tables with the provided instructions, the CoC value for a 35 mm motion picture will be used (0.0254 mm). You can easily change this value to the one that represents the camera you will be using.
Mathematics
If you don’t want to understand the equations behind the DoF tables, you can skip this section. It’s not critical that you understand the equations to use the tables. The information provided allows you to evaluate the limitations of the formulas. Since there are a large number of real-world factors that affect DoF (lens precision, camera mounting, etc.), there are more complex equations available that have special case calculations to add precision. However, that higher level of precision is generally more important for optical professionals than filmmakers.
To calculate DoF, the hyperfocal distance must first be computed. Hyperfocal distance is the distance that for a given lens and f/stop setting provides the greatest DoF. The equation for calculating this number is listed in the American Cinematographers Manual, 8th edition, as:
![]()
In this equation, f is the focal length of the lens, a the aperture setting (f/stop), and c the circle of confusion. The formula for the near-focal plane distance of the DoF is
![]()
In this equation, h is the hyperfocal distance, d the distance to the point of focus, and f the focal length of the lens. The formula for the far-focal plane distance of the DoF is nearly the same:
![]()
Using these three equations, all the values needed for the DoF table can be calculated. For a complete account of the background of optics, characteristics of camera optics, and an in-depth explanation of depth-of-field as it relates to cinematography, see the excellent description in the “Optics” section of “Cinematography Theory and Practice” by Blain Brown.
DV cameras
For DV cameras, there are some special considerations with regards to DoF. In contrast to the size of a 35-mm film negative, DV cameras have a small CCD chip that records the video image. Smaller chips have more depth of field than larger chips. This means that limiting the amount of DoF for DV cameras can be tricky. However, achieving deep focus on the average DV camera is a snap!
| TIP | Note that the image quality of the small chips suffers from a loss of resolution caused by diffraction at small aperture sizes (large f/stop numbers). Therefore, even if you want the optimal deep focus image, try to avoid having an f/stop greater than 11. |
Table 18-1 shows some of the most common DV cameras and the sizes of their CCDs. Note that the professional-grade cameras have the largest CCD sizes, therefore allowing them to have the smallest depth of field. Since professional cameras all have interchangeable lenses, they have even more latitude in the choice of DoF.
| CCD size | Camera type |
| Canon GL1/GL2, Sony TRV900, Sony PD100 | |
| Sony VX2000/DSR-250/PD150, Canon XL1/XL1S, JVC GY-DV300U, Panasonic AG-DVC15/AG-DVX100 | |
| Sony DSR-370L, JVC GY-DV500U/550U/5000U, Panasonic AG-DVC200 | |
| Professional-grade video cameras (dimensions close to a 16-mm camera): Sony DSR-570WSL, JVC GY-DV700WU, Hitachi Z-V1A, Panasonic AJ-D610WA/AJ-D810A/AJ-D900W, AJ-SDX900 |
TABLE 18.1 The CCD sizes of popular DV cameras.
Limiting DoF is one of the key ingredients to giving a DV image the “film look.” Most commercial films use DoF very specifically in order to blur background details to let the audience focus on the actors. Consumer-grade DV cameras, constructed primarily for taking family or vacation footage, seek to provide the largest DoF possible, so everything will always be in focus.
There are two practical methods of limiting the DoF with a DV camera: increasing the focal length and decreasing the f/stop. When I shoot DV, I typically use a Sony VX2000 and by zooming in as much as possible, the DoF can be minimized. Unfortunately, this also means that you must back away from your subject which cancels some of the advantage. By using a combination of zooming in and decreasing the f/stop number, decent results can usually be achieved.
While the DoF tables are primarily for use with prime lenses, they’re still very useful if your camera has a built-in zoom lens. Check your camera manual and you’ll find the upper and lower limits of the zoom lens. Print the proper DoF tables for the upper limit, the median, and the lower limit of your camera.
Construction
The final DoF table will contain a list of hyperfocal distances for each lens and f/stop as well as the near- and far-focal plane distances cross-referenced with focal distances. Since the common camera lenses are listed using the metric system, the table that provides the distances in meters is slightly simpler because no measurement conversion is necessary. The English system tables will be adapted from the metric tables to show the distances in feet.
All the instructions for table construction are presented for use in Microsoft Excel. If you’re using another spreadsheet, you may have to make some adaptions. I’ve tried to use only standard mathematical functions, so they may be adapted to simple spreadsheets that are available on a PDA.
Metric DoF table
Since each table is specific to a single lens and four f/stop values, you’ll be probably duplicating the same table across the different areas of the sheet. I find that I can use a 6-point font and it will still be legible. At that point size, eight tables can be fit on a single page with each table having the dimensions of less than a business card. By making each table the size of a business or credit card, you can use a standard clear wallet protector to hold your tables.
Feel free to use the table in a large point size to fit your needs. For easier reading, it is usually best to use a large font size until you’ve finished construction.
To make a DoF table, follow these steps:
1. Create a new spreadsheet in your spreadsheet program. The default Excel cell designations will be used here with rows numbered (1, 2, 3, etc.) and letters for column headings (A, B, C, etc.).
2. In the top-left cell (A1), enter the number 50. This cell will hold the focal length of the lens that is used in the table.
3. In the next columns, enter the f/stop values of 2, 2.8, 4, and 5.6 while leaving one empty cell between each. Therefore, the value 2 will appear in cell B1, 2.8 in cell D1, and so on.
4. Enter the text “Meters” into cell I1. This text is useful since you can quickly glance at the table and know all the focal distance measurements are denoted in meters.
5. Enter the formula “=A1/1000” in the cell J1. This formula will convert the current lens size into meters (from millimeters) to simplify calculations.
6. In cell J2, place the value of 0.0254. This value is the default CoC value for a 35-mm motion picture. You can change it later to the value required for your camera. For now though, use this value so you can verify the sheet is working properly with the supplied information.
7. Starting the second row, enter the text “HFD” for hyperfocal distance into cell A2.
8. Enter the formula “=(($A$1^2)/(B1*$J$2))/1000” into cell B2. This formula calculates the hyperfocal distance by squaring the focal length supplied in cell A1 and dividing it by the current f/stop times the CoC value in cell J2. The cell should show a value of 49.21259843.
9. Select the cell B2 and use the Copy item in the Edit menu.
10. Paste the formula into the cells D2, F2, and H2. You might wonder about the function of the “$” symbol in the formula. Any cell reference preceded by the dollar sign doesn’t change when pasted into a new cell. Cell references that don’t include the dollar sign automatically adjust to their new location. Therefore, when you pasted this formula into the new cells, the f/stop references changed to use the value above them, while the focal length and CoC references remained constant.
11. Format the cells to display a number with a single decimal place. In Excel, use the Cells … option in the Format menu. The formatting options only effect the display and not the actual stored precision, so the calculations will remain accurate. You should now have a row of hyperfocal distances that read 49.2, 35.2, 24.6, and 17.6.
12. Enter the text “FD” for focal distance into the cell A3.
13. Enter “NF” for near focus into the next cell (B3) and “FF” for far focus into the cell after that (C3).
14. Repeat the “NF”/“FF” pattern in the cells D3–I3.
15. Enter the following values (one per cell down the column) in A4–A18: 0.5, 0.75, 1, 1.25, 1.5, 1.75, 2, 2.5, 5, 6, 7, 8, 10, 15, 25.
You’ve now completed the basic template of the DoF table. It should appear approximately like the one shown in figure 18-2.
All that remains is entering the formulas for the near- and far-distance calculations. Follow these steps:
1. Enter the formula “=(B$2*A4)/(B$2 + (A4–$J$1))” into cell B4. This is the near-distance equation.
2. Enter the formula “=(B$2*A4)/(B$2 – (A4–$J$1))” into cell C4. This is the far-distance equation.
3. Enter the following formulas into the cells D4–I4. Each of these formulas represents the near- and far-distance equations customized to each cell location.
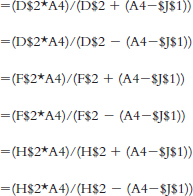

FIGURE 18.2 Basic template of the DoF table.
4. Select all the formula cells in that row (B4–I4).
5. Format the cells as numbers that display a single decimal place (see step 11 in previous section).
6. Select the square dot in the bottom-right corner of the selection and drag it downward until the selection area extends to row 18. This should fill all the necessary table cells with the proper variations of the near- and far-distance formulas (see figure 18-3).

FIGURE 18.3 Fill the table cells with the proper variations of the near- and far-distance formulas.
You now have a complete DoF table with measurements in meters. You may have noticed that some of the cells contain negative numbers. This indicates that the focal distance for that combination of parameters is infinity.
To make the chart easier to read, I’ve used a custom cell format to display negative numbers as the “(-)” text. To use this technique, select all the distance cells in the table. Open the Format dialogue and select Custom for the category. Now type “#, ##0.0; (-)” into the Type text box.
You may also want to add borders and other formatting to make the chart easier to read. You can look at figure 18-1 to see the formatting I find most legible. Be sure to save your spreadsheet when you’re done!
English measurement DoF table
Now that you have the tables constructed, adapting them to use feet instead of meters is fairly straightforward. Because the lens size and CoC measurements are given in millimeters, the table has to first convert these values to feet (or fractions of a foot) before the computations can be completed.
To adapt the metric DoF table to display the distances in feet, follow these steps:
1. Open the metric DoF table and Save As … to store it as a new file. You don’t want to corrupt your original.
2. Enter the text “Feet” into cell I1.
3. Enter the formula “=(A1*3.28)/1000” in the cell J1. This formula will convert the current lens size into feet (from millimeters).
4. Enter the formula “=J2*0.00328” in the cell J3. This formula will convert the CoC value held in J2 into feet (from millimeters).
5. Enter the formula “=($J$1^2)/(B1*$J$3)” into cell B2. This formula calculates the hyperfocal distance. The cell should show a value of 161.4.
6. Select the cell B2 and use the Copy item in the Edit menu.
7. Paste the formula into the cells D2, F2, and H2.
8. Enter the following values (one per cell down the column) in A4–A18: 3, 4, 5, 6, 7, 8, 9, 10, 12, 15, 20, 30, 40, 50, and 100.
That’s it! Your table should appear like the one shown in figure 18-4.

FIGURE 18.4 The completed DoF spreadsheet.
Multi-table pages
While you can print out the individual tables for each lens and set of f/stops, I’ve found it most convenient to create a page with eight tables on a single page. Note that when you copy and paste the table into a different section of the spreadsheet, you’ll have to adapt the formulas to reference the proper cells.
In figure 18-5, you can see the general layout that I’ve used. Make the first two tables on the left side (A1 and A2) for the same lens size (18 mm) with the full range of necessary f/stops. For example, have table A1 include f/stops 2, 2.8, 4, and 5.6 while table A2 includes f/stops 8, 11, 16, and 22. Do the same with tables B1 and B2, only this time use a different lens size (i.e. 35 mm).
Follow this same pattern with tables A3 and A4 for the 25-mm lens and tables B3 and B4 for the 50-mm lens. When you have the page filled with the eight tables, print them out. Cut the page into four rows and fold them in half so, for example, tables #1 and #2 are back to back (see figure 18-6).
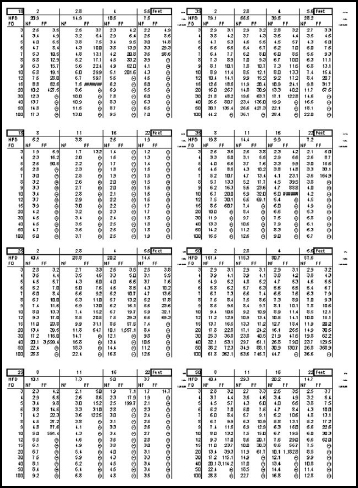
FIGURE 18.5 The general layout of eight tables on a single page.
Each set of back-to-back tables can then be slid into a clear plastic wallet ID protector slot. When complete, you have a wallet protector with a full range of lens sizes for easy reference. For more loose-leaf reference, you can use clear ID badge protectors that are available at office supply stores.
You can customize the tables based on the camera kit you will be using. It’s been my experience that a low-budget 35-mm shoot will have a lens package that includes around six prime (see Glossary) lenses. The focal lengths of a standard 35-mm kit may include 18, 25, 35, 50, 85, and 135 mm lenses. If you find out what lenses will be part of your camera package, you can print out the necessary tables to fit the ones you’ll be using.
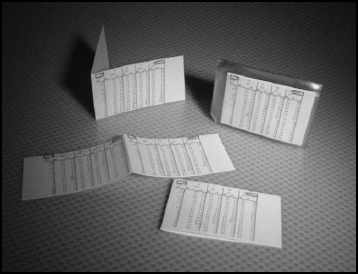
FIGURE 18.6 Cut the page into four rows and fold them in half.
The focal distances that I’ve suggested to put in the table have been very useful in my experience. If you have access to the lenses you’ll be using, however, you can make tables that are customized to the lens distance markings. For the feet table, these markings may include the distance (in feet) of 2, 3, 5, 6, 8, 10, 15, 20, 25, 30, and 40.
Suggestions
Here are a few suggestions when dealing with focus:
• Get a fiberglass tape measure (see figure 18-7) These inexpensive measures are the same type used by professional ACs to determine the distance from the camera to the focal point for focus pulling. There is usually a small metal bolt or flange on the camera where the end of the tape is hooked on. The other end is run out to the actor’s mark. If your camera doesn’t have such a bolt or flange, measure from the general location of the image plane – in a DV camera that would be the CCD. Check your manual for the approximate location of the CCD within the camera body.

FIGURE 18.7 Use a tape measure and test focus at specific positions.
• While professional-grade prime lenses use a linear focus scale so that you may change the focus between one spot and another evenly, many zoom and consumer-grade lenses do not Manufacturers of consumer-grade lenses often provide greater control of focus at the near end of the focus scale. The focus settings are more closely clustered where the lens focuses near infinity. Be sure to do tests with the lenses you will be using before the shoot.
• It’s a good idea to perform focus tests prior to a shoot Set up the camera at one end of a long hall. Place an object such as a chair (with its back facing the camera) in the hallway at a specific distance. Set the camera so that lens is at the same height as the back of the chair (any up or down tilt will affect the distance to the lens). Focus the camera on the top back of the chair. Using a tape measure, test focus at specific positions as you move the chair away from the camera. Match the focal distances that you have used for your DoF tables.