
Squeezer
Applications
A squeezer is a small box that has a dimmer control combined with an on/off switch (see figure 25-1). Squeezers are excellent for light control situations since they can be set to a particular light level and turned off and on while retaining that selected level. A squeezer can be used with most incandescent lights and many other electric devices (such as barber poles, old tape players, etc.).
The most common use of a squeezer is to control the light levels of practical lights (lights seen by the camera). This can be particularly useful to adjust the level of a practical to minimize lens flare. Since practicals are typically more for set decoration than determining the general light level of the scene, the squeezer can help adjust the practicals to match the ambient light level provided by the rest of the lighting package.
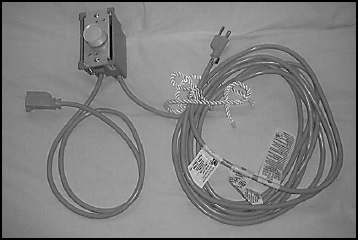
FIGURE 25.1 Squeezers can control light situations since they regulate the illumination level of an attached light.
PARTS
| Qty | Item |
| 1 | Dimmer control |
| 1 | Extension cord |
| 1 | Wall mount socket box |
| 4 | Twist-on electrical caps |
General Instructions
A squeezer works by increasing resistance (thereby decreasing the voltage) on the power being sent to the device. The decrease in voltage results in a dimmer light or a slower motor movement (in a barber pole, for example). To be confident the squeezer to work properly, make sure the device that it’s attached to is a direct AC device. If the device converts the AC current (coming from the wall outlet) into DC current, the effects of decreasing the voltage may be uncertain.
For incandescent lights, the general rule is that for every 10 V decrease in power, the color temperature will decrease 100 K (see Chapter 38 for an explanation of lighting temperature). Therefore a 120 V tungsten light that provides a color temperature of 3200 K will shine at 3100 K when the voltage is dimmed to 110 V. Likewise, the light will shine at 3000 K when the voltage is decreased to 100 V and so on.
A squeezer can be used dynamically within a scene for a variety of effects. Manually rotating the dimmer back and forth quickly with a light gelled to yellow or orange can effectively simulate the flicker of a campfire. Gelled to blue, it can simulate the flicker of a television. After you’ve created a squeezer, you’ll find numerous uses for everything from simulating lighting flashes to imitating the passing of car headlights.
Construction
A squeezer can be assembled in less than half an hour with a screwdriver and a pair of wire-cutters. Since none of the parts require soldering, be sure that the various wires are securely mounted to provide good connections. Be aware that generally a dimmer comes with three twist-on caps to secure the wires and this project requires four. Therefore, you’ll have to obtain an extra cap to properly complete the project.
The complete wiring diagram is shown in figure 25-2. The extension cord and dimmer should use the industry standard color scheme for the wires (green = ground, white = neutral, and black = hot). If the wires in your equipment don’t follow this standard, make sure that you wire the box properly, so you don’t have any electrical problems.
| TIP | When building new equipment that uses electricity, it is usually a good idea to test them on an outlet with a breaker already on it. That way, electrical problems don’t throw a distant breaker, blow a fuse, melt cable, or cause other problems. You can usually find an electrical outlet with a built-in breaker in your bathroom. These outlets have two buttons (usually one black and one red) labeled “Reset” to reset the breaker when it gets thrown. Also, there are some power strips that have breakers included. |
To create a squeezer, follow these steps:
1. Cut the extension cord into two pieces. Cutting the cord will create two cords: one with a plug end (we’ll call the plug cord) and another with a socket end (we’ll call the socket cord). I always cut my cord in uneven pieces with the socket cord being a length of about 2′ and the plug cord taking up the rest. That way the squeezer can be kept close to the item it will be controlling and the rest of the cord becomes an extension. Some people prefer the socket cord to be longer, so the item can be controlled distantly. The choice is yours.
2. Strip the wires on the cut sides of each cord.
3. Feed the stripped ends of each cord through the input holes into the wall outlet box (see figure 25-3).
4. Wind the white (neutral) lead of the plug cord to the white lead of the socket cord and twist on the cap (see figure 25-4). Be sure to twist the wires together in the clockwise direction and then twist the cap on in the same direction. Matching the twist directions will help the cap be most secure.
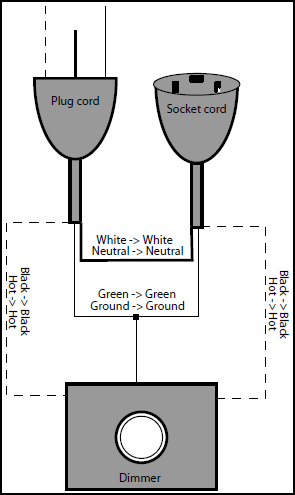
FIGURE 25.2 The complete squeezer wiring diagram.

FIGURE 25.3 Feed the stripped ends of each cord through the input holes into the wall outlet box.
5. Twist together one black (hot) lead of each cord to a black lead on the dimmer and put on the cap. The black lead is the hot lead, so this wiring puts the power through the dimmer for control of the voltage. Be sure to screw the caps on the twisted leads to bind the connection and insulate it from the environment.
6. Twist together all three green (ground) leads and twist on the cap.
7. Push all the wire down and screw the dimmer plate to the wall outlet box (see figure 25-5). There should be two screws included with the dimmer that will hold the plate firmly in place.
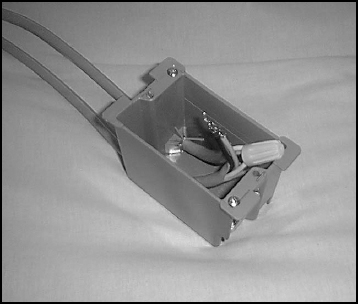
FIGURE 25.4 Wind the white lead of the plug cord to the white lead of the socket cord and twist on the cap.
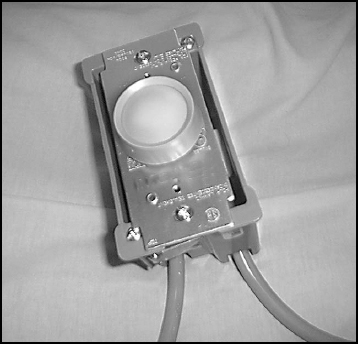
FIGURE 25.5 Push the wire down in the box and screw the dimmer plate to the wall outlet box.
To use the squeezer simply plug the plug cord into a wall outlet or powered extension cord. Plug the controlled device (such as a light) into the socket cord. Have fun!
Suggestions
Here are a few operating suggestions to help you get the best use of the squeezer:
• Label the maximum wattage of the dimmer Dimmers are certified for a maximum amount of power they can handle by a rating in watts (a normal household dimmer is rated at 600 W). It is a good idea to place a label right on the faceplate to indicate the maximum number of watts that can be drawn through the dimmer. This will prevent someone from using a light or other device that exceeds the rating which might create a fire hazard or other problems.
• Use the squeezer only on accent lights Any change in voltage will alter the color frequency of the light emitted from the bulb. Therefore, you don’t want to use the squeezer on a key light as it may change the color balance of the entire scene. Try to limit the use of the squeezer to accent lights.
• Mark the minimum and maximum positions of the dimmer Place a mark on the dial of the dimmer. Then turn the dial and mark the lowest possible point on the faceplate. Turn the dial the opposite direction and mark the highest possible point on the plate. If you want, mark a few positions in between. These markings will help you when the DP indicates that the light level should be varied between two points.