

Barn Door Mount
Applications
Barn doors (see figure 27-1) are perhaps one of the most efficient methods of controlling the throw pattern of a light. While light control with flags and diffusion is more exact, barn doors can be adjusted instantly right at the source. Additionally, barn doors provide an easy mounting platform to attach gels, diffusion, or other light-modulating materials.
While most professional lights for film production include barn doors, few consumer-grade lights do. The size and form factors vary so much from light to light, so you can’t purchase generic barn doors that will fit any lighting fixture. The construction of barn doors, however, is not very complicated. With a little work and ingenuity, you can construct a set for each of your lights.
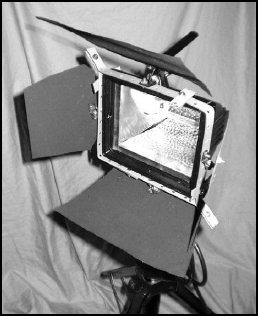
FIGURE 27.1 Barn doors are one of the most efficient methods of controlling the throw pattern of a light.
PARTS
| Qty | Item |
| 3 | 24″ Hyco metal bar 14 or 26 gauge |
| 4 | Sheets of galvanized metal flashing |
| 1 | Can of BBQ Grill black spray paint |
| 18 | |
| 4 | Locking nuts |
| 8 | Small L-brackets |
| 1 | Pair of tin snips |
The barn doors you’ll construct in this chapter are made up of two parts: the doors themselves and the frame on which they’re mounted. Both the doors and the frame may have to be modified to fit the front of the light you’ll be using. The instructions provided here describe doors meant to fit a standard construction work light available at most hardware stores (see figure 27-2).
The front of a construction work light is rectangular, so the barn door frame is also rectangular to match the light’s face. Since the chassis of lights vary dramatically, you may need to make modifications to the frame for it to mount properly. If the front of your light is circular or oval, you can bend the brackets of the frame to fit an irregular shape. Although you’ll have some light leaks, these can be masked with blackwrap or simply ignored (if the light doesn’t fall into the scene).

FIGURE 27.2 These barn doors are meant to fit a standard construction work light.
| NOTE→ | Lights can get very hot, so under no circumstances would you want the barn doors to fall or be knocked off once they’ve been heated by the light. Therefore, if you make modifications to the frame mount, pull on the frame before you use it to make sure it is mounted securely in place. |
Remember that blocking light close to the source makes soft shadows, while close to the destination makes hard shadows. The close proximity of barn doors to the light source creates a very soft border on the shadows, so if you want a harder cut, you’ll need to use a flag to create the sharp line.
Besides directing light, the other primary purpose of barn doors is to serve as a mounting edge where professional gels and diffusion can be attached with clothespins as shown in figure 27-3. Multiple layers of gels may be used to achieve the exact lighting results desired. These gels have been fabricated to withstand the heat of very bright lights, so most lights available to the guerilla filmmaker present no fire risk. However, realize that by putting gels on barn doors, a great amount of the light’s heat energy will be confined within the fixture. This constriction will make the light fixture run much hotter and will reduce the working life of the bulb.
| WARNING→ | You should only use professional gels and diffusion material on a barn door frame. These professional gels have been specially heat-treated to ensure they won’t catch fire or burn. The close proximity of the barn doors means that the material is extremely close to the heat of the light. Putting any material not explicitly made for such use is very dangerous, so don’t do it. |
Gel material can be fairly expensive and I’ve talked to a number of guerilla filmmakers who planned to locate cheap cellophane that matched the gel colors and simply keep the material far enough away from the light to avoid a fire hazard. While this plan is fine to introduce color for lighting effects, it won’t work very well for color correction (see Chapter 38).
Any type of translucent material looses some color and fades when light passes through it. Cellophane is not made to withstand the high-intensity light blasting that takes place on a movie set. Therefore, while the color may be close to the desired correction at the beginning of a shoot, it will quickly fade and lose its color. That means that the light coming through the low-grade cellophane will be a different color gradient at the end of the film than at the beginning. The use of cellophane would be terrible news to the post-production people who will have to attempt the color correction.
Professional gels are produced to minimize the color shift even under the strongest lights. If you can’t afford a full set of professional gels, you can often find a fairly inexpensive “starter pack” online. These packs provide you with square gels in various color correction levels at a reasonable price.
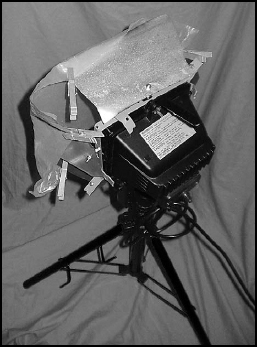
FIGURE 27.3 Barn doors serve as a mounting edge where professional gels and diffusion can be attached.
| TIP | At the conclusion of principal photography of a film, I often ask for any gel scraps that the production crew had planned to throw away. Once a gaffer handed me hundreds of dollars in barely used gels. When I first started working in film, I did a lot of volunteer work to learn the ropes and obtained the equivalent of a free starter gel kit this way. If there’s any filming in your area, you might do the same. |
Construction
For the barn door construction, you’ll only need a few tools including tin snips, a drill, a screwdriver, and a few wrenches. The materials are very inexpensive, so you should be able to make a set of doors for every light you have in your arsenal.
After you’ve completed a set of barn doors and mounted them, be sure to take the light outside, turn it on, and leave it for half an hour. The coating from the paint will need some time to bake and solidify. While it does, it produces a distinct and sometimes strong odor. By running it outside for a while, a majority of the smell will be burnt away, so you won’t have to worry about it polluting your set when you use the light for interior shots.
The doors
Before you begin construction, you’ll need to figure out exactly the size of the barn doors you’ll need. Figure 27-4 shows a rough pattern for barn doors that will fit on the utility work light. If you have a similar light fixture, measure the face frame to make sure the dimensions approximately 7″ (18 cm) by 5.5″ (14 cm).
If your light is not the same as this one, I recommend you scale the template accordingly and then cut sample doors out of cardboard. Tape the cardboard mock-ups to the sides of your light (while it’s turned off) and see if the size you’ve chosen will work properly. Adjust the mock-up doors until you have the proper cardboard cut-out size to use as templates for your doors.
The barn door panels are made with the metal shingle flashing that is available in the roofing section of most hardware stores. Metal flashing is inexpensive, made to withstand heat, and easy to cut (with tin snips) yet firm enough to resist being easily bent.
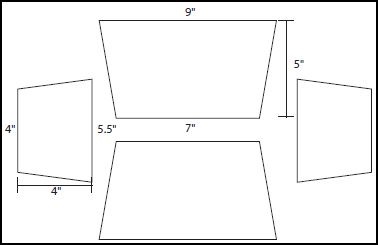
FIGURE 27.4 A rough pattern for barn doors that will fit on the utility work light.
Use tin snips to cut the panels to the proper size. You’ll be surprised how easily the snips can cut through the tin panels – so be extra careful. While tin snips may appear like a pair of large scissors, they are many, many times sharper. Tin snips can be dangerous if used carelessly.
Once you have the doors cut, you’ll need to spray paint each door to matte black. Since flashing is normally silver, without painting it would reflect the light at various angles creating odd light spots on your set. When I first constructed these barn doors, I didn’t paint them and within moments of turning on the light, I could see my mistake glaring on the floor and ceiling.
Use barbeque grill spray paint to paint the panels. This paint is especially made to handle extreme heat levels which makes it perfect for use around lights. Be sure to sand the panels before you paint them. Flashing is generally very smooth, so the sanding will roughen the surface, so the paint will hold better.
The grill spray paint can take some time to dry. Once it has dried, you should add a second coat. After the second coat has dried, the surface will have thin coat of black dust on the surface. Wash each door with water and a sponge or toothbrush to remove the dust. Otherwise the dust will get all over your hands during the shoot.
Creating the frame mount
The frame mount will be secured to the face of the light and provide a surface where the doors will be attached. The frame will be constructed from hyco bar brackets that are traditionally used to hold plumbing pipes (see figure 27-5). These strips are perfect for many applications in project construction since they’re inexpensive, malleable, and have holes at regular intervals that can accept screws of various sizes.
Bend the end of the first length of hyco bar to a 45° angle. The end should have a single hole available to insert a screw. Make a right angle bend at the corner of the light frame so the bar fits two sides of the light. The corner bend should be tight enough to hold the frame snugly over the front housing of your light. At this point, cut (or bend) off the remaining length of bar, so there is one hole available at each end (see figure 27-6). The bar you have should cover two sides of the light.
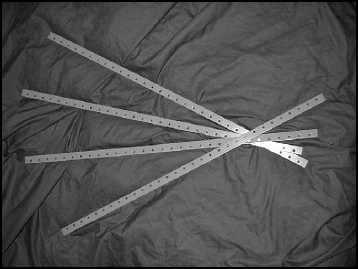
FIGURE 27.5 The frame will be constructed from hyco bar brackets that are used to hold plumbing pipes.
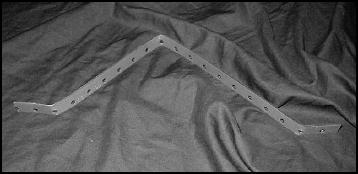
FIGURE 27.6 Cut off the remaining length of bar so that there is one hole available at each end.
| TIP | To obtain the proper lengths of the hyco bar, you can use a cutting tool such as a hacksaw. I’ve found that it’s much easier to take two pliers (see figure 27-7) and bend the metal back and forth until one side shears off. For the least work, perform the bending at one of the holes where the metal is weakest. I’ve found that it generally takes six bends before the metal gives. If you have a mounted vise, place the bar in it for the easiest bending. Be sure to cover the sheared ends with tape to prevent anyone from getting a metal sliver or being cut by a sharp edge. |
Create a matching bar to fit the other two sides of the light and secure them to each other with a pair of machine screws and nuts (see figure 27-8). If the holes punched in your hyco bar are not centered in the middle of each bar, before you start bending check to make sure both of your brackets will match so they’re not offset from one another.
Now that you have a frame, you’ll need to create some brackets that will hold the frame onto the front of the light. These brackets will be in the form of a lopsided U. One side will be longer than the other since it has to reach the back of the light faceplate fixture. For me, one bracket per side of the frame (four in total) was enough to safely secure the frame, although you can feel free to use more to create a firm hold.

FIGURE 27.7 Take two pliers and bend the metal back and forth until one side shears off.
Create the lengths for the U-brackets from small pieces of hyco bar. On my hyco bars, a length that had two holes was just about perfect. Secure these short lengths to the frame (see figure 27-9).
Slide the frame onto the light (see figure 27-10). Mark the place in the front and back of the U-brackets with a pen where you will make the bends to secure the light.
Remove the barn door frame and make the bends to the front of the U-brackets. With only the front part of the bracket bent, the frame can still slide on and off the light. Only after everything is ready and mounted will you bend the back of the U-bracket to solidly fix the frame to the light.
Mounting the doors to the frame
Now you’ll need to create the pivot mounts that will attach the barn doors to the frame. Each pivot will use a lock nut opening and closing the barn doors repeatedly will not rotate the nuts loose.
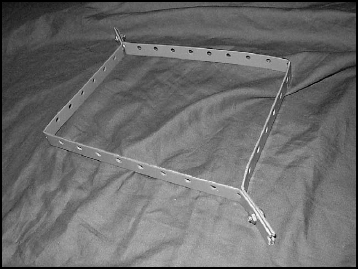
FIGURE 27.8 Create a matching bar to fit the other two sides of the light.
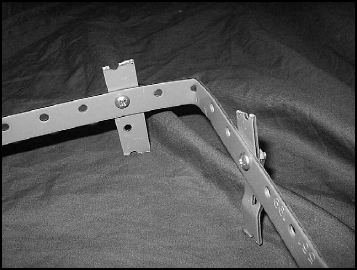
FIGURE 27.9 Secure the short bar lengths to the frame.
Create the top mount pivot by following these steps:
1. Attach an L-bracket to the frame with a screw and a nut. Tighten the screw, so it won’t move when you swivel the barn door.
2. With the lock nut, attach the second L-bracket to the first (see figure 27-11). Tighten the lock nut until the bracket is secure, but moves smoothly.
3. Hold the top barn door panel up to the second L-bracket and mark the spot where a screw will hold the panel centered over the light’s face.
4. Using the marked spot as a guide, drill a hole that is wide enough to accept a screw.
5. Mount the barn door panel on the pivot of the frame (see figure 27-12) with a screw and a nut. The barn door should pivot smoothly, so the panel can be placed flush with the face of the light.
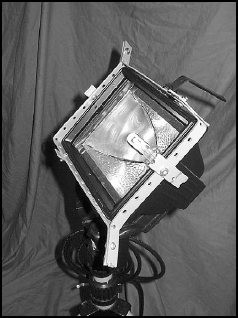
FIGURE 27.10 Slide the frame onto the light.
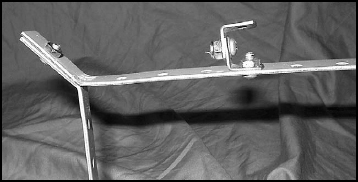
FIGURE 27.11 With the lock nut, attach the second L-bracket to the first.

FIGURE 27.12 Mount the barn door panel on the pivot of the frame.
Repeat the above steps for the other three barn door panels, so they allow the barn doors to shut out the light. Having the barn doors closed is the traditional way that a light is wrapped for storage. The doors provide protection for the glass they cover.
Slide the frame onto the light and bend the backsides of the U-brackets down to secure the frame into place (see figure 27-13). You might find bending the short lengths of bar to be difficult. To make it easier, before you place the frame on the light, bend the bars to the proper U-shape and then bend them back. That will slightly weaken the metal and make it easier to bend later.
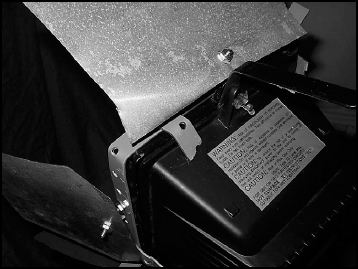
FIGURE 27.13 Slide the frame onto the light and bend the backsides of the U-brackets down.
Your barn doors are now complete. If you find that the panels that you made have some light leaks, cut pieces of cardboard to larger sizes and attach them to the existing panels. When you find a shape that accomplishes what you want, construct a new set of panels.
Suggestions
Here are a few operating suggestions to help you get the best use from the barn doors:
• Give the barn doors time to cool There is always pressure when you wrap for the day to get off the set and go home. However, if you’ve been shooting all day (or night), both the barn doors and the light will most likely be hot. Turn off the light and give them time to cool. You don’t want to burn your hand or set a hot surface on carpet.
• Re-cut the doors if necessary The flashing material and spray paint are cheap. Therefore, if you didn’t cut the doors properly in the first place and you have light leaks, re-cut new ones. The small inconvenience of re-doing the doors is nothing compared to the aggravation that can be created on set when light leaks.
• Barn doors will cut the life of the light Almost invariably, work lights are constructed with poor ventilation. When you add the barn doors that hold in the extra heat, the life of the light bulb will almost certainly be shortened. Be sure to bring extra bulbs. Also you may consider drilling a few ventilation holes in the light housing as long as these holes do not create additional light leaks.
• Add safety wire or chain On a professional set, barn doors are secured to the light itself with a safety chain. If they ever come loose or are knocked off, there is no chance then will fall away from the light and hit anyone. I would suggest that you create a safety chain or use some thin wire to securely attach the frame of the barn doors to the housing of your light.