
Lux Incident Meter
Applications
While using a gray card is an excellent way to obtain light readings, there is a way to obtain a light level measurement with a little more precision. Inexpensive digital lux meters (see figure 17-1) are available that measure the total amount of incident light and return an absolute numerical reading in units known as lux. A lux unit is a measurement of the amount of light striking the incident meter.
Lux meters are fairly cheap (about the price of an inexpensive microwave) and yet very accurate. These meters, used by farmers and gardeners, are employed to determine the amount of light striking a particular area of land. Additionally, art galleries use them to make sure that the light level is low enough to protect paintings from fading. Because of their intended use, a lux meter has an incident area larger than the ball on a meter made for film production. While the larger area is not as exact as the point reading on a film meter, it handles most cinematic situations perfectly.
You can obtain a lux meter through some garden supply outlets or look on the Internet. A couple of years ago a friend recommended I buy one from the company Family Defense Products (www.familydefense.com).

FIGURE 17.1 Inexpensive digital lux meters measure the total amount of incident light.
It’s worked perfectly since I got it. Other manufacturers include Extech Instruments (www.zefon.com) and University Products (www.archivalsuppliers.com).
PARTS
| Qty | Item |
| 1 | Lux incident meter |
| 1 | Spreadsheet program such as Microsoft Excel or Quatro Pro |
| 2 | Sheets of paper |
General Instructions
The unit lux is the measure of the amount of light emitted by a single candle that is exactly 1 m away. In other words, 1 lux is equal to 1 lumen per m2. Similarly, you might hear of light measured in foot-candles. The foot-candle (fc) measurement unit is the amount of light emitted by a single candle that is exactly 1 ft away. Converting between lux and foot-candles is a simple process, as approximately 1 foot-candle equals 10 lux. Therefore, multiplying an fc value by 10 will result in a lux value.
| NOTE→ | To be precise, 1 foot-candle equals 10.76 lux. The breadth of the light scale makes this level of precision generally unnecessary. However, if you need a specific value and you have a calculator handy, use the 10.76 value. |
While you may be used to working in f/stops, lux values have several advantages. Since it is an absolute light value, a lux reading exists apart from the lens and film speed being used. f/stops depend on a number of variables including film stock ISO/ASA rating, camera filters, frame-rate, etc. A lux value provides a single number that states how much light is falling on the light meter.
With practice, the lux reading can be intuitively understood to determine the proper exposure. Of course, lux values can be converted into a working f/stop value with a simple table. Using a conversion ratio along with the factors of film ISO/ASA and shutter speed, exposure can be calculated.
One of the practical reasons to use absolute lux values is the suitability of the measure’s use with video cameras. Although some cameras attempt to simulate f/stop settings, there can be a wide range in how closely these settings approach reality. On lower-end cameras, f/stop settings aren’t even included. Instead an “exposure value” scale specific to each camera type indicates an increase or decrease in exposure.
Because the lux meter provides a single objective light value reading, it is much easier to learn proper exposure for a given video camera with the lux meter scale. Attempting to manually convert the f/stop and ISO/ASA charts to match the specifics of a particular camera can be complicated and frustrating.
Lux values are also excellent in understanding light source levels and placement. It’s far easier for a gaffer to learn how much light will be provided by a particular source at a particular distance when a simple absolute value is used. After learning how changes to a light source will alter the lux value, an experienced gaffer can very intuitively add or remove lights to reach a desired lighting level.
Table 17-1 shows lux values for common light sources and situations. Briefly studying this chart should provide a basic understanding of the ranges of lux readings.
TABLE 17.1 Lux values of common situations.
Testing video cameras
If you are using a camcorder (Hi-8, MiniDV, etc.), check the technical specifications in the camera manual. Most likely the minimum amount of light required for shooting will be provided as a lux value. With a lux meter, you can test to see how close the stated minimum level is to reality.
To perform a light level test, you’ll need a small flashlight to read the meter display and a light facing a white wall. When you sit in a completely darkened room and face away from the light, you should have a zero meter reading. Slowly turn toward the light until the meter shows the stated camera minimum value. Place an object (preferably an item that is fairly detail) at the point where you obtained the reading.
Point the camera at the object and record a small segment. In playback, do you see any detail? Raise the light level until you can make out the object and you’ll have the practical minimum lux value for filming. To perform this test more easily, you can build the squeezer described in Chapter 35. That will allow you to manually increase the light level by turning the dimmer dial.
[AU1]
Finding the minimum light level with your camera is fine, but not especially useful. When you watch the playback, you may have noticed a large number of small gray or white flecks in the picture. This picture noise is caused by circuitry in the camcorder that digitally boosts the signal under low light conditions. This signal boost is a terrible technology for professional filmmaking as it makes the picture look very amateurish.
Therefore, use the process described above for testing the low light level, but instead, keep increasing the light until these noise artifacts are no longer present. Write down the lux number of this minimum no-noise level. When the light levels fall below this number on a shoot, you can know that you’ll be introducing noise artifacts into the footage. You can then take steps to increase the light level and prevent these unsightly artifacts.
Lux to f/stop chart
If you are using film or a camera that has f/stop settings, you’ll need to convert the lux values into settings you can use. Table 17-2 provides the lux values and their equivalent f/stop numbers. You’ll need to know the speed of the film you’re using to convert one value to the other.
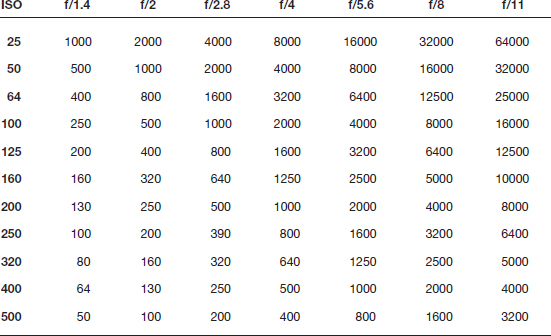
TABLE 17.2 Lux values to f/stop conversion chart.
To use the chart, find the ISO/ASA of the film in the first column and that will indicate the proper row of lux readings. Take a meter reading and, using the proper film speed row, locate the column with the approximate lux value. The heading of that column will provide the equivalent f/stop value. If your value falls between the values given in two of the columns, you’ll have to approximate the f/stop value just as if you had a traditional digital light meter that returned a setting such as f/1.4.
Suggestions
Here are a few operating suggestions to help you get the best use from the lux meter:
• Measure the contrast range on your camera Since the lux meter provides a single precise lux value for a particular area, it’s perfectly suited to determining the exposure range of a camera. This is particularly effective for testing digital cameras. Start with a nearly dark room and obtain a lux reading. Try to photograph for detail. Check your footage. Did anything record? Continue raising the light level until you determine the real minimum lux for the camera. Do the opposite to determine the high end of the scale.
• Keep spare batteries As with any light meter, keep spare batteries close by on the set in case your meter stops working.
• Determine the minimum level when digital gain begins Most DV cameras have an automatic gain control that, if the light level is too low, the gain kicks in and brightens the image to provide detail. Unfortunately this gain creates a great deal of picture noise that looks like little fireflies throughout the image. This signal noise is unacceptable for most dramatic footage. By using the meter testing techniques described in the last suggestion, determine the lowest lux level that does not engage the gain circuitry.