

Cable Ties and Coiling
Applications
One of the first things you learn when working in film is the value of cable ties. A cable tie is a short length of rope attached near one or both ends of a cable. Rather than tying a cable with itself or separate piece of rope, the ties are used to secure the cable as shown in figure 42-1.
Two ties (one at each end) are only necessary for very long cables (greater than 50 ft) or very thick ones. When completing a shoot or “wrapping,” the ties allow a cable to be quickly coiled, bound, and stored. I find that cable ties to be extremely useful both at home and on set.
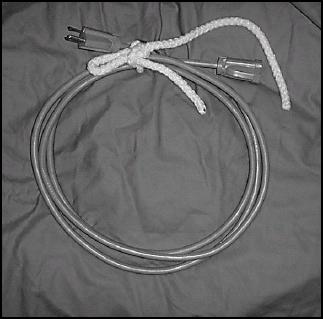
FIGURE 42.1 Ties can secure a cable more conveniently than tying a cable with itself or separate piece of rope.
General Instructions
I would recommend that you include ties on all the cables that you’ll be using on a shoot. Most common extension cords (stingers) are coiled, tied, and then stacked inside milk crates for easy transport and storage. However you haul your cables, try to make sure that the cable ties are in place before you go to location. It will make cleanup and packing much easier.
Some thought should be given to the type of rope that you’ll use for the ties. If a poor rope is chosen, cable ties can be more frustrating than helpful. Try to avoid using slick or thin rope. I’ve found that cotton- or cloth-based rope is best since it doesn’t slide (like most polyrope), so your ties will hold better.
However, natural fiber rope does require the ends to be bound to avoid fraying, where you can simply melt the ends of polyrope. I’ve found that clothesline polyrope is light, thick enough for easy tying, and holds fairly well. An advantage of polyrope is that it doesn’t rot if it gets wet – which cable ties often do.
Although any color of rope may be used, try to use rope that’s white in color. There is nothing more frustrating than wrapping cables in a poorly lit location after a long shooting day and not being able to see the cable ties clearly. There has been many a time that I’ve cursed a rental house which provided cables with black rope ties.
Adding the cable tie
To add a cable tie, cut a length of rope about 12″ in length. Twelve inches is plenty for most cord 50 ft and under. For cord greater than 50 ft, it’s a good idea to cut two ties, one for each end. If the cable is longer or thicker than a traditional extension cord, increase the size of the tie as necessary.
Use a clove hitch (see Chapter 40) to make the tie around the cable as shown in figure 42-2. Be sure that the two ends of the tie are the same length. This makes the tie easy to knot regardless of which end is chosen as the working end.
Once you’ve tied the clove hitch, coil the cable and tie the two ends together around the coil. You can use either the shoelace knot (see Chapter 37) or a variation of it. Is the length of tie rope long enough to making knotting easy? If not, discard this tie and cut a longer length.
Now put on a pair of work gloves. Try to tie the knot again. Is the rope thick enough for easy handling? Most rope coiling is done with gloves since the cable may have been used outdoors in dirt, mud, or other grime. You should make your ties such that they can be knotted while wearing work gloves.
Once you’re satisfied with the cable tie, use a piece of duct tape or similar to secure it to the cable (see figure 42-3). This will hold the tie in place and prevent it from sliding down the cable or coming loose.

FIGURE 42.2 Use a clove hitch to make the tie around the cable.
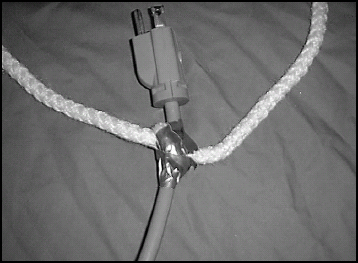
FIGURE 42.3 Use a piece of duct tape or similar to secure the tie to the cable.
Coiling a cable can take a little practice, but the results are well worth the time spent. Once you begin to coil your cables properly, the skill will quickly become second nature. Proper coiling makes the process much easier and conditions the cables to lie flat for easy storage.
First, make sure you always coil in a clockwise direction. You can see a cable being coiled properly in figure 42-4. If the cable seems to be fighting you, flip it over and try again. Don’t shrug and coil it counter-clockwise because you’ll be breaking a habit for yourself and possibly breaking the conditioning of the cable.
Next, make sure that you coil a cable the same way each time. The cable will become “trained” so that with each additional coiling it’s easier to create the same spiral. Once properly trained, a cable will coil easily without fighting and without becoming the frustrating mess of an improperly coiled cable.
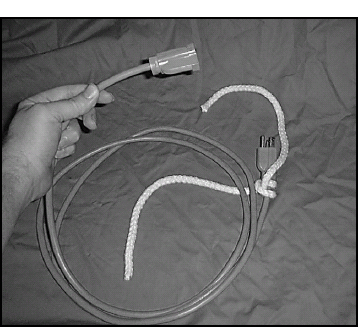
FIGURE 42.4 Always coil in a clockwise direction.
Coiling should never be done around your elbow. People often use the length between the hand and the elbow to force unmanageable rope or cable into a coil. This can break the cable conditioning and also helps to damage and breakdown the wires or fibers.
Except when coiling extension cords (which coil from the plug) always start coiling from the device (light, fan, etc.). By coiling from the item, any twists in the cable generated by the coiling can spin out at the end. For extension cords (stingers) or open power cords (such as generator cables), you coil from the pins or plug. This applies whether the power cord is a simple extension cord or heavy 4/0 generator cable.
Proper coiling is so useful that I find that even my vacuum cleaner cord at home, once a rat’s nest of curls, is now trained to coil perfectly.
Using the ties for differentiation
Once you have a tie on each cable, the tie itself can be used as an effective non-written identification system when the cable is in use. For example, if four cables lead into a single power strip or gang box, different knots in the ties of each cable can tell you which cable belongs to a specific light or item. A particular strength of this system is that it can be read even in the dark.
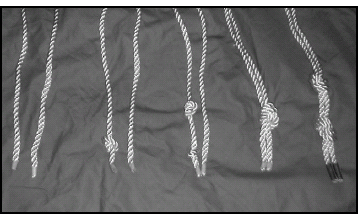
FIGURE 42.5 Knot patterns in the cable ties can be used to identify specific cables by touch or in the dark.
In figure 42-5, you can see a series of knot patterns for cable ties that can be used. These knots are used on professional sets to identify particular lines from a generator. The following is a list of the knots shown in the picture in order from left to right:
1. No ties the blue leg of the generator power.
2. Single knot in one rope the red leg of the generator power.
3. Two knots in one rope the black leg of the generator power.
4. Single knot tying ropes together the neutral line of the generator.
5. Double knot tying ropes together the ground line of the generator.
While these standards are useful to memorize, don’t let that stop you from using a knot system customized to your own needs. However, be sure to notify your co-workers if a non-standard system is being used to prevent confusion or accidents.
Light ties
Whatever type of lighting you’ll be using, it’s helpful to have a tie that secures the coiled cable directly to the light. As you can see in figure 42-6, this is a fairly simple proposition. A short length of rope or cord tied between the bail (the metal bracket that holds the light) and the positioning knob does an excellent job of fastening the cable.
You can tie this securing line any way you want. I find that a double half-hitch is good for the bail. To create a loop that will easily slip on and off the positioning knob, tie a small bowline of the appropriate size.

FIGURE 42.6 A tie can secure a coiled cable directly to the light.