

Figure-8 Knot
Applications
A figure-8 knot (see figure 38-1), also known as a Flemish or Savoy knot, is a stopper knot. The knot looks like its name and is used to temporarily bulk-up the end of a rope. It can stop a rope from fraying, provide a hand-hold knot, or be used in conjunction with another knot or hitch (see Chapter 39).
Very commonly on a film set, the figure-8 knot is used as a stopper when a length of rope has been fed through a grommet (such as those found in tarps or tents). The figure-8 knot is used in preference to the overhand knot (the most basic stopper knot) since the figure-8 knot is easier to undo after a load has been placed on it.
The knot is tied using either the twist method or the traditional method. The twist method is quicker and easier to remember. The regular method is most often used in a complicated rope setup or when the figure-8 knot is being integrated into the tying of another knot.

FIGURE 38.1 A figure-8 knot is a stopper knot.
Twist Method
Take the working end of the rope and fold it over as shown in figure 38-2, so it forms a bight.
Grasp the working and standing ends with one hand and the peak of the bight with the other. Twist the bight away from you until it turns 360° (see figure 38-3). Because your wrist can only easily turn 180°, you will need to do two twists to complete the 360° revolution.

FIGURE 38.2 Take the working end of the rope and fold it over so that it forms a bight.
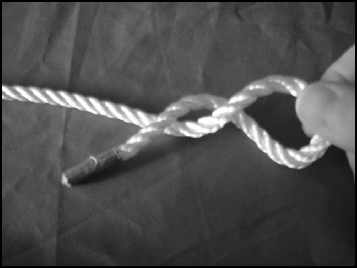
FIGURE 38.3 Twist the bight away from you until it turns 360°.
After you’ve completed the two turns, push the working end of the rope down around the loop and pull it up through the hole (see figure 38-4). Pull the working end and the standing end in opposite directions and you’ll have a figure-8 stopper knot.
This knot is useful at the end of a rope (or even a shoelace) if it begins to fray. Simply pull the knot tight and snip off the excess.
Traditional Method
To tie the knot using the traditional method, take the working end and wrap it around the standing end (see figure 38-5).
Pass it down behind the loop. Bring the working end up through the loop (see figure 38-6). Pull on both ends to make the knot tight.
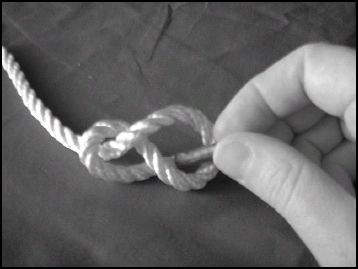
FIGURE 38.4 Push the working end of the rope down around the loop and pull it up through the hole.

FIGURE 38.5 Take the working end and wrap it around the standing end.
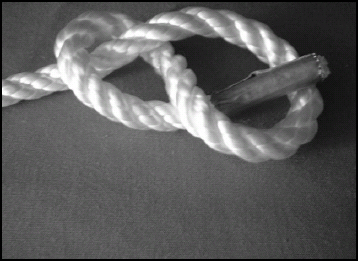
FIGURE 38.6 Bring the working end up through the loop.
The advantage of the traditional method over the twist method comes if you want to loop the knot to make it stronger. A double figure-8 can be tied with a loop and is commonly used by climbers to secure a rope to a carabineer (see figure 38-7). This version of the knot should be used if the knot will sustain a heavy load.
To make the double figure-8, make sure that there is a good amount of extra rope at the working end. Complete a figure-8 knot, but don’t pull it tight. Twist the working end around the pole or carabineer and then feed it back into the loop. Essentially, the working end should retrace its path through the knot. Once it has completed its journey, pull the knot tight and you have a strong double figure-8.

FIGURE 38.7 A double figure-8 knot can be tied with a loop and is used by climbers to secure a rope to a carabineer.
You can also tie a double figure-8 by using the traditional method of tying, but form a loop of the working end and run this through the pattern. This method can be used to quickly tie a double figure-8 in a standing line.