
Flags, Reflectors, and Diffusion
Applications
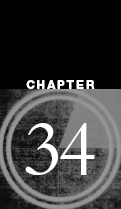
Flags, reflectors, and diffusion screens are used to control light. While barn doors, spot/flood adjustments, and dimmers may alter a light source in a basic way, flags and diffusion screens allow you to determine exactly the place shadows will fall (see figure 34-1) and the type and strength of light. In this chapter you’ll learn how to construct a general frame to which you can attach any type of flag or diffusion material.
This frame is made to be used in conjunction with the C-stand that was demonstrated in Chapter 32. This frame is also useful in many other situations, particularly where it can be mounted with tape or rope. You may also hold the flag in position by hand, also known as “Hollywooding” it.
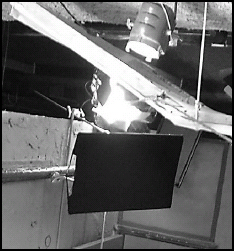
FIGURE 34.1 Flags and diffusion screens let you determine exactly where the shadows will fall.
PARTS
| Qty | Item |
| 4 | 90° PVC bends |
| 1 | Threaded PVC T-joint |
| 1 | Can of PVC cement |
| 2 | |
| 1 |
General Instructions
A flag may seem like the simplest device possible, but achieving a particular effect takes a little practice. The role of a flag is simple: blocking light. How this is achieved takes some experience. You should also learn some terminology that’s used as a method of shorthand on the set for people to communicate the desired role of a specific flag.
The DP may call for a topper which means that a flag should be placed to cut off the top of the light. A bottomer cuts off the bottom of the light and a sider is used for one side or the other. Setting a lenser means placing a flag such that it prevents light from entering the optics of a lens and serves the same purpose as a matte box (see Chapter 9).
It is generally a good idea to hold up the flag by hand to determine where the shadow will be cast. Once you have a good idea of the proper location, then you can bring in the stand and mount the flag. This prevents knocking around an unwieldy stand while trying to find the proper angle and location.
To create a soft edge on the shadow caused by the flag, place the flag near the light source. For a hard shadow, place it away from the light source. Most often, when a hard shadow is desired, the flag is placed just out of frame.
If the shadow has a really soft edge, it can sometimes be difficult to know where the shadow caused by the flag ends (as opposed to other natural shadows). You can stand in front of the flag and wave your hand to determine the bounds of the shadow. When your hand disappears, you know it’s being hidden by the flag.
| WARNING→ | When you put a flag on a stand, it will act like a large sail. If used outside, that means that any gust of wind will push against it, sometimes strongly. Therefore, make sure that the flag is well anchored, so wind doesn’t tip over the stand. |
Materials for the frame
The possible materials that you can use in the frame are limited only by your imagination. For a complete list of diffusion and reflector materials, see Chapter 28. Whatever material you use, remember that you’ll be placing it in front of hot lights. If there’s any possibility that it might catch fire, don’t use it.
The flag is really simply a black solid which has the function of blocking and absorbing light. Here is a list of suggestions for commonly available materials that can be used for flags:
• Black foamcore I highly recommend using either black foamcore or the black side of a foamcore sheet. Foamcore is light, yet it doesn’t catch fire easily. It can be cut to size and is available in large 4′ × 8′ sheets (available from most expendable suppliers).
• Black cloth The cloth must be very thick to make sure that the light doesn’t filter through the material. A good test is to hold it up to the sun and look through it. That will tell you how opaque the material may be. Also be certain that the cloth you buy is flame-retardant.
• Painted cloth Just about any surface painted with matte black paint can become an effective flag. Canvas drop clothes are available cheaply and can be painting with inexpensive craft acrylic paint to provide an excellent flag. You might choose the black paint that’s available for painting an outdoor grill as it is very flame-retardant and usually fairly cheap.
| WARNING→ | Note that professional materials are treated and tested to minimize their flammability. If you use other flag materials around hot light, be very careful that there is no fire hazard. Be sure to read the fire retardation qualities of the material you choose and do not use them outside the bounds specified. Make sure you put any material a good distance from the light it is absorbing. |
When the materials aren’t mounted in the frame, there are several effective ways you can transport them. Cloth and more durable material can be rolled up and kept in a cardboard tube. For materials that must remain flat, you can purchase an inexpensive artwork portfolio traveling case.
To construct a frame to hold your flag, diffusion, and reflector materials, follow these steps:
1. Cut the PVC pipe of the following lengths: two of length 38″ (97 cm), two of length 12.5″ (32 cm), and one of length 26″ (66 cm).
2. Create one side of the frame by taking the two 21″ pieces and joining them with the PVC T-joint. The threaded end of the T-joint should be left open (see figure 34-2). Use the PVC cement to glue the pieces into place. Note that the cement sets in less than 30 s, so you have to have everything ready for quick placement immediately after application.
3. Put the rectangle together with the 36″ pieces forming the top and bottom sides, the 24″ forming the right side, and the T-joined pieces forming the left side. frame by taking the two 21″ Your frame should look like the one shown in figure 34-3. Use the PVC cement to glue them into place.
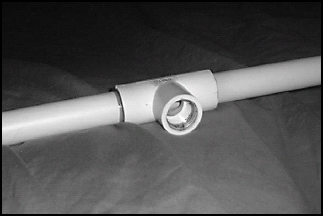
FIGURE 34.2 Create one side of the frame by taking the two 21″ pieces and joining them with the PVC T-joint.
FIGURE 34.3 Put the rectangle together with the other pieces.
Now that the frame is complete, there are several ways that material can be attached to it.
The simplest method is to tape the material directly to the frame. You can use duct tape to secure it, but this silver material can cause unwanted reflections. A much better idea is to use black gaffer’s tape as the adhesive is very strong and the surface is a non-reflective matte black.
Cord ties (see figure 34-4) are a very effective means of securing soft material. The cord ties are used with the shoelace knot variation demonstrated in Chapter 37. The biggest problem with this method is the time it takes to change the material on the frame. Often you have to switch out level of diffusion or the reflector type at a moments notice. Untying one material and re-tying another can take some time.
You may choose to use elastic string (see figure 34-5). The elastic is convenient because it can be very quickly slipped on or off the frame for nearly instantaneous changing of the frame materials. You will have to occasionally replace it, however, as the elastic tends to lose its strength over time.
You can also place strips of Velcro around the edges of the frame. The other side of the Velcro strip is then adhered to the flag or diffusion material. There are different strengths of Velcro available, so try to use the strongest Velcro you can find.

FIGURE 34.4 Cord ties are a very effective means of securing soft material.
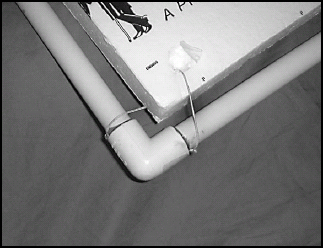
FIGURE 34.5 Elastic string is convenient because it can be very quickly slipped on or off the frame.
| NOTE→ | Velcro is extremely convenient and one of the most versatile methods of affixing various materials. However, I discovered the problem with it on a very windy exterior shoot one day. Each time a large gust of wind would blow, the Velcro would come a little undone. While the material didn’t come off the frame, that Velcro tearing sound was enough to ruin the soundtrack on several takes. Perhaps if I’d used a stronger type of Velcro this wouldn’t have been a problem. Just be aware that this is a potential drawback of using Velcro. |
If the material can be secured to a stiff board such as foamcore, you can actually glue button snaps directly to the frame. Place the other side of the button on the flag or reflector board and you can quickly and easily snap your material into place.
Here are a few suggestions to help you get the best use from a flag:
• Make several frames Since the frame is so cheap, light, and easy to construct, you might consider making four or five to keep them on hand. That way you could leave a different material mounted on each frame for quick utilization.
• Place a union on the end of each flag When you’re using the flag with the C-stand shown in Chapter 32, releasing it from the head can take time. You’ll have to loosen the brackets and then slide out the holding arm. This process can take some time, especially if you’re leaving the stand where it is and simply swapping out the flag for another material type. You might instead place a small nipple on the flag, attach a union to that, and finally add the extension arm. If all of your frames have a union attached, you can simply unscrew the union and switch frames in seconds.
• Bring extra soft material For material that is soft, you’ll find that they may be damaged in transportation. A silk with a tear down the middle can be frustrating because it will be rendered useless. For material that damages easily, be sure to bring extra fabric, so you can repair any tears and still obtain the needed shots.