

Weighted Tripod Glider
Applications
Although the cam glider introduced in the last chapter is probably the most effective means of obtaining a smooth camera shot, you can use an ordinary tripod if your time and/or finances are extremely limited. Turning your tripod into a glider is as easy as affixing a number of weights to the tripod (see figure 11-1) such that the weight pulls directly down on the center of the tripod. This weight will steady the tripod as it’s moved around.
Aside from convenience, there is an added advantage of using a tripod since the camera can be easily tilted and swiveled on the tripod head. However, the tripod will generally not provide as balanced a shot as a device specifically created for this purpose.

FIGURE 11.1 Affixing weights to a tripod turned it into a glider.
| WARNING→ | Tripods are not deliberately built to carry weight in the manner shown in this chapter. The weight puts a great deal of strain on the tripod itself. Test the weight first on the tripod and see if you can determine where exactly wear points and points of stress will occur. One point is usually on the restraining bolt on the neck of the tripod. If this point fails or slips, what happens to your camera? Be certain there is a final catch of some sort that even under circumstances of failure that the camera remains safe. |
PARTS
| Qty | Item |
| 1 | Tripod |
| 3 | 24″ pieces of rope |
| 2 | 2 pound weights |
| 1 | 4″ length of |
Make sure the rope you use has very little stretch in it. The weights need to be as steady as possible. If the rope is stretching and retracting like the end of a bungee cord, not only will your shot most likely have problems, but also the apparatus will be far less maneuverable. With rope that stretches, you’ll also have to make sure that the weight doesn’t hit you in the shins!
To create the weighted tripod, follow these steps:
1. Tie each of the three pieces of rope around one leg of the tripod (see figure 11-2). You can use a double half-hitch to ensure each knot will tighten on the leg. Once the knot is tied, drape the end of the rope in the same direction (say the right side) for each leg. There are a large number of tripod types available, so you may have to modify the tying technique shown here to properly balance the tripod you’ll be using.

FIGURE 11.2 Tie each of the three pieces of rope around one leg of the tripod.
2. Make sure the lengths of the rope are mostly even (see figure 11-3). If not, re-cut or re-tie the ropes until they are even.
3. Cut a PVC pipe to a 4″ length.
4. Draw three evenly spaced dots (for the rope holes) near the base of one end of the pipe. I’ve found that the easiest way to obtain these evenly spaced holes is to wrap a small sheet of paper around the pipe. On the paper, place a mark on the paper where the wrapping overlap occurs. Unroll the paper and you should have a mark that indicates the complete diameter of the pipe. Use a ruler to measure this diameter and divide the value by 3. Make two marks on the paper at the appropriate distances to indicate thirds (the end of the paper will indicate the first third). Wrap the paper around the pipe again and mark on the pipe where the holes should go.
5. Drill the three holes large enough so that each hole can accommodate one of the ropes.
6. Feed the ends of the ropes through the central holes of the weights.
7. Feed the ropes through the center of the PVC pipe and push one rope through each hole (see figure 11-4). To accomplish this process, I had to tie a piece of string to a rope, feed the string through the hole, and then pull the rope through.

FIGURE 11.3 Make sure the lengths of the rope are mostly even.
8. Tie a stopper knot in the end of each rope (see figure 11-5). You can use the figure-8 knot that is demonstrated in Chapter 49.
9. Hold the tripod by the neck and make sure the weights hang directly under the center of the tripod (see figure 11-6). If the weights hang off to the side, adjust the position of the stopper knots until the weights hang even.
When you carry the tripod, you’ll grasp it around the neck. To retain a firm grip on the neck (since it is usually slick metal or plastic), wear a latex glove. These gloves are available cheaply in dollar stores for dish washing. It is usually a good idea to keep the neck at full extension, so the weight rests on the neck stopper rather than the neck-restraining bolt.

FIGURE 11.4 Feed the ropes through the center of the PVC pipe and push one rope through each hole.
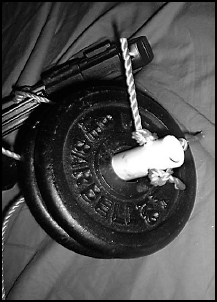
FIGURE 11.5 Tie a stopper knot at the end of each rope.

FIGURE 11.6 Hold the tripod by the neck and make sure the weights hang directly under the center of the tripod.
Suggestions
Here are a few operating suggestions to help you:
• Make a cam glider if you have the time A tripod glider may seem more convenient since you don’t have to create and transport a completely separate apparatus. However, the cam glider is a specialized piece of equipment that will provide you with the best footage. And getting the best footage is what it’s all about, isn’t it?
• Weigh the material of the tripod Although a metal tripod may seem like a much better choice for a tripod glider because of the sturdy material, the weight of a metal tripod may quickly fatigue the glider operator. That will result in the later shots suffering. A plastic glider, while not as sturdy, may have a tremendous weight advantage for the user. Aluminum tripods are excellent because they’re light although they’re often far more expensive than the equivalent metal or plastic tripods.
• Take some test footage Evaluate if the glider will give you the results you want. If not, find you’ll know before you waste time on the set.
• Gliders require special care in set dressing and lighting Realize that with the added freedom of any glider comes added responsibility. Even a wide panning shot, when taken on a stationary tripod, is very controlled and can be limited to see specific areas of the set. Gliders and steady-cams tend to look around the scene in a much more uncontrolled way. That means that undressed areas, light stands, and dark areas might all be captured (even briefly) and ruin the entire take. Plan your glider shots carefully.
• Light your scene evenly Obtaining the correct exposure with variations in lighting are much harder to control when using a glider. Lighting the entire shooting area evenly can help prevent over- and underexposure while taking glider footage.