
Gray Card Incident Meter
Applications
Light meters are critical for proper lighting whether you’re shooting on video or film. While instructions for properly using a light meter are beyond the scope of this book, it is important to describe why a meter is necessary. The growth of digital technology, monitors, and video assist has convinced some filmmakers that using a meter is unnecessary. Only after they’ve shot poorly lit footage or gone dramatically over the shooting schedule that it becomes apparent that a light meter is an investment well worth making.
The most basic lighting for scene simply makes everything important visible. Most notable films, however, use lighting to create a mood or further a theme. Lighting is used to separate the actors from the background and highlight parts of the background for specific effect. Light meters allow you to determine and thereby precisely control the level of each light in the overall scene.
Have you ever driven your car in the darkness when there are very few other cars on the road? A single car following two car lengths behind you with their headlights on can be incredibly distracting and annoying in your rearview mirror. However, those same headlights at the same distance in daylight are virtually unnoticeable. The difference is the level of contrast between the headlights and the surrounding environment. In daylight, headlights are lost because the ambient light level is so high (thanks to the sun). At night, the headlights become a spotlight in a pool of darkness. The difference between these situations is the level of light contrast.
Using a light meter can help you determine and adjust the light contrast to mold the environment within the frame to highlight particular actors or set decoration. Since a light meter will allow you to quantitatively determine the light level at any spot on the set, you can control explicitly what needs to be emphasized in your film.
Many low-budget filmmakers avoid using a light meter because of the expense. A good light meter can cost as much as a low-end DV camera! However, you can use an inexpensive reflected meter in conjunction with a gray card to obtain the same readings provided by an expensive incident meter. Whether shooting on film or video, you’ll quickly learn that using a meter will save you both time and money. A meter will also minimize the amount of unusable footage that you’ll shoot.
Shooting on film
When shooting on film, you don’t really have much choice – you have to use a light meter. Since the final negative image is determined by a large number of factors (film type, ASA/ISO, exposure latitude, filters, etc.), proper lighting is based on using your experience to guesstimate how all these factors will affect the final image. A light meter provides the information the cinematographer (DP) needs to make a proper assessment of factors such as contrast ratios, blow-out levels for highlights, and detail levels in shadow areas.
Some videographers believe that they can just look at the monitor and light the scene properly without a meter. Having worked with a number of professional cinematographers, it has been my observation that lighting a scene with the monitor generally is much slower than using a meter. Using a meter seems to allow the DP to take in the entire lighting scheme and balance accordingly.
When a monitor is used, the DP tends to focus on individual areas in the scene. Just as one area is perfectly lit, adjustments are made to another area that throws off the entire picture. While it is entirely possible to light a scene well using only a monitor, in real life it seems to burn a great deal of time.
Reliance on a monitor also creates problems if the monitor is not properly tuned. I myself have shot footage based on the monitor image, only later to discover that the monitor brightness or contrast was set improperly. Frustratingly I discovered this while examining dailies and all of my footage was too dark due to underlighting.
Types of Meters
There are two primary types of light meters: incident meters and reflected meters. Incident meters are the kind most commonly used on film sets. Reflected light meters (including spot meters) are generally used more often in still photographs.
| TIP | If several people on the shoot have meters (typically the DP and the gaffer), check the meters against each other. If there is any variation between them, you can choose one of the meters as the standard and make adjustments to the other meter readings so they match. Most current digital meters provide a feature that allows slight adjustment to allow for meter synchronization. With older meters, you just have to mentally make the calculation (e.g., add a third of a stop). |
Incident meters
I use Minolta Flash Meter IV as shown in figure 16-1 for most of my current film work. There are many other popular brands including Sekonic, Gossen, and others. The problem with digital incident meters is that they are very expensive. Even older used meters can run a couple of hundred dollars, so they are not within the financial reach of many low-budget filmmakers.
General practice of using an incident meter involves placing the meter where your subject will be and pointing the meter toward the camera (see figure 16-2). The reading will tell you how much light is falling on the subject. By taking a reading in the highlight area and another in the shadow area of the frame, you can get a good idea of whether both the highlights and the shadows will retain detail. If the range between light and dark is too great for the media (film, video, etc.), detail in a portion of the image won’t be captured.
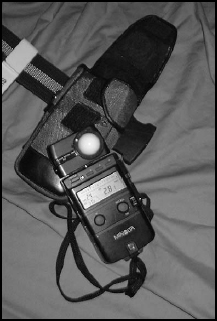
FIGURE 16.1 The Minolta Flash Meter IV.

FIGURE 16.2 Place the meter where your subject will be and point the meter toward the camera.
The specifics of using incident light meters are beyond the scope of this book. For an excellent and complete explanation, see the “Exposure” section of Blain Brown’s “Cinematography Theory and Practice” (ISBN 0-240-80500-3).
Reflected meters
Older light meters used for still photography are called reflected light meters. In contrast to incident meters (which read light falling on a subject), a reflected meter is pointed at the subject and it takes a reading of how much light bounced-off of or was reflected back from the subject. Reflected meters can be obtained at many pawnshops or on Internet auction sites generally for less than the price of a pizza.
| TIP | Whenever you buy a used meter, be sure to check it against one that is known to be tuned properly. Digital meters can generally be adjusted if they aren’t correct. |
The problem with reflected meters is that the meter reading is meant to be an average of everything in the picture. Think of taking all the white and blacks of a picture and averaging them together. Generally, you would get a gray. That is the intent of the reflected meter. If everything taken together and averaged is a gray, then the exposure is at the right level.
This works out great for pictures that are generally balanced in light such as a family standing in a lit living room or in the backyard. However, if you don’t want this average “good enough” picture, the reading becomes a problem. Most movies are made so and they have broad contrast ranges in frame. That keeps the picture interesting. Foreground and background are often separated by light levels.
Further, the averaging doesn’t work well in conditions such as taking footage with a background of white snow. Since the reflected meter is trying to average the whole picture to gray, that is generally what the photo will show – gray snow. That’s where a gray card comes in.
General Instructions
A gray card is available at most photo stores for under $10. A gray card is made to reflect 18% of the light that hits it. Therefore, if you point a reflected light meter at a gray card (see figure 16-3), the reading will tell you the amount of light hitting the subject – the same as an incident meter.
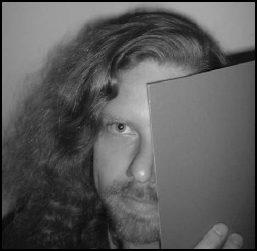
FIGURE 16.3 Point the reflected light meter at a gray card.
Simply place the gray card where you want to take a reading (see figure 16-4) and trigger your reflected meter. Be sure not to get in the way of the light source or your reading will be incorrect. While using the gray card with a reflected meter may seem a little cumbersome, the ability to cheaply meter a scene is well worth the trouble. It also provides an excellent learning tool allowing you to examine various lighting situations long before principal photography begins.
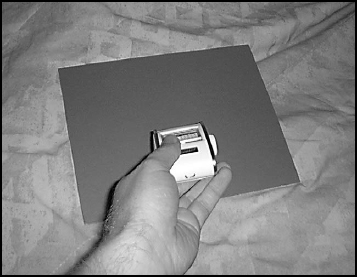
FIGURE 16.4 Place the gray card where you want to take a reading.