

Matte Box
Applications
A matte box is a black hood that fits over the front of a camera lens (see figure 7-1). The matte box prevents unwanted light from entering the lens by keeping the actual optics of the camera within its shadow. This prevents unintended overexposure of the film and minimizes artifacts commonly known as lens flares. It’s very rare to work on any professional exterior shoot where a matte box isn’t being used.
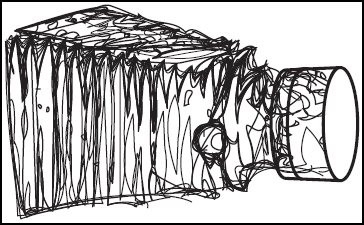
FIGURE 7.1 Matte box mounted on the front of a camera lens.
A common filming problem known as lens flare can be prevented by a matte box. A lens is made up of several layers of glass elements. When a light source (such as the sun) shines directly into the lens, the light hits each layer of glass causing circles that appear in the final footage (see figure 7-2).
Occasionally, lens flares are used for artistic reasons (such as in the movies Die Hard or Legends of the Fall). But generally, flares are a signature of amateur filmmaking. Flares make editing a film difficult because some shots in a sequence will have the flare and others will not. The appearance and disappearance of the flares between cuts (such as cutting between two people having a conversation) is very distracting to the viewer.
In this chapter, you’ll construct a simple matte box for a camera. Professional matte boxes can be incredibly expensive because they include custom accordion bevels. The bevels can be expanded and collapsed to accommodate different lens sizes and also provide slots to hold various filters. However, since a matte box doesn’t generally take a lot of abuse, a simple hood that will last a long time can be made from materials such as foamcore.

FIGURE 7.2 A lens flare in the picture of an author before his morning coffee.
A matte box must be able to adjust to wider or narrower field of vision depending on the lens or the zoom of the lens. For example, if the lens is zoomed to the maximum magnification (large focal length) and the light source is near the subject, the matte box will be narrowed to protect the lens against flare. If the next shot is a wide angle with the lens zoomed out, the unadjusted matte box would be visible in the frame. Therefore, the matte box must be expanded to accommodate the increased viewing area.

FIGURE 7.3 Mini-matte box included with many cameras.
Most mid-ranges DV cameras (VX-1000, VX-2000, GL1, GL2, etc.) have a small plastic shield on the front of the camera that looks almost like a mini-matte box (see figure 7-3). While this piece of plastic provides a rudimentary level of shade for the lens, it doesn’t provides nearly the coverage needed to shoot professional footage on a bright day.
In figure 7-4, you’ll see a diagram of a light source, that with only the standard plastic shield, will surely create a lens flare. With a proper matte box, the source comes nowhere close to directly hitting the lens.

FIGURE 7.4 A light source entering the lens to create a lens flare.
PARTS
| Qty | Item |
| 1 | 18″ × 22″ (46 cm × 56 cm) piece of foamcore |
| 2 | Binder clips |
| 1 | Piece of heavy black cloth |
| 1 | Bottle of matte black spray paint |
The following instructions explain how to make a matte box for a round lens since this type is the most difficult. The instructions can be easily adapted to match the type of camera you’ll be using. The mounting of the matte box should be solid enough that doesn’t move when the wind is blowing.
This matte box is constructed from foamcore. You can use lighter material as long as it’s sturdy enough to withstand the abuse it will suffer during shooting. Make sure whatever material you choose is painted with a matte black. You don’t want to create any new reflections in the lens.
Construction
In figure 7-5, the template for the matte box is shown. The solid lines indicate where cuts should be made while the dashed lines indicate places where the material should be scored.
To create the matte box, follow these steps:
1. Enlarge the template to fit the front of your lens or plastic hood. A copying machine is excellent for producing the enlargement or you can do it by hand. Notice where the lens opening is specified on the template. The lens opening show is designed for mounting on a circular lens. If you have a lens hood, simply alter the template to use a rounded rectangle.
2. Transfer this template to foamcore.
3. Cut along all the black lines to create the matte box. I would suggest cutting the foamcore with an exacto knife, but a utility knife will work fairly well. Don’t cut out the circle for the lens opening. Instead, cut along the starburst lines and bend the triangles backward. These triangles will encircle the lens and help prevent light leaks.
4. Score the foamcore along the dashed lines indicated by the template.
5. Paint the silver parts of the binder clips with the matte black paint. Note that in the following pictures, I haven’t painted the binder clips so they would show up better in the photographs.

FIGURE 7.5 Template for the matte box that will be cut from cardboard or foamcore.
6. Mount the hood on your camera lens.
7. Attach the binder clips to the matte box flaps as shown in figure 7-6.

FIGURE 7.6 Binder clips to adjust the viewing angle of the matte box.
8. Look through your viewfinder and adjust the flaps until they’re out of the viewing area (see figure 7-7).
9. The mounted matte box now be properly adjusted for use and should appear as shown in figure 7-8.
10. Tape the heavy black cloth to the back of the matte box and drape it over the area where the box attaches to the lens in order to prevent light leaks. Also, use black tape to cover and white edges that you notice inside the hood to prevent possible artifacts in your picture.

FIGURE 7.7 Adjust the angle of the flaps by looking through the viewfinder.

FIGURE 7.8 Properly mounted matte box.
It is a good idea at this point to check the parameters of the matte box. Close down the flaps to their smallest opening and zoom out on the camera to the maximum viewing area. Do you see the side of the box? If so, you’ll have an idea of the bounds within which you’ll have to work. Remember that this template is just a guideline. You can make the hood as big or as little as your needs.
Suggestions
Here are a few suggestions for using the matte box most successfully:
• Check the parameters of the matte box Make sure that the matte box doesn’t infringe on your image area. If you make the hood too narrow or use the zoom to make the shot wider, you may not notice that the edge of the box is now in the frame. Look through the viewfinder and poke your fingers into the frame from all four sides (top, bottom, left, and right). When you see your finger, you will know the limits where you can collapse the matte box to be. A test commonly used to see if the matte box will be in frame is to move your finger around the outside of the frame. If the first knuckle of your finger is below the side of the matte box, you know the box is too close.
• Take off the matte box when you store the camera Since the matte box and the frame can be so easily bent or damaged, remove it from the camera when not in use. You’ll avoid potentially having to make a new one the next time you take your camera out.
• Use the matte box in addition to a flag If you have a flag for keeping the camera in shadow, use that in addition to the matte box. There are many potential slivers where light can leak through into a camera. Keeping it in shadow will help in avoiding exposure problems. It will also keep the camera (and the camera operator) cool and functioning better.