

Underwater Cam Stand
Applications
Shooting below the waterline is one of the more difficult filming tasks you can attempt. Underwater enclosures are expensive and generally have to be obtained specifically to fit a particular model of camera. Controlling the camera through the enclosure is not very convenient.
While it doesn’t give you the flexibility of a sealed underwater camera, placing your camera inside a fish tank (see figure 15-1) can allow you to film below the surface of the water. It will even allow you to move from the surface of the water to just below it – a technique used to obtain excellent effect in the classic movie Jaws.
In this chapter you’ll build a frame that will secure an aquarium to a stable platform that rests on the bottom of a pool. Placing a fish tank under the water may seem rudimentary on first glance, but it’s actually fairly involved. To force the bottom of the tank under the water’s surface, a fairly large volume of water needs to be displaced. To achieve the proper amount of displacement, a significant amount of downward pressure (supplied by dead weight) can be required.
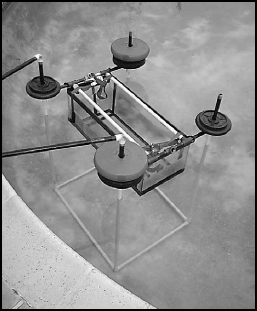
FIGURE 15.1 Placing a camera inside a fish tank allows filming below the surface of the water.
PARTS
| Qty | Item |
| 1 | Fish tank larger than your camera |
| 2 | Ratchet straps or ratchet tie-downs |
| 10 | ½″ steel T-joints |
| 4 | ½″ × 3″ threaded steel pipe |
| 8 | ½″ × 8″ threaded steel pipe |
| 12 | ½″ PVC to threaded adapter |
| 4 | ½″ PVC corners |
| 4 | ½″ × 10′ PVC pipe |
| 8 | Dumbbell weights |
The underwater cam stand is a frame made from lengths of iron pipe and PVC pipe. PVC is an excellent building material for such a stand because it won’t rust or absorb water. It also won’t scratch the bottom surface of the pool while resting on it.
The exact measurements of the PVC lengths will be determined by the size of your fish tank and the height of the water in your pool. A good general level is to adjust the height of the stand so that half the tank is above and half is below the waterline.
Any fish tank or aquarium that is large enough to hold your camera can be used effectively. While a tall thin tank can provide the greatest viewable distance under water, it may not be wide enough to avoid getting the edges of the tank in the camera frame. Test your camera in the aquarium before you even consider using it for the underwater cam setup.
With a tall enough tank, you can take footage simultaneously above and below the surface. Figure 15-2 shows a picture of a pool thermometer taken from within the tank. You can see that the difference in diffraction between the above surface and under water provides an interesting split effect.
Once you’ve selected a tank that you believe will fit your purposes, you should test the tank to make sure it doesn’t have any leaks. This should be done before you put your camera in harm’s way. You can test for leaks by filling the tank with water and placing it on a solid dry surface such as a table. Leave it for half an hour and then move it. If the tank is in watertight condition, there shouldn’t be any water deposited on the surface.
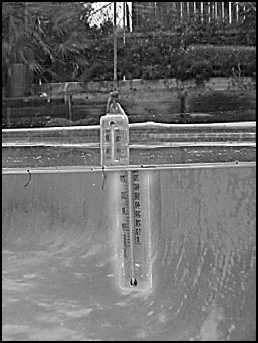
FIGURE 15.2 Diffraction differences between above surface and under water.
Once you’re confident that the tank is well sealed, you can begin to prepare it for filming. You’ll build a frame that will be secured to the tank and will hold mounted weights to force the tank below the water line.
| WARNING→ | Be extremely careful whenever your camera is near water. In the process of taking the photographs for this chapter, I wasn’t paying attention and dipped my digital still camera about an inch into the pool water. The camera died a quick and vocal death. I hope my expensive mistake can serve as a lesson to help you make sure that you pay strict attention anytime your equipment is in close proximity to a body of water. |
Construction
To achieve underwater filming, you’ll be creating an empty space in the water with the aquarium where your camera can be safely positioned. Being no physicist, it surprised me how much weight it took to push the tank below the water line. In the end, the tank you see in the photos took more than 90 pounds of dead weight to keep it solidly anchored to the bottom of the pool. Therefore, it’s better to overestimate the amount of weight you’ll need than underestimate. Be sure to have extra weights on hand.
There are two primary structures to the frame: the top and the base. The top is the frame that will be secured to the top rim of the tank with ratchet straps. The base is an open-ended box of PVC pipes that will sit on the bottom of the pool and structurally keep the tank at the proper level.
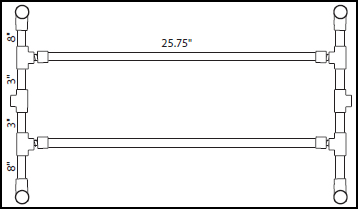
FIGURE 15.3 A diagram of the top frame.
Constructing the top frame
Before you begin creating the top frame, you’ll need to take the measurements of your tank. The goal is to have the top frame rest securely on the rim of the tank. In figure 15-3, you can see a diagram of the top I constructed to fit my tank. The tank measured 12.25˝ × 24.75˝ × 12.5˝. That meant that the central pipes of the top frame that span the width of the tank would be 25.75˝ long after taking into account the added length of the joints.
The central PVC pipes have threaded caps attached to allow them to be screwed into the metal T-joints. Each of the central pipe ends feed into a T-joint (see figure 15-4) to extend across the width of the tank. You’ll then need two other PVC pipes to complete the rectangle and span the length of the tank. In figure 15-4, you can see that I used two smaller threaded pipes that are fed into a T-joint to form the proper length. These T-joints are placed at each end. They’re then rotated downward on each side to somewhat “sandwich” the tank between the joint on the top frame.

FIGURE 15.4 The central pipe ends each feed into a T-joint to extend across the width of the tank.
Once you have the primary rectangle together, you’ll add the weight-carrying extensions. These are formed by screwing an 8˝ iron pipe into each of the T-joints. Then add another T-joint to the end of the new pipe with the two open ends of the joint facing up and down. To the top of the joint, add another 8˝ pipe (see figure 15-5).
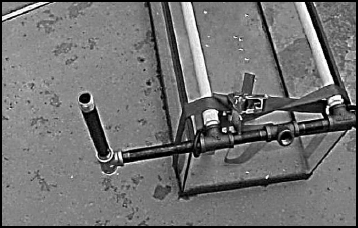
FIGURE 15.5 Add another 8˝ pipe to the top of the joint.
To complete the weight-carrying member, screw a threaded PVC adapter into the final open socket of each T-joint. These adapters will convert the threaded socket into a normal PVC socket (see figure 15-6). The converted sockets will allow you to slide the four PVC pipes from the base frame into the open PVC end.
The top frame itself is now complete. You need only to use the two ratchet straps to secure it to the top of the tank. Be careful to make sure that the primary stress from the straps lies on the metal parts of the top frame rather than the frame of the tank. You want to hold the top frame to the tank, but not unnecessarily stress the tank.
Also make sure that the top frame has a solid anchor on the rim of the tank before ratcheting it down. I accomplished this by sizing the central pipes such that the lip of each T-joint sat inside the rim and the rest of the joint sat outside (see figure 15-7). Placing the joints in this way ensures that the top frame doesn’t slide back and forth, even without the ratchet straps to hold it in place.
Once the top frame is strapped to the tank (see figure 15-8), you’ll have essentially a single piece. From now on, lift the tank using the top frame to avoid any danger to the tank itself.

FIGURE 15.6 Adapters convert the threaded socket into a normal PVC socket.

FIGURE 15.7 Size the central pipes so the lip of each T-joint sits inside the rim while the rest of the joint sits outside.
Constructing the base
Once you have the top frame complete, you can easily determine the measurements of the base. Use a tape measure or long ruler to obtain the length and width distances between the T-joints at the weight-bearing extensions (see figure 15-9).
When you have these distances, cut four lengths of PVC pipe to the proper lengths to allow you to construct a rectangle frame that will match these edge sizes. Assemble the four lengths with corner joints (see figure 15-10). The rectangle should be precisely the same size as the rectangle created by the top frame’s T-joints.
The foundation of the base frame is now complete. Before you continue, you’ll need to know the desired elevation for the tank in the water. Use a tape measure to determine the distance from the bottom of the pool to the water line. Then determine the amount of tank you want above the water line and add this to the measurement. By adding these together, you’ll have the length of the support poles that you’ll need. For example, the shallow end of my pool was 4-ft deep and I wanted 8˝ of clearance at the top of my tank. Therefore, I cut the poles to 4′ 8˝.
Cut four poles to the proper lengths and attach threaded converter caps to a single end of each PVC pipe (therefore four caps will be needed). Screw the threaded ends into the corners of the base frame (see figure 15-11). You should do another measurement to make sure that the height will hold the top frame at the proper level.
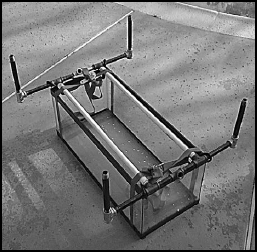
FIGURE 15.8 Strap the top frame to the tank.
Once you’ve obtained the tank and completed the top and base frames, you’ll need some type of weight to push the buoyant structure to the bottom of the pool. Dumbbell weights will be placed on the weight-bearing 8˝ pipes attached to the top frame. The weights shouldn’t be in place until the tank and the frame are in the water. Be sure to keep them handy because once the structure is lowered into the pool, you won’t be able to release it until the weights are in place. If you don’t want to use weight, you can use some of the sandbag alternatives listed in Chapter 44.
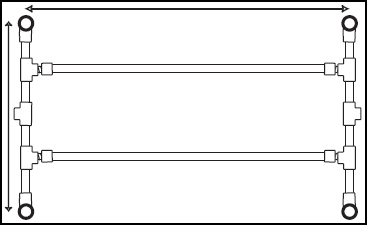
FIGURE 15.9 Use a tape measure or long ruler to obtain the length and width distances.
Lower it into the pool
You’re now ready to use the underwater cam stand. Note that the next step requires two people to accomplish safely. Since the stand is only meant to be used in the water, the flexible PVC pipe is unstable on land and the tank should not be left unattended once mounted on the base (see figure 15-12). Have two people lift the top frame with tank attached and push it onto the tops of the base poles. Once this is complete, you should have the entire underwater cam structure in place.
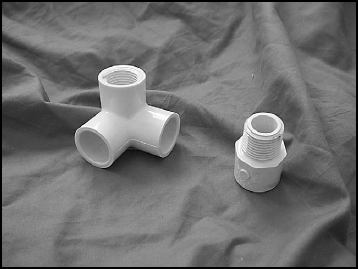
FIGURE 15.10 Assemble the four lengths with corner joints.
With a person holding each end of the top frame, lower the structure into the pool. It’s best if there is a third person (perhaps the cameraperson) already in the pool to guide it down properly. Note that without any weight on the frame, when the bottom of the aquarium reaches the water line, the structure will float above the bottom.
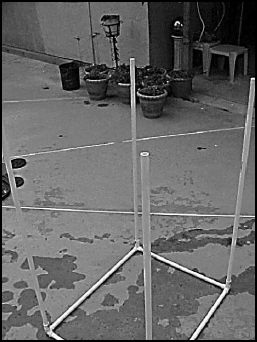
FIGURE 15.11 Screw the threaded ends into the corners of the base frame.

FIGURE 15.12 Don’t leave the tank unattended once it’s mounted on the base.
The person in the pool should position the stand in the desired position for shooting. Begin adding weights to the weight-bearing poles. Distribute the weights evenly around the four corners. Little by little, the weights will force the base to the bottom of the pool. When you have enough weights to hold the frame securely to the bottom, continue to have someone gripping the stand to make certain that it doesn’t tip over because of a wave or someone bumping into it.
Now you need to perform a safety check to make sure that the tank is tall enough so that the agitation of the water (by the actors) won’t splash over the rim of the tank. Have someone make a wave at the position desired for the actors. Start small and progressively make larger waves. Stop before water is actually splashing into the tank. This test will give you the parameters of how much splashing is possible before placing the camera in danger.
Finally, I would recommend taking a large plastic bag (a trash bag will do), cutting a hole large enough for the lens of your camera, and keeping the camera inside for the duration of the underwater cam shoot. The plastic bag will prevent any random splash of water from reaching the camera. Keep in mind that if you use a black bag, on a sunny day the temperature within the bag might rise and pose a danger to your camera. Make sure you always operate the camera within the parameters specified in the manual.
Suggestions
Here are a few operating suggestions to help you get the best use from the underwater cam:
• When not in use, remove the camera from the tank Under no circumstances should your precious camera be left in the tank unattended. That’s just asking for someone to unintentionally knock over the stand or splash water into the tank possibly causing damaging.
• Whenever the camera isn’t in use, power it down Typically, water only damages electronics when power is running through the circuitry. If the camera is powered off, even if it gets slightly wet, no harm will occur as long as you’re sure to completely dry the camera before attempting to power it back on.
• Determine the white balance before shooting Water filters most wavelengths of light and let’s through light mostly in the blue/green spectrum. Since audiences are accustomed to seeing an underwater picture with a slight blue/green tinge, it is usually a good idea to white balance the camera to the above water picture. Just make sure that whether you white balance above or below the water, lock it before you shoot.