

Boom Pole
Applications
The aspect of a film that audiences are least likely to forgive is poor sound. It seems that the hallmark of a poorly done guerilla film is a muddy soundtrack with a great deal of background noise. Having a good boom microphone mounted on good boom pole, when used properly, can make a fundamental difference in sound quality.
Note that there is no suggestion in this book of an effective replacement for a decent boom microphone because there really isn’t one. Rent or invest in a good microphone and it will pay for itself many times over in saved frustration and difficulty. Although a good boom mic can cost about the same as a mid-range computer monitor, it’s worth every penny in increased production quality. Any boom mic can be easily mounted on the boom pole you’ll learn to make in this chapter.
PARTS
| Qty | Item |
| 1 | 6′ length of |
| 1 | 4′ length of |
| 1 | Roll of duct tape |
| 1 | 90° bend joint for |
| 1 | Boom microphone |
General Instructions
When I started making short films, I thought that any sound problems could simply be re-dubbed in post-production. Not only does re-dub sound terrible when compared against properly captured sound, but also it’s a difficult, time-consuming, and tedious process. It can extend the time spent in post-production by 20%. Additionally, getting your actors to come back and redo their lines is a challenge in itself.
Although skimping on the microphone itself is problematic, the boom pole is another thing entirely. Microphones tend to be very light, so they can be easily mounted on a variety of extensions. The professional graphite boom poles will telescope to various lengths and are made to be very light. They are, however, very expensive and you can do almost as well with a PVC boom pole that can be constructed for less than the price of this book.
Construction
The most popular material to use for a boom pole is ![]() PVC pipe (see figure 44-1). The pipe should be cut to about a 6 ft length as this length is long enough to reach most locations, yet short enough so the PVC pipe doesn’t bend tremendously.
PVC pipe (see figure 44-1). The pipe should be cut to about a 6 ft length as this length is long enough to reach most locations, yet short enough so the PVC pipe doesn’t bend tremendously.
After you have the pipe cut to the proper length, you’ll need to fix the mic mounting bracket to the end. Your boom mic should have included the bracket. You’re going to attach this bracket to the PVC pipe for easy use. Duct-tape the microphone holder to the end of the pole (see figure 44-2). If you’re using a rental, use gaffer’s tape instead or you’ll be spending some time cleaning the adhesive gunk off the mounting bracket before you return it.
Spiral the mic cord around the top of the bracket and down the length of the pole. Be sure to leave a little slack near the mic so that the bracket can be tilted without running out of cord. Also, place two or three small pieces of tape on the cord spiral down the length of the pole. This will hold the cord to the pole to prevent any unraveling. The boom pole is now ready for use.
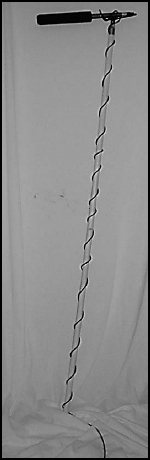
FIGURE 44.1 A boom pole made with ![]() PVC pipe.
PVC pipe.
Boom bend pole
If you have an inexperienced boom operator, it’s likely their arms will grow tired during the length of a long shooting day. You want to avoid that because it means they’ll stop paying attention to the scene, won’t follow the dialogue properly, and generally allow the sound quality to fall short of what you want. In figure 44-3, you can see a boom bend pole made of two pieces of PVC for easy handling.
The same 6 ft length of PVC is used for the vertical part of the bend pole. A 90° joint connects it (see figure 44-4) with a horizontal pole of 4 ft. I’ve found the 4 ft length to be about the maximum length before excessive sagging occurs.
For many shots, a boom operator can simply hold the vertical length against their shoulder, so it requires little energy. Although the 90° boom mount is easier to hold, it is much less flexible than a standard boom pole. It casts a larger boom shadow and is easier to bump causing noise in the soundtrack. Be sure to only use it when situation demands.

FIGURE 44.2 Attach the bracket to the PVC pipe by using duct tape on the microphone holder.

FIGURE 44.3 Use a boom bend pole for easier handling.
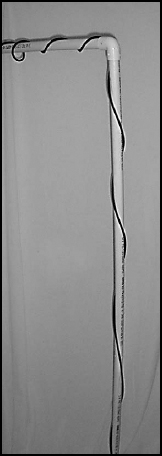
FIGURE 44.4 A 90° elbow joint connects the poles together.
Suggestions
Here are a few operating suggestions to help you:
• When recording a conversation, twist the pole When you’re recording two people having a conversation, use the standard boom pole. Then, instead of moving the microphone back and forth between them, simply locate the mic at the middle point and twist it to point at the person speaking.
• Watch the boom shadow One of the most common ways to ruin a shot is to have the boom cast a shadow onto the background. Since the shadow is subtle, it’s easily missed until the dailies are watched where it becomes annoyingly obvious. Try to be sure to watch for the shadow to make sure it doesn’t end up in the shot.
• Place the boom mic below the frame and point up One of the most common mistakes made by beginning boom operators is to think that the boom always needs to be positioned above the frame. Many conversations, however, can be caught excellently if the microphone is under the actors pointed up. This position is particularly useful when filming exterior walking conversations. The sun can cast a bad boom shadow and catching the sound from below ensures that the shadow won’t fall across the actors.
• Don’t rest the mic against something while filming Although you may be tired and it sounds like there is no sound created by leaning the mic against an object, any shift or bump will result in a noticeable thud on the soundtrack. It’s best just not to do it.