
Storyboarding
Applications
Storyboarding tells the story of a film visually in a series of comic-like panels. Unfortunately, many filmmakers approach the process of storyboarding with a sense of dread. Some believe that they don’t have the artistic talent to draw the storyboard panels correctly. Others think that storyboarding hampers spontaneity and flexibility on the shoot. Among A-list filmmakers, there seems to be a constant argument on this topic, so I’m not about to address the pros and cons of each viewpoint here.
One thing that is definitely true – the use of storyboards on a film can drastically reduce the time necessary for prepping shots while on set. Some big-budget filmmakers can afford to take hours to figure out a shot during principal photography and then communicate it to the actors and filmmaking staff. Few guerilla filmmakers can afford to fritter away valuable time and energy “winging it” on a production day. A thorough set of storyboards can help focus the filming activities for each day of the shoot.
General Instructions
Storyboarding is essentially a form of planning that enables a filmmaker to understand and recognize exactly what footage needs to be obtained to tell the desired story. Time is taken in preproduction to create the storyboards from a shooting script. Once the storyboards have been created, the panels can be re-arranged and augmented. Like the script, a storyboard is not the movie itself, but instead a blueprint or a guideline from which the movie can be dynamically created.
Concrete shot understanding
It takes many, many years of experience to read a script and know the shots, inserts, and reverses that will be needed to create a coherent scene. To an inexperienced filmmaker, the translation from script to screen on the surface appears straightforward. However, whether you’re framing shots or describing the performance that should be given by the actors, a great deal of work is required to comprehend exactly the footage that’s needed.
For example, filming a car chase down a suburban street might seem like a simple process of setting up the camera in various positions and shooting. Later close-ups of the actors and the necessary dialogue are filmed. But wait … have you made sure that when the cars race past that they’re moving in the same direction through the frame in each shot, say left to right? Does the angle you’ve chosen to film the actors match the exterior footage? Does an actor point off to the left side of the street for a driveway that’s located on the right side in the exterior shot? Will both cars fit in frame given the camera angle you intend to use?
The process of storyboarding forces the director to think precisely about how a scene needs to be constructed. This construction process can often reveal shooting problems and sticking points that would normally have been overlooked. The points usually revealed in storyboarding are continuity problems, shot-matching problems, logistical problems (such as the presence of unwanted immovable background objects such as water towers, billboards, etc.), and framing problems where multiple items (actors, props, scenery) are poorly composed. Once identified these problems can be minimized or resolved.
With a storyboard, proper shot angles, reversals, inserts, and ambient footage can all be pre-planned. The concrete understanding of each shot allows everything from lens choice to set decoration to be considered before the pressures of shooting are upon you.
A method of communication
Guerilla filmmakers often rely on free workers to serve in positions as varied as PAs, grips, gaffers, and actors. These individuals may not have any previous experience on a film set. Attempts to instruct them on what is needed for a scene can be difficult and time-consuming. A simple storyboard frame can be used to immediately communicate the desired shot to the entire staff.
Even examining the storyboard panels for the day’s shot list can help everyone. Wardrobe can know whether shoes will be seen, so the actress can take off her 3″ stilettos. Make-up can see when a wide shot will not pickup fine details of the eyeliner; the production designer can recognize when the left set wall will need to be removed for proper positioning of the camera; the prop master can see that certain props will be needed in the background; the lighting crew can work faster because everyone understands the illumination goal; and so on.
A budgeting tool
The most difficult estimation problem on a shooting schedule is determining how much can be shot in a single shooting day. Outside of your lead actor refusing to come out of his trailer, re-lighting for each new shot is probably the most time-consuming process that takes place in a shooting day.
A storyboard can help you determine how many shots you can make. A scene may only take up a single script page, but if you want to shoot it from 18 different angles, a dozen or more lighting set-ups may be required. Since each storyboard panel would show you a different angle, you can more accurately determine what is and isn’t possible in your shooting schedule.
Storyboarding allows you to see what props need to be rented for a shot or what locations can be faked or “cheated” to minimize expensive locations. The storyboards allow for much more accurate time and financial budgeting than a script alone.
A useful checklist
Films are generally shot over very long hours under very stressful conditions. This environment can make it difficult to obtain all the footage needed. On guerilla films, there are very limited opportunities to come back at some later date and re-shoot missed scenes. Locations disappear, crew members are unavailable, or actors have changed their look (cut their hair or got a new tattoo).
A storyboard can provide a visual checklist for an accurate idea of how much of the film is in the can. On a shotlist, every item can be checked off and yet there may still be missing reaction shots, inserts, and other easy-to-overlook footage. The storyboard provides a common foundation checklist between the director, the director of photography, and the script supervisor. Often late into a night of shooting, even a director who is excellent at remembering desired shots and framing new ones may have his attention flag enough to miss a crucial setup.
Construction
Making storyboards can be as simple as sketching a quick frame on a piece of paper and drawing stick figures inside. The following sections contain a number of suggestions for materials, methods of construction/drawing, and means of presentation. These ideas can help you make better storyboards or aid you in using them more effectively. However, the key to making storyboards is to do them – however you can. Don’t procrastinate. Ugly or neat, organized or messy, get them done by whatever method you find most useful.
3″ × 5″ cards
You can begin creating your storyboards with simple 3″ × 5″ cards. The 3″ × 5″ card has a height to width ratio of 1.66 that closely approximates the HDTV standard and Super 16 mm negative proportions (Standard/matted 35 mm is 1.85, DV is 1.5, 16 mm is 1.33, and Television is 1.3). These cards are convenient since you can buy them anywhere, take them anywhere, sort them, color code them, paste them to posterboard, pin them to a corkboard, and mark the edges for filing. They’re even available for feeding through laser or ink-jet printers.

FIGURE 3.1 A simple sketch of a frame on the blank side of a 3″ × 5″ card.
You can get started by creating a simple sketch of the frame on the blank side (see figure 3-1). If you’re shooting for television, you can draw a line down the right side (a little more than 1″ from right) to obtain the proper frame proportions. You can draw action arrows and necessary frame directions on the surface.

FIGURE 3.2 Script notes and scene explanations written on the lined side of a 3″ × 5″ card.
Script notes and scene explanations can be written on the lined side (see figure 3-2). At a minimum, usually the scene number is written on the card. You might also include a shot number (within the scene), the names of the characters involved, and the location if known. Leave room to scratch out and rewrite this information in case it changes.
Once you have a few cards, you’ll want to begin organizing them. You can use a hole punch and affix the cards to a ring (see figure 3-3) which I find very effective to present the storyboard like a flip book. These rings are available inexpensively at most office supply warehouses. You can also put the storyboard cards in a card box and number them in shot order.
While working on a scene, you could pin them to corkboard, although it’s impractical to keep an entire movie up on the board because of the number of cards involved. You might create a number of posterboards although when you tape them to the board, just do it along the top or you’ll be unable to look at the notes on the back.
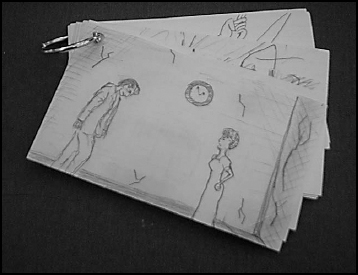
FIGURE 3.3 Cards affixed to a loose leaf binder ring.
One of the disadvantages of the 3″ × 5″ card method is the difficulty in duplicating the cards. I haven’t seen a copy machine that can accept a stack of cards, so the cards would have to be fed through the machine by hand. Drawing the storyboards on a standard 8.5″ × 11″ sheet of paper has many advantages in this area.
Basic templates
Using paper, pen, and ruler or a computer, you can easily create a template for a storyboard that provides the proper proportions for the medium you’ll be filming on. The type of medium you will be shooting will determine the size of your storyboard panel. In figure 3-4 you can see templates for the most common film and video types.
Even the drawing tools in the popular word processor Microsoft Word can be used to create the template. If you don’t have easy access to a computer, you can draw the templates by hand and use a copier to make duplications. Depending on the size of the storyboard you desire, a template could include several panels on a single page.

FIGURE 3.4 Templates for the most common film and video types.
Thumbnail sketches
Filmmakers often see the professionally rendered drawings used by directors such as Steven Spielberg or Ridley Scott and feel that they don’t have the artistic skill to draw a storyboard. Professional storyboards are really works of art created by trained, full-time artists. Few filmmakers need this level of detail to understand, visualize, and communicate a shot.
Stick figures are the favored method of panel drawing among filmmakers who have to draw them themselves. In figure 3-5, you can see some stick-figure actors and actresses in a scene. For thumbnail sketches, stick figures are perfect for the first pass to try and decide how the scene will be framed.
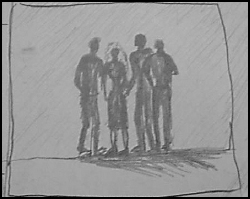
FIGURE 3.5 Thumbnail sketches of stick-figure actors in a scene.
Try to always include the horizon line which appears in figure 3-5. It can usually tell the camera operator if you’re shooting above or below the actors. Shooting above the actors will make the horizon line rise (see figure 3-6), while below the actors will make it drop (see figure 3-7).
You might also want to write the shot you intend to shot directly on the frame and use the abbreviation CU for close-up, M for medium, MCU for medium CU, ECU for extreme CU, and W for wide. You might consider other directions as well such as 2S for two shot when both actors are in scene, I to indicate an insert, and so on.
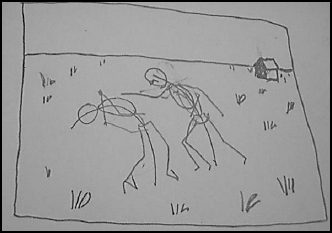
FIGURE 3.6 High horizon line framing.
Don’t worry about making the backgrounds too detailed. Each panel is meant to help understand the actions of the scene, not represent the scene itself. Here are the typical steps that are taken to draw a storyboard.

FIGURE 3.7 Low horizon line framing.
1. Draw the horizon line first to provide a guideline for the rest of the picture. Note that with most CUs, the horizon line will be out of the frame, so it doesn’t need to be drawn at all.
2. Draw circles for the heads of your actors. Don’t put in any features yet.
3. Draw a drop line from the head to show the angle of the bodies. If an actor is standing, you can drop it straight down. Bent over, draw a curve.
4. Draw the nose to show the direction and inclination of the head.
5. Draw the shoulder line to indicate the direction of the torso.
6. Draw the remaining facial features such as the eyes, ears, hair, and eyebrows.
7. Connect the hip line to indicate the direction of the hips.
8. Add arms and legs.
9. Add any necessary scenery.
Quick thumbnail sketches may help you get started with storyboarding but don’t let it stop you from creating the full panels. You may not be familiar enough with basic drawing conventions to advance beyond the stick figures. For this reason, I’ve created Adam Actor and Amy Actress.
Adam Actor, Amy Actress
To properly frame a scene that will show people, you need to make sure that the people are correctly proportioned. For example, you can see in figure 3-8 that the entire length of the body of a simple cartoon figure and his twin can fit within the frame. The figure is not correctly proportioned for a human, however, so this shot will not actually be possible with most cameras.
The same shot with Adam Actor shows that only his upper torso will appear in the frame (see figure 3-9). Adam Actor is constructed to correspond to the proportions of a human being, so he can be used to accurately estimate how a shot will look.

FIGURE 3.8 Simple cartoon character with improper proportions.

FIGURE 3.9 Adam actor is a simple character for fast storyboarding.
For simplicity, both actor and actress are proportioned using head size as the standard unit of measure. Adam Actor is 7 heads tall while Amy Actress is 6.5 heads tall (see figure 3-10). You can use a ruler to draw in the head and then measure off the rest of the body. However, this provides precision that’s not necessary for most panels.
I use the fingertip-measuring method. Since most of your figures in the panels are small, you can easily hold together your thumb and your index finger, and use the edges of your fingernails to approximate the measurement of the head (see figure 3-11). Keep your fingers together at that angle and you can use that distance to quickly measure further spaces of the panel. With a pencil in your other hand, you can mark distances as you measure.

FIGURE 3.10 Amy actress is 6.5 heads tall.
Figure 3-12 shows the heads of Adam and Amy from all eight primary angles (each turn of 45°). You can use these heads as templates that you can copy into your panels. If the head of one of your actors is tilted (perhaps bent over), rotate this book to the proper angle and then copy the head.
In figure 3-13, you can see some common facial expressions. Notice that only the eyebrows, eyes, and mouth really change to alter the expression. Try other variations of these facial features to obtain different expressions. Remember that these shouldn’t be works of art. You’re just looking for a representative picture to understand the scene.

FIGURE 3.11 Thumb and index figure measurement approximation.
If you have problems sketching your own poses, buy a flexible doll or action figure. Draw a proper head, so you can get the proportions correct and then use a stick-figure body modeled on the position you’ve placed the action figure (see figure 3-14).

FIGURE 3.12 Heads of Adam and Amy from the eight primary angles.
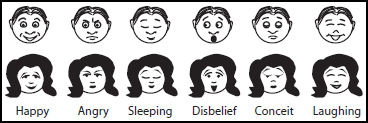
FIGURE 3.13 Some common facial expressions.
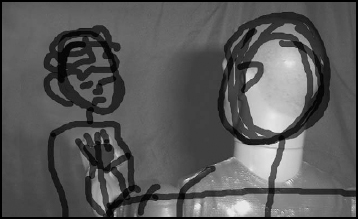
FIGURE 3.14 Overdrawing an action figure photo.
Sketch a few storyboard panels of movies that you know. Below are four famous movie scenes that I used Adam Actor to illustrate (see figure 3-15). Do you recognize the movies these are from? Storyboarding existing material will help you to learn how excellent directors framed a scene.

FIGURE 3.15 Framing of four famous movie scenes.
Photographic storyboarding
If you don’t want to draw the storyboards, you can always use a camera instead. With dolls or stand-ins actors and a few toy props, a complete storyboard can be made of all the key scenes.
The advantages of using photographic storyboarding include:
• Simple to begin You can start immediately without worrying about your drawing talent or ability to accurately project the scenes. You can also usually use many of the pictures that have already been taken on the location scout.
• Provides actual color photos of the scenes You can take the pictures at the time of day and the place where you think you might want to shoot the actual scenes. Lens filters, diffusion, and camera angles can all be used to make the storyboard pictures appear close to the intended final picture of a scene.
• Determining focal lengths If your camera has interchangeable lenses or a wide-ranging zoom lens, you can determine the general focal length that might be needed for the shot. While a drawn storyboard can easily show a close-up or wide-angle shot of a scene, it won’t provide a good idea of how the frame will actually look through the camera.
Disadvantages of the method:
• Expense Developing all the film or printing to an ink-jet for a digital camera can be very expensive. While pen and paper costs almost nothing, each photo may stretch your budget to the breaking point.
• Availability of resources (human and otherwise) Stand-ins may get tired of acting out every shot in the scene. Dolls or action figures may not provide the flexibility or emotional drama needed to communicate the key aspects of the scene. Additionally, a critical prop or set may be difficult to procure for the picture.
• Tedium Standing somewhere with a camera and taking every single shot needed for the storyboard can be incredibly tedious. It can also be time-consuming since making a simple sketch typically requires a few moments, but each picture needs to be setup, framed, and shot.
In figures 3-16 through 3-18, you can see a few storyboards I’ve created using an action figure and a doll. The male action figure is excellent because of the wide range of movement for the limbs as well as the head and neck. Can you see how the difference in lighting between figures 3-16 and 3-17 makes a difference in the tension of the scene? These type of lighting effects are often difficult to represent in sketches, but are fairly easy to accomplish using a small light in a photograph.

FIGURE 3.16 Over-the-shoulder shot using photographic storyboarding with two action figures.

FIGURE 3.17 Casting a shadow using photographic storyboarding.
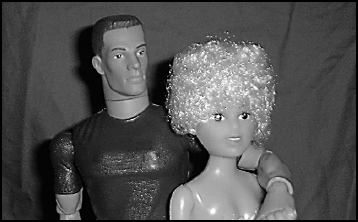
FIGURE 3.18 Medium shot using photographic storyboarding.
For those who want to spend the money, there is a program called Poser that allows you to position computer-generated people, change their expressions and poses, alter their hairstyles, add scenery, and so on. It even lets you choose the camera angle, set and modify lights, and render out the final image in high resolution.
I thought this sounded great, so I bought Poser and found myself wasting a great deal of time. Though no fault of the program itself, I couldn’t abandon a frame that wasn’t quite perfect. I spent hours and hours tweaking the actors or the camera angle to achieve the shot I really wanted. Each storyboard panel must have taken at least an hour. The program gives you so much control you almost can’t resist becoming a director of the moment.
Of course when I went to shoot the scene, the logistics and actor’s decisions rendered these panels no more accurate than the quick 5-min sketches I’d made for the rest of the film. If Poser works for you, that’s great, but try and prevent yourself from wasting time making the panels hyper-accurate.
| TIP | You can also combine the photographic storyboard with your own drawings. If you’re using a traditional film camera, you can take the pictures and either draw on an acetate overlay of the picture or sketch on the picture itself with a marker. With a computer, you can use features such as the layer options in Adobe Photoshop to draw representations of the characters over the scenery pictures. |
Presentation storyboarding
Whether your storyboard panels are photographed or hand-drawn, presentation software can be used very effectively to help develop your movie. Common programs such as Microsoft Powerpoint, Lotus Freelance, Macromedia Director, or other presentation software can be used to turn your static storyboard panels into a dynamic presentation.
The software can be used to set up timing of the movie, put in a sample soundtrack, or create an automated presentation. The flexibility of presentation software allows you to rearrange panels instantly. Additionally, the presentation can be output to a CD, DVD, or even the web for easy distribution. Viewer software for the presentation files is free and available on most computers in most formats.
Most presentation software also has excellent printing capabilities. Presentations can be printed to standard paper sheets, 3″ × 5″ cards, or tiled summary slides. Further, most programs feature the ability to add speaker notes to each slide. These notes can be used for a number of uses including important narration, prop lists, lighting notes, and transition information.
Suggestions
Here are a few suggestions relating to creating useful storyboards:
• Be sure to storyboard your inserts When you’re creating your storyboards, include a number of inserts or cutaways (general scenery, the clock ticking on the wall, children playing in the park, etc.) for each location. If you make sure to shoot different cutaways, editing becomes a much easier task. Cutaways are also often the shots that are forgotten on the shooting day in the thrill of the moment or end of the day trudge.
• Use corkboard or posterboard to mount the panels You can easily mount 12 or more panels, so an entire scene may be viewed at once.
• Do a little storyboarding at a time Storyboarding can be extremely tedious, so don’t do it all at once. Break the task up into blocks of scenes or time. I generally sit down, start my stopwatch, and work for 20 min. This block of time seems long enough to get something done, but not long enough to create drudgery. Just make sure you do more than one 20-min block per day or you’ll never get your storyboard done!