This appendix takes a look at the Visual Basic Power Packs Tools. These tools are a set of off-cycle release packages that focus on helping developers who are maintaining traditional Visual Basic 6.0 applications begin the process of transitioning to Visual Basic .NET. Additionally, they contain a set of features intended for developers with years of Visual Basic experience to replicate tasks and behaviors that were easy in Visual Basic 6.0 in Visual Basic .NET.
This appendix briefly examines the two installation packages that are currently available. These packages were released targeting Visual Studio 2005, but they are fully compatible with Visual Studio 2008. Moreover, elements of the Visual Basic Power Packs 2.0 package for printing have been fully integrated with, and ship as part of, Visual Studio 2008. It is hoped that additional portions of this package will be included in Visual Studio 2008 as part of a future update such as a service pack.
This appendix focuses on three areas:
These tools are available as free downloads; however, due to licensing restrictions on the Express Editions, Visual Basic Express and the other Express Editions do not support any add-ins. Thus, to leverage the Power Packs, you need a licensed version of Visual Studio Standard or above. Why you would want to leverage the Power Packs is a question best answered by understanding the issues that the Power Packs address. These aren't just technology for technology's sake: they address very real issues that traditional VB developers are facing today.
The Visual Basic Power Packs were introduced by Microsoft's Visual Basic Development team to introduce new features and capabilities needed by Visual Basic developers between major releases of Visual Studio. The main focus has been on helping Visual Basic 6.0 developers who have implemented solutions that aren't easily migrated in one fell swoop to .NET. There are two problems:
Like it or not, the migration wizard that originally shipped with .NET 1.0 doesn't meet the requirements of a developer migrating a real-world application.
Once they are working in .NET, typical developers face challenges with certain tasks that under Visual Basic 6.0 were easy but in Visual Basic .NET are not.
Each of these two issues is currently addressed by a different package.
In a perfect world, when Visual Basic .NET 1.0 came out, the transition from Visual Basic 6.0 to .NET would have felt seamless. The migration wizard that was introduced would have looked through your project files, found all of the custom COM components for which you had source available, and then been able without any problem to convert every line of VB 6.0 source code to VB.NET. Unfortunately, we don't live in that world, and, in fact, the migration wizard left several gaps in coverage. These gaps in code migration didn't affect a demonstration, but were of significant concern if you were trying to update an application to .NET. This meant that your primary tool for migration forced you into an all-or-nothing decision with regard to moving your application, but at the same time couldn't fully complete the process. As a result, you faced a scenario in which you couldn't really add new capabilities to your application without converting it, and converting a decent-sized application with all of the associated manual migration elements could take months — time you didn't have.
Recently, the same scenario again appeared with the anticipated end of the Windows Forms user interface. However, in this case, as discussed in Chapter 18, Microsoft found a better way to handle the migration. Instead of including a wizard that tried to manage the entire application at once, they created a set of components that enabled you to interoperate between your existing code and the new feature set. The most exciting part about this is that when .NET 1.0 shipped, it actually included this same capability for COM. In theory, there was also support for calling .NET components from COM, but, in reality, that interface was difficult, so the Visual Basic team stepped up to the plate and created a package that would solve that problem.
The Visual Basic Interop Forms Toolkit 2.0 does this. It was designed to enable you to create and implement a form in .NET, after which the toolkit makes it easy for you to wrapper this form so that it can function as a working component within your existing VB6 application. The wrapper handles integrating the .NET form with your application, enabling you to maintain a common environment for the data and context and even messaging. Events can be passed between your new .NET form and your existing Visual Basic application. The result is that now you can extend your existing VB6 application with new .NET features without the cost and risk associated with attempting to migrate your entire application in one fell swoop.
Of course, this was only one aspect of the migration challenge for VB6 developers. The second key aspect was that under Visual Basic 6.0, it was easy for developers to carry out tasks such as printing. .NET follows a paradigm that is much closer to the C++ model. It provides a great deal of control and is fully customizable. However, the ability to control and customize your output also introduces a layer of complexity for managing those capabilities. VB6 developers often just wanted to output a display or add a geometric shape to the display. As a result of the added complexity of these tasks, VB6 developers were often unsure how to implement the same capabilities they had under VB6.
Again the Visual Basic team stepped up and created the Visual Basic Power Packs 2.0. This is a separate installation package from the Interop Forms Toolkit, and instead of targeting code that can be integrated with traditional COM applications, it focuses on making it just as easy to do things like printing as they were in Visual Basic 6.0.
In addition, instead of waiting for the next release of Visual Studio, the Visual Basic team scheduled these Power Packs as standalone deliverables so that users could take advantage of them much sooner.
Don't assume that these packages are of lower quality. In fact, to highlight how valuable the Power Packs 2.0 tools are, the printing capabilities introduced in this Power Pack are included within Visual Studio 2008, and there are plans to include many of the line and shape capabilities in a future update to Visual Studio 2008.
The Power Packs are available as free downloads. In addition to the downloads page, the Visual Basic team also maintains a suggestion page directly related to features that you, as a Visual Basic developer, would like to see. This page also includes links to the existing Power Packs and is a great place to start when looking for more information on the Power Packs: https://connect.microsoft.com/vbasic.
The current download for the Interop Forms Toolkit 2.0 can be found at www.microsoft.com/downloads/details.aspx?familyid=934de3c5-dc85-4065-9327-96801e57b81d&displaylang=en.
The current download for the Visual Basic 2005 Power Packs 2.0 can be found at www.microsoft.com/downloads/details.aspx?familyid=92faa81e-e9c1-432c-8c29-813493a04ecd&displaylang=en.
Keep in mind that two separate download packages are needed to collect all of the assorted tools available to Visual Basic developers, and that both packages are currently on version 2.0.
Additional forums are available to discuss issues or ask questions regarding use of the tools. The Interop Forms Toolkit forum is at http://forums.microsoft.com/MSDN/ShowForum.aspx?ForumID=879&SiteID=1
The forum for the Power Packs 2.0 package is at: http://forums.microsoft.com/MSDN/ShowForum.aspx?ForumID=903&SiteID=1.
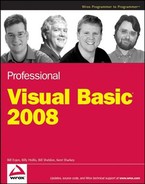
To begin working with the Interop Forms Toolkit, download the packages. The default download page includes three files for download, shown in Figure B-1.
Download all three of these files to a local directory of your choosing.
The first file, which is also the largest, InteropFormToolsInstaller.msi, contains the actual application files that need to be installed.
The second file is the microsoft.interopformsredist.msi file. As its name implies, this is a redistributable version of the Interop Forms Toolkit of tools.
The third file is setup.exe. As you can tell by its size, it relies on the installation.msi file, but if you are running on Vista then you'll need this file.
Once you have downloaded all three files, run the setup file to install the tool. Aside from selecting the installation directory and similar standard setup screens, there are no special steps related to installing this package. One thing to note, regardless of whether you are running Visual Studio 2005, Visual Studio 2008, or both, is that the installation package updates your Visual Studio environments.
Because Visual Basic Express Edition does not support add-ins, this application will not be updated when you install the software.
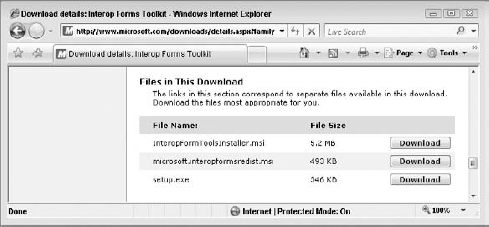
To validate your installation, there are three easy items you can check. First, once the installation is complete, the help topic associated with the Interop Forms Toolkit 2.0 should open. Second, when you access the Tools menu, the first item in the menu should be the option to Generate Interop Form Wrapper Classes. This menu item should be located above the standard option to Attach Process. Third, and probably most important, when you access the File menu and select the New Project dialog, you should see two new project types under the My Templates section within Visual Basic Windows, as shown in Figure B-2.
The first custom project type is the VB6 Interop User Control project type. This type of project enables you to create user controls that can then be used to populate the body of an MDI window. This project type was introduced with version 2.0 of the Interop Forms Toolkit and is the solution the Visual Basic team developed to support interoperation within an MDI environment.
The second project type is the VB6 InteropForm Library project. The original project type, it was designed to enable you to create a DLL that defines a .NET form.
After you have validated that your installation is working, the next step is to create a simple Interop Form.
Select the project type shown in Figure B-2 and rename the solution ProVB_AppB_InteropForm. Click OK to generate your source project files. The resulting project opens, and you can open and edit your new Windows Form. However, note that what you are creating, while it supports the Form Designer, isn't a standalone executable. If you open your project properties, you'll find that your project will build as a DLL, not a standalone executable.
Another thing to note is that as part of the generation of your project, a file named InteropInfo.vb is created. This file takes settings that might otherwise exist in your AssemblyInfo.vb file and places them here so they are a bit more apparent. The first line references the standard COM Interop classes and turns these settings off. This is important because you won't be using traditional COM Interop; you've added a new Interop class specifically for this purpose. By moving this setting into a separate file, if you do accidentally cause the AssemblyInfo.vb file to be regenerated by Visual Studio, you'll get a compile error. This is good because you can quickly and easily delete the newly duplicated line from AssemblyInfo.vb and not wonder why your project suddenly isn't working correctly. Compile errors are always better then runtime errors. The other item in this file is a declaration that extends the My namespace to include the Interop toolbox. In general, you shouldn't make any changes to this file, but now you know what it's doing.
Opening the InteropForm1.vb, you have a typical design surface for a form, on which you can add controls. Behind the scenes is an InteropForm1.vb that contains the following default code:
Imports Microsoft.InteropFormTools

<InteropForm()> _
Public Class InteropForm1

End Class
As you can see, the default class definition has been decorated with an attribute indicating that this class should be considered an InteropForm. This enables the postprocessor that is used to generate your COM wrappings to recognize which type of wrapping should be applied to this class.
For now, however, go to the Form Designer, and because this is a truly simple demo, drag a label and a TextBox control onto the display. Within the code, create the four other types of interface members you'll want in your production code: an initializer, a property, a method, and an event (in that order). The following code is placed within your class definition:
Public Sub New()
    ' This call is required by the Windows Form Designer.
    InitializeComponent()

    ' Add any initialization after the InitializeComponent() call.
    End Sub

    <InteropFormInitializer()> _
    Public Sub New(ByVal label As String)
        Me.New()
        Label1.Text = label

    End Sub

    <InteropFormProperty()> _
    Public Property TextBoxText() As String
        Get
            Return TextBox1.Text
        End Get
        Set(ByVal value As String)
            TextBox1.Text = value
        End Set
    End Property

    <InteropFormMethod()> _
    Public Sub ChangeLabel(ByVal lbl As String)
        Label1.Text = lbl
        RaiseEvent CustomEvent(lbl)
    End Sub

    <InteropFormEvent()> _
    Public Event CustomEvent As CustomEventSig

    'Declare handler signature...
    Public Delegate Sub CustomEventSig(ByVal lblText As String)
For the initialization code you'll note that first a default New constructor, is created. When you define the default New constructor, it adds the call to InitializeComponent, which handles the creation of your controls within the form. Thus, when the object is initialized, you will be able to reference the controls you have placed on the form.
The next step is to create a parameterized constructor so that you can quite literally pass a parameter as part of the initialization process. Note that similar to the class itself, the exposed initialization method has an attribute on the method. Each type of class member that is to be exposed gets an attribute matching the type of that method. Thus, for the New method, the type of the attribute is InteropFormInitializer. For this simple example, the parameterized New(ByVal label As String) simply changes the text associated with the label. Finally, although this class is defined in .NET syntax, COM and VB6 don't allow parameterized New statements. Thus, when you go to reference this parameterized initializer, you'll find that the method name is in fact Initialize.
Next, the code defines and exposes a public property. In this case, to help simplify the code, there isn't a private member variable to hold the value; this provides an easy way for the code that creates this form to set and retrieve the value of the text box. Similarly, there is a method to allow the calling code to update the label shown on the form. Note that it has also been attributed, and after you update the label for demonstration purposes, it raises the custom event that is defined next.
That event, called CustomEvent, is defined with an attribute, but the event that is defined must also define the signature or definition of its handlers. In this case, the Delegate CustomEventSig handles a single parameter. This .NET code, as noted, provides a basic example of each of the primary types of Interop you'll want to carry out. The next step is to generate your Interop methods.
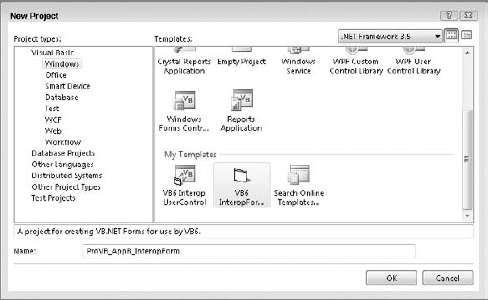
One of the key differences between an InteropForms project and an Interop User Control project is this step. Only the InteropForms project requires the generation of custom COM wrappers. To do this, access the Tools menu and select Generate InteropForm Wrapper Classes. There is no user interface; instead, the generation process will create a new directory in your project containing the InteropForm1.wrapper.vb class, as shown in Figure B-3.
For readers developing on Vista: keep in mind that registry access requires elevated permissions. You need to start Visual Studio 2008 with the Run as Administrator option on your right-click context menu. If you don't, then when you attempt to automatically register your newly built DLL as a COM component, you'll get an error, which Visual Studio 2008 reflects as a Build Error.
At this point, your application is ready to be called from VB6. If you follow best practices, you'll have the VB6 integrated development environment (IDE) installed on the machine with Visual Studio 2008. In that scenario, you can immediately go to your VB6 project and reference the necessary DLLs, both the Interop Forms Toolkit DLL and your custom DLL. Otherwise, you'll need to get ready for deployment now instead of later.
To deploy your Interop Forms project, you need a traditional MSI installation. Creating a setup project is covered in Chapter 24, so the details of creating your setup project aren't repeated here. However, note a couple of special steps. In order for your new Interop Forms project to work on the client, the client needs both the .NET Framework 2.0 redistributable and the second MSI you downloaded earlier in this chapter (shown in Figure B-1), the microsoft.interopformsredist.msi. If you are using Visual Studio 2005 to create your installation package, then you can add these items as prerequisites for installing your DLL via the user interface.
The recommendation is to create a simple setup project in Visual Studio 2005 for installing your Interop Forms project and the associated prerequisites and have this run in advance of whatever legacy installation project you have. To extend an existing MSI, you need to carry out the appropriate steps for the tool generating your MSI, a subject beyond the scope of this appendix.
When you first start planning to work with the toolkit, you might try to keep the VB6 IDE on a separate machine from your primary development machine. However, this leads to two issues. First, in order to work with the Interop Forms tools on your VB6 machine, you need to install the tools package a second time. That's a minor issue. Second, because Visual Basic 6.0 doesn't know how to step into .NET applications, if you want to debug the Interop Form you created in .NET, you have a problem. The solution to this, of course, is to run both development environments on the same machine.
Alternatively, you can try to create a simple Windows Forms EXE that will call and initiate your Interop Forms project from within .NET. The debugging isn't perfect because, of course, you aren't actually calling your code across the correct interface, but it should enable you to find most pure .NET coding issues. You can also leverage the Debug and Trace classes, but you won't have any interactive breakpoints in that scenario.
This still leaves unresolved the issue that you can't just open Visual Studio 2008 and expect the VB6 IDE to call it when you are in debug mode. Therefore, this section briefly discusses debugging Interop Forms Toolkit projects when you are running your VB6 application.
Once you have compiled your .NET application, you have a DLL. This DLL is then exposed to your VB6 development environment and added as another COM component in your VB6 application. However, when you debug, you can't step into this DLL from Visual Basic. Presuming you have started your Visual Basic 6.0 project so that its process is now running, your next step is to open Visual Studio 2008 and open your Interop Forms project. It is hoped that you have set typical breakpoints in your source code and might even add new breakpoints.
Next, go to the Tools menu and select the Attach to Process menu item. At this point, you get a dialog containing a list of running processes. Locate the "Visual Basic 6.0.exe" process. Once you have found this process, which represents the running application in VB6, attach to this process.
At this point, you can work with your running application, and when the call is made into your .NET code, Visual Studio 2008 detects the call into the DLL and stops you on your breakpoint. In order for Visual Studio 2008 to detect the DLL call, you must be calling the same copy of your DLL that your Interop Forms project references. In other words, you can't just copy it off to some other location on your local machine for installation.
If you stop and restart your VB6 application, Visual Studio 2008 will maintain the attachment, but if you close the VB6 IDE, then you'll need to reattach the debugger in Visual Studio 2008.
Overall, the development process in VB6 is simple. Once you have either built your project or deployed it to the machine on which you have the VB IDE, you'll need to add references to both the Microsoft Interop Form Toolkit library and your custom DLL. Keep in mind that both of the DLLs must be registered on your VB6 IDE machine for them to be visible. If you are building on the same machine, they are automatically visible. Once you have added references for these libraries, you can create a new instance of your Interop Form's Form class and call the standard methods and any custom methods you've exposed on that form.
The one key point to remember, which was mentioned earlier but bears repeating, is that if you have created a custom constructor, in order to use it, you will call an Initialize method on your Interop Form class.
As noted earlier in the book during the discussion of the WPF Interop controls, the Interop control packages aren't perfect. Each has certain limitations that reduce their desirability for the long term. To resolve this, keep track of how much of various branches you have already converted. There will be a point where it is time to convert a larger section so that you can reduce the number of different Interop DLLs that you are using.
Along these lines, note that you can't put an Interop Form and an Interop User Control into the same project. Each of these items needs its own DLL, and, in fact, you should consider it best practice to only expose the DLL for a single form or control. Similarly, don't plan on calling a VB6 form from within your Interop Form. The Interop logic was written to enable you to call .NET from VB6.
In terms of interfaces, the Interop layer was designed to support only a minimum number of interface types. In particular, the String, Integer, and Boolean types should be at the core of what you expect to pass in terms of data. In theory, the Object type is supported, which enables you to pass custom data, so you could pass a Recordset from .NET to VB6 or vice versa; of course, VB6 doesn't know about a Dataset object, so you need to reference VB6 types as the generic object. In general, the best practice is to keep your interfaces as simple as possible.
When you start the VB6 IDE with your project, it attaches to your DLL. Normally this isn't an issue until you first run your VB6 application. At this point, you can't rebuild your Interop project. The Interop project is, in fact, referenced and therefore locked by VB6. If you need to rebuild your Interop project, you need to first shut down the VB6 development environment so that your code will correctly reference your latest build. As noted previously, debugging your Interop project from VB6 isn't the most productive set of steps.
If you change any of the method attributes, you need to regenerate the Interop wrapper classes that you generated in the last step of creating your Interop Forms project. Moreover, although it wasn't covered, you can raise errors from .NET into VB6. To do this, you want to leverage the following method call on the custom My namespace that was defined as part of your Interop Form:
My.InteropToolbox.EventMessenger.RaiseApplicationEvent("CRITICAL_ERROR", _ "Error
Detail.")
The other runtime issue that you may encounter is that certain internal events to your .NET application will not be triggered in the same fashion that they were in VB6. Under VB6, for example, when you referenced a property on a Form class, this triggered the Load event on that class. Under .NET, the Load event is not fired until the form is being displayed, so you need to recognize the impact on any code that you previously set to run on the Load event.
The remaining issue is related to the VB6 IDE. The IDE and VB6 don't really recognize that if you have started a .NET DLL, there are other in-memory classes to release. For a deployed application, this isn't an issue because when the application is closed, all of the memory associated with the process is automatically released. When you are debugging in VB6, however, the core process is associated with the IDE, not your application. As a result, the resources are not released between debugging cycles. To ensure that they are released, you can explicitly instantiate a series of code modifications contained in the Interop help files and release the .NET resources associated with your application. The recommendation is to implement these calls only after your references with the Interop tools are functioning correctly.
Unlike the Interop Forms Toolkit, the Power Packs extensions are intended to facilitate some of the same development simplicity that existed in VB6 for tasks such as printing. These classes aren't meant to support Interop, they are meant to support migration in the sense that the code for creating simple geometric shapes or using the VB style of form printing could be implemented using syntax similar to that of VB6. Since these Power Packs were released, the printing syntax has proven so popular that the Visual Basic team migrated those classes into the core features of Visual Studio 2008.
Similar to the Interop Forms Toolkit, the Power Pack Tools are installed from the Microsoft downloads. However, unlike the Interop Forms Toolkit, only a single MSI is available, which you run when the tools are installed. Prior to installing the tools, Visual Studio 2008 already has the printing control installed as such. If you review a typical Windows Forms project, you'll see the display shown in Figure B-4, which already includes the PrintForm control as part of your default Toolbox.
Unlike the Interop Forms toolkit, there is no need to begin with a special project template. There is no COM Interop involved because the Power Packs don't target VB6. They target experienced VB developers who want to be able to continue to implement certain tasks in the same way they could in VB6.
When your application ships, you still need to ensure that you create a dependency for the Power Packs library if you aren't using the DLLs that are included with Visual Studio 2008, but that's it. Additionally, because the Power Packs are just another set of .NET libraries, there aren't any issues related to debugging.

For the sample project shown in Figure B-4, you can create a new Windows Forms application and add the Print control to it. At this point, close Visual Studio and install the Power Packs 2.0 installation package. After installation, when you reopen your project within the Toolbox window, Visual Studio 2008 has a new section for the Power Packs 2.0, showing the Oval and Rectangle shape controls along with the Line and Print controls, as shown in Figure B-5.

Add a Rectangle shape to the upper section of the display and an Oval to the center of the display. Without getting into pages of details here, using the Visual Studio 2008 designer, you should customize the look and feel of the display by adding a variety of controls. Take some time to color and fill the shape controls with a solid color. The gradient colors are defined by selecting a fill color (Coral), a FillGradientColor (Navy), a FillGradientStyle (Horizontal), and a FillStyle (Solid). All of this can and should be done within the Visual Studio 2008 designer to achieve a display similar to what is shown in Figure B-5.
Now try to build your project. This will probably result in an error because of an ambiguous class reference with regard to the Print control. In the steps just discussed, Visual Studio 2008 includes references to both versions of the Power Packs library DLL. The 9.0.0.0 version is the one that ships with Visual Studio 2008, whereas the version from the Web is labeled 8.0.0.0.
If you install the Visual Basic Power Packs 2.0 on Visual Studio 2008 and you use the graphical elements, you may need to remove the Power Packs reference that ships with Visual Studio 2008 for the Printing controls as a reference in your project. Because the Power Packs include the most recent version of this DLL for the graphics, it is recommended that you remove the version that ships with Visual Studio 2008.
Once the duplicate reference is removed, the application should build. The next step is to ensure that the check box in the upper-right corner, labeled "Landscape" in the figure, is checked. Having done this, label the button in the bottom center of the display "Print" and double-click it in the Design view to trigger the automatic event handler generation.
The only code needed for this printing demonstration is placed within the handler for this button. The code hides the button, determines whether or not the Landscape check box is checked, and uses the Power Packs Print control to Print Preview the document. Once this is completed, the Print Me button is made visible again:
Private Sub ButtonPrintForm_Click(ByVal sender As System.Object, _
                                  ByVal e As System.EventArgs) _
                                  Handles ButtonPrintForm.Click
    ButtonPrintForm.Visible = False
    PrintForm1.PrinterSettings.DefaultPageSettings.Landscape = _
                                                   CheckBox2.Checked
    PrintForm1.PrintAction = Printing.PrintAction.PrintToPreview
    PrintForm1.Print()
    'PrintForm1.Print(Me, _
PowerPacks.Printing.PrintForm.PrintOption.CompatibleModeFullWindow)
      ButtonPrintForm.Visible = True

  End Sub
The code shows how you can reference the PrinterSettings property, and within that are the page settings to change details regarding how the page is printed. The PrintAction defines what the control should do. There are three options: print to the default/selected printer, print to a file, or use the Print Preview window. In this case, displaying the results is the most useful option.
The next line is all you need by default to print the current window. Note that this control doesn't call the form to determine what is visible on the form. Instead, it essentially captures the current screenshot of the form for printing. This is the default behavior, but not the only option available. If you open and resize this project so that it is fairly wide and print in profile mode, you'll see how the control truncates the printed image (see Figure B-6.

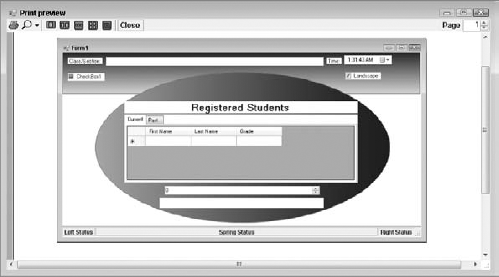
As shown in Figure B-6, the default behavior is to show the contents of the screen without the border displayed. Unfortunately, in this case the printout shows less than the full window contents. Before you print again, go to the print event handler and comment out the default print line and uncomment the parameterized print line. In this case, specify the window, which is Me, and then add one of the print options.
The current code uses the CompatibleModeFullWindow option, which you are encouraged to test. The results in this case are shown in Figure B-7, and the Print Preview shows the full window with the border in place. However, don't stop at this option; try out other options. The Compatible Mode option uses a display-based logic that properly captures the screen. Other display options do not capture the screen accurately, so in some cases the only things visible in the Print Preview window are the shape controls.
Overall, the Power Packs 2.0 shape controls enable you to easily add a custom look to your otherwise gray forms. The controls are somewhat limited, but if you want a quick and easy way to add some graphics, they do the trick. Similarly, the Print control is a quick and easy way to create a hard copy of what your application is displaying. However, keep in mind that the Print control sacrifices capabilities and customizations in order to provide a simple interface.
The Power Packs 2.0 provide tools that VB6 developers can leverage for migrating an application, and for a rapid application design (RAD) prototype, they provide a dynamic and visually interesting display. Just keep in mind that when it comes to the shape controls, if you need any sort of fancy graphics, then it is recommended that you leverage WPF and the new graphical capabilities provided as part of .NET 3.0.
This appendix covered the Visual Basic Power Packs. This set of off-cycle release tools enables experienced Visual Basic developers to leverage their knowledge and existing code with the new capabilities of .NET. The Visual Basic team has created two downloadable packages that improve your ability to manage COM to .NET Interop migration and to continue to print and create graphics the same way you did before. As with all Interop-focused solutions, there are key limitations in working with the Interop Forms toolkit, but in general it provides classes that will help you if you need to migrate an existing application in a controlled and cost-effective manner. In particular, this appendix highlighted the following:
The focus of the Visual Basic Power Packs
How to integrate Visual Basic 2008 forms with Visual Basic 6.0 applications
Leveraging printing and drawing controls that behave similarly to those in Visual Basic 6.0.
Although there are currently only two Power Packs, you can keep track of what is occurring in the Visual Basic Development center at http://msdn2.microsoft.com/en-us/vbasic/default.aspx. There is talk of adding more Power Packs in the future, which would add still more features to increase the productivity of Visual Basic developers.