
Creating and Managing Views
The process of creating views was covered in Chapter 19, in the section titled “Creating a View in a List,” and so will be reviewed from the perspective of the list administrator in this section.
One of the main concerns a list or library administrator should have pertains to the columns that are shown in the default view for a list or library (the view that shows by default when a user visits the list) and how it presents the information. It is generally an ongoing process for the list administrator to experiment with the best way to present the data stored in the list or library by manipulating the view by showing or hiding columns, using filtering, using grouping, totals, limiting the number of items shown in each view, and tuning the other options. An example is given in this section of a view that is created using a specific style to leverage the metadata that is available for documents by default (such as created date and time, and created-by information).
Tip
A recommended best practice is to create a view titled Home Page View for each list or library that will have its list view web part added to the home page or other web part page. Generally, the default view can be modified and several columns hidden, which results in the list view web part taking up less space on the page that displays it, which is often the home page to the site.
When the administrator clicks the Create View button from the Library tab on the Ribbon in a document library, several options are provided, which are affected by the software installed on the PC. The basic options are to create Standard View, Datasheet View, Calendar View, or Gantt View. A general recommendation is to experiment with the different views, but in most cases, the Standard view will be used. It is generally recommended that Calendar views be used with a list created from the Calendar template, and the Gantt view be used with a list created from a Project Tasks list.
Options Available When Modifying a View
If the administrator clicks the Modify View button from the Library tab on the Ribbon, he has the option of changing which columns are displayed, and in which order, whether sorting is used, whether filtering is used, and if in-line editing is allowed. Also, the administrator has the option to use Tabular view, which determines whether individual item check boxes are displayed. These allow users to perform bulk operation by checking multiple items at a time. Items in the list or library can be grouped by one or more columns, and the display can default to collapsed or expanded, which can make navigating the list or library much easier. Totals can be displayed for some types of columns, but not all, and the Totals section will show which columns can be totaled, and the options of Count, Average, Maximum, Minimum, Sum, Std Deviation, or Variance will be offered based on the type of data. It is worth noting that calculated columns cannot be totaled.
A variety of styles are offered that change the appearance of the data. For example, the Shaded view style colors each other row a darker shade, making it easier for users to track metadata associated with a document as they scroll to the right. The preview pane is a powerful new view that displays the columns that are selected in the Edit View page. Figure 20.3 shows a document library view that is using the preview pane that was customized to show a subset of columns in the preview pane to provide a data-rich preview of the metadata attached to the document. Note that the documents’ filenames are displayed to the right of the Quick Launch, and then when a document name is hovered over, the pane on the right shows the columns that the library administrator has chosen to be shown in the Edit View page. In Figure 20.3, the following columns are displayed:
• ID— Available in all lists and libraries. Because document names can be long and confusing, showing the ID number of the document that was assigned by SharePoint when the item was uploaded is a quick way to uniquely identify the document.
• Type— Available in all lists and libraries. The icon associated with the type of document is shown, which is a quick way for the user to tell the type of Office document they are looking at. This is especially useful because the Name column hides the extension of the document.
• Name— Available in all lists and libraries. This is the name of the file.
• Type of Document— A column added to this list. The user selects a category for the type of document from a drop-down list.
• Project Name— A column added to this list. The user selects a project name from a drop-down list.
Figure 20.3. Example of using the preview pane in a document library.
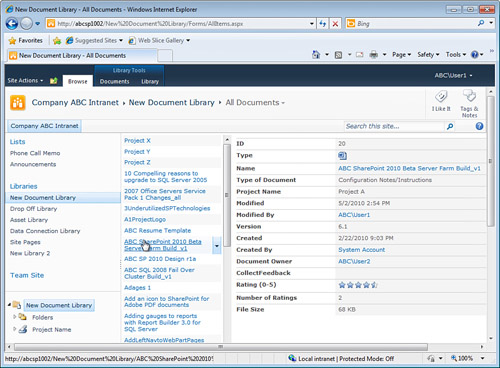
• Modified— Available in all lists and libraries. This column displays the date and time the document was last modified.
• Modified By— Available in all lists and libraries. This column shows the user who modified the document last.
• Version— Available in all lists and libraries where versioning is enabled. This column shows the version number of the document.
• Created— Available in all lists and libraries. This column shows the date and time the document was created.
• Created By— Available in all lists and libraries. This column shows the username who created the document, or who uploaded it originally. It can be helpful to display this column in addition to Modified By because they are often different users, and the user who uploaded it can have significance.
• Document Owner— A column added to the library, this value needs to be filled in on a per-item basis. Because the Created By value and Modified By values may be different from the person who is responsible for the overall content of the document, a best practice is to add this column for documents that are critical to the operations of the group that uses the site.
• Collect Feedback— This column was added when the Collect Feedback workflow was added to this list.
• Rating (0-5)— Ratings were enabled on this library, and this field shows the average rating.
• Number of Ratings— Shows the number of ratings given for this item. In general, the more ratings given to an item, the more valid the rating.
• File Size— Available in all lists and libraries. Shows the size of the file in kilobytes. This is a useful value to provide so users have an idea of how long it will take to open the file. For example, a user accessing the SharePoint site over the Internet from a relatively slow connection might decide not to open a document for casual review if it is over 10MB in size.
Note
When editing or creating a view, not all columns can be totaled. For example, calculated columns cannot be totaled, which is an annoyance when tracking financial information or other numeric information where calculated columns are used.
In addition, when editing a view, the administrator can choose whether to show folders or show items without folder, and to show the view in all folders, in the top-level folder only, or in folders of a certain content type. Item limits can be set per view, and the administrator enters an integer for the number of items to display, and whether to display in batches of the specified size, or limit the total number of items returned to the specified amount. Finally, the administrator can determine whether the view is enabled for mobile access, and if it is the default view for mobile access, and the number of items to display in web part for the view. This is important to test with any mobile devices supported because the size of the screens will affect the ease of interacting with the view and how many items can be displayed.
Access Views Explained
If the Access View option is chosen from the Create View page, SharePoint will open Access 2007 or 2010 and ask the user to name and save the database that is then created, using the .accdb extension. Right off the bat, there is obviously more to the process than simply creating a “view,” but in fact a database is created for which forms, pivot charts, pivot tables, or reports can be created. This database will remain connected to the SharePoint list, so changes in the SharePoint list will be synced with this database.
Figure 20.4 shows the Create Access View window that appears after the Access View option is chosen and the database is named and saved. Figure 20.5 shows the results of choosing the Split Form option. This form can be customized to display exactly the fields that the administrator wants to show, but this is a more advanced and complex process than most administrators will want to engage in to simply modify a view. Content is also displayed in a “nonfriendly” fashion in several fields, such as the Project Name, which includes some characters before the Project Name, and the Rating (0-5) field, where the average rating is displayed to 14 decimal places.
Figure 20.4. Creating an Access view from a document library.

Figure 20.5. Split form created in Access.
