
Getting Started with a PerformancePoint Service Application
Before building a PerformancePoint Service application, a few initial setup steps are required. The first step of setting up is to configure the web application to use PerformancePoint Services. Chapter 1, “Introducing SharePoint 2010,” talks about the services-oriented architecture, and how services can be enabled only where and when they are needed. One of these services is PerformancePoint Services.
Note
To configure a PerformancePoint Service application, you must have SharePoint Server 2010 Enterprise installed and configured. Neither SharePoint Foundation 2010 nor SharePoint Server 2010 Standard offers the PerformancePoint Service application.
Before getting started with a PerformancePoint Services site, you need to have a service application established for PerformancePoint Services. It is recommended that a new service application be created for testing purposes, which is done by following these steps:
- Open SharePoint Central Administration by clicking the SharePoint 2010 Central Administration link from All Programs, Microsoft SharePoint 2010 Products menu.
- Under Application Management, click Manage Service Applications.
- In the Service Applications Ribbon, select New and then PerformancePoint Service Application from the list. The New PerformancePoint Service Application Wizard opens.
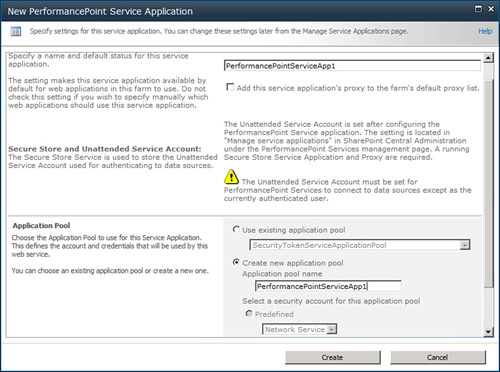
- Enter a name for the service application, which is the name of the PPS service application and needs to be unique. It is helpful to start the name with PerformancePoint so that it appears at a logical place in the list of other service applications on the ServiceApplications.aspx page, and it is immediately clear what the purpose of this service application is in the future. A unique GUID, assigned at creation time, can distinguish this service application from any other service application. Figure 30.1 shows a sample of the wizard.
Figure 30.1. The new PerformancePoint Service Application Wizard.
You can optionally choose to make this service application part of the Default settings for all future web applications. If you later create additional SharePoint web applications on your SharePoint farm—that is, for additional URLs, such as http://external.mycompany.com and http://projects.mycompany.com—the default set of service applications can be shared among those web applications.
- Next choose to use an existing application pool, or create a new one. A general best practice is to create a new application pool, keeping in mind that server performance can degrade if too many application pools run at one time. Then determine whether to use a predefined security account for the application pool or to use a configurable account, or click the Register new managed account if wanted.
- Click Create to create the new service application.
The next step in the process is to create a new custom web application by following these steps:
- Return to the home screen of Central Administration. Under the Application Management section, click Manage Web Applications.
- In the Web Applications Ribbon, click New. When the New Web Application dialog opens, leave Classic Mode Authentication selected, and enter an IIS Web Site name and Port Number, such as
PerformancePoint1, and enter25000in the field under Port. - In the Security Configuration section, leave NTLM selected, and No for Allow Anonymous, and No for Use Secure Sockets Layer (SSL), unless your test environment is configured differently. For example, Kerberos is often used for business intelligence configurations because it enables impersonation to take place, and SSL is often implemented to ensure that all data is encrypted.
- In the Public URL section, leave the default (http://servername:portnumber) unless a different Public URL is wanted, or if SSL is used.
- In the Application Pool section, select Create New Application Pool if not already selected, and create an application pool that matches the web application name (for example,
PerformancePoint1 – 25000) and select a security account or register a new managed account. - Validate the database server and database name to meet your requirements. A best practice is to make the database name simpler, readily identifiable, and still include the term Content. So instead of the randomly generated name, something such as
PerformancePoint1_Contentcould be used. - Enter a failover server if there is a failover database server in the farm.
- In the Service Application Connections section, ensure that the correct service application is selected by choosing [custom] from the drop-down list, and then selecting the service application just created (in this example, PerformancePointServiceApp1), as shown in Figure 30.2.
Figure 30.2. Service Application Connection window.

- Review your settings to make sure they meet your requirements, and click OK.
The next step is to create a new site collection using the Business Intelligence Center site template. To do so, complete the following steps:
- On the SharePoint 2010 server, select Start and SharePoint 2010 Central Administration.
- Under the Application Management section, click Create Site Collections.
- In the upper-right corner of the Create Site Collection page, verify that the Web Application setting is the same name and port number that you used when you created a new Web Application earlier in the chapter. If not, click the down arrow in the Web Application box, and select Change Web Application. Then change the web application to the one created earlier.
- In the Title box of the Create Site Collection page, type
PPS Sample Site. - In the URL section, select the /sites/ option in the drop-down box, and type
PPSSamplein the text box. - Enter one or two login accounts to serve as the site collection administrator(s).
- In the Template Selection section, click the Enterprise tab, and choose the Business Intelligence Center site template.
When this site is created, you can begin building a PerformancePoint Services dashboard.