
This recipe will show you how to configure Service Manager to send an e-mail notification when a work item moves into either an SLA warning or breach state.
Ensure Service Levels are fully configured by following the previous recipes in this chapter.
It is also assumed that you have set up an SMTP channel for e-mail.
The following steps will guide you through the process of creating notifications within Service Manager for when an SLA goes into warning or breach:
- Navigate to the Administration node of the Service Manager console, expand the Notifications folder, and click on Templates.
- Click on Create E-Mail Template in the tasks pane on the right-hand side of the console.
- Provide a title for the template and a description.
- Click on the Browse button next to the targeted class box.
- In the Select a Class window, use the drop-down box next to the search filter to change it from Frequently used basic classes to All basic classes and then filter the list to find Service Level Instance Time Information:

- Choose the relevant custom management pack to store this customization in and click on Next:

- You can now design the template for the e-mail, including what information you would like to include.
You can type custom text, or you can use the Insert... button to insert tokens, or a combination of both:
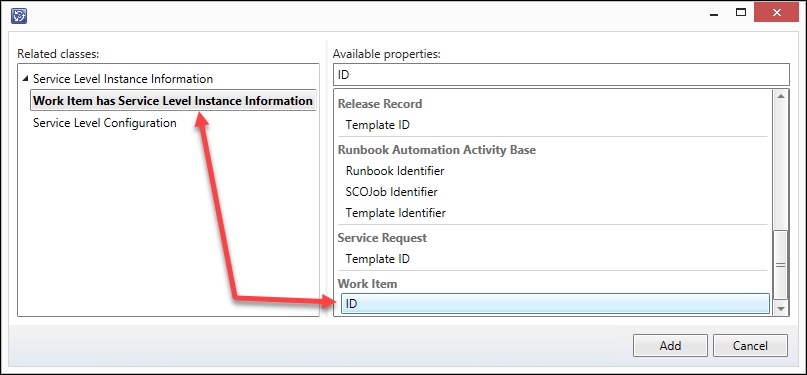
These tokens will dynamically resolve to information stored within Service Manager. For example, using the Select Property screen that opens and choosing ID under the Work Item has Service Level Instance Information work item will provide this token string back to the e-mail template design screen:

This long text will actually resolve the ID of the affected work item with the SLA breach, so if it was an incident, the ID might be IR324, for example.
If you intend to use the Exchange Connector with Service Manager then it is advisable to wrap any incident IDs with square brackets, for example, [IR324].
To do this, just add the opening bracket "[" before the token and the closing bracket "]" after the token.
For example, using the token shown in the screenshot, this would now look like the following:
      [$Context/Path[Relationship='CustomSystem_SLA_Library!
      System.WorkItemHasSLAInstanceInformation'SeedRole=
      'Target'TypeConstraint='CustomSystem_SLA_Library!
      System.WorkItem']/Property[Type=CustomSystem_SLA_
      Library!System.WorkItem]/Id$]
- Add more meaningful text around any tokens used; for example, in the message subject before the Work Item ID, add something meaningful such as
SLA Warning - Incident::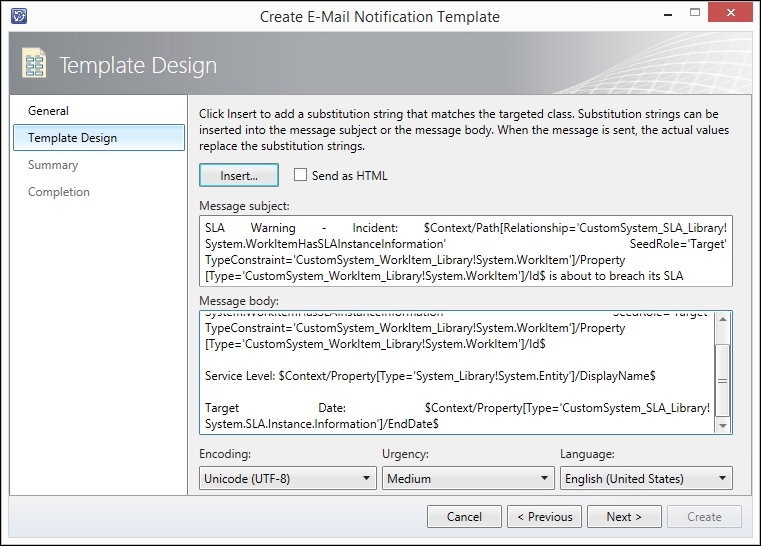
- Click on Next when editing of the content is complete.
- Review the Summary screen and click on Create.
- Once it is completed, click on Close.
- Navigate to the Administration node of the Service Manager console, expand the Notifications folder, and click on Subscriptions.
- Click on Create Subscription in the tasks pane on the right-hand side of the console.
- Click on Next on the Before You Begin screen.
- Provide a title and a description for the subscription.
- Use the drop-down list for When to notify and choose When an object of the selected class is updated.
- Change the Targeted class to Service Level Instance Time Information using the Browse... button.
- Select your custom management pack to store this subscription in and click on Next:

- You can select specific groups/queues if it applies in your case, but we will skip it here and go to the additional criteria by clicking on Next.
There are two tabs on the Additional Criteria screen, Changed From and Changed To.
- In the Changed From tab, filter the properties down to find Status and add it as a criterion.
- Change the validation from equals to does not equal and set the value as Warning:

- On the Changed To tab, filter the properties down to find Status and add it as a criterion.
- Set the value for the criteria to Warning:

- Click on Next.
- Click on the Select Button, choose the e-mail notification template you created earlier in this recipe, and then click on OK. Click on Next.
- You can either specify certain recipients to receive this notification by selecting their domain accounts from the CMDB, or click on Next to set up dynamic recipients.
- Related Recipients is a feature that allows you to use relational information within the CMDB. For example, you can send the same notifications to secondary recipients.
- Click on Add. On the Select Related Recipient screen, click on [Work Item] Work Item has Service Level Instance Information and then use the filter to narrow the choices down to Assigned To User. Select this and click on Add:

- This adds a more dynamic nature to the e-mail subscriptions and provides flexibility. For example, we might want warning e-mails going to the assigned user for the incident, but for breaches, we might want e-mails sent to the primary owner and the person responsible for customer satisfaction, whom we would add as a direct recipient:

- Click on Next.
- Review the Summary screen and click on Create.
- Once it's created, click on Close.
We created a template that defined the information and layout of the message we want to send, and then we created a subscription that defines what event (change of SLA status to warning) causes the e-mail to be sent and to whom.
This recipe can be followed for breaches of SLA rather than just warning, except for a couple of key changes.
When setting the additional criteria, we need the Changed From criteria setting as equals Warning and the Changed To criteria setting as equals Breached.
You must create a specific e-mail notification template just for breaches. Be sure to choose this template when creating the subscription.
Also, ensure names and descriptions are reflective of the intent of the notification.