
Request Offerings in the SCSM 2016 Service Catalog are the different services the users can request. In the Request Offerings, the required questions to fulfill the Service Request are defined and mapped within the different forms of a Service Request.
This recipe will provide the steps required to create a Request Offering in the Service Catalog of SCSM 2016.
To create Request Offerings in the SCSM 2016 Service Catalog, open the SCSM 2016 console and navigate to Library | Service Catalog | Request Offerings.
To create a Service Catalog Request Offering, follow these steps:
- Click on Create Request Offering in the Tasks pane of the SCSM 2016 console.
- In the Create Request Offering wizard, read the Before You Begin information and click on Next.
- On the General page, fill in a title (for example, Request A New User In Active Directory)
- Optionally choose an icon. This icon will be shown in the SCSM 2016 Self-Service portal.
- Add a short description (for example, This Service Offerings is for requesting a new user in Active Directory).
- Choose a Service Request template. We will choose the Service Request template New User Service Request Template we created in the previous recipe.
- Choose a management pack to store the Request Offering. In this recipe, we will use the same management pack we used previously, Custom.ServiceRequest. Library:

- Click on Next.
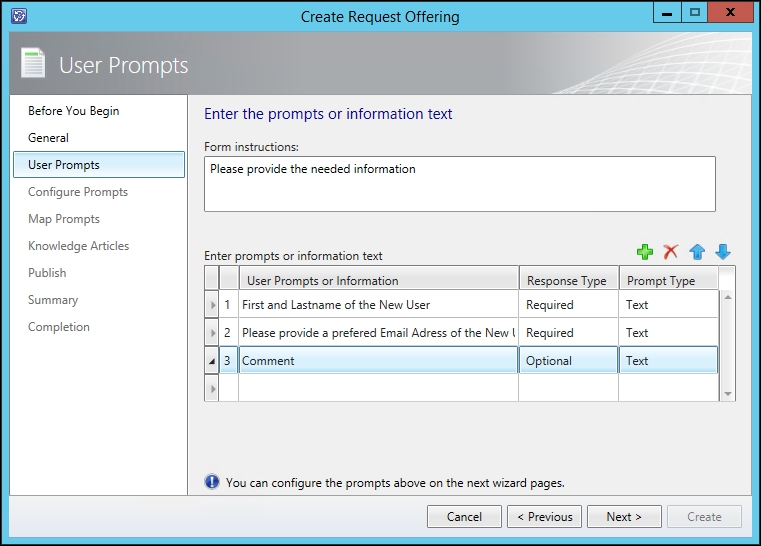
- On the User Prompt page, fill out Forms Instructions. This information will be shown in the SCSM 2016 portal to the end user.
- Add Prompts or Information Text in the next fields. For each prompt, you can define different types. Supported prompt types are as follows:
- Date
- Decimal
- File Attachment Integer
- MP Enumeration List (content of a SCSM 2016 list you have to specify in the next step)
- Query Result (Query on the SCSM 2016 CMDB. For instance list of users, computers, and so on.)
- Simple List (A simple list available only in this Request Offering. No relation to any other list in SCSM 2016.)
- Text
- True/False
Note
You can choose if the prompt is required, optional, or only displayed (for information).
Importantly, all prompts need to be mapped to fields in the Service Request or Activity forms in a later step. The type of the prompts must match the type of fields in the forms, Text | String, Date/Time | Date/Time, and so on:
- Click on Next.
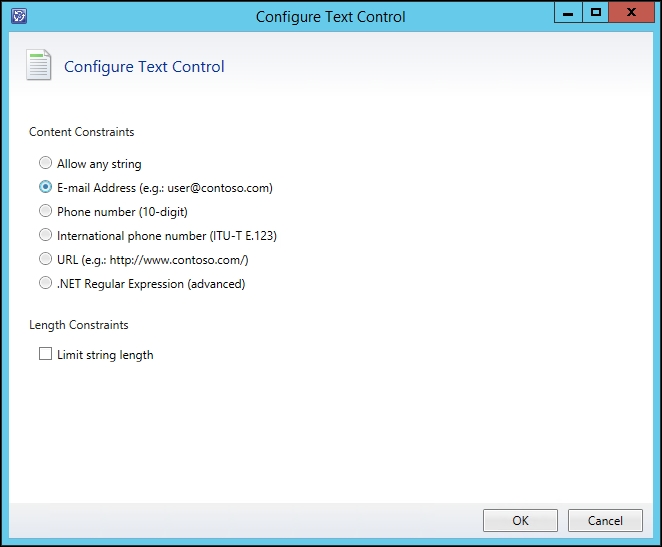
- On the next page, you can configure each prompt. For this, select the prompt and click on Configure. In this recipe, we will configure the text prompt of Please provide a preferred Email Address of the New User to be a valid e-mail format.
- Configuring the text prompt is optional. Some of the prompt types must be configured. For instance, if you choose Simple List on the previous page for a prompt, you have to configure the values of the Simple List. Also, the MP Enumeration List and Query Result prompts need to be configured (which SCSM 2016 list you want to refer to and which SCSM 2016 class in the CDMB you want to query). Click on OK to close the Configure Text Control window:
- Click on OK and then on Next in the wizard.
- On the Map Prompts page, you have to map the prompts to the Service Request form or the related activities of the Service Request template we chose in Step 6 of this recipe.
- Each prompt must be mapped at least once. But you can map a prompt in different forms/fields more than once.
- Select Service Request in the Select an object and map its properties pane. By default, you will only see the common properties. Activating Display all properties will show all fields of the selected object.
- Select Description of the Service Request and map the prompt to the Comment field:

- Select the New User Request Service - (Service Request) Request Approval activity and map Description to the prompt First and Lastname of the New User: String. Select the Create A New User in Active Directory - (Manual Activity) activity and map Description to the prompt Please provide a preferred Email Address of the New User: String.
- In the selection form, all prompts that are mapped at least once show a tick next to them. The mapping of Token: Portal User Name is optional (the user who created the Service Request in the SCSM 2016 portal):

- Click on Next.
- On the Knowledge Articles page, relate an existing article to the Request Offering. This step is optional:

- Click on Next.
- On the Publish page, add an Offering owner. This owner will be responsible for this Service Offering. We will publish the Service Offering in a later recipe, named Publishing Service Offerings and Request Offerings.
- Click on Next.
- On the Summary page, verify the information and click on Create.
Request Offerings, when scoped to the Service Request class, provide you with the ability to map all fields in the Service Request template form and its Activity templates to user-friendly questions. These user friendly questions are displayed in the SCSM 2016 Self-Service Portal and will also include the name, description, and an icon image of the Request Offering.
Request Offerings can be copied. This is helpful if you need to create similar Request Offerings, for instance, in different languages.
You can create copies of Request Offerings, for instance, to use different languages or create almost similar Request Offerings. Follow these steps to copy an existing Request Offering:
- Select a Request Offering you would like to copy.
- Click on the Create a copy task. You can choose if you would like to create a corresponding Service Request template.
- Open the newly created copy and make your changes.
In the SCSM 2016 console, there are different views of Request Offerings. This offers the opportunity to quickly navigate through the filtered list of Request Offerings.
The following views are default in SCSM 2016:
- All Service Request Offerings
- Published Request Offerings
- Draft Request Offerings
- Standalone Request Offerings
Take look at the Publishing Service Offerings and Request Offerings recipe.
If a Request Offering isn't related to a Service Request, it is called a Standalone Request Offering.
This type of Request Offering is not visible in the SCSM 2016 Self-Service Portal but you can search for this Request Offering in the Portal by name.
There is a special view available for Standalone Request Offerings. You must navigate to SCSM 2016 Console | Library | Service Catalog | Request Offerings | Standalone Request Offerings to view this type of offering.
To add a Request Offering to an existing Service Offering in the SCSM 2016 console navigate to Library | Service Catalog | Request Offerings (Draft, Published, or Standalone Request Offering).
- Select the Request Offering and click on Add to Service Offering in the Tasks pane.
- Select a Service Offering from the list.
- Click on Add.
- Click on OK to close the window.
To control the access to Request Offerings to a specific group of users you can use groups and user Roles in SCSM 2016:
- In the SCSM 2016 console, navigate to Library | Groups.
- Click on Create Catalog Group.
- Provide a name and choose a management pack.
- Click on Next.
- On the Included Members page, add Request Offerings from the list.
- Click on Next.
- On the Dynamic Members page, you can specify a criteria for dynamically selecting the offerings (for example, dynamically include Request Offering class where "Display Name" contains "Active Directory").
- Click on Next.
- Add existing catalog groups if needed.
- Click on Next.
- Add offerings to the excluded members (if they are added dynamically as a dynamic member).
- Click on Next.
- Verify the Summary screen and click on Create.
The Microsoft TechNet Library: Using the Service Catalog in System Center 2016 - Service Manager, at https://technet.microsoft.com/en-us/system-center-docs/sm/manage/admin-using-the-service-catalog-in-system-center-2016-service-manager.
How to create and configure user roles in SCSM 2016 is described in the Creating and managing Service Request roles, Creating and managing Incident Management roles, Creating and managing Problem Management roles, Creating and managing Change and Release Management roles, and Creating hybrid roles recipes in Chapter 9, Implementing Security Roles.