Creating a SharePoint Publishing Rule Using Forefront TMG
After an SSL Certificate from the SharePoint server has been installed onto the Forefront TMG server, the actual Forefront TMG SharePoint publishing rule can be generated to secure SharePoint via the following procedure:
Note
The procedure outlined here illustrates the Forefront Edge line SharePoint publishing rule that uses forms-based authentication (FBA) for the site, which allows for a landing page to be generated on the Forefront Edge line to pre-authenticate user connections to SharePoint.
- From the Forefront TMG console, click once on the Firewall Policy node from the console tree.
- Click the link in the Tasks tab of the Tasks pane labeled Publish SharePoint Sites.
- Enter a descriptive name for the publishing rule, such as SharePoint Publishing Rule.
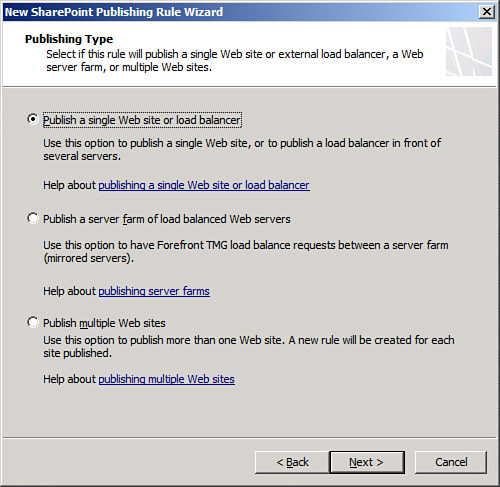
- Select whether to publish a single website, multiple websites, or a farm of load-balanced servers, as illustrated in Figure 14.3. In this example, we choose to publish a simple single website. Click Next to continue.
Figure 14.3. Creating a Forefront TMG publishing rule for SharePoint sites.

- Choose whether to require SSL from the Forefront Edge line server to the SharePoint server, as shown in Figure 14.4. It is recommended to provide end-to-end SSL support for the Forefront Edge line, although it will require a copy of the SSL certificate with the private key exported to the TMG server for this to be set up properly. Click Next to continue.
Figure 14.4. Configuring SSL for publishing rule.

- In the Internal Publishing Details dialog box, enter the site name that internal users use to access the SharePoint server. Examine the options to connect to an IP address or computer name; this gives additional flexibility to the rule. Click Next to continue.
- Under the subsequent dialog box, enter to accept requests for This Domain Name (type below): and enter the FQDN of the server, such as home.companyabc.com. This will restrict the rule to requests that are destined for the proper FQDN. Click Next to continue.
- Under Web Listener, click New.
- At the start of the Web Listener Wizard, enter a descriptive name for the listener, such as SharePoint HTTP/HTTPS Listener, and click Next to continue.
- Again, a prompt is given to choose between SSL and non-SSL. This prompt refers to the traffic between client and SharePoint, which should always be SSL whenever possible. Click Next to continue.
- Under Web Listener IP addresses, select the External network and leave it at All IP Addresses. Click Next to continue.
- Under Listener SSL Certificates (if creating an SSL-based rule; if not, you will not be prompted for this), click Select Certificate.
- Select the previously installed certificate (if using SSL) and click the Select button.
- Click Next to continue.
- For the type of authentication, choose HTML Form Authentication, as shown in Figure 14.5. Leave Windows (Active Directory) selected and click Next.
Figure 14.5. Selecting to use forms-based authentication for a Forefront TMG publishing rule.

- The Single Sign On Settings dialog box is powerful; it allows all authentication traffic through a single listener to be processed only once. After the user has authenticated, he can access any other service, be it an Exchange OWA server, web server, or other web-based service that uses the same domain name for credentials. In this example, we enter
.companyabc.cominto the SSO domain name. Click Next to continue. - Click Finish to end the Web Listener Wizard.
- Click Next after the new listener is displayed in the Web Listener dialog box.
- Under Authentication Delegation, choose Basic from the drop-down box. Basic is used if SSL is the transport mechanism chosen. If using HTTP only, it is recommended to use NTLM authentication to avoid the passwords being sent in clear text. Click Next to continue.
- At the Alternate Access Mapping Configuration dialog box, shown in Figure 14.6, select that SharePoint AAM is already configured, as we configured the Alternate Access Mapping on the SharePoint server in previous steps.
Figure 14.6. Creating a Forefront TMG publishing rule for a SharePoint site with AAM already configured.

- Under User Sets, leave All Authenticated Users selected. In stricter scenarios, only specific AD groups can be granted rights to SharePoint using this dialog box. In this example, the default setting is sufficient. Click Next to continue.
- Click Finish to end the wizard.
- Click Apply in the details pane, and then complete the change management options and click Apply again.
- Click OK when finished to commit the changes.
The rule will now appear in the details pane of the Forefront TMG server. Double-clicking the rule brings up the settings. Tabs can be used to navigate around the different rule settings. The rule itself can be configured with additional settings based on the configuration desired. For example, the following rule information is used to configure our basic FBA web publishing rule for SharePoint:
• General tab— Name—SharePoint; Enabled = checked.
• Action tab— Action to take = Allow; Log requests matching this rule = checked.
• From tab— This rule applies to traffic from these sources = Anywhere.
• To tab— This rule applies to this published site = home.companyabc.com; Computer name or IP address = 10.10.10.105 (internal IP address of SharePoint server). Forward the original host header instead of the actual one (specified in the Internal Site Name field) = checked; Specify how the firewall proxies requests to the published server = Requests appear to come from the Forefront TMG computer.
• Traffic tab— This rule applies to traffic of the following protocols = HTTPS.
• Listener tab, Properties button— Networks tab = External, All IP addresses; Connections tab – Enabled HTTP connections on port 80, Enable SSL connections on port 443; HTTP to HTTPS Redirection = Redirect authenticated traffic from HTTP to HTTPS; Forms tab = Allow users to change their passwords, Remind users that their password will expire in this number of days = 15; SSO tab = Enable Single Sign On, SSO Domains = .companyabc.com.
• Public Name tab— This rule applies to requests for the following websites = home.companyabc.com.
• Paths tab— External paths = All are set to <same as internal.; Internal paths = /*, /_vti_inf.html*, /_vti_bin/*, /_upresources/*, /_layouts/*, /* (as illustrated in Figure 14.7).
Figure 14.7. Viewing the tabs on a newly created SharePoint site publishing rule.

• Authentication Delegation tab— Method used by the Forefront Edge line to authenticate to the published web server = Basic authentication.
• Application Settings tab— Use customized HTML forms instead of the default = unchecked.
• Bridging tab— Redirect requests to SSL port = 443.
• Users tab— This rule applies to requests from the following user sets = All Authenticated Users.
• Schedule tab— Schedule = Always.
• Link Translation tab— Apply link translation to this rule = checked.
Different rules require different settings, but the settings outlined in this example are some of the more common and secure ones used to set up this scenario.
