An Overview of Site Collection Administration Tools
These tools are visible only to a site collection administrator and only from the top-level site of the site collection. Lower-level sites will have a link in this section of the page labeled Go to Top Level Site Settings. These tools affect the full range of sites in the site collection and can affect search settings, site collection features, auditing, policies, content types, the use of SharePoint Designer, and numerous other features:
• Search Settings— Allows custom scopes to be enabled by connecting this site collection with a Search Center, or limits scope to simply This Site. A variety of drop-down modes for search boxes are also available to choose from, and the site collection search results page can be changed. This allows for granular customization of the search tools:
• Search Scopes— Shows the existing search scopes (such as All Sites and People) as well as the Advance Search scopes. New scopes are created from the Central Administrator site, by accessing the Application Management page, then Manage Service Applications, choosing the Search service application, and then choosing Scopes from the Quick Launch area, and then creating a new scope and rules, or modifying an existing scope.
• Search Keywords— Keywords can be defined by the administrator to link to Best Bet sites in this interface. For example, a keyword of “benefits” could be linked to a Best Bet for the HR Department site, so the HR Department site would be marked with a star and display at the top of the list if the term “benefits” was searched for.
Note
FAST Search keywords, FAST Search site promotion and demotion and FAST Search user context are covered in Chapter 8, “Leveraging and Optimizing Search in SharePoint 2010.”
• Recycle Bin— Displays the End User Recycle Bin and give a link to the Deleted from End User Recycle Bin (otherwise known as the Second Level Recycle Bin). The administrator can restore list or library items as well as lists and libraries that have been deleted.
• Site Collection Features— These are discussed later in this chapter in the section titled “Reviewing Site Collection and Site Features.”
• Site Hierarchy— Shows all websites that have been created under the current site. This was discussed earlier in the chapter in the section titled “Reviewing the Scope of an Existing Site Collection.”
• Site Collection Navigation— Enabled by default, navigation links can be disabled from this page. If disabled, the navigations bars will be hidden. Security trimming on navigation is also on by default, but can be turned off. If turned off, users will see links even if they don’t have permissions to access the URLs the links connect to. Audience targeting, also on by default, can be turned off for navigation links.
• Site Collection Audit Settings— Provides access to a number of settings pertaining to audit logs, such as automatic trimming of audit logs, specifying the events that will be audited on documents and items, as well as on lists, libraries, and sites.
• Audit Log Reports— This page provides access to several categories of reports: Content Activity Reports, Custom Reports, Information Management Policy Reports, Security, and Site Settings Reports. The Custom Report link allows the administrator to define the specific events to report on such as deleting or restoring items or searching site content. These reports will be generated when selected, and the administrator simply needs to enter a destination for the report and it will be generated and can be opened immediately.
• Portal Site Connection— A portal site can be specified. If specified, it will appear in the options accessible from the Folder icon located to the right of the Site Actions drop-down menu. This is most often used when site collections are created beneath an existing site collection and provides a means of navigating from the top-level site of the nested site collection to the higher-level site collection. Without this connection, there is no built-in navigational tool to reach to topmost site.
• Site Collection Policies— Policies can be created or imported from this page. Figure 21.21 shows some of the options available for enabling retention and retention stages, enabling auditing of opening or downloading documents, editing items, or checking out, moving, or deleting items. Barcodes and labels can also be enabled.
Figure 21.21. Creating a new policy.

• Record Declaration Settings— After an item has been declared a record, additional restrictions and retention policies can be applied. This page provides the Record Restrictions, Record Declaration Availability, and Declaration Roles tools. For example, Block Edit and Delete can be selected, which means that items declared to be records can’t be edited or deleted. Also, the ability to manually declare a record can be enabled or disabled, and the declaration of records and undeclaration of records can be set to be performed by list contributors and administrators, only list administrators, or only policy administrators.
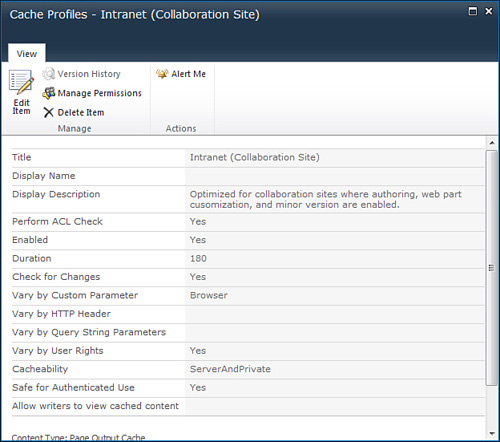
• Site Collection Cache Profiles— Cache profiles determine the behavior of the page output cache for the items it is applied to which can be a site collection, and individual site, or a master page. Four cache profiles are provided by default, and additional ones can be added by clicking the Add New Item link. The default cache profiles are Disabled, Public Internet (Purely Anonymous), Extranet (Published Site), and Intranet (Collaboration Site). Figure 21.22 shows the default Intranet cache profile, and if Edit Item is clicked from the View tab on the Ribbon, the administrator can read more about the different settings and their impact on performance and security.
Figure 21.22. Cache Profile for Intranet (Collaboration Site).
• Site Collection Object Cache— Object cache applies to complete field data for a page, excluding data for any web part controls on the page, and can speed up rendering of navigation data and data accessed through cross-list queries because these items are running queries to compile the data presented to the user. The maximum cache size can be set here (default is a massive 100MB, so this can easily be reduced for smaller site collections), the object cache can be reset for troubleshooting purposes, and cross-list query results (for example, from the Content Query web part) can be cached for a specified amount of time.
• Content Type Service Application Error Log— This list stores content type publishing error information for all subscriber sites to help the administrator troubleshoot issues related to publishing content types. Basically, if the log is empty, SharePoint is not seeing any obvious errors.
• Site Collection Output Cache— This page allows the administrator to determine whether output caching is enabled. If enabled, the anonymous cache profile and authenticated cache profiles (configurable from the Site Collection Cache Profiles tool), whether publishing sites can use a different page output cache profile, and whether page layouts can use a different page output cache profile. An option is also provided to enable debug cache information on pages, which shows the date and time the page contents were last rendered.
• Content Type Publishing— The first entry on the page allows the administrator to refresh all published content types on next update. The Managed Metadata Service hub, if one is defined, will be displayed, as well as any subscribed content types.
Note
Variations, Variation Labels, and Translatable columns and Variation logs are discussed in the “Site Variations Demystified” section, later in this chapter.
• Suggested Content Browser Locations— This list allows the administrator to specify links to SharePoint libraries that contain useful resources to be included in web pages. Page editors are able to see these locations when inserting assets into the web pages.
• Document ID Settings— Although all documents are assigned an ID number when added to a library, this is not a unique number, and SharePoint 2010 allows the creation of unique document IDs. The Document ID Settings page provides the options to assign document IDs, define the character set the document IDs will begin with, reset all document IDs in this site collection to begin with a set of characters, and define the search scope that can be used to search for these IDs. Figure 21.23 shows this page after the administrator has decided to begin IDs for the site collection with the characters UNLEASHED1 and then clicked the Reset All Document IDs box and clicked OK. A message on the page indicates that a job needs to run before the IDs will be changed. This job is the document ID enable/disable job, which is set to run daily by default.
Figure 21.23. Document ID Settings page.

• SharePoint Designer Settings— This link allows the administrator to enable or disable the following settings: Enable SharePoint Designer, Enable Detaching Pages from the Site Definition, Enable Customizing Master Pages and Page Layouts, and Enable Managing of the Web Site URL Structure.
• Visual Upgrade— If the environment has been upgraded from SharePoint 2007, this page allows the administrator to Hide Visual Upgrade or Update All Sites. By default, the old SharePoint 2007 look and feel is maintained.
• Help settings— A number of different help features can be enabled here, including FAST search, PerformancePoint, Search Server 2010, and SharePoint Server 2010. The administrator should decide which to enable based on the features enabled and whether the organization is encouraging the use of some of these more advanced features (such as PerformancePoint).