
Creating a Workflow-Based Application in SharePoint Designer 2010
Although Chapter 28 provides an introduction to the basic types of workflows available in SharePoint 2010 and covers some of the capabilities of SharePoint Designer 2010 when working with workflows, this section takes the process further and covers the creation of a basic application that involves multiple lists and a customized workflow that creates a new item in a new list and leverages lookup columns.
The following instructions describe the process of creating a workflow that interacts with multiple SharePoint lists when items are created and modified. The workflow is based on three lists: a Region list, a Sales Lead list, and a Customer list. When a user marks a sales lead as SaleClosed, a manager can trigger the workflow and create a customer based upon the data in the Sales Lead list. This workflow also demonstrates how to work with SharePoint lookup columns by copying the salesperson from the Region list and adding the value to the customer list.
Although limited, this example demonstrates the steps necessary to develop a relatively simple application using SharePoint Designer. The functionality is limited because the processes are asynchronous, and the lists can only be joined by a single column, but the general concept could be reused for a variety of business purposes. Generally, a quickly developed application built in SharePoint is an easier sell to business owners than a standalone .NET application that requires everything from an IIS site, security, documentation, and even its own database. Furthermore, the following example can be extended with list item security, custom views, custom forms, and email notifications to make the application more fully featured.
Follow these steps to create the application using SharePoint Designer 2010:
- In a nonproduction site collection, create three SharePoint lists with a Standard View (Do not use Datasheet View) using the Custom List template with the columns and data types, as shown in Tables 29.1, 29.2, and 29.3. Unless specified in these tables, leave the other settings for the columns and the list on their defaults. Table 29.1 provides the columns needed for the Region list, Table 29.2 provides the columns needed for the Sales Leads list, and Table 29.3 provides the columns needed for the Customer list. Several of the columns are specified as Required to maintain data integrity within the application; if fields are allowed to be left blank, the application may not function properly.
Table 29.1. Region List Columns and Settings

Table 29.2. Sales Leads List Columns and Settings

Table 29.3. Customer List Columns and Settings

- Browse to the home page of the site housing these lists, and from the IE File menu, click Edit with Microsoft SharePoint Designer. If this option doesn’t exist, open SharePoint Designer manually, and then select Open Site and enter the URL for the site that houses these lists (such as http://abcsp1004/sites/spdtest). Provide credentials if asked.
- Next, select the Workflows entry from the Navigation pane, Site Objects section on the left side of SharePoint Designer, and then select the drop-down menu under List Workflow in the Workflows tab that should be active. Click Sales Leads list, as shown in Figure 29.2.
Figure 29.2. Creating a workflow for the Sales Leads list.

- Name the workflow
Sales Leads–On Change. Click OK. - Upon creation of a new workflow, the workflow editor screen appears with a blank canvas containing a single step named Step 1. Click within the Step 1 editor box in the section under the title bar to ensure it is active, and then click the Condition button on the Workflow Ribbon and choose the Condition If Current Item Field Equals Value. Step 1 will now reflect this change and display If Field Equals Value.
- Click the field link that now appears in Step 1, and select SaleClosed from the drop-down list.
- Then click the value link, and select Yes from the drop-down list. Figure 29.3 shows the contents of the step at this point.
Figure 29.3. Creating a workflow condition.

- Next add an action just below the condition created. Click in the Step 1 box below the row where the Condition was just defined. Type
Createand press Enter, and choose Create List Item from the options. - Click the This List link that will now be visible to open the Create New List Item window.
- Choose Customer from the drop-down menu List field at the top of the window. Figure 29.4 shows the results.
Figure 29.4. Create a New List Item window.

- In the Create New List Item window, double-click the field Title to open the Value Assignment window.
- In the Value Assignment window that opens, click the fx button and the Lookup for Single Line of Text window opens.
- In the Lookup for Single Line of Text window, select Title in the Field from Source field, as shown in Figure 29.5.
Figure 29.5. Complete the Lookup for Single Line of Text window.
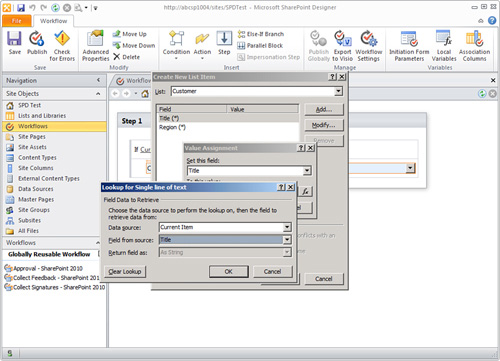
- Next, click OK to close the Lookup for Single Line of Text window, and click OK to close the Value Assignment window. The Create New List Item window should be active. The Title (*) entry in the Field column now has a Value entry of Current Item:Title.
- In the Create New List Item window double-click the field Region to open the Value Assignment window.
- In the Value Assignment window, click the fx button to open the Lookup for Integer window. Verify that the Data Source field has Current Item in it.
- Change the value for the Field from Source to Region.
- Choose Lookup Id (as Integer) for the Return Field As field. The completed Lookup for Integer window looks like Figure 29.6.
Figure 29.6. Lookup for Integer window.

- Click OK in the Lookup for Integer window and again in the Value Assignment window to return to the Create New List Item window. Now the Create New List Item window has a value assigned to the Region (*) field of Current Item:Region.
- In the Create New List Item window, click the Add button to open the Value Assignment window.
- In the Value Assignment window, specify Salesperson for the Set This Field drop-down list.
- Click the fx button to open the Lookup for Person or Group window.
- Change the value in the Data Source field to Region and additional fields appear.
- In the Field from Source field, select Salesperson from the drop-down menu.
- In the Return Field As drop-down menu, verify that As String is selected.
- In the Find the List Item section of the Lookup for Person or Group window, select Title in the Field drop-down list, as shown in Figure 29.7.
Figure 29.7. Partial lookup for Person or Group window configuration.

- To complete the Lookup for Integer window, click the fx button for the Value field to open the Lookup for Single Line of Text window.
- In the Data Source field, leave Current Item selected.
- In the Field from Source field, choose Region from the drop-down menu.
- In the Return Field As drop-down, choose Lookup Value (as Text) from the drop-down menu. Click OK.
- The Lookup for Person or Group window will now be complete and look like Figure 29.8.
Figure 29.8. Completed Lookup for Person or Group window configuration.

- Click OK to close the Lookup for Person or Group window, and click Yes when the message The Lookup You Defined Is Not Guaranteed to Return a Single Value appears. Click OK to close the Value Assignment window.
- The Create New List Item window should now look like Figure 29.9 and include a Salesperson field with a value of Region:Salesperson.
Figure 29.9. Completed Create New List Item window.
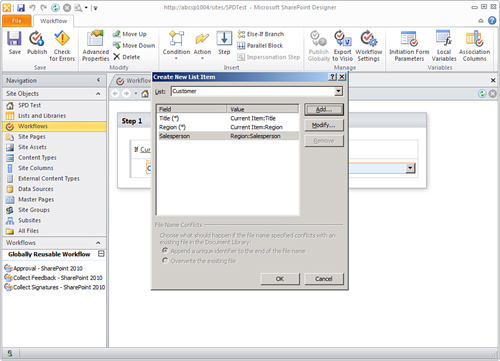
- Click OK to close the Create New List Item window.
- Save the workflow by clicking the Save button on the Workflow tab of the SharePoint Designer Ribbon.
To publish the SharePoint Designer workflow designed so far, follow these steps:
- Click the Workflow Settings tool on the Ribbon, and the display changes to show the workflow settings.
- Verify that Allow This Workflow to Be Manually Started is selected from the Start Options section in the lower-right side.
Note
The workflow can be configured to start automatically, but the logic in this example is that the list item may be changed many times, and a user might accidentally set the item to Closed; a manager should be the only one starting the workflow, after the manager has confirmed that the lead is closed.
- Click the Publish button on the Workflow tab on the Ribbon to deploy and activate the workflow on the list.