Developing a Visual Web Part
The most commonly developed components for SharePoint are web parts. SharePoint 2010 now contains project templates that contain all the functionality that supports the immediate deployment of a variety of objects including but not limited to workflows, event receivers, web parts, business data connectivity objects, and even list definitions. SharePoint 2007 developers will be pleased to note that the packaging of these components as a SharePoint solution (.wsp) is automatic.
Follow the next steps to create a Visual Web Part that renders a SharePoint announcements list in a custom format. To show some of the more recent advancements of both .NET and SharePoint 2010, this example uses LINQ and a ListView control. LINQ is an advanced query tool that enables developers to reference database objects directly as native types. The ListView control is a powerful new UI component that allows for complete control of the HTML output based upon developer-defined templates.
To create a Visual Web Part, follow these steps on a system with SharePoint Server 2010 Standard or Enterprise installed and Visual Studio 2010 Professional or Ultimate:
- Choose a site in a development SharePoint site collection. In this example, the site used is a site collection created beneath a top-level portal site collection (http://abcsp1004/sites/VSTest). It needs an announcements list and a picture library. If these do not exist, they need to be created. The announcements list needs to be named Announcements for the code included in this exercise to work. The image library can be named anything because it is not directly addressed in the code. For this exercise, the picture library is named Images.
- The announcements list needs to have several columns added, but otherwise settings should be left at their default. Table 29.4 shows the columns that need to be added and relevant settings.
Table 29.4. Add These Columns to the Announcements List

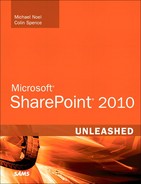
- The picture library should have an image uploaded to it. When the image is uploaded, capture the URL for the image; then create an announcement and paste the URL for the image in the Picture field. Figure 29.12 shows the Announcements list with an entry in it that references a picture.
Figure 29.12. Preparing an Announcements List prior to the creation of the web part.
Before continuing with the web part development, verify that the account used to run Visual Studio 2010 has the following rights:
• Local administrator rights to the development machine
• Farm administrator rights (not necessary if a sandboxed solution is created, but always helpful to have if possible)
• Site collection administrator rights to the site collection where the solution will be deployed during debugging
To create a project in Visual Studio 2010, which will be used in the following exercise, follow these steps:
- Open Visual Studio 2010 by clicking the Start button, then All Programs, SharePoint, and click Microsoft Visual Studio 2010.
- The first time it is opened, the default environment settings need to be set. Different developers have their preferences, but for the exercises in this chapter, the first setting, General Development Settings, is sufficient.
- When Visual Studio is open, access the File menu, then click New then Project.
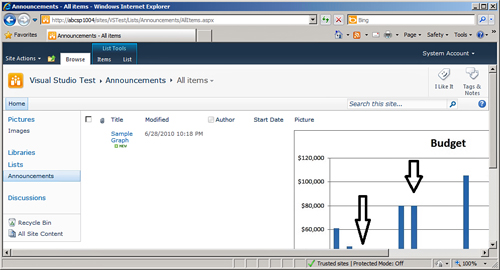
- In the New Project window, choose Visual C#, and choose the SharePoint node from the list of choices in the left pane. Expand the SharePoint node and select the entry 2010, as shown in Figure 29.13.
Figure 29.13. Creating a SharePoint project using Visual Studio 2010.
- Then select the Visual Web Part template from the center pane. Name the Visual Web Part project
EventWebPart, and it will be auto-populated in the Solution name field. Verify the location where Visual Studio 2010 creates the project folder structure is suitable. Click OK.Caution
If SharePoint 2010 is not installed on the machine, an error message displays. In addition, if the account used does not have sufficient permissions, an error message appears. It may be necessary to restart Visual Studio 2010 by right-clicking it from the Start menu and choosing Run as Administrator.
Note
Templates include Empty SharePoint Project, Visual Web Part, Sequential Workflow, State Machine Workflow, Business Data Connectivity Model, Event Receiver, List Definition, Content Type, Module, Site Definition, Import Reusable Workflow, and Import SharePoint Solution Package for both the Visual C# and Visual Basic languages.
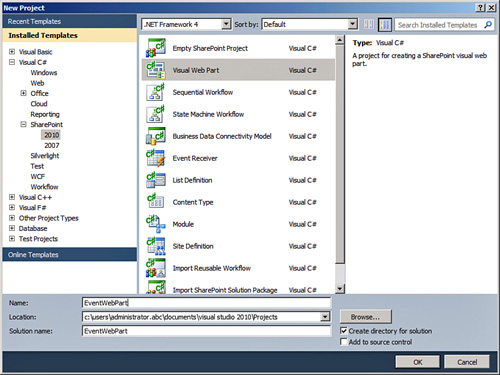
- The SharePoint Customization Wizard dialog then opens. Enter the URL for the target SharePoint site with the Announcements list configured in the previous section running on the server where Visual Studio 2010 deploys the code. In this example, the URL is http://abcsp1004/sites/vstest. Press the Validate button, and Visual Studio 2010 verifies that the URL responds properly and runs the appropriate version of SharePoint 2010 and should display a Connection Successful message. Click OK to close the message. Verify that Deploy as Farm Solution is checked, as shown in Figure 29.14, and click Finish. The resulting view should be similar to Figure 29.15.
Figure 29.14. Choosing the local site that will be used for debugging.
Figure 29.15. Visual Studio 2010 New Visual Web Part project.
Note
Sandboxed solutions are “safer,” because they can be deployed to a site collection, instead of deployed to the whole farm. Also they are run in a more secure fashion by using a combination of features, solution galleries, solution monitoring, and a validation framework. In addition, the sandboxed solution’s assembly is not loaded into the IIS process (w3wp.exe); it is loaded into a separate process (SPUCWorkerProcess.exe) that is more closely monitored and managed by SharePoint 2010. Sandboxed solutions have some limitations, such as a not offering site definitions and workflows, and only types in the Microsoft SharePoint Foundation 2010 assembly Microsoft.SharePoint can be used in sandboxed solutions.
There is a Boolean project property called Sandboxed Solution that can be changed in the project. However, changing the Sandboxed Solution property of a project after it is created may cause validation errors. Farm solutions require higher-level privileges to run or deploy the solution.
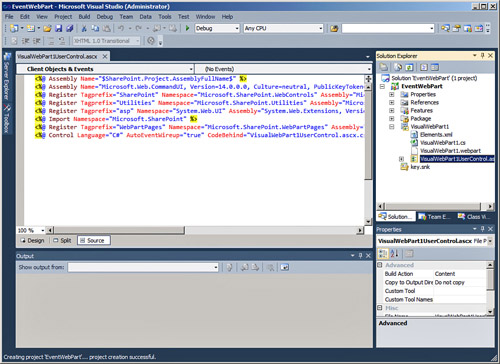
- By default, Visual Studio creates the web part with the name VisualWebPart1, as shown in the Solution Explorer to the right of Figure 29.15. (Click the View menu and choose Solution Explorer if it is not already visible.) To give the web part a more meaningful name, open the VisualWebPart1.webpart file by double-clicking it, and a new tab will open.
- In the new tab in the code editor, under <properties>, replace the Title text VisualWebPart1 with the text
Event Web Part; then in the next line, replace the text My Visual Web Part with the textWeb Part to Display Events with an Imageand click the Save icon. The results are shown in Figure 29.16 where the two modified lines of code are highlighted. Now click the Save icon to save the project.Figure 29.16. Changing the title and description of the web part.

- Before adding any code or UI components to the Visual Web Part, debug the web part by clicking the Debug menu, and then click Start Debugging. Debugging the web part before adding code or UI components allows the developer to verify that the project and development environment work as expected, and in this case, packages and deploys the solution, and then removes the solution when it is complete.
Note
An error message may appear after Start Debugging is clicked. This message states The Project Cannot Be Debugged Because Debugging Is Not Enabled in the Web.config file. If this message appears, select Modify the Web.Config File to Enable Debugging or Run Without Debugging. A note in this window also suggests that debugging should be disabled in production SharePoint 2010 environments, so this is a judgment call. Debugging is generally considered to be essential in most development efforts, so in general the option to Modify the Web.Config File to Enable Debugging needs to be enabled.
- A browser window opens to the SharePoint site as part of the debugging process, because manual intervention is required to add the web part to the SharePoint site. From this window, click Site Actions, Edit Page.
- Click the Add a Web Part link in a zone on the page.
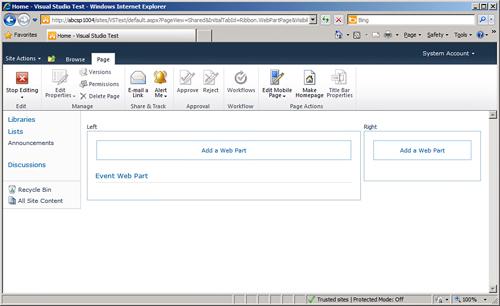
- Click the Custom folder in the Categories list under the Ribbon, and then select Event Web Part. Click the Add button and the web part should be added to the zone selected. Figure 29.17 shows the result (other contents of the page may vary) where the web part title Event Web Part is visible on the page.
Figure 29.17. New web part added to the page as part of the debugging process.
- If needed, depending upon the type of site being edited, click Save and if necessary publish the page. Then close the browser and return to Visual Studio.
- In Visual Studio, the debug process completes, and the Output window shows the activities taking place, ending with the solution being retracted.
- Next, to take advantage of the LINQ feature in this project, a reference to Microsoft.SharePoint.Linq needs to be added. In the Solution Explorer, right-click References, and click Add Reference.
- Click the .NET tab, scroll roughly halfway down, and find and click Microsft.SharePoint.Linq. Click OK to save this reference, and it appears under the References node.
- Next, the SPMetal program will be run from the command prompt to generate a LINQ class file. Open a command prompt by clicking the Start button and entering
cmdin the Search field and pressing Enter. - Navigate to the c:Program FilesCommon FilesMicrosoft SharedWeb Server Extensions14BIN folder.
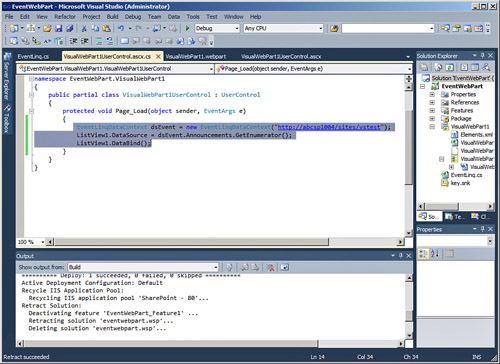
- Run the following command to generate a LINQ class file, EventLinq.cs, that the web part can use to read the announcements list created previously. Be sure to update the following command by replacing the text in bold to reference the project directory where SPMetal will place the EventLinq.cs file. Figure 29.18 shows a sample of code with the servername and site collection name included (http://abcsp1004/sites/vstest), and the username to set the correct EventWebPart directory location (administrator.abc). Type the following code and press Enter, and SPMetal will run:

Figure 29.18. Running SPMetal.exe to create the EventLinq.cs file.

Note
LINQ enables developers to access data using strongly typed .NET objects. A program shipped with SharePoint 2010 called SPMetal.exe generates the LINQ class file that enables these strongly typed .NET components to be used.
- No message appears, but a new line appears when the process finishes. Close the command prompt and return to Visual Studio.
- After successfully generating the EventLinq.cs code file, the code can now be consumed by the EventWebPart project. In Visual Studio 2010, in the Solution Explorer, right-click the project’s title EventWebPart. A context menu appears; click Add, and then choose Add Existing Item.
- In the dialog box that opens, locate and select the EventLinq.cs file created previously and click Add, as shown in Figure 29.19. The EventLinq.cs should now appear in the Solution Explorer.
Figure 29.19. Adding the EventLinq.cs item to the project.

- Click Save in Visual Studio to save the progress.
- In the Solution Explorer, locate the VisualWebPart1UserControl.ascx file, and open it by double-clicking it.
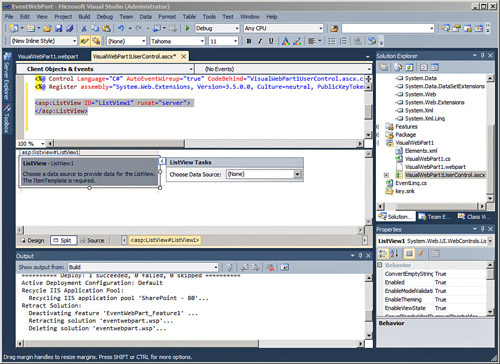
- Click the Split button under the active tab for VisualWebPart1UserControl.ascx.
- Access the View menu, and click Toolbox to display the Toolbox. Locate the ListView component in the Data node, and drag it to the Design pane (which opened when the Split button was pressed), as shown in Figure 29.20, where the ListView can be seen in the Design pane.
Figure 29.20. Adding the Listview component to the Design pane.
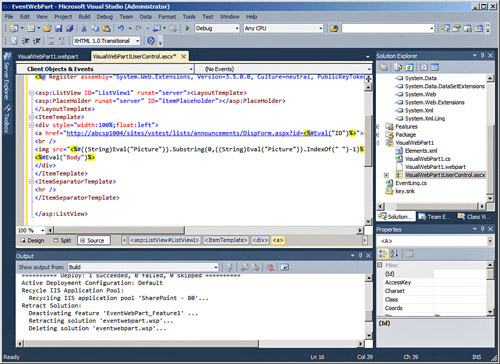
- Return to the Source view by clicking the Source button on the WebPart1UserControl.ascx editing window. Position the cursor after the code:
<asp:ListView ID="ListView1" runat="server">
- Then paste in the following code, and the results will look like Figure 29.21. Be sure to modify the href so that the
sharepointservernameandsitenameportion of the code refers to the test site collection and site in the code below before pasting:
Figure 29.21. Pasting additional code into the VisualWebPart1UserControl.ascx code.
Note
Adding the ListView component using the Design view enables Visual Studio 2010 to update the import and tag prefixes as needed.
Note
Using the
Eval()statement with LINQ objects provides a relatively easy way to insert code directly into the web part; however, in some cases, the result of theEval()statement needs to be modified. The code inside the<imgtag demonstrates the use of standard .NET string operations against the results of anEval()statement. - In the Solution Explorer, click the plus button next to the VisualWebPart1UserControl.ascx; a child file appears named VisualWebPart1UserControl.ascx.cs. Double-click this file and paste the following code within the Page_Load method (between the brackets under the line that starts with “protected void”). Make sure to update
sharepointservernameandsitenamewith the appropriate site name, as done previously. Figure 29.22 shows the results, with the new lines of code highlighted:
Figure 29.22. Adding code to VisualWebPart1UserControl.ascx.cs file.
- Click the Save button to save the work done so far.
- To debug the solution, click the Debug menu, and choose Start Debugging or simply click F5.
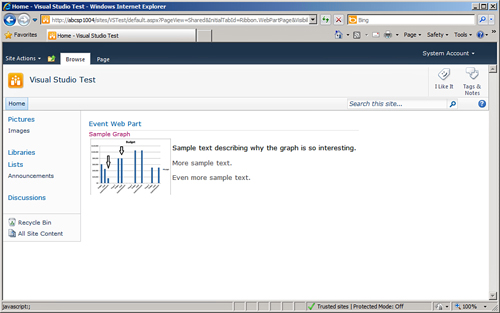
- Again, a browser opens to the site home page. If the web part doesn’t display, edit the page as done before, and add the Event Web Part to a zone on the page. Figure 29.23 shows a sample result.
Figure 29.23. The Event Web Part displayed during the debugging process after completion.
- Close the browser and return to Visual Studio where the debugging process completes.
Although the results may not appear to be earth shattering, this web part is quite different from a normal list view web part, an example of which is shown in Figure 29.24. In this regular list view, note that the image has not been resized, which was accomplished in the WebPart1UserControl.ascx code. Of course, a contributor to the images library could simply go in and resize the image, but that gets time-consuming. Also note that in Figure 29.23, the column headers are not included, making the web part more esthetically pleasing. This is a common request and an example of making a page look “less SharePointy.”
Figure 29.24. Normal announcement list view.
