Submodels in ER/Studio
When we create a data model, the Main Model submodel is also created. Think of the Main Model submodel as a holding area for everything that we create in our model. When we create a new submodel, only those objects we assign to that submodel will be displayed. When we create a new object in that submodel, that object will also exist in the Main Model.
Creating Submodels
|
Menu |
Toolbar |
Explorer |
Shortcut Key |
Shortcut Menu |
|
Model > Create Submodel… |
|
Right-click where submodel should be added |
<ALT + M>, then <C> |
Right-click on white space, Create Submodel… |
|
Become an ER/Studio Hotshot: · You can nest submodels within submodels. For example, we can have the Transaction submodel contain submodels Order, Return, and Credit. You can click and drag submodels to be included in another submodel just like dragging folders to create subfolders. · A shortcut for creating a submodel with entities already in it, is to highlight those entities you would like to have in the new submodel, and then use one of the approaches above to create your submodel. You can highlight multiple entities by keeping the <CTRL> key depressed. · ER/Studio automatically includes relationships between entities if related entities are part of the submodel. You can edit the submodel to include or exclude specific relationships. · When you add a relationship from entity A to entity B, ER/Studio automatically includes entity A in all submodels that already contain entity B. | ||||

Let’s create the submodel Title by using one of these approaches, and the Create Submodel screen appears as in Figure 5.2.
Figure 5.2 Create Submodel screen
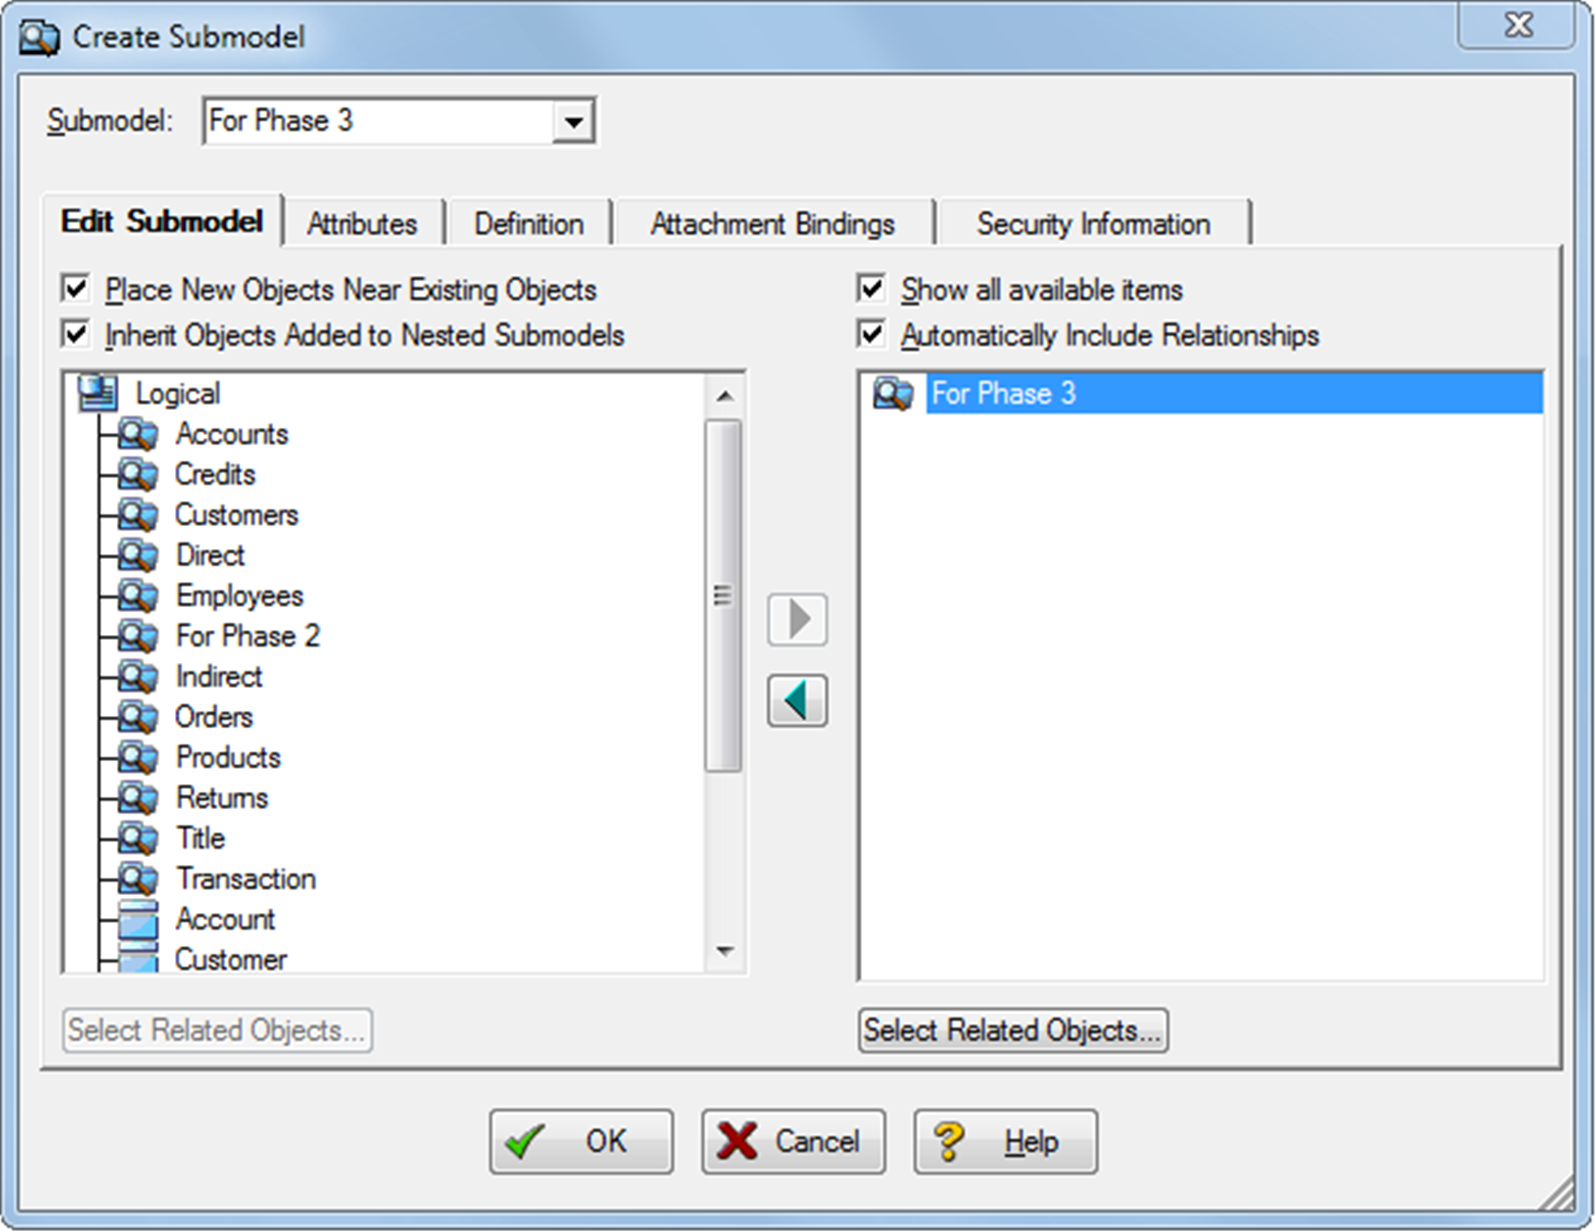
Note that this screen can be resized by clicking and dragging the lower right corner.
Choose the entities (or other submodels) you would like in the new submodel by highlighting in the left pane and clicking the  icon. If you want to remove an item you have selected, highlight it in the right pane and click the
  icon. You can highlight multiple entities or submodels using the <SHIFT> or <CTRL> keys. There are several settings on this screen that are important to mention:
· Place New Objects Near Existing Objects, when checked, will place the entities you assign to the submodel near existing entities in this submodel (or towards the center of the submodel if there are no pre-existing entities in the submodel). If left unchecked the entities will appear in the same positions they were in their source submodel.
· Inherit Objects Added to Nested Submodels, when checked, means if an entity is added to a nested submodel (the child), it will automatically be displayed in the parent submodel. So if the Order submodel is nested within the Transaction submodel, and we add the entity Employee to the Order submodel, the entity Employee will also be added to the Transaction submodel if this checkbox is selected.
· Show all available items, when checked, will show all possible submodels and entities that can be added to the submodel. When unchecked, only those entities and submodels that already have been assigned to the submodel will appear. That is, the source and target panes would contain the same objects when this feature is unchecked. Good idea to keep this one checked.
· Automatically Include Relationships, when checked, means all of the relationships associated with the entities you select will also be brought into the submodel. Good idea to leave this one checked too.
· Select Related Objects… allows you to bring in what is related to the entity in addition to the entity. I use this feature for a number of situations, including when I visually want to see what is related to an entity or group of entities. It is also useful when I need to do a model review with a group of users in just one area, but I need to show the boundaries of that area (that is, if I review the Order area, I would be interested in showing that orders connect to another area such as Employee). The number 1 is set by default, meaning that only entities or submodels with direct relationships will be brought in. If you set this number to 2, for example for Order, and Order is related to Employee and Employee is related to Beneficiary, both Employee and Beneficiary would be brought in (that is, instead of just parents, grandparents will be brought in too). Select Related Objects… appears twice on this screen so you have the option of selecting the parents, grandparents, etc., and then bringing them over using the left button – or first bringing over the entities you need and then deciding on the parents, grandparents, etc., using the right button.
There are four other tabs on the Create Submodel screen:
|
Tab |
Here’s what you need to know: |
|
Attributes |
Choose which attributes of the entities selected to include in the submodel. If you deselect an attribute, ER/Studio can display an ellipsis to indicate that not all attributes are displayed. I would advise using this feature only when the entity contains an extremely high number of attributes and, for readability, when displaying only a subset of attributes makes sense. |
|
Definition |
Enter a definition for the submodel. |
|
Attribute Bindings |
Bind an external piece of information, such as an MS Word document or PDF file, to the submodel. Very useful for requirements documents, user stories, etc. Attachments are created in the Attachments folder of the Data Dictionary (discussed in Chapter 11) and must be applied to the submodel before they will display on this tab. |
|
Security Information |
Change or view the current security information as defined in the Data Dictionary (discussed in Chapter 11). |
Assign the entities Title, Electronic Title, and Print Title to the Title submodel. Click <OK> when done exploring each tab and the Title submodel is now created.
Editing Submodels
|
Menu |
Toolbar |
Explorer |
Shortcut Key |
Shortcut Menu |
|
Model > Edit Submodel… |
n/a |
Right-click on submodel, Edit Submodel… |
<ALT + M>, then <E> |
Right-click on white space, Edit Submodel… |
|
Become an ER/Studio Hotshot: ·
You can also add a comment to a model or submodel by highlighting the model or submodel in Explorer and clicking | ||||

You can also easily change the background color on a submodel:
|
Menu |
Toolbar |
Explorer |
Shortcut Key |
Shortcut Menu |
|
Format > Colors & Fonts |
Diagram toolbar: |
n/a |
<ALT + O>, then <C> |
Right-click on white space, Colors & Fonts |

Choose Model Background from the drop down list, and click <Set Color> to select the color you would like. Click <OK> to exit this screen and apply your changes.
Moving Submodels
To assist you in analyzing your data model, you can move submodels from one model to another. You can also move submodels to nest them within other submodels. On the Main toolbar, click the Selection tool (the arrow). In the Data Model Explorer, click the submodel you want to move and then drag it to another model or submodel.
Deleting Submodels
|
Menu |
Toolbar |
Explorer |
Shortcut Key |
Shortcut Menu |
|
Edit > Delete Submodel |
n/a |
Right-click on submodel to delete and choose Delete Submodel |
<ALT + E>, then <D> |
n/a |