
Relationships in ER/Studio
In this section we will practice creating and modifying relationships for the publishing data model.
Creating Relationships
|
Menu |
Toolbar |
Explorer |
Shortcut Key |
Shortcut Menu |
|
Insert > Relationship |
Modeling toolbar: |
Right-click on Relationships, New Relationship… |
<ALT + I>, then <R> |
Right-click on white space, Insert Relationship |
|
Become an ER/Studio Hotshot: · Are you a “drop-downer” or a “clicker”? When you create a relationship in Data Model Explorer, you can choose which entities the relationship should connect via drop downs. For the other four techniques, the cursor has changed into a relationship symbol. Click first on the parent entity and then the child entity, and the relationship line appears. · Note that the cursor will stay in the relationship symbol allowing you to create many relationships easily. When you want to turn this sticky buttons feature off, just right-click on any white space and the cursor returns to its default selector symbol. · ER/Studio supports sound design practices by automatically propagating the primary key from the parent to the child entity as a foreign key. In the Relationship Editor, you have the option of propagating alternate keys from parent to child entity as well. · The status bar at the bottom of the screen shows the number of relationships in the model or submodel. You can hide or show this status bar using View > Status Bar. | ||||

Practice creating relationships between Author and Title using each of these five techniques. Click <CTRL + Z>, which is your faithful undo button, after each technique except for the last technique, so you have something similar to the model in Figure 7.10.
Figure 7.10 Each Author may write one or many Titles

· Each Author may write one or many Titles.
· Each Title must be written by one Author.
There are five types of relationships that can be created, and I’ll illustrate each using Author and Title. See Table 7.1.
Table 7.1 Example of each relationship type
|
Symbol |
Name |
Example |
|
|
Identifying |
· Each Author may write one or many Titles. · Each Title must be written by one Author. |
|
|
Non-identifying, mandatory |
· Each Author may write one or many Titles. · Each Title must be written by one Author. |
|
|
Non-identifying, optional |
· Each Author may write one or many Titles. · Each Title may be written by one Author. |
|
|
One-to-one |
· Each Author may write one Title. · Each Title may be written by one Author. |
|
|
Non-specific (many-to-many) |
· Each Author may write one or many Titles. · Each Title must be written by one or many Authors. |


Creating Subtypes
|
Menu |
Toolbar |
Explorer |
Shortcut Key |
Shortcut Menu |
|
Insert > Subtype Cluster > Complete or Incomplete |
Modeling toolbar: |
n/a |
n/a |
Right-click on white space, Insert > Subtype Cluster > Complete or Incomplete |
|
Become an ER/Studio Hotshot: · To create a subtype relationship, make sure you are on a logical data model, as subtype structures do not exist in a physical data model. Click an entity to designate it as the parent (supertype) and then click the child (subtype). · You can add multiple entities to the subtype cluster by pressing <CTRL> while clicking the desired entities. · A subtype cluster can be either complete or incomplete. Complete means all possible subtype entities are included in the subtype cluster. An example of a complete subtype cluster is one in which Person is the supertype and Male and Female are the subtypes. An example of an incomplete subtype cluster is one in which Account is the supertype and Checking Account and Savings Account are subtypes. There could be other types of accounts as well, such as Brokerage Account, making this subtype incomplete. · A subtype cluster can be either exclusive or inclusive. Exclusive or non-overlapping means that each supertype can be only one subtype at a time. A Person is either a Male or Female, but not both. Inclusive or overlapping means that each supertype can be more than one subtype at the same time. An Account can be both a Checking Account and a Savings Account, for example. · The subtype discriminator is an attribute that distinguishes each of the subtype entities from one another. For example, Gender Code would be the subtype discriminator in the gender subtype cluster. · You can add an entity to a subtype cluster by choosing Insert > Relationship > Identifying, clicking the subtype cluster symbol next to the supertype you want to associate the entity with, and then clicking the entity you want to add to the subtype cluster. | ||||
Creating Recursive Relationships
A recursive relationship is when an entity is related to itself. For example, let’s say there are relationships between titles, such as the 2nd edition of a particular title replaces the 1st edition. We would therefore want to create a relationship from the Title entity to the Title entity. When we do this in ER/Studio, the Recursive Relationship screen appears, as shown in Figure 7.11.
Figure 7.11 Recursive Relationship screen

Using this editor you can assign rolenames to any duplicate keys to differentiate the native and foreign key. Recall from an earlier discussion that a rolename is another name given to a foreign key. The rolename cannot be the same as an existing attribute or column name.
Duplicate Relationships
If there is already a relationship between two entities and we create an additional relationship between these same two entities, the Duplicate Relationship screen appears, as shown in Figure 7.12 when we created a second relationship from Author to Title.
Figure 7.12 Duplicate Relationship screen
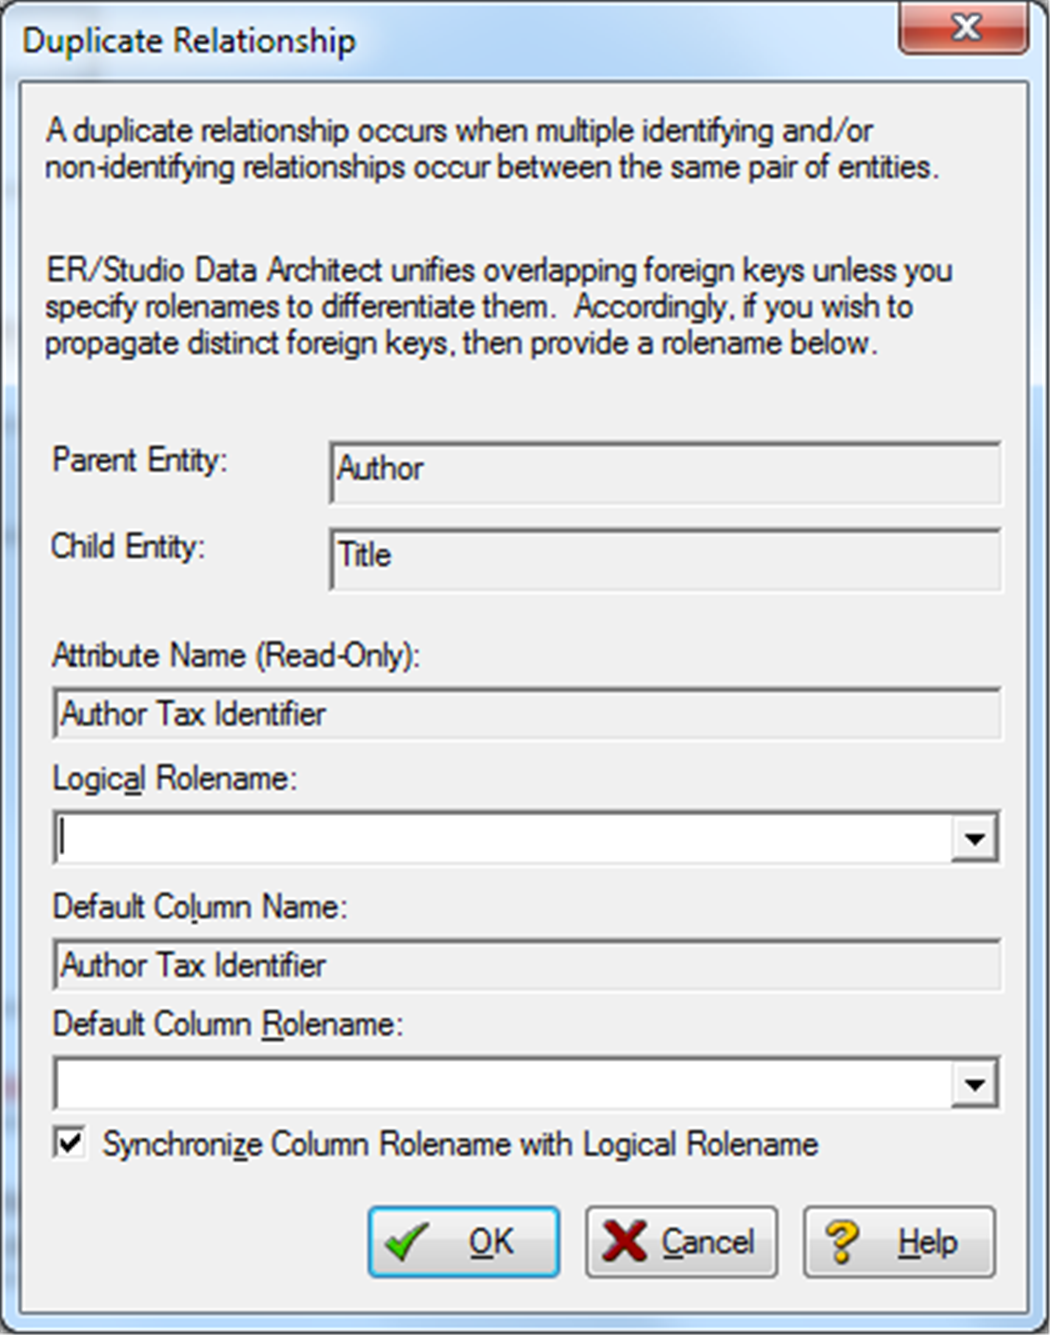
Using this editor you can assign rolenames to any overlapping foreign keys.
Duplicate Attributes
Let’s say we have the model in Figure 7.13 and want to create a relationship from Author to Title.
Figure 7.13 Author Tax Identifier already present in Title

Notice that Title already contains the Author Tax Identifier. This would be the foreign key from Author after we create our relationship. Therefore, when we draw the relationship from Author to Title, the Duplicate Attribute Editor screen appears as in Figure 7.14.
Figure 7.14 Duplicate Attribute Editor screen

We have several choices on this screen:
· Replace Existing Attribute with propagating Attribute. If selected, ER/Studio replaces the attribute in the child with the propagated foreign key attribute.
· Rolename propagating Attribute. If selected, you can rename the foreign key so that the native attribute in the child entity can still exist with its original name. After propagation, both attributes will exist in the child entity.
· Change Existing Attribute Name to allow propagating Attribute Name. If selected, you can rename the original native attribute in the child entity so that the attribute name from the parent entity can be used for the foreign key. After propagation, both attributes will exist in the child entity.
· Unify Existing Attribute with propagating Attribute. If selected, ER/Studio unifies the propagating foreign key with the native attribute in the child table. If the relationship is later deleted, ER/Studio leaves the native child attribute.
Editing Relationships
The Relationship Editor screen will allow you to enter additional information about the relationship. If you created the relationship via Data Model Explorer this screen automatically appears. If you created the relationship using one of the other techniques, double-click on the relationship line to bring up the Relationship Editor. See Figure 7.15.
This screen can be resized by clicking and dragging the lower right corner. This screen can also become maximized by clicking the square symbol in the upper right corner (to the left of the ‘x’ which closes the window), and then returned back to its original size by clicking the two square symbols in the upper right corner.
Figure 7.15 Relationship Editor
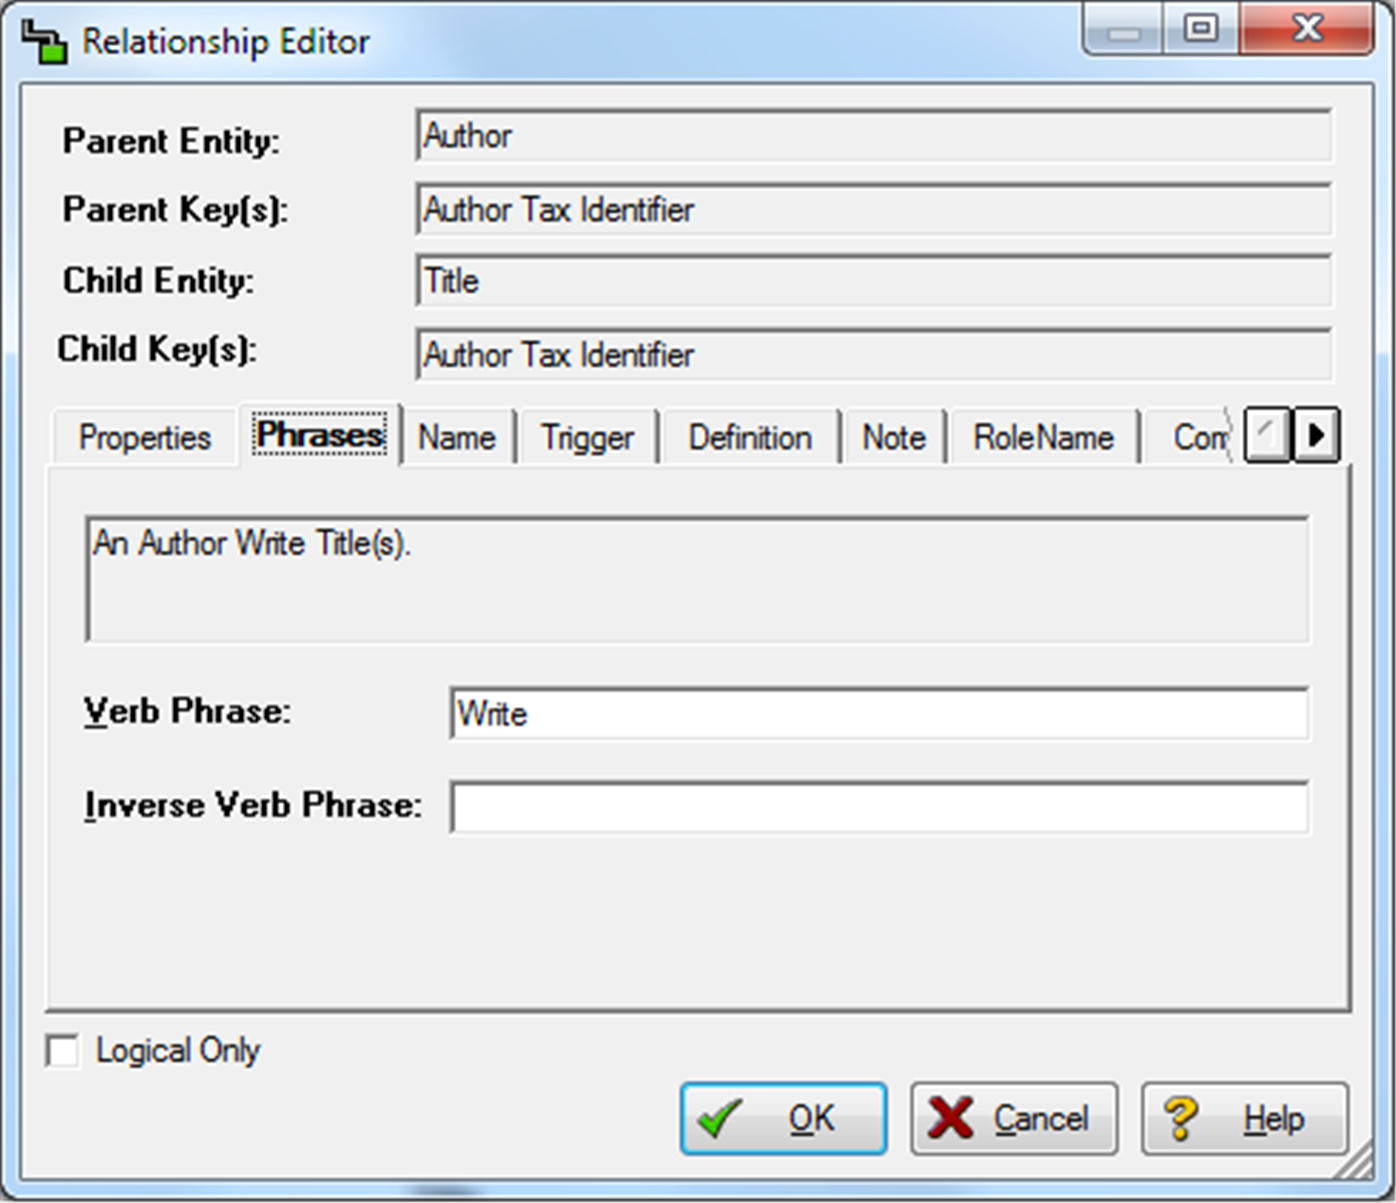
Notice the Relationship Editor contains parent and child entity and primary key information, followed by a series of tabs. The Logical Only checkbox if checked will not copy this relationship to the physical – the relationship will only exist on the logical data model.
There are 9 tabs on this screen:
|
Tab |
Here’s what you need to know: |
|---|---|
|
Properties |
Change the type of relationship, including existence and cardinality. |
|
Phrases |
Write the business reason for the relationship. You can add verb phrases on both sides of the relationship. I really like that ER/Studio creates sentences based on these verb phrases. If you write a verb phrase that does not appear on the model, most likely you will need to turn on the verb phrase through View > Diagram And Object Display Options, or click on the icon |
|
Name |
If you feel it is useful you can create both business and physical (constraint) names for the relationship. |
|
Trigger |
Set the actions to take when a parent or child instance is deleted. |
|
Definition |
This is where the full definition for the relationship is stored. |
|
Note |
Use this for any other text outside the definition, such as questions to ask business experts, known issues, or action items. HTML tags used in Notes will be applied as formatting in the HTML reports. The macro Notes Editor, allows for easily entering notes for multiple objects. More on macros in Chapter 13. |
|
RoleName |
Rename a foreign key attribute. This is useful when the same foreign key could appear more than once in the same entity and we need to therefore avoid duplicates. (For example, Country of Residence and Country of Citizenship.) |
|
Compare Options |
Select which, if any, properties (e.g. cardinality, definition, notes) of the relationship to ignore when comparing this relationship to another using the Compare and Merge Utility, discussed in Chapter 16. |
|
Attachment Bindings |
Bind an external piece of information, such as an MS Word document or PDF file, to the relationship. Very useful for requirements documents, user stories, etc. Attachments are created in the Attachments folder of the Data Dictionary (discussed in Chapter 11) and must be applied to the relationship before they will display on this tab. |

When you are done making your changes, click <OK> to exit the editor.
Moving Relationships
You can click and drag on a relationship line to move it to a new location. You can also click and drag on the relationship label to position it in a different place. As you move your cursor over the relationship line, you will notice that the cursor shape changes into a two directional arrow indicating you can click and drag to move the relationship line. As you move your cursor over the relationship label, the cursor changes into a four directional arrow indicating you can click and drag to move the relationship label.
You can also move a relationship by right-clicking on the relationship line and choosing one of the following options:
· Layout Relationship. Choose Elbowed if you would like the option to have the relationship line go around other entities or relationships, and choose Straight if would like the relationship line to be as short and direct as possible.
· Straighten Relationship Line. Sometimes the relationship line is slightly misaligned and choosing this option takes out the jaggedness. After choosing this option, it is also easier to click and drag and have the resulting line still be straight. Alternatively, you can straighten a horizontal relationship by selecting the relationship line and then pressing <CTRL + H>. Pressing <CTRL + L> straightens a vertical relationship.
· Reset To Default Docking Position. Redraws the relationship line to what it looked like when it was first created.
· Remove All Bends. This option takes out all of the 90 degree relationship line direction changes, sometimes resulting in a diagonal line.
You can select all the relationship lines in the data model by pressing <CTRL + A> and then apply one of these options as well.
Changing the Appearance of Relationships
You can decide whether hovering on a relationship line brings up a description of the relationship:
|
Menu |
Toolbar |
Explorer |
Shortcut Key |
Shortcut Menu |
|
View > Cursor Popup Help Options > Display Relationship Help |
n/a |
n/a |
n/a |
n/a |
You can also apply auto layouts. When you use the auto layouts, ER/Studio organizes the data model objects according to the specifications of that particular layout. Each layout has different specifications for the way relationships bend and how relationships dock or intersect with entities and attributes. You can move the docking positions of relationship lines on parent or child entities.
There are two kinds of bends in ER/Studio, N bends and Orthogonal bends. N Bends are relationship lines that bend at any angle while Orthogonal bends only bend at a 90 degree angle. Both Hierarchical and Orthogonal auto layouts use only Orthogonal relationship lines. All other auto layouts use straight relationship lines. You can also create straight relationship lines that are vertical or horizontal.
You can also change the colors of relationships. Using certain colors and fonts can help highlight portions of the model and distinguish sections of the model from other sections:
|
Menu |
Toolbar |
Explorer |
Shortcut Key |
Shortcut Menu |
|
n/a |
n/a |
Right-click on relationship, Relationship |
n/a |
Right-click on relationship, Relationship |
After applying one of the commands above, you are given two options:
· Edit Settings. Choose the color you would like for the highlighted relationship, and click <OK>. If you would like to change this relationship color everywhere this relationship appears, click Apply to all submodels.
· Set Relationship(s) to Use Submodel Defaults. This will reset the colors and fonts to the submodel defaults.
There is a very quick way to change the color of all of the relationships at once:
|
Menu |
Toolbar |
Explorer |
Shortcut Key |
Shortcut Menu |
|
Format > Colors & Fonts |
Diagram toolbar: |
n/a |
<ALT + O>, then <C> |
Right-click on white space, Colors & Fonts |

Click on the relationship symbol, or choose Relationships from the drop down and click <Set Color> to select the color you would like. Click <OK> to exit this screen and apply your changes.
To change the style of relationship lines in all new data models, open Options:
|
Menu |
Toolbar |
Explorer |
Shortcut Key |
Shortcut Menu |
|
Tools > Options |
n/a |
n/a |
<ALT + T>, then <P> |
n/a |
The Model Display area also contains other display options for relationships, such as displaying cardinality and verb phrases.
Finding Relationships
Relationship Navigation highlights relationships, making it easier to see which entities a relationship connects, as well as providing a method for you to walk someone through the model. That is, the relationships become highlighted one at a time as you right-click on entities, so you can discuss a relationship and then when finished, right-click again to move on to the next relationship. To bring up Relationship Navigation, use one of these options:
|
Menu |
Toolbar |
Explorer |
Shortcut Key |
Shortcut Menu |
|
Insert > Relationship Navigation |
Diagram toolbar: |
n/a |
<ALT + I>, then <G> |
n/a |

Deleting Relationships
Highlight the relationship (or relationships) you would like to delete and use one of the following options:
|
Menu |
Toolbar |
Explorer |
Shortcut Key |
Shortcut Menu |
|
Edit > Remove Relationship |
n/a |
Right-click on relationship, Remove Relationship |
<DELETE> |
Right-click on relationship, Edit > Remove Relationship |
|
Become an ER/Studio Hotshot: · To select multiple entities, press and hold <CTRL> while clicking the entities, or click and drag over the entities. · We’ll cover submodels in the next chapter, but a quick point here. Sometimes you will delete a relationship and receive a message asking whether you would like to delete the relationship from the entire data model or just the submodel. If you delete the relationship just from the submodel, this relationship will still exist in the model. | ||||
You can delete a subtype if you no longer want to include it in your data model. You can also add or remove entities from a subtype cluster in much the same way you add or delete relationships between entities. Delete a subtype by selecting the subtype and then choosing Edit > Delete Subtype Cluster. Deleting a subtype cluster deletes all relationships between the parent entity (supertype) and the child entities (subtypes).