
Excel 2010 now offers a couple of ways to format globally—meaning you can perform certain tasks to help standardize the look of your worksheets and create a consistent appearance for all your documents.
A theme is a set of formatting attributes that apply specifically to the line and fill effects, the color palette, and the fonts that are available when formatting documents. The three buttons that control these attributes—Colors, Fonts, and Effects—appear in the Themes group on the Page Layout tab, shown in Figure 9-12. Themes give individuals or workgroups using Microsoft Office programs (versions 2007 and 2010) the ability to use the same sets of basic design attributes for all the documents they create. You’ll find corresponding themes in Microsoft PowerPoint and Microsoft Word as well. You can use themes to standardize all your internal documents, for example, or to maintain a consistent look between pages in a package of presentation handouts.

When you apply a theme using the Themes button, all applicable formats in the active workbook change instantly, including the colors of text, background, accents and hyperlinks, heading and body text fonts, line and fill effects, and even graphics, as shown in Figure 9-13. This happens regardless of the number of cells you have selected.
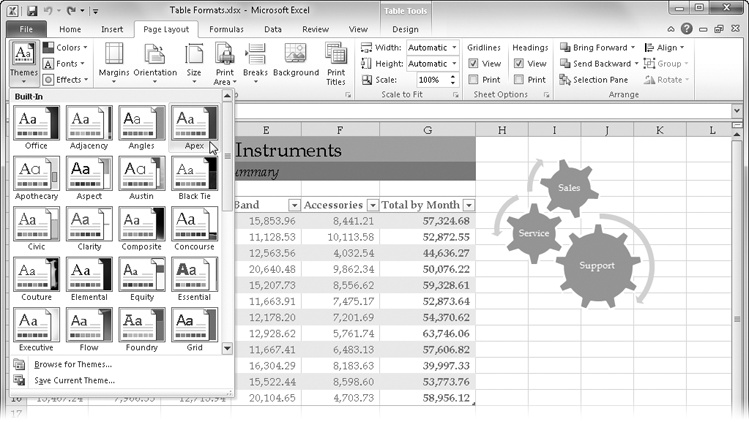
Figure 9-13. Changing the theme instantly changes the look of all the worksheets in the active workbook.
Just as when you choose a theme, changes you make using the Colors, Fonts, or Effects galleries are reflected immediately throughout the workbook. The Colors gallery contains a selection of coordinated color schemes that, when selected, change the available colors in all other galleries where colors are used. The Fonts gallery offers a selection of font sets including two fonts each—one for headings and one for body text. The Effects gallery gives you a choice of graphic “looks,” accomplished using various applications of line and fill effects that reflect the current color scheme.
Caution
Themes have no effect on cells to which you have directly applied font, color, line, or fill formatting using settings that are not part of a theme.
You can save your own themes using the Save Current Theme command at the bottom of the Themes gallery, which you can see in Figure 9-12. Doing so creates a .thmx file and saves it in a special folder on your computer. The name you give the file when you save it becomes the name of the theme, which subsequently appears in the Custom category at the top of the Themes gallery, as shown in Figure 9-14. The Custom category appears only if a custom theme exists.

The Browse For Themes button at the bottom of the Themes gallery lets you load .thmx files from other locations, such as a company theme file on your network, for example.
Tip
INSIDE OUT Mousing Around
Microsoft has gone to great lengths to try to make features more discoverable and self-explanatory. It crafted a new approach for many of the commands that used to live on menus, transforming them into drop-down galleries containing thumbnail representations of the options they offer. In many cases, these galleries exhibit “live preview” functionality, where you can rest the pointer on items in the gallery to get a live preview in the worksheet of what would happen if you actually clicked. This is a great feature, but it can be finicky. For example, if you convert an older Excel file and try to use the Themes gallery in this way, you might find that not much seems to happen. This can occur when formatting in the old file overrides the default font, color, line, or fill styles controlled by themes. For example, the default font in Excel 2003 is Arial, and the default font in Excel 2010 is Calibri. When you convert an old Excel file, the original fonts carry over as well. Resting the pointer on the Themes gallery might not show any changes in the font, and indeed, applying a theme might not have any effect either.
To get around this problem, you can start with a fresh workbook and type everything again (but who wants to do that?), or you can copy the contents of each worksheet in the old workbook and click Paste, Paste Values (on the Home tab) to add the data to the new workbook. This requires you to redo all the formatting, but that should be a lot easier with the tools in Excel 2010. Another approach is to reformat all the text in the converted workbook using one of the fonts from the current theme. Use the same approach to convert any colors, lines, or fill styles to use current theme styles.
The relatively new Cell Styles feature bears little resemblance to the fairly old Styles feature, although the basic idea is the same: applying combinations of formatting attributes all at once to eliminate a lot of time clicking buttons, opening dialog boxes, and choosing individual options. Cell styles help you achieve consistency in formatting, both within a worksheet and across worksheets and workbooks. Using cell styles, you can easily modify the formatting characteristics of many cells at once.
Note
Cell styles are based on the formatting attributes of the current theme. Changing the theme causes the displayed cell styles to update accordingly.
The Cell Styles button appears in the Styles group on the Home tab on the ribbon. Cell styles wield the following formatting attributes: number and fill formatting, cell alignment, fonts, borders, and even cell-level protection settings. Several built-in cell styles have specific purposes, as you can see in Figure 9-15, and you can create your own custom styles (designed in concert with your company theme, perhaps).
You’ll find the following six cell style categories, with individual styles that have uses suggested by their titles and the categories in which they live:
Good, Bad And Neutral If you want, you can use these styles when highlighting good news, bad news, and … just plain old news. The Normal style also lives here, which you can use to “reset” selected cells to default formatting.
Data And Model These styles are intended for specific purposes, such as Input and Output styles for cells that are meant to accept user input or reveal the results of calculations.
Titles And Headings The intended use is self-explanatory, but it’s interesting to note that the top three Heading styles include bottom borders of different weights, making them useful for creating color-coordinated column headers in tables.
Themed Cell Styles These Accent and Emphasis styles are heavily dependent on the current theme colors, offering four graduated percentages of each Accent color for quartile comparisons.
Number Format Included for continuity, these styles are actually more accessible using the Number buttons on the Home tab on the ribbon.
Custom This category does not appear in the gallery until you create a custom style. After you do, the Custom category appears at the top of the gallery.
The Cell Styles gallery exhibits “mouse hover” functionality, letting you see a live preview in selected cells on the worksheet when you rest the pointer on an item in the gallery. To apply a style, select the cells you want to format, and click your chosen style in the gallery.

You can create your own styles using one of two methods: by modifying an existing style or by clicking the New Cell Style command at the bottom of the Cell Styles gallery, which displays the Style dialog box shown in Figure 9-16.
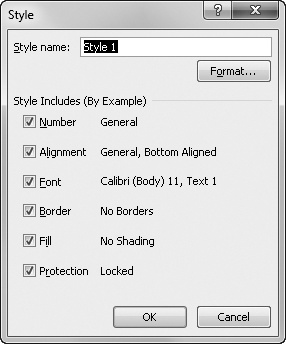
The Style dialog box opens with the attributes of the default Normal style displayed. Styles can have a minimum of one and a maximum of six sets of attributes: Number, Alignment, Font, Border, Fill, and Protection, each with a corresponding check box in the Style dialog box. Use the check boxes to specify the attributes you want for your cell style. For example, you could clear all but the Protection check box to define a style that does nothing more than change selected cells to “unlocked” status, allowing user entries on a protected worksheet. Using such a style would have no effect on any of the other five style attributes in cells to which it is applied.
To specify style attributes, click the Format button to display the Format Cells dialog box, where you can specify your formatting choices in detail. The Format Cells dialog box contains six tabs corresponding to the six categories of style attributes; you can make as many choices as you want on each tab. When you finish with the Format Cells dialog box, click OK to close it and return to the Style dialog box. Then type a name in the Style Name box, and click OK. Your custom style appears in the Custom category at the top of the Cell Styles gallery, as shown in Figure 9-17, where you can see the Unlocked style we created.
Note
For more information about the Format Cells dialog box, see Formatting Numbers on page 324.

As you can see in Figure 9-17, you can right-click a cell style to display a shortcut menu you can use to delete, modify, or duplicate the style. Duplication is handy if, for example, you want to create a number of related styles with different fill percentages. Clicking the Duplicate command would make it easier because it copies the other attributes for you—all you have to do is change the fill percentage.
Creating Cell Styles by Example If you have formatted a cell using attributes you want to use often, you can use the style-by-example procedure to encapsulate those attributes in a new style. For example, suppose you format a cell with right alignment and 18-point Arial Black. To make this combination of attributes a new style, follow these steps:
Caution
The safest way to create a style by example is to select only one cell—one you know has all the attributes you want to assign to the new style. If you select two or more cells that are not formatted identically, the new style assumes only those attributes that all cells in the selection have in common.
Modifying and Duplicating Cell Styles The principal advantage of using styles is that if you change your mind about the appearance of a particular element in your workbook, you can revise every instance of that element at once by changing the style. For example, if you’d like the font in the custom HeadRight style—which is now 18-point Arial Black—to also be italic, you can redefine HeadRight.
To modify a style definition, follow these steps:
Click Home, Cell Styles.
Right-click the thumbnail for the style (in this case, HeadRight) in the gallery, and click Modify to display the Style dialog box.
Click the Format button to display the Format Cells dialog box, and select the appropriate format options, as shown in Figure 9-18. (For this example, click the Font tab, and select the Italic option in the Font Style list.)
Click OK to return to the Style dialog box, then click OK to confirm your changes.
You can also right-click an existing style and click the Duplicate command, which opens a Style dialog box similar to the one shown in Figure 9-18 and appends a number to the end of the style name. You can then change the name if you like and click the Format button to make adjustments to the formatting attributes. Using Duplicate is helpful when you want to create a number of similar styles or when you want to base a custom style on one of the built-in styles. When you finish defining the style, click OK; your new style appears in the Custom category of the Cell Styles gallery.
Note
The predefined Normal style is applied to every cell in every new workbook. Thus, if you want to use the standard set of formatting attributes, you don’t need to do anything. If, however, you want to change the default attributes for all cells in a worksheet, you can redefine any or all attributes of the Normal style.

Figure 9-18. Modify an existing cell style by right-clicking its thumbnail in the gallery and clicking Modify.
Merging Cell Styles from Different Workbooks To maintain formatting consistency across a group of worksheets, you can keep the worksheets in the same workbook. If this is impractical but you still want to maintain stylistic consistency, you can copy style definitions between workbooks. (Of course, themes are also helpful in this regard and are covered in Formatting with Themes on page 300.)
To copy a style from one workbook to another, take the following steps:
Open both the source workbook (the one you’re copying from) and the destination workbook (the one you’re copying to).
Click the destination workbook to make it the active window.
On the ribbon, click Home, Cell Styles, Merge Styles. Excel displays a dialog box listing all the other open workbooks, as shown in Figure 9-19.
Select the name of the workbook you want to copy styles from, and click OK.

Caution
If a style in the source workbook has the same name as one already in your destination workbook, a message asks whether you want to merge styles that have the same names. You receive this warning only once, however, no matter how many duplicate style names exist. If you click Yes, the styles from the source workbook override those with the same names in the destination workbook.
Deleting a Cell Style To delete a style, click Home, Cell Styles, and right-click the custom style you want to delete. (You cannot delete a built-in cell style.) Then click Delete. Any cells formatted using the deleted style revert to the Normal style.