
One of the advantages of working with computers is the convenience of electronic files. In this section, we describe both the usual and unusual ways you can manage your Excel files.
To create a new workbook, click the File tab, and then click New to display the Available Templates screen shown in Figure 2-20. With Blank Workbook selected, press Enter (or click the Create button on the right), and a fresh workbook opens. Each new workbook you create in the current Excel session is numbered sequentially: Book1, Book2, and so on.

In the Available Templates screen, you can create all kinds of new workbooks using templates or existing workbooks as starting points. The template you select on the left side of the window controls what appears in the sample display on the right. When you click a template icon (other than the Blank Workbook icon), the available options for that category appear in the screen or in a separate dialog box. Click the little Back arrow at the top of the screen to return to the Available Templates screen. The categories include (but are not limited to) the following:
Blank Workbook Clicking the Blank Workbook icon creates just that—a new blank workbook.
Recent Templates Clicking Recent Templates, as expected, shows the last few templates you opened.
Sample Templates Clicking Sample Templates shows the templates that are installed with Excel.
My Templates Clicking My Templates opens a dialog box displaying the contents of your own personal template treasure trove.
New From Existing Clicking this icon displays the dialog box shown in Figure 2-21. This dialog box opens any existing Excel file as a template. Two things happen differently here from using the normal Open command: First, instead of opening the actual workbook, it opens a copy of it. Second, when you save the workbook, it appends a number to the end of the file name and displays the Save As dialog box, making it virtually impossible to overwrite the original file.
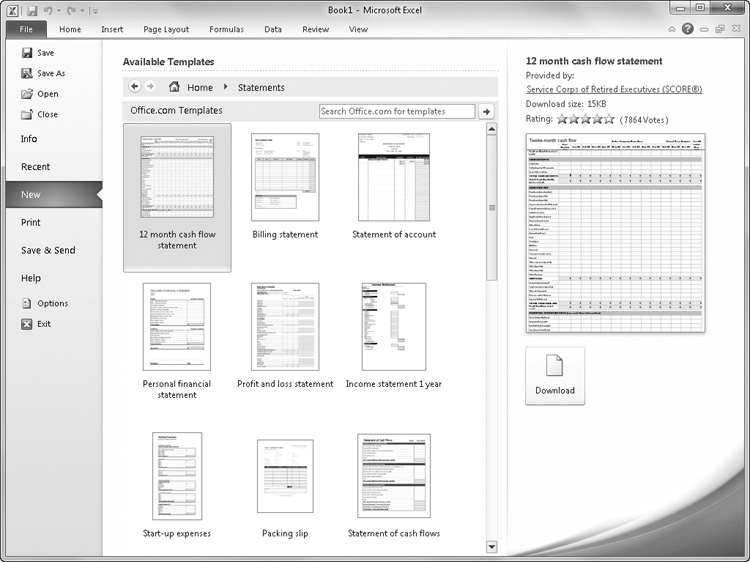
Office Online Templates The Online Templates area displays some templates that are available as downloads. Obviously, you need to be connected to the Internet for this. There are literally hundreds of templates online, so this is only a sampling. To zero in a bit more, type keywords into the box labeled “Search Office.com for Templates” to display any relevant templates that are available for downloading.

Figure 2-21. You can create a copy of any file you select in the New From Existing Workbook dialog box.
Excel 2010, being more Web connected than ever, takes advantage of this by storing most templates on the Office Online Web site, instead of putting them on your computer. This not only saves a little space on your hard disk but also makes it possible to offer many more templates than would be possible on CDs, makes it easy for developers to keep them up to date, and provides a continually updated source of new templates. Figure 2-22 shows just a few of the templates available in one of the categories.
There are a few templates created when you first install Excel, and these are available when you click the File tab, click New, and then click Sample Templates, as shown in Figure 2-23.
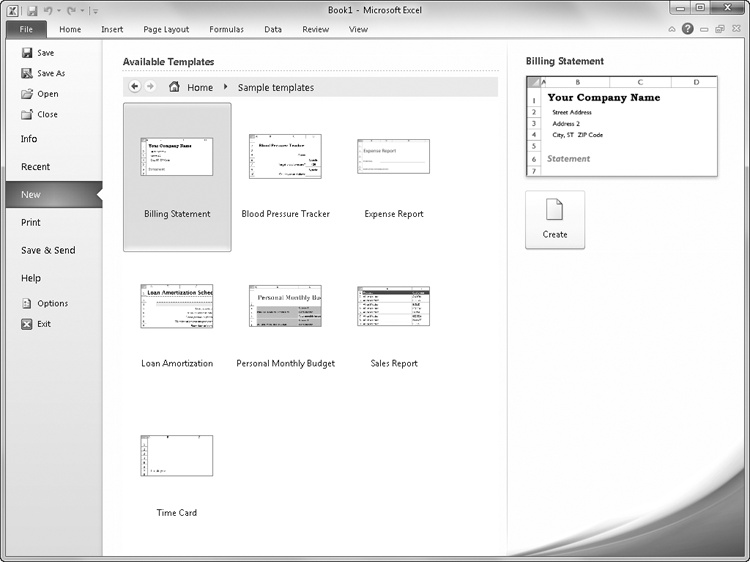
Figure 2-23. A number of templates are ready and waiting on your computer when you first install Excel.
Creating your own templates is a great idea for worksheets you use a lot. You can click New From Existing in the Available Templates window to open any workbook as a template. Better yet, you can create, organize, and format a workbook the way you want (minus the data), then click the File tab, click Save As, and choose Excel Template in the Save As Type list. When you click the Save button, Excel automatically installs your new workbook in a special folder as a template. You can find this folder in the following locations:
Templates in this folder appear in the New dialog box when you click My Templates in the Available Templates screen, as shown in Figure 2-24.

Figure 2-24. Your own templates appear in a dialog box when you click My Templates in the Available Templates screen.
Tip
INSIDE OUT Hidden Windows Folders Revealed
You probably have to change a Windows setting to find the AppData folder (Application Data in Windows XP) because it is normally hidden. To reveal it, navigate to the folder that bears your name in Windows Explorer, as shown in the previous paths. Then, on the Organize menu (the Tools menu in Windows XP), click Folder And Search Options. On the View tab, select Show Hidden Files And Folders. Note that <your name> is the user name you use when logging on to Windows.
When you click the File tab, click New, and then click My Templates, the New dialog box appears, which derives its contents from a special folder installed by the Microsoft Office system, as described in Installing Your Own Templates on the previous page. You can create your own personalized subfolders in this special folder that in turn become tabs in the New dialog box—but only when they contain valid template files. The name of each folder becomes the title of each new tab. Figure 2-25 shows the New dialog box with a new tab, which appears after creating a folder in the Templates folder and adding an Excel template file.
Note
In versions previous to Excel 2007, you could put any type of Excel file into the Templates folder or any of its subfolders, and Excel would recognize the files and pretend they were templates. This stopped with Excel 2007, and continues in Excel 2010. Only actual template files now show up in the New dialog box.

Tip
INSIDE OUT Office-Wide Templates Tabs
When you create a custom folder within the Templates folder, it is available to other Microsoft Office applications, too. Your custom folder appears as a tab in the New dialog box of every 2010 Office application, but only if the folder actually contains a template in that application’s native format. For example, if you create an Accounting folder in the Templates folder and put a Microsoft Word template in it, the Accounting folder appears as a tab in the New dialog box in Word. If the folder contains only Excel files, the tab does not appear in Word.
Arguably, the most important function of any computer application is preserving data. In Excel, you can save your files in many ways, including by clicking the Save, Save As, Publish, Close, or Exit command and—the easiest way to save—by clicking the Save button on the Quick Access Toolbar.
One other command that saves your workbooks is the Share Workbook command in the Changes group on the Review tab. When you click this command, you save your workbook in shared mode. Besides saving the file, this command makes the workbook available to others on a network, who can then open it and make changes of their own.
Note
For more information, see Sharing Workbooks on a Network on page 860.
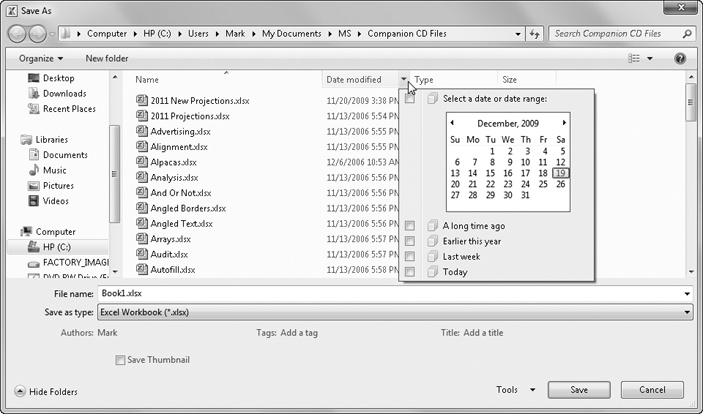
The first time you save a file, the Save As dialog box opens, as shown in Figure 2-26.
Note
If you use the same folder most of the time, you can specify that folder as the default location that the Open, Save, and Save As dialog boxes use when you first open them. Click the File tab, click Options, select the Save category, and type the full path and file name for the folder you want to use in the Default File Location text box.
The Windows 7 (or Windows Vista) version of the Save As dialog box has a lot more bells and whistles than previous versions. This is also true with other dialog boxes that are provided by the operating system, including Save and Open. The dialog box has a sophisticated file interface that includes a number of useful features, such as the ability to find files by using a date range you specify using a calendar, as shown in Figure 2-26. For details, click the Help button (the question mark icon) in the Save As dialog box to display the corresponding Windows Help file.
File names in Excel can have up to 218 characters. They can include any combination of alphanumeric characters, spaces, and special characters, with the exception of the forward slash (/), backslash (), greater-than sign (>), less-than sign (<), asterisk (*), question mark (?), quotation mark (“), pipe symbol (|), colon (:), and semicolon (;). Although you can use any combination of uppercase and lowercase letters, keep in mind that Excel does not distinguish case in file names. For example, to Excel the names MYFILE, MyFile, and myfile are identical.
The old familiar MS-DOS three-character file name extensions, which now come in a four-character version as well, help identify your Excel files, and they are added automatically when you save a file. Table 2-1 lists Excel extensions in the order in which they appear in the Save As dialog box’s Save As Type list (except for Workspace, which doesn’t work there—see Saving the Entire Workspace on page 60).
Table 2-1. The Excel File Extensions
|
Document Type |
Extension |
|---|---|
|
Workbook |
.xlsx |
|
Macro-enabled workbook |
.xlsm |
|
Excel binary workbook |
.xlsb |
|
Excel 97-2003 workbook |
.xls |
|
XML data |
.xml |
|
Template |
.xltx |
|
Macro-enabled template |
.xltm |
|
Excel 97-2003 template |
.xlt |
|
XML spreadsheet 2003 |
.xml |
|
Microsoft Excel 5.0/95 workbook |
.xlt |
|
Add-in |
.xlam |
|
Excel 97-2003 Add-in |
.xlm |
|
Workspace |
.xlw |
Tip
INSIDE OUT Hidden File Name Extensions Revealed
File name extensions might not appear with Windows file names, depending on your settings. To display file name extensions, click the Start button, and then click Computer (Control Panel in Windows XP). Next, click Folder And Search Options (located on the Organize menu in Windows 7 or Vista). On the View tab, scroll down and clear the Hide Extensions For Known File Types check box.
In addition to providing the file name and location, you can specify a different file format in the Save As dialog box. Click the Save As Type drop-down list, which expands to reveal all the formats in which you can save your files.
The default format is Excel Workbook (XLSX), and you’ll almost always use this option. If you want to export an Excel file to another program, however, you can use one of the other options to convert the file to a format that is readable by that program.
Note
For more information about the Excel export formats, see Importing and Exporting Text Files on page 70.
When you open a workbook in Excel 2010 that was created in a previous version of Excel, it automatically opens in Compatibility mode, a condition that is indicated in the Excel title bar, as shown in Figure 2-27. You can always tell by looking at the title bar whether you’ve converted a file to the new format.

You can work normally with Compatibility mode, and when you save the file, it remains in the old file format. If, however, you make any changes using features that are not compatible with the older version, the Excel Compatibility Checker intervenes when you save and displays a dialog box like the one in Figure 2-28.

Figure 2-28. The Compatibility Checker opens when you try to save an old-format workbook containing features not supported by the older version of Excel.
The Compatibility Checker lets you know exactly what is causing the problem, so you can click Cancel and rework your worksheet using a different approach or save it anyway. You can click the Find or Fix links in the Compatibility Checker dialog box to highlight or correct each item that is causing compatibility problems. Clicking the Copy To New Sheet button adds a new worksheet to the current workbook entitled Compatibility Report, containing a copy of the information displayed in the dialog box—sort of a compatibility paper trail. If you clear the Check Compatibility When Saving This Workbook check box, this dialog box no longer opens when you save the current workbook. You might prefer this if you plan to repeatedly edit and save without updating the workbook to the new file format. But fear not, you can always look for problems at your convenience; click the File tab, click the Check For Issues button, and then click Check Compatibility to display the same dialog box shown in Figure 2-28.
Tip
INSIDE OUT What Doesn’t Work in Compatibility Mode?
When Compatibility mode is on, Excel disables a number of features that produce results that cannot be transferred to older versions of Excel. You can still click disabled commands, but when you do, Excel displays a ScreenTip explaining why you can’t use them. For example, Excel 2010 allows 64 levels of nesting in formulas (parenthetical expressions within expressions), but previous versions allowed only 7. If you are working on a worksheet where you try to exceed the previous limitation, Excel prevents it and displays an error message:

Here are some of the things that can trigger compatibility error messages:
A workbook contains too many rows and/or columns.
A formula exceeds the maximum allowed number of characters.
A formula exceeds seven nested levels.
A formula exceeds the maximum number of arguments in a function.
A formula contains more than 40 operands.
A workbook contains too many cross-sheet array formulas.
A workbook has more than 4,050 unique cell formats.
A PivotTable field has more than 32,500 unique items.
A PivotTable item has a string length greater than 255 characters.
A PivotTable caption has more than 255 characters.
A PivotTable field list has more than 1,024 fields.
In case you’re wondering how to get out of Compatibility mode, all you have to do is use the Save As command to save the workbook in one of the new file formats, such as XLSX or XLSM, and then close and reopen the new converted file you just saved.
If you need to save files in other formats, the Save As Type drop-down list in the Save As dialog box includes a number of special formats you can choose, including Excel 97-2003 Workbook and Microsoft Excel 5.0/95 Workbook. Users of any of these versions of Excel can open a file saved in this format, but if someone using Excel 95 or Excel 5 saves changes to this file, any features from Excel versions 2000 through 2003, as well as the formatting, are lost. To alleviate this and other problems, you can download the Microsoft Office Compatibility Pack from the Office Online Web site to open and edit Excel 2007 and Excel 2010 files using earlier versions of Excel. When you use these converters, you don’t have to save files in the old file format, and you don’t have to upgrade the old Excel installation. You do, however, have to make sure you have the latest software updates installed on both ends of the transaction.
Although Microsoft trimmed some of the lesser-used file formats from the last release, the volume of native Excel file formats has swelled somewhat, largely due to accommodating “legacy” file formats—that is, file formats employed in previous versions of Excel. We’ll explain the major differences here:
Excel Workbook (XLSX) This is the default Excel 2010 (and Excel 2007) file format, which is based on XML and uses ZIP compression for reduced file size and increased security. Unlike the default file format in older versions of Excel (XLS), this format does not support VBA or XLM macro code.
Excel Macro-Enabled Workbook (XLSM) Microsoft created a completely separate XML-based file type to be used for workbook files containing VBA or XLM macro code. This increases security by making it impossible to inject macro code into non-macro-enabled workbooks and makes for easier identification of files containing code.
Excel Binary Workbook (XLSB) This is a lean and mean file format designed for the fastest possible loading and saving. It supports all the features of Excel 2010 and also supports macro code, but it is not XML based, does not use compression, and is less secure than XML-based formats.
Excel Template (XLTX) This is the template version of the Excel 2010 (and Excel 2007) file format. This format does not support VBA or XLM macro code.
Excel Macro-Enabled Template (XLTXM) This is the template version of the Excel 2010 (and Excel 2007) file format that does allow VBA and XLM macro code.
Excel 97-2003 Workbook (XLS) This is a legacy file format used by previous versions of Excel.
Microsoft Excel 5.0/95 Workbook (XLS) This is a legacy file format used by previous versions of Excel.
Excel 97-2003 Template (XLT) This is a legacy template format used by previous versions of Excel.
Excel Add-In (XLAM) This is a special type of VBA-enabled workbook that can be loaded as a supplemental program in Excel.
Excel 97-2003 Add-In (XLM) This is a legacy type of VBA-enabled workbook that can be loaded as a supplemental program in Excel.
In addition to these “XL” file types, there are two XML file types that are somewhat related. XML Spreadsheet 2003 (XML) is the previous XML file format provided as an option in Excel 2003. Another format, XML Data (XML), shares the same extension but produces entirely different results. This format is a proprietary XML format that requires specific programmatic data maps to be present before you can even save the file. You’ll know if you need it.
Tip
INSIDE OUT What Is XML?
The Excel 2010 (and Excel 2007) file format is based on XML, which was created as a way for structured data to be interpreted and was originally envisioned for use on the Web. Excel 2003 introduced XML as an optional file format; Excel 2010 (and Excel 2007) uses XML as the default format, indicated by the file name extension .xlsx. Based on a file format specification called SpreadsheetML, Microsoft’s implementation of XML has undergone significant improvements since being introduced. At first, the format didn’t have, shall we say, sufficient language skills to interpret all of what Excel could do, including objects such as charts and graphics. Now, SpreadsheetML can handle everything Excel can dish out and does so in a much more efficient manner than the old XLS format, resulting in significantly smaller file sizes. The new XML formats also provide improved recovery of damaged files and better overall security. And because SpreadsheetML is part of an overall extensible Open XML format initiative, it’s easier for developers to create ways to hook things together.
Note
For some additional information about XML, see Working with XML Files on page 825.
Usually when you save a new workbook, you save it in the Excel Workbook format (XLSX). You can specify a different format as the default for saving files. This might be helpful, for example, if you share files regularly with users of Excel 2003. To do so, click the File tab, click Options, and select the Save category, shown in Figure 2-29.
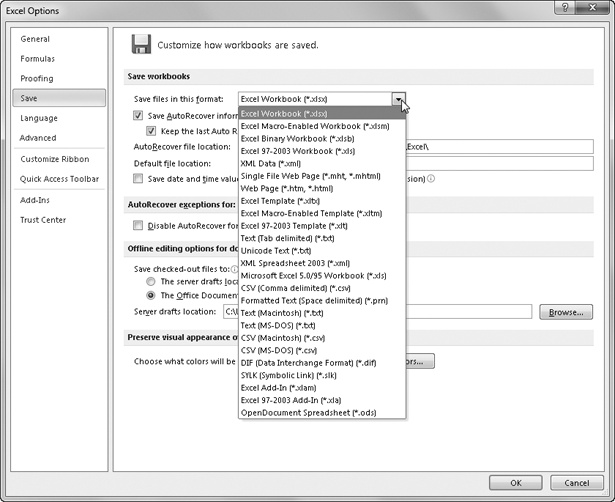
The Save Files In This Format drop-down list contains all the same file formats as the Save As Type drop-down list in the Save As dialog box.
You can have Excel create a duplicate copy of your file on the same disk and in the same folder as the original every time you save. Click the File tab, click Save As, click Tools at the bottom of the Save As dialog box, and click General Options to display the dialog box shown in Figure 2-30. Then select the Always Create Backup check box.
The backup file is a duplicate file that carries the same name as your original, but the name is preceded by Backup of and has the file name extension .xlk.
Caution
Keep in mind that Excel always uses an .xlk extension when creating backup files, regardless of the file type. Suppose you work with a workbook named Myfile.xlsx as well as a template file on disk named Myfile.xltx. and you select the Always Create Backup check box for both. Because only one Myfile.xlk can exist, the most recently saved file is saved as the .xlk file, and Excel overwrites the other file’s backup if one exists.
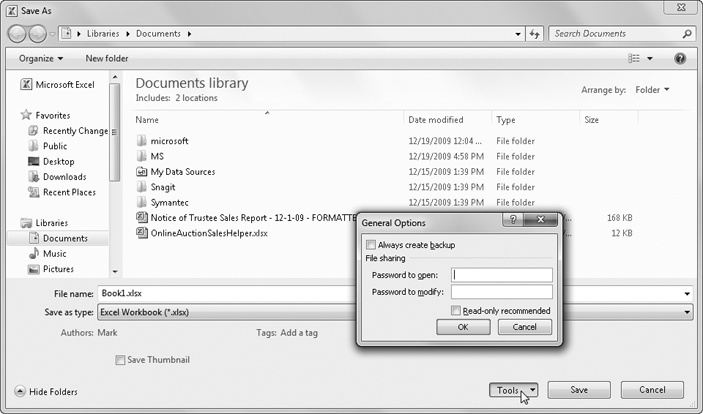
You can password protect your files by using options in the General Options dialog box shown in Figure 2-30. Choose from two types of passwords: Password To Open and Password To Modify. Passwords can have up to 15 characters, and capitalization matters. Thus, if you assign the password Secret to a file, you can’t reopen that file by typing SECRET or secret.
Tip
INSIDE OUT Create a Better Password
Although Microsoft has tightened the under-the-hood security measures of Excel over the years, some people delight in finding new and better ways to crack passwords. You can help by simply building better passwords. Make sure your password is eight or more characters long—the longer, the better—and try to use a healthy mix of uppercase and lowercase alphanumeric characters and nonalphanumeric characters. Never use birthdays, anniversaries, or the names of your children or pets as passwords.
When you click the File tab, the Backstage view screen that first appears includes a thumbnail view of the current workbook. Just below the thumbnail, click Properties, and then click Show Document Panel to display the Document Properties panel, which appears below the ribbon, as shown in Figure 2-31. Use this to record general information about the active workbook. If you juggle a lot of files, getting into the habit of adding properties can make it a lot easier to find something later. Windows looks at these property values when you use the Search command to locate files on your computer.
You can quickly view properties for the active workbook by clicking the File tab and looking on the right side of the Info screen. Several properties are displayed there beneath the thumbnail of the workbook. Click Properties, and then click Show All Properties to expand the list visible on the Info screen, as shown in Figure 2-32. It’s a lie, though; not all properties are displayed there. For the rest of the story, you must click Properties, then click Advanced Properties to display a dialog box full of information, also shown in Figure 2-32. Most of the information visible on the Document Properties panel is available and editable on the Summary tab.


Click the View tab, and then click Save Workspace in the Window group to save a snapshot of your current Excel environment. When you save a workspace, Excel notes the locations of all the workbooks that are currently open, as well as many of the workspace settings, so you can retrieve your files and settings in the same configuration they were in when you saved. Settings that are saved with workspaces include many display and calculation settings. The default file name suggested for a workspace file is Resume.xlw, but you can rename it.
Linking Custom Properties to Cells
You can link your own custom-built properties to named cells on your worksheet. When you do, the value of the custom property becomes whatever the named cell contains and changes whenever the value in the cell changes. First you must name a cell (see Rules for Naming on page 487). Then click the File tab, click Properties (under the worksheet thumbnail), and then click Advanced Properties. On the Custom tab in the Properties dialog box, selecting the Link To Content check box displays the workbook’s defined names in the Value box (which changes to a drop-down list named Source when linking content), as shown in Figure 2-33.
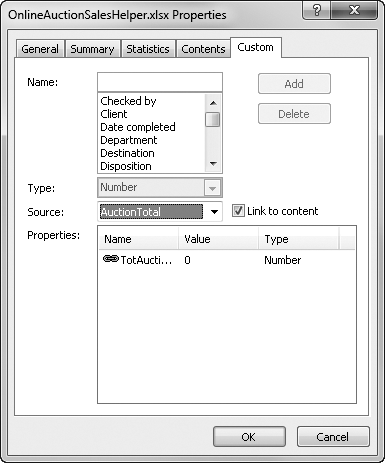
Select or create a name for the custom property in the Name box. (The Type drop-down list becomes unavailable when you’re linking to content.) When you’ve specified a source (the named cell to which you want to link), click Add, and the custom property appears in the Properties list.
If the link is broken (the defined name is later deleted, for example), the Properties dialog box stores the last value recorded for that property.
If the name defines a range of cells, only the value in the cell in the upper-left corner of the range appears as the property value.
Only slightly less basic than saving files is opening them. Click the File tab, and click Open to display the Open dialog box, shown in Figure 2-34.
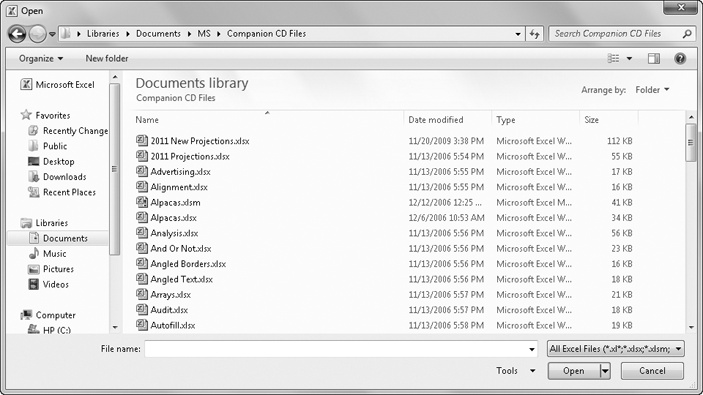
Click one of the icons on the left side of the dialog box to display the corresponding files on the right side. The contents of the Documents folder is displayed when you first open the dialog box, unless you change the default file location. (Click the File tab, click Options, and select the Save category.) Important icons in the list include the following:
The Recently Changed icon lists the latest files you have edited, in chronological order with the latest first.
The Recent Places icon lists folders you have navigated to, in chronological order with the latest first.
The Desktop icon brings you to the top level of your computer’s file system, where you can click your way down through the hierarchy.
The Documents icon displays the contents of the Documents folder.
The Computer icon displays all storage locations available on your computer, including disks, CD and DVD drives, and shared folders.
The Views button (to the right above the list window) provides different ways to display files in the dialog box. The Tools button (to the right, below the list window) displays a drop-down list that contains a single command, Map Network Drive, which lets you connect to a location on your network.
The drop-down list to the right of the File Name text box at the bottom of the Open dialog box determines which files are available for selection. The default option is All Excel Files, which displays file names whose extensions begin with xl. You can display specific file types or all files by clicking the arrow to the right of the text box.
Notice that headings appear at the top of the file list in the Open dialog box. When you click one of these headings, you sort the files in order, based on that heading. For example, if you click the Date Modified heading, you sort the files in date order. Click the same heading again to re-sort in reverse order. You can further refine your quest by using the hidden menus adjacent to each heading. When you rest the pointer on a heading, a downward-pointing arrow appears to the right of the heading; click it to display a menu of additional options pertinent to that heading, as shown in Figure 2-35.
Note
You can right-click most files listed in the Open and Save As dialog boxes to display a shortcut menu that contains commands you can use with the selected file. For example, you can delete a file displayed in the Open dialog box by using this shortcut menu.
Each heading has its own menu of options, some of which are based on the actual files contained in the current folder. For example, when you click the menu for the Type heading, you can select from the list of file types contained in the folder.
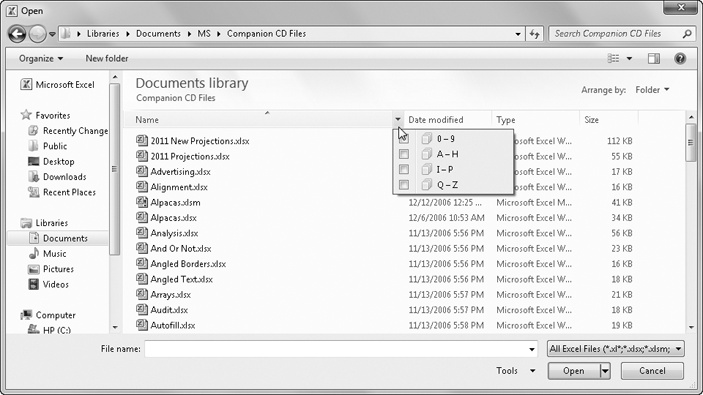
Figure 2-35. You can specify additional criteria when looking for files in the Open dialog box by using the menu buttons adjacent to each heading in the file list.
To the right of Open at the bottom of the Open dialog box is a small arrow. Clicking this arrow displays a menu containing the following options:
Open Read-Only This opens the file so that you cannot save any changes made to it without renaming it.
Open As Copy This creates a duplicate of the selected file, adds the words Copy of to the file name, and leaves the original untouched.
Open In Browser This applies only to HTML documents and opens the selected file in your default Web browser.
Open In Protected View This opens the document for viewing but not editing. All active content is disabled, including any kind of macro or HTML code. Once you have established the bona fides of the file, you can click the Enable Editing button to carry on.
Open And Repair This is a powerful feature that you can use to try opening corrupted files. For more information, see Recovering Corrupted Files below.
Show Previous Versions This reveals previous versions of files that are created by Windows Backup or that are created automatically by Windows when System Protection is set to create restore points. (Note that this command does not appear unless you first select a file in the list.) For details on this Windows functionality, click the Help button in the Open dialog box and type “show previous versions.”
If you have files you need to work on every day, you can store them in a special folder called XLStart. Every time you start Excel, any files in the XLStart folder automatically open.
Note
You can save workspace files in the XLStart folder so that all the files and the workspace setup are automatically loaded each time you start Excel. For more information about workspace files, see Saving the Entire Workspace on page 60.
The XLStart folder is created when you install Excel and is located in the following place:
Windows XP C:Documents and Settings<your name>Application DataMicrosoftExcelXLStart
Windows 7 or Vista C:Users<your name>AppDataRoamingMicrosoftExcelXLStart
If you want to start Excel and simultaneously open files that are in a folder other than the XLStart folder, you can specify an alternate startup folder. Click the File tab, click Options, and select the Advanced category. In the At Startup, Open All Files In text box, under General options, type the full path of the folder. This feature is particularly useful if your computer is connected to a network and you want to open files from a shared folder.
Figure 2-34 shows the Open dialog box, where you can find the Open Options menu (click the arrow next to the Open button) containing the Open And Repair command. This command gives you a fighting chance at either repairing a corrupted file or extracting the data from it if it doesn’t respond to a repair attempt. When you select a file and click the Open And Repair command, the message box shown in Figure 2-36 opens.

Note
If you can live with a day-old version of the workbook, try using the Show Previous Versions command. Click the File tab, click Open, navigate to the location of the file you want to recover and select it. Then click the arrow next to the Open button at the bottom of the dialog box, and select Show Previous Versions to display any that are available. For details on this Windows functionality, click the Help button in the Open dialog box and type “show previous versions.”
Try the Repair button first, and if Excel still has no luck opening the file, try the Extract Data button, which displays the message box shown in Figure 2-37.

You’ll have to make a judgment call here—if you think your formulas will be OK after extraction, click Recover Formulas; otherwise, click Convert To Values. Recovering formulas will probably work unless the formulas include references to cells that were lost in corruption. Whatever you choose, the Extract Data feature pulls all the data from your workbook, including all worksheets and tabs, in the same order in which they appear in the original file. Unfortunately, the recovery process ignores all formatting, charts, and other objects—you can recover only the actual cell contents (the important stuff).
Note that unless the part of the file that became corrupted was the part storing passwords, you probably won’t be able to use this technique to retrieve data from a password-protected file.
Tip
INSIDE OUT Recover Data Using Links
You can try to recover data from a corrupted workbook by using another trick. It is essentially the same trick used by the Excel Open And Repair command, but it still might be worth a try if Open And Repair fails.
First, open two new workbooks. Select cell A1 in one of the workbooks, and then press Ctrl+C to copy. Activate the second workbook, and right-click cell A1. Click Paste Special, and then click the Paste Link button. Next, click the File tab and click Edit Links To Files on the Info screen (this command is in tiny type at the bottom of the shaded area on the right), click Change Source, and locate the corrupted workbook. Click OK, and then click Close to close the Edit Links dialog box.
If luck is with you, data from cell A1 in the lost workbook appears in cell A1, thanks to the linking formula. If it does, press F2 to activate Edit mode, and press F4 three times to change the absolute reference $A$1 to its relative form, A1. Finally, copy the formula down and across until you can see all the data you need to retrieve. Repeat for each worksheet in the workbook. You lose the formatting and formulas, of course, and zeros appear in every blank cell, but at least you can get at the important stuff. Although you can save this worksheet with linking formulas, you might consider converting all the formulas to their underlying values, just in case the original corrupted file has any further degradation. To do so, select all the cells containing the formulas you just created, click Ctrl+C to copy, right-click, click Paste Special, select Values, and then click OK.
Note
For more information about document recovery, see Recovering from Crashes on page 78. For more information about passwords, see Hiding and Protecting Workbooks on page 189.