
When the ribbon was introduced in Office 2007, it was fixed—you couldn’t modify the user interface unless you were conversant in VBA or XML. In Office 2010, the ribbon is open for interpretation; you can freely rearrange command groups; change the order and position of tabs; remove groups; and create custom commands, groups, and tabs. This is very good news for tool geeks. The bad news: you cannot add or delete commands from existing groups, and you cannot delete existing tabs. But this really isn’t much of a problem; a truly dedicated customizer can create a whole new set of tabs and stick them in front, forcing the default tabs off the screen, or simply hide all the default tabs.
Start by right-clicking anywhere on the ribbon and clicking the Customize The Ribbon command on the shortcut menu that appears. This opens the Excel Options dialog box with the Customize Ribbon category selected (saving you several mouse clicks), as shown in Figure 3-1.
The Customize Ribbon category in the Excel Options dialog box displays two scrollable lists. The Choose Commands From list on the left displays commands you can use to create your own command groups and tabs. The list on the right shows the current contents of the ribbon as a collapsible outline, making it easy to see the ribbon’s structure. The first level of the outline represents tabs, and the second level of the outline represents command groups, corresponding to the labels at the bottom of each group (Clipboard, Font, Alignment, and so on) on the ribbon. Click the plus sign icons to reveal the subordinate groups and commands. Many groups have additional plus signs that expose another level of commands. For example, Figure 3-2 shows the outline for the Font group fully expanded. There are a lot of commands in this one group—more than you can see at once.

Note
Some items in the outline might be wider than can be displayed in the dialog box at its default size. Just drag any border of the dialog box to make it wider or deeper. The next few figures were created after making the dialog box a bit larger for ease of viewing.
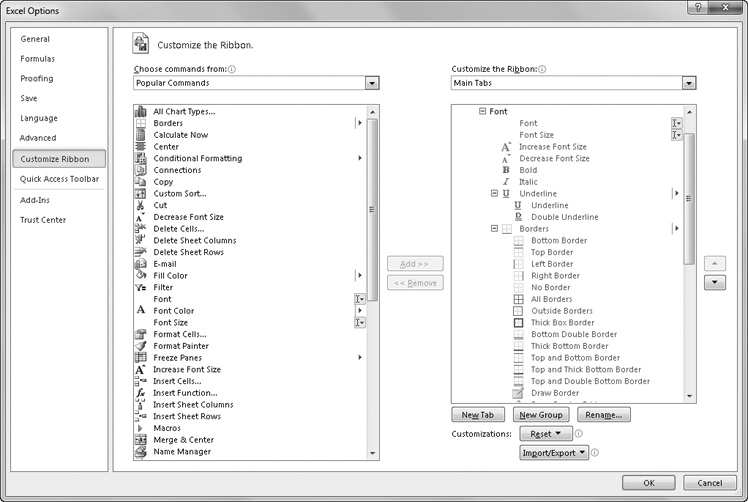
Figure 3-2. The list on the right is a collapsible outline listing the current contents of the ribbon.
The drop-down list boxes above each list contain categories you use to filter the list of displayed commands. For example, Figure 3-3 shows the drop-down list with one of the more interesting categories selected: Commands Not In The Ribbon. This category is fun to browse just to see what you’ve been missing.
Note
You can clear the check box next to a tab in the outline to hide it on the ribbon; select it to display it. Note that many tabs are dynamic, such as the Add-Ins and Background Removal tabs in Figure 3-1, and all of the Tool tabs in Figure 3-3. Even if they are selected in the outline, they do not appear on the ribbon until they’re needed.
On the right side of the dialog box in Figure 3-3, the Tool Tabs option is selected in the drop-down list. This displays a wealth of “hidden” tabs and groups on the ribbon that are normally invisible but that appear dynamically when the appropriate object or tool is selected.
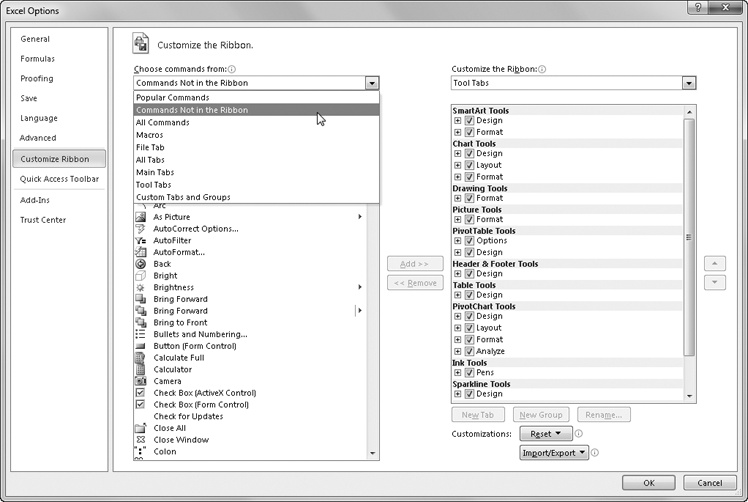
Figure 3-3. Choose options from the drop-down lists above to filter the contents of the scrollable lists below.
Most of the items you can see in the command list on the left side of the Customize Ribbon category in the Excel Options dialog box are buttons. That is, clicking the command button on the ribbon executes the associated command immediately. You can see that some items also have a small icon to the right of the command name in the dialog box. These are called command modifiers, and they tell you that although the item may still be a button, it is also something more, as detailed in Table 3-1. (Note that this also applies to the Quick Access Toolbar category in the Excel Options dialog box. The controls are almost identical to those in the Customize Ribbon category.)
Note
The Quick Access Toolbar is discussed later in Customizing the Quick Access Toolbar on page 92.
If you want a little more information about the commands in the command list, rest the pointer on any command to display a ScreenTip.
Table 3-1. Command Modifiers
You can add custom groups to existing tabs, but if you have limited screen real estate, creating your own tabs might make more sense. To do so, first right-click the ribbon, click Customize The Ribbon, and then click the New Tab button. This creates a new top-level outline item provisionally entitled New Tab (Custom). Select New Tab (Custom), and then click the Rename button to display the dialog box shown in Figure 3-4. The new tab is inserted below the selected tab in the outline.

Figure 3-4. Create a new ribbon tab by clicking the New Tab button, and then click Rename to give it a sensible moniker.
After you create a tab, you need a group, because commands can be added only to groups. Helpfully, a custom group is created automatically whenever you create a custom tab, as shown in Figure 3-4. Even after you rename a tab or a group, (Custom) continues to appear, appended in the outline to any title you provide, which helps to quickly identify your own tabs and groups.
You can reposition any tab or group in the outline by simply dragging it to a new location, or you can select it and click the arrow buttons located to the right of the list box. You cannot reposition commands within preset groups, but you can move groups around from tab to tab all you like.
Creating custom command groups is similar to creating custom tabs. First, select the tab where you want the custom group to live, and then click the New Group button in the Excel Options dialog box. (If you created a new tab, a new group already appears on the new tab.) Select your new group, and click the Rename button to display the dialog box shown in Figure 3-5.
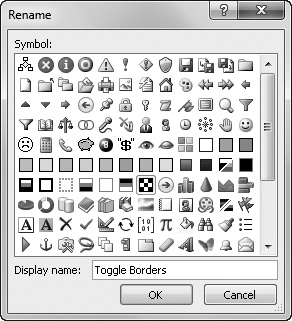
Figure 3-5. Clicking the Rename button with a group selected allows you to select an icon for the group as well.
As you can see, you can rename your new group and also assign an icon to it, which is visible only when you add the group to the Quick Access Toolbar. If you look at the Home tab on the ribbon, you’ll notice that most of the commands do not have labels displayed; they appear as buttons. For example, Paste is the only command in the Clipboard group that displays a label; there are no command labels visible at all in the Font, Alignment, and Number groups. The ribbon shown at the top of Figure 3-6 displays a custom Formatting tab populated with border-specific commands with their command labels visible. If you want to create a tab filled with other kinds of Formatting commands, you’ll need a lot more space, and hiding the labels helps a lot.
To hide command labels, right-click the ribbon, click Customize The Ribbon, then right-click any custom group in the outline and click Hide Command Labels. Note that this command appears on the shortcut menu only when you click a custom group. You cannot change the command labels of default groups. The ribbon shown at the bottom of Figure 3-6 shows the result—now there is plenty of space left on the custom Formatting tab for more groups. Notice that hiding the command labels does more than what the command’s name implies; the button icons become considerably smaller as well.

After hiding the command labels so that they are not visible on the ribbon, you can still easily see the command names by resting the mouse pointer over the buttons.
When constructing custom tabs, you can take advantage of predefined command groups. Microsoft decided to make the built-in groups noncustomizable partly because a lot of sweat and tears went into creating them as they are today. Decades of usability studies and real-world usage of menus and command trees went into the design of the ribbon, and as such it makes sense for 80 percent of our needs. But we’re talking about the other 20 percent here. Because you can create your own groups anyway, there is no harm in having the default groups fixed—and plenty of good reasons for you to take advantage of them.
Right-click the ribbon, and then click Customize The Ribbon. In the Choose Commands From drop-down list, click All Tabs to display an outline of all the predefined command groups, as shown in Figure 3-7.

First, select a tab or group in the outline on the right below which you want to insert a preset group. Next, in the All Tabs list on the left, click the plus sign icons to expand the outline and locate the group you want. Select it, and click the Add button to insert the group into the outline on the right. If you decide you want your inserted groups somewhere else, you can always move them up and down the outline by using the arrow buttons. A well-populated custom Formatting tab is shown in Figure 3-8, along with the outline in the Excel Options dialog box that created it.

When you customize the ribbon, it stays customized; everything is still there the next time you start Excel. But if you ever joke about “hitting the reset button,” well, now you actually have one. In the Customize Ribbon category in the Excel Options dialog box, the Reset button does the eponymous trick, discarding your customizations and returning the ribbon and the Quick Access Toolbar to their original states. The button is also a menu, offering the dual options of resetting only the selected tab (if one is selected) or resetting all customizations (which resets both the ribbon and the Quick Access Toolbar). Before you reset either, though, you might want to save your customization work so that you can retrieve it later. Below the Reset button, the Import/Export button allows you to reuse and recycle your work. This button is also a menu from which you can choose to import or export a special file containing all your customizations. Figure 3-9 shows a version of the File Open dialog box that appears when you choose Import Customization File from the Import/Export menu, with a couple of saved customization files. The first file—Excel Customizations.exportedUI—is the rather clunky default name offered. The proprietary extension for the resulting file—.exportedUI—is appended to any file name you supply.

Using these exported customization files and a Web storage location such as Windows Live SkyDrive, you can store your custom tool sets as well as your workbooks, making them available from any Internet-connected computer in the world running Office 2010.