
After you create or insert a graphic object, Excel 2010 provides plenty of new and powerful tools you can use to modify it. Most of these tools are on hidden ribbon tabs that appear only when an object is selected. Three types of hidden tabs exist, depending on the object you select: SmartArt Tools, Drawing Tools, or Picture Tools appear on a menu bar above the new tabs. All three types include a Format tab; SmartArt Tools includes an additional tab, Design, which is discussed in Creating SmartArt on page 389. The controls available on the Format tab change depending on the type of object selected.
When you select an inserted picture or piece of clip art, you can use the Format tab under Picture Tools to make some rather extreme adjustments to the image. Although the source program that created an imported picture probably offers more options, you can do a surprising amount of formatting within Excel as well. All the basics are there, including tools for rotating and aligning images, adding borders, and cropping, but Excel now includes some surprisingly advanced formatting tools as well. Take a look at the largest group on the Format tab, Picture Styles, as shown in Figure 10-27.
As Figure 10-27 shows, simply resting the pointer on a thumbnail in the Picture Styles gallery temporarily displays the selected picture using that style. The same functionality applies to most other galleries available on the Format tab.

The Adjust group on the Format tab hides a powerful collection of menus that are new in Excel 2010. They replace the relatively pedestrian Brightness, Contrast, and Recolor commands and also offer a robust arsenal of special controls and artistic effects. It would be an understatement to say that the new Corrections menu, shown in Figure 10-28, replaces the old brightness and contrast controls. Having actual thumbnail representations gives you an immediate idea of where you need to go, rather than using the old Undo trial-and-error method.

Figure 10-28. The Corrections gallery offers sharpening, brightness, and contrast adjustments on steroids.
The Brightness And Contrast thumbnail matrix displays 25 examples of the selected image in 0%, 20% and 40% applications of brightness and contrast, as well as 25% and 50% applications of sharpening. For more control, click Picture Corrections Options at the bottom of the gallery to display the dialog box shown in Figure 10-29.

Figure 10-29. The Format Picture dialog box contains all the available fine-tuning controls for the selected image.

The Format Picture dialog box controls pretty much everything you can do with pictures, including fill and line color, shadows, special effects, rotation, cropping, and sizing. Note that different picture types might cause some options to become active or disabled and could change the appearance of the dialog box itself.
Here is a quick rundown of the categories available in the Format Picture dialog box and what they do. Note that if there is a corresponding menu or gallery on the ribbon, its options are duplicated here as well:
Fill Controls the color and nature of the fill (solid, gradient, picture, texture, pattern), if any.
Line Color Controls the color of the line (solid or gradient), if any.
Line Style Allows you to determine line width and type (compound, dashed) and whether it has arrows. If the line is segmented, these options control the nature of the joins (round, beveled, or mitered).
Shadow Controls a shadow’s color, transparency, size, angle, distance from the object, and amount of “blur” you want it to exhibit.
Reflection Controls transparency, size, distance, and amount of blur for these shadowlike mirror images.
Glow And Soft Edges Controls the color, size, and transparency for each of these effects.
3-D Format Offers options for type of bevel, color, depth, size, and options for surface material and lighting effects.
3-D Rotation Offers precise control of the orientation of the selected 3-D object in three dimensions, as well as distance from “ground.”
Picture Corrections Provides precision control of brightness, contrast, and sharpening.
Picture Color Controls the color saturation and “tone” (a.k.a. color temperature), ranging from very cool to very warm.
Artistic Effects Duplicates the gallery of the same name on the ribbon, offering only an additional “Reset” button.
Crop Offers precise control of not only the cropping dimensions, but also the exact position of the picture on the worksheet.
Size Provides control over the size and (non-3-D) rotation of the image, and a “Reset” button.
Properties Controls how the image reacts to changes in the underlying worksheet (Move But Don’t Size With Cells being the default), and whether the object is locked or can be printed.
Text Box Controls margins, alignment, and wrapping of objects containing text, and whether the object automatically scales to fit its text contents.
Alt Text This is an accessibility feature provided for images that end up on the Web. Use it to enter descriptive text for the visually impaired.
Color is the next command in the Adjust group on the Picture Tools Format tab. It displays the gallery shown in Figure 10-30.

Figure 10-30. The Color menu offers control over saturation and color temperature and reveals a lot of nifty presets.
The Color menu’s Color Saturation options give you an idea of the range available between no color at all (a.k.a. grayscale) and 400% color saturation.
Color Tone is the same as color temperature and shows you a range of options between fairly cool (4,700 degrees Kelvin) and very warm (11,200 degrees Kelvin).
The Recolor options essentially remove the color from the image (desaturate) and then add another color as a transparent overlay, much like a hand-tinted black and white photograph. One of the more popular applications of this technique is Sepia, which is offered here, as well as several options without the added color, such as Black And White and Grayscale.
At the bottom of the Color menu, More Variations offers a standard color palette if you want to select a color not represented in the menu as the overlay color. For more control, click Picture Color Options to display the Format Picture dialog box.
At the bottom of the Color menu on the Picture Tools Format tab is the Set Transparent Color command. Click the command, and then click anywhere in the image to essentially remove that color, leaving a “see-through” hole in the image. This is similar to removing the background (discussed next) except that it works only on a single color at a time.
Clicking the Remove Background button in the Picture Tools Format tab’s Adjust group displays the Background Removal tab, shown in Figure 10-31, which normally remains hidden.

When you first click the Remove Background button, the image appears with selection handles inside its frame and, as Figure 10-31 shows, shaded areas that represent areas specified for removal. The selection handles indicate where the image will be cropped. The shaded areas are selected around the periphery of the image and are based on predominant, common, adjacent colors and—to some extent—lines and textures. You can drag the selection handles to include more or less of the image in the result, and the shaded areas might change when you do this. If the automatic selection doesn’t quite get it right, you can use the Mark Areas To Keep and Mark Areas To Remove buttons, which do pretty much what they indicate. When you mark an area, you might find that an area has a lot more colors than it appeared to at first, so trial and error is helpful here. The Undo and Redo buttons work beautifully. In Figure 10-31, we simply dragged the selection rectangle to include the entire rock outcropping, and the automatic background selection algorithms worked pretty well for this image.
The remaining menu in the Picture Tools Format tab’s Adjust group is Artistic Effects, which includes a number of textures, screens, and various other types of distortions and manipulations. The very nice Pencil Grayscale effect is shown in Figure 10-32.


The second of the three buttons on the right side of the Picture Tools Format tab’s Adjust group, Change Picture, allows you to swap the underlying image with another one by opening a version of the Open dialog box. When you use Change Image, any formatting you have applied is not affected. The new image simply appears in place with all the same options applied. The last button on the right side of the Picture Tools Format tab’s Adjust group, Reset Picture, does exactly what you think—reverts the image to its original inserted condition. The first button in this group of three—Compress Pictures—is discussed in Applying Compression to Pictures on page 411.
Note
For more detail about many of the effects mentioned here, see Using Advanced Object Formatting Effects on page 412.
When you select any type of object other than pictures or embedded objects, the Format tab under Drawing Tools appears, containing controls similar to ones on the Format tab under Picture Tools and a couple of new ones, too, as you can see in Figure 10-33.

Figure 10-33. This version of the Format tab appears when any shape, text box, or WordArt object is selected.
Here are details about the formatting controls on the Format tab under Drawing Tools that are different from those on the Format tab under Picture Tools:
Shape Fill This is a standard color palette that allows you to select colors, textures, gradients, and even pictures to fill the selected shape.
Shape Outline This is a standard palette that controls the outline of the selected shape, including its color, line weight, and line style, including options for dashed lines and arrows.
Shape Effects Displays a menu of special effects you can apply to the selected picture, including the Shadow, Reflection, Glow, Soft Edges, Bevel, and 3-D Rotation options, as shown in Figure 10-34.
Note
The Format tab under Drawing Tools and the Format tab under Picture Tools contain groups covered elsewhere in this book. For more about the Insert Shapes group, see Using the Shapes Tools on page 374. To read about the WordArt group, see Creating WordArt on page 387. For information about the Arrange group, see Positioning Objects on page 423.

When you select a SmartArt graphic, the Format tab under SmartArt Tools appears, containing controls similar to the two other versions of the Format tab (Picture Tools and Drawing Tools) and a few new ones, as you can see in Figure 10-35.

The Edit In 2-D button in the Shapes group allows you to “flatten” a selected object with 3-D formatting applied. This does not eliminate 3-D formatting, it just suspends it and speeds up the redrawing of the object. The Larger and Smaller buttons are used to scale individually selected objects in a group by a preset amount, which is more precise than dragging selection handles and makes it easier to scale multiple objects by identical amounts.
On this version of the Format tab, the Arrange button is a menu with some familiar controls—Align, Group, Rotate, Bring Forward, and Send Backward—and one unfamiliar one, Selection Pane. Clicking the latter button opens a task pane with a list of all the objects on the worksheet. Clicking an item in the list selects the corresponding object. If you are working with multiple objects, especially if they are in close proximity or stacked, using the selection pane can be very handy. For more information about the selection pane, see Working with Graphic Objects on page 421.
Most of what you can do with text in cells applies to text in graphics as well. You can use the tools in the Font group on the Home tab to accomplish most of what you need to do in either cells or text-capable objects. You can also apply the advanced formatting options available in the WordArt Styles group on the Format tab that appears when an object is selected. However, you can employ a few additional text-formatting options using the Font dialog box when working with text in objects.
To see what we’re talking about, click Shapes on the Insert tab, draw any kind of two-dimensional object, such as a rectangle, and then type some text. Drag through the text you just typed to select it, then right-click the selected text, and finally click Font to display the Font dialog box, shown in Figure 10-36.

Note
You can also display the Font dialog box by selecting any text-capable object and clicking the dialog box launcher in the Font group on the Home tab.
The Font dialog box shares many of the same controls found in the Format Cells dialog box that you use to format text in cells. The Font dialog box additionally offers the following options, several of which are illustrated in Figure 10-36:
Double Strikethrough This effect draws two lines through the middle of the selected text.
Offset When the Superscript or Subscript effect is turned on, Offset offers precise control over the distance of the selected text from the baseline.
Small Caps This effect changes lowercase characters in selected text to small capital letters. Text typed as capital letters is unaffected.
All Caps This effect changes all the selected lowercase characters into capital letters.
Equalize Character Height This effect changes the size of each selected character so they all occupy the same amount of vertical space. Characters with descenders are moved above the baseline.
Character Spacing On the Character Spacing tab in the Font dialog box, this effect lets you expand or condense the space between characters of selected text by a specified number of points, as shown in Figure 10-37.
Kerning This effect applies special spacing rules to correct problematic character pairs and lets you specify a font size above which kerning is applied.
In Figure 10-37, the first text box is formatted as usual; kerning was applied to the second text box. The effect is subtle, but you can see that the spacing between each letter pair in the second box is a little tighter. Kerning is particularly noticeable when applied to large display fonts and logos.

Note
Chapter 9 discusses the overall formatting features of Excel 2010; we discuss text formatting in depth in Using Fonts on page 351.

When you import pictures using the Picture button on the Insert tab, you can choose to optimize the storage of these images on your worksheets to decrease the amount of disk space they consume. Clicking the Compress Pictures button on the Format tab under Picture Tools (which appears only when a picture is selected) displays a dialog box of the same name, shown in Figure 10-38.

Here are details about the options in the Compress Pictures dialog box:
Apply Only To This Picture Ordinarily, all the images in your workbook are compressed at once. Select this check box to compress only the currently selected images.
Delete Cropped Areas Of Pictures This discards any nonvisible portions of pictures you have cropped using the options in the Size group on the Format tab under Picture Tools. This is the default setting and is nonreversible.
Target Output options These options allow you to specify the number of dots per inch (dpi) to suit your output requirements: print, screen, e-mail, or the default resolution of the encapsulating document. (Document resolution options, if any, are available by clicking the File tab, Print, Printer Properties, and clicking the Advanced button.)
Most of the formatting controls you need for graphics are right up front on the ribbon—the “dashboard” of Excel. The ribbon offers easy access to buttons and galleries as well as live preview functionality. However, a few additional options are not available on the ribbon. To access them, right-click any graphic (except an embedded object), and click Format Shape to display the Format Shape dialog box. The command and dialog box name is Format Picture when you select clip art or an inserted picture, but the dialog box is the same either way. See A Dialog Apart on page 402, for more information.
You might find the Format Shape dialog box convenient because you can leave it open and move it out of the way while you work. The categories on the left side of the Format Shape dialog box are always the same, no matter what type of object you select. However, the options available in each category change based on the object type. For example, the settings in the Text Box category are unavailable when you select a picture.
Much of what you find in the Format Shape dialog box is self-explanatory, but we’ll hit the high points for you in the following sections, which also serve to describe some of the inner workings of equivalent ribbon-based controls.
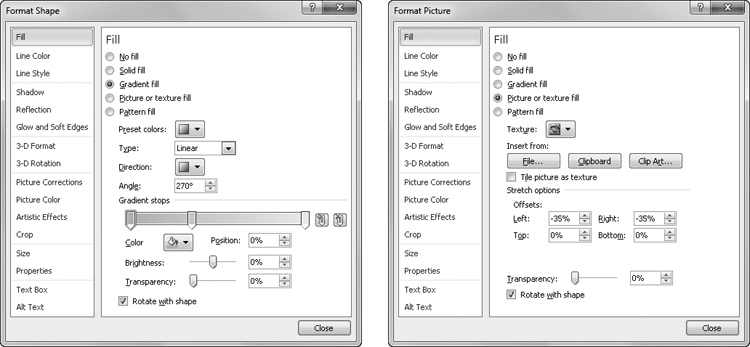
The first two categories in the Format Shape dialog box, Fill and Line Color, contain options that change the controls displayed in the dialog box, as shown in Figure 10-39. For example, you can see the differences between the controls available when the Gradient Fill and Picture Or Texture Fill options are selected. (Curiously, as the figure shows, the name of the dialog box also changes if you select a nonpicture object and choose Picture Or Texture Fill.) As always, any changes you make in the dialog box are reflected immediately in the selected object:
Gradient Fill Gradient Fill is the third option in the Fill category in the Format Shape dialog box; a gradient fill consists of two or more colors, cross-fading from light to dark. You can choose from a number of presets in the Preset Colors drop-down list, or you can customize your own. In the Type drop-down list, select from Linear, Rectangular, Radial, or Path, which follows the contours of the selected object. You can select a fill direction for any gradient type except Path. You can specify an angle—the point from which the gradient emanates—from 0 to 359.9 degrees. The Direction settings are presets of the Angle setting; both settings are applicable only to linear gradients.
Gradient Stops You can create complex, nonlinear gradients using the Gradient Stops option, which lets you specify up to 10 intervals of gradation using varying amounts of color and transparency. To get an idea how this works, select any of the more colorful samples in the Preset Colors list, and then look at the Gradient Stops drop-down list. For example, the preset named Rainbow has seven gradient stops, each set to a different color. The controls below the Gradient Stops slider apply settings to each individual stop on the slider. The Stop Position control determines where along the gradient path the selected stop comes into play. For example, if you want to create a three-color gradient, you can add stops at 50 percent and 100 percent for a fairly even gradient or at 10 percent and 80 percent to emphasize the middle color. You can also use the Transparency slider to add varying amounts of transparency to each gradient stop. For example, you could set a shape to be 0 percent transparent on one end of the scale and 80 percent on the other end, revealing varying amounts of the worksheet below the shape.
Note
If you find that you keep applying the same formatting options to objects you create, you can easily make these hard-earned formats the default for all new objects you create. Right-click any object that’s formatted the way you like, and click Set As Default Shape. The command name might change, depending on the object you select. Note that you must right-click the border of a text box, not the text area, to display the Set As Default Shape command.
Picture Or Texture Fill Selecting the Picture Or Texture Fill option in the Fill category in the Format Shape dialog box reveals the controls shown on the right in Figure 10-39. You can select one of the preset textures in the Texture drop-down list, or you can import an image from a file on disk, a piece of clip art, or even the current contents of the Clipboard by clicking the appropriate Insert From button. Selecting the Tile Picture As Texture option repeats an image as needed to fill the selected shape; if this option is not selected, a single instance of an image is placed in the center of the selected shape. The Stretch Options let you offset the image from the edges of the shape, giving you control over the percentage of offset from the left, right, top, or bottom of the shape.
Line Colors and Line Styles The Line Color and Line Style categories in the Format Shape dialog box don’t contain any surprises; these categories are where you control the formatting of lines and arrows. You can create gradient lines and compound lines; you can specify different styles of dashed lines and arrowheads; you can add square, round, or flat caps to the end of lines; you can specify a percentage of transparency to solid lines; and you can specify round, bevel, or miter intersections where lines meet.
You can use the Shadow category in the Format Shape dialog box to add depth to any graphic object. In Figure 10-40, we created a shape, right-clicked it, and then clicked Format Shape. We then clicked the Shadow category and applied shadow effects. When you click the Presets button, options appear for a number of built-in shadow configurations. After you apply a shadow effect, you can modify it using the sliders in the dialog box.

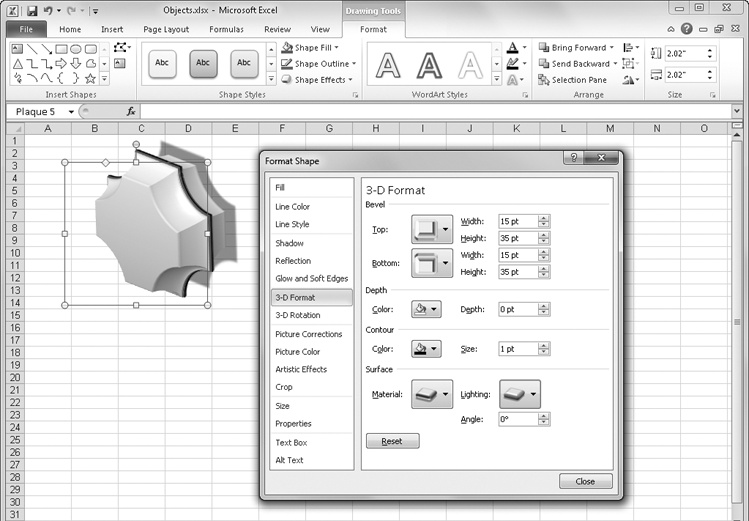
Click the 3-D Format category in the Format Shape dialog box to apply three-dimensional effects to the selected shape. If you apply one of the Bevel presets, several formats are applied to the selected object: color and amount of depth and contour, surface type, and lighting type. In Figure 10-41, we created a shape and applied the Convex preset from the Top drop-down list.
Note
The controls used most often in the 3-D Format and 3-D Rotation categories in the Format Shape dialog box are available directly on the ribbon. On the Format tab under Drawing Tools, which appears when you select a graphic object, click the Shape Effects button, and then click commands on the Bevel menu and the 3-D Rotation menu.

With the controls in the 3-D Rotation category, you can control the attitude of the selected shape in all three dimensions. We’ll describe the controls in the two 3-D categories in the Format Shape dialog box in detail.
Bevel (in the 3-D Format category) Controls the amount of “extrusion” applied to the selected shape, giving it the appearance of having a beveled edge. You can create extrusions on both sides; the Top drop-down list controls the front of the shape, and the Bottom drop-down list controls the back, as shown in Figure 10-42. (To see the results of the Bottom settings, you must rotate the shape using controls in the 3-D Rotation category.) The Width settings control the width of the beveled edge, and the Height settings control the distance the bevel is extruded from the surface of the shape.
Depth (in the 3-D Format category) Controls the thickness and color of the shape itself—not any “extrusions” you apply with the Bevel controls. (To see the results of the Depth settings, you must rotate the shape using controls in the 3-D Rotation category.)
Contour (in the 3-D Format category) Controls the size and color of a raised border applied to the perimeter of the selected shape.
Surface (in the 3-D Format category) Includes two galleries you can use to select types of surface treatment and lighting effects. Materials include surfaces such as plastic and metal, translucent, and special effects such as soft edge and wireframe. Choose from lighting effects such as Three-Point, Sunset, and Chilly, and choose the angle from which the light originates.
Rotation (in the 3-D Rotation category) Contains controls to adjust the position of the selected object in three-dimensional space. The x-axis is horizontal, the y-axis is vertical, and the z-axis is front to back.
Perspective (in the 3-D Rotation category) Controls the amount of foreshortening applied to a shape, if applicable. Foreshortening makes shapes that are closer look larger. You use this control to make shapes appear to tilt forward or backward. It is easiest to start by clicking one of the Perspective options in the Presets drop-down list; then you can change the angle of foreshortening using the Perspective controls.
Keep Text Flat (in the 3-D Rotation category) Prevents any text typed in a shape from rotating along with the shape, effectively separating the text from the shape.
Besides objects you create with the Text Box button on the Insert tab, many of the objects you can create in Excel are de facto text boxes. Figure 10-43 shows two objects, one created with the Text Box tool and another created with one of the Star tools in the Shapes gallery. Both objects are subject to the influence of the Text Box controls in the Format Shape dialog box, as are most two-dimensional shapes and even WordArt and SmartArt objects.

Figure 10-43. The Text Box category of the Format Shape dialog box offers controls not found on the ribbon.
Note
The controls used most often in the Text Box category of the Format Shape dialog box are available directly on the ribbon. On the Home tab, use the buttons in the Font and Alignment groups. For more information, see the following topics: Using Fonts on page 351, Aligning Data in Cells on page 342, and Working with Text Boxes on page 381. For advanced font formatting, see Formatting Text in Graphics on page 409.

The Text Layout controls perform some of the same tasks as the buttons in the Alignment group on the Home tab of the ribbon. You can see in Figure 10-43 that both the Middle Align and Center buttons on the ribbon are highlighted, indicating that the selected objects have those attributes applied. The corresponding setting in the Vertical Alignment category in the dialog box is also selected.
The Allow Text To Overflow Shape option is normally selected; if you clear this option, text too large to fit the shape is truncated. If you select the Resize Shape To Fit Text check box, the object shrinks (or expands) to fit the text it contains as it’s typed and formatted. The Internal Margin settings add or decrease the amount of space between the edge of a shape and the text it contains. The Columns button displays a dialog box you can use to create columns of text within any text-capable object, as shown in Figure 10-44.

Selecting Text or Shapes
You have two ways to select objects containing text: You can select either the text area or the entire object. When you select the text area, you can edit it; when you select the object, you can move it. You tell the difference by looking at the object’s border. When you click a shape created using the Text Box tool on the Insert tab, the border is a dashed line at first, indicating the text area is ready for editing. Click the border of the box, and the border changes to a solid line, indicating the object is now selected:

For shapes other than text boxes, selection depends on whether the shape contains text: Click near the text, and the text area is selected; otherwise, the shape is selected. If a shape other than a text box doesn’t contain text, you can’t activate the text area, but you don’t need to do so—just start typing after you select the object to create a text area.
As mentioned earlier in this chapter, objects you create using the Object button on the Insert tab cannot be formatted using the Format Shape dialog box you have now become familiar with. Objects inserted this way are called embedded objects, and they do not cause additional formatting tabs to appear on the ribbon when you select them. To apply formatting to an embedded object, you must right-click it and then click the Format Object command (or Format Picture, depending on the object type). When you do so, a dialog box like the one shown in Figure 10-45 appears. Depending on the type of object selected, some of the options available in this dialog box have no effect.
Note
For more information about embedded objects, see Inserting Other Objects on page 397.
In Figure 10-45, we used the Colors And Lines tab in the Format Object dialog box to apply a gradient fill to an embedded Microsoft Equation Editor object and added 75 percent transparency and a 3-point border. In general, the options available in this dialog box are self-explanatory and similar to options found elsewhere.
