
Besides all the nifty formatting options for graphics that are built into Excel 2010, there are also tools you can use to select and arrange graphic objects, group and hide them, move them around, and protect them.
Sometimes you’ll find it convenient to move, resize, or even reformat more than one object at a time. If you create a logo using multiple objects, for example, you want to move the objects as a single unit, preserving their positions relative to one another. For these purposes, Excel includes the Group button, located in the Arrange group on the Page Layout tab. This button is a menu containing the Group, Ungroup, and Regroup commands, and it remains inactive unless more than one object is selected. (The Group button can also be found on the Format tab that appears when an object is selected.)
Note
You can select multiple objects by holding down Shift and clicking individual objects. You can select all the objects on the current worksheet by clicking one to select it and then pressing Ctrl+A (Select All). You can also select all objects by clicking Home, Find & Select, Go To Special, and then selecting the Objects option.
After you select a group of objects, you can lock them together by using the Group button on the Page Layout tab or by right-clicking any of the selected objects, clicking Group, and then clicking one of the Group commands, as shown in Figure 10-46.
When you group objects, the sets of handles around each selected object are replaced by a single set of handles for the entire group, as shown in Figure 10-46. After you group the objects, you can manipulate the set of objects as a single object. You can resize, move, and apply formatting to them as a group. When you apply formatting, however, the separate objects might behave differently, especially if you have grouped different kinds of objects with different formats. It’s best to apply formatting before you group objects, unless the objects are similar.
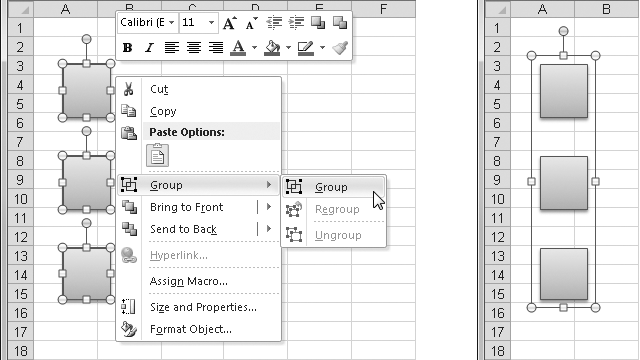
Figure 10-46. Select a group of objects, right-click any one of them, and then click Group to lock them together.
To ungroup a set of objects, select the group, right-click, and then click Group, Ungroup. You can use the Regroup command to reconstitute the group of objects you most recently ungrouped. This is handy, for example, if you ungrouped a set of objects to make changes to one or more of them. Rather than selecting them again and clicking Group, just click Regroup.
Note
Unlike with other objects, when you click an object containing text and a dotted border appears around it, the text area—not the object—is selected. To select the object, click the border; when the border appears as a solid line, the object is selected. If you want to move an object containing text while its text area is active, you can drag it by its border.
Think of the objects on a worksheet as stacked on top of each other. Each new object you draw is placed on top of the stack. If necessary, you can adjust the position of objects in the stack by using the Bring Forward and Send Backward buttons in the Arrange group on the Page Layout tab. (You can also right-click an object and then use the equivalent commands on the shortcut menu.)
Figure 10-47 shows two sets of ungrouped objects. The set on the right was originally just like the set on the left, but then we selected the banner and clicked Bring Forward, Bring To Front, and then we selected the star and clicked Send Backward, Send To Back.

Figure 10-47. You can reposition objects in relation to each other using buttons in the Arrange group.
As you can see in Figure 10-47, the Send Backward button is both a menu and a button—clicking the main part of the button issues the Send Backward command, while clicking its arrow displays a short menu. The same is true for the Bring Forward button. The Bring Forward and Send Backward commands move the object one step at a time through the stack, while the Bring To Front and Send To Back commands move the object all the way forward or back with a single click.
If you need to work with multiple objects on a worksheet, you can gain a little more control using the selection pane. Click the Selection Pane button in the Arrange group on the Page Layout tab to display a task pane like the one shown in Figure 10-48.

Figure 10-48. Use the Selection And Visibility task pane to control the display of multiple objects.
You can use the buttons at the bottom of the Selection And Visibility task pane to show and hide all objects on the worksheet and to move selected objects up and down in the object stack. You can click the little eyeball icon to the right of an object name to hide that object; click again to unhide it. You can also edit the names of the objects by simply clicking the name once to select it and then clicking it again to edit its text. It is important to note that hidden objects continue to appear on the list in the selection pane, which is one of the only ways you can tell they are there.
Note
The Selection Pane button is also available on the Format tabs under both Drawing Tools and Picture Tools; these tabs appear when you select a picture, a shape, WordArt, a text box, or clip art.
You can change the relationship of objects to the underlying worksheet by using the options on the Properties tab in the Format Shape dialog box. To do so, right-click an object, click Format Shape, and click Properties to display the dialog box shown in Figure 10-49. (You’ll find a similar command when you right-click pictures or embedded objects.)

Note
The Format Shape dialog box is also available by clicking the dialog box launcher in the Size group on the Format tab that appears when a shape, WordArt, a text box, or clip art is selected.
The default Object Positioning option is Move And Size With Cells, meaning that if you do anything to change the size or shape of the underlying cells, the object adjusts accordingly. An underlying cell is any cell whose right or bottom border is between the upper-left corner and the lower-right corner of the object. Here are some facts you need to know about the Object Positioning options:
If you insert columns or rows to the left of an object formatted with the Move And Size With Cells option, the object moves accordingly.
If you insert columns or rows between the first and last cells underlying an object formatted with the Move And Size With Cells option, the object stretches to accommodate the insertion.
If you select the Move But Don’t Size With Cells option and then insert or delete columns or rows, the object moves but retains its shape and proportion.
If you select the Don’t Move Or Size With Cells option, the object floats above the worksheet and isn’t affected by any changes you make to the underlying cells.
The Print Object check box is ordinarily selected. If you clear it, the selected object isn’t printed when you print the worksheet.
Note
In addition to moving and sizing objects with cells, Excel lets you control what happens when you cut, copy, or sort cells to which objects are attached. Click the File tab, click Options, select the Advanced category, and in the Cut, Copy, And Paste group, select or clear the Cut, Copy, And Sort Inserted Objects With Their Parent Cells check box.
The Size tab in the Format Shape dialog box offers precise control over the height, width, angle of rotation, scale, and cropping of the selected object. You can perform these tasks directly by dragging, but you might find it helpful to display the dialog box if you want to resize objects proportionally using the Lock Aspect Ratio option.
What Is Alt Text?
You’ll notice that the Format Shape dialog box contains an Alt Text tab. If you click it, you’ll see Title and Description fields for adding text to the selected object, known in Web parlance as alt text. (Also notice that in Figure 10-45 on page 421, the Format Object dialog box includes an Alt Text tab that does the same job for embedded objects.)
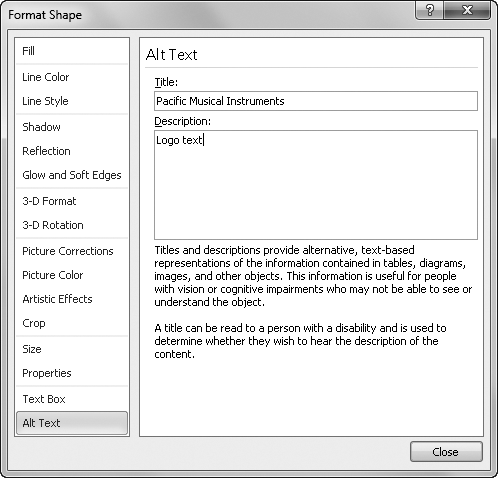
When you save an Excel document as a Web page, graphics are converted to their Web-based equivalents. In HTML, the language of the Web, alternative text is added to images for four reasons. First, alt text appears in the browser while an image is loading, which is helpful for large images over slow connections. Second, when you rest the pointer on an image containing alt text in your browser, the text appears in a tiny pop-up window. Third, alt text is used by text-reading software commonly used by the blind, allowing them to hear a description of the image. And fourth, Web search engines index the alt text attached to images along with all the other “visible” text on your Web site. If you’re planning to save your workbook in HTML format, you should consider adding alternative text to all your graphics. For more information about Excel and the Web, see Chapter 26.
It’s great to be able to create cool graphics with Excel, but the free-floating nature of graphic objects sometimes makes it hard to maintain a semblance of order on your worksheet. The Align button, in the Arrange group on the Page Layout tab, contains commands you can use to straighten up your worksheet, as shown in Figure 10-50.

Note
You can also find the Align button (as a button only, without the “Align” label) on the Format tab that appears when an object is selected (except embedded objects).
Suppose you have a number of objects that you want to be evenly spaced, like the randomly spaced boxes shown on the left in Figure 10-50. You can start by selecting the top row of objects, using the Align Top command to line them up, and then selecting Distribute Horizontally to space them evenly. Then you can use the other alignment and distribution commands to position the rest of the objects to your liking. Here are some key points to remember about using these object-positioning commands:
Snap To Grid Uses the columns and rows of the worksheet to align objects. Preexisting objects don’t line up with the grid when you choose this command, but as soon as you create or drag an object, it snaps to the nearest column and row borders. The Snap To Grid command is a toggle—that is, you click once to turn it on and click again to turn it off.
Snap To Shape Turns on the Snap To Grid command when you choose it, activating its functionality. It adds to the spreadsheet grid virtual gridlines tangent to the edges of any existing objects, making it easy to align objects to the grid or to one another. If you turn off the Snap To Grid command, the Snap To Shape command is turned off as well. The Snap To Shape command is also a toggle.
The Align and Distribute commands Arrange the selected objects relative to each other. These buttons are available only when you select two or more objects.
Align Left/Right/Top/Bottom Lines up the edges of all selected objects with the corresponding edge of the leftmost, rightmost, top, or bottom object selected.
Align Center Lines up the centers of objects along a vertical axis and finds the average common centerline of all selected objects.
Align Middle Lines up the centers of objects along a horizontal axis and finds the average common centerline of all selected objects.
Distribute Horizontally/Vertically Calculates the total amount of space between the selected objects and divides the space as equally as possible among them. The first and last objects (leftmost and rightmost or top and bottom) do not move—all the objects in between are adjusted as necessary.
Objects are ordinarily prevented from being selected, moved, formatted, or sized when you apply protection to a worksheet (Review tab, Protect Sheet). You can change this before applying sheet protection by right-clicking the object, clicking the Format Shape (or Format Picture) command, and then selecting or clearing the Locked check box on the Properties tab. (Refer to Figure 10-49.) You can also select the Lock Text check box, which is available only when you select a text-capable object, to protect an object’s text contents. Newly drawn objects are assigned Locked status. Remember, to activate worksheet security and protection, you must also click Protect Sheet on the Review tab. For more information about protection, see Protecting Worksheets on page 170.