
The SmartArt button on the Insert tab represents a significant set of features. In the previous release of Excel, SmartArt replaced the organization chart feature with a comparative cornucopia of new functionality and graphic complexity. SmartArt graphics are prepackaged sets of graphic objects designed to address a variety of presentation tasks, such as creating timelines and decision trees, illustrating procedural steps and relationships, and, yes, creating organizational charts.
Note
The feature formerly known as Microsoft Organization Chart 2.0 is still available as an add-in, which you can add by exiting all programs and using Windows installation tools. For details, click the Help button, and under “Working with Graphics,” read “Where Can I Find Microsoft Office Organization Chart?”
When you click the SmartArt button, the Choose A SmartArt Graphic dialog box shown in Figure 10-17 appears.
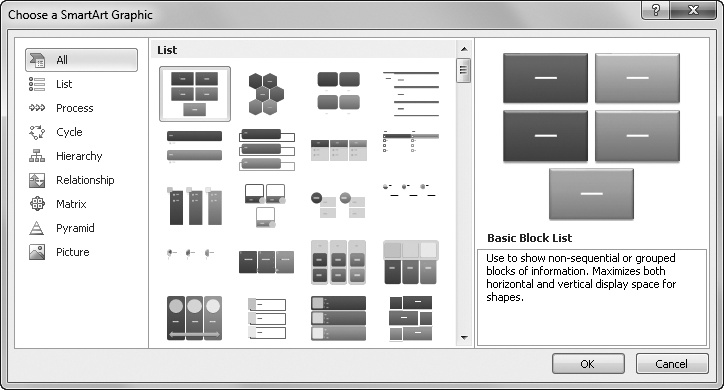
The categories on the left represent conceptual approaches you can select to narrow the SmartArt graphics available in the main area of the dialog box:
List Creates a list of information that does not need to be in any particular order
Process Illustrates sequential steps to achieve a goal
Cycle Describes processes that are cyclical rather than goal oriented
Hierarchy Creates organizational charts or decision trees
Relationship Shows connections
Matrix Illustrates relationships that are interdependent
Pyramid Shows relationships that are proportional in size or importance
Picture Allows you to add your own pictures to predesigned graphics
After you select a SmartArt graphic in the dialog box, click OK to add it to your worksheet, as shown in Figure 10-18.

Figure 10-18. You can type your text into the box on the left, and it appears in the graphic to the right.
A SmartArt graphic comprises several components: the text pane with its Name box at the bottom displaying the currently active item; the SmartArt graphic; and the border surrounding the SmartArt like a picture frame. The text pane and the border appear only when you select the graphic. Similarly, two tabs appear on the ribbon—under SmartArt Tools—when you select a SmartArt graphic: Design and Format. The text pane makes organizing large charts and diagrams a lot easier and lets you easily perform editing tasks such as indenting bullet lists and rearranging hierarchical items.
A new category of SmartArt in Excel 2010 is the Picture category, whose graphic framework is shown inserted in Figure 10-18. This category allows you to add not only your own text but your own images as well, as shown in Figure 10-19.

Here’s more information about the text pane and the border:
Resize the graphic by dragging any of the eight dotted handles on the border.
Move the graphic by dragging the border; the text pane follows.
Enter text directly into the graphic’s items by clicking and typing.
Redisplay a closed text pane by clicking the tab that appears in its place on the border or by clicking the Text Pane button on the Design tab under SmartArt Tools.
In the Picture category, click any photo icon to display a version of the Open dialog box in which you can select an image to insert. Selecting any inserted image displays the Picture Tools tab on the ribbon, as shown in Figure 10-19, which appears only when an image is selected.
If you change your mind about your original SmartArt selection, the Layouts gallery on the Design tab under SmartArt Tools lets you switch to a different arrangement within the same SmartArt category without having to start from scratch. Or click the More Layouts command at the bottom of the Layouts gallery to switch to a different SmartArt category. The SmartArt Styles gallery offers different treatments within each category, as shown in Figure 10-20. Both of these galleries exhibit live preview functionality: just rest the pointer on each thumbnail to quickly view your graphic in each style.

Figure 10-20. Use the SmartArt Styles group on the Design tab under SmartArt Tools to add graphic interest to your SmartArt.
Note
The Layouts and SmartArt Styles galleries share a clever design feature with a number of other galleries on the ribbon. The top two arrows on the right side of the gallery allow you to scroll up and down through the available styles without obscuring the worksheet; clicking the bottom arrow button displays the entire gallery.
The buttons in the Create Graphic group on the Design tab under SmartArt Tools offer ways to modify your graphic, and how they work depends on the particular graphic you’re using. For example, the Add Bullet button works perfectly in most List graphics but not so well in the picture graphic shown in Figure 10-19. Experimentation is inevitable and rewarding. You can always press Ctrl+Z to undo any changes or click the Reset Graphic button on the Design tab under SmartArt Tools. Here is some more information about buttons in the Create Graphic group:
Add Shape Inserts another shape similar to those already in the selected graphic. Clicking the arrow displays a menu of commands that allow you to choose where to put the new shape: above, below, after, or before the active shape. The Add Assistant command applies only to Hierarchical Organization Chart graphics; it adds a box outside the hierarchy that is typically used for administrative assistants or other positions outside the normal chain of command.
Add Bullet Creates a new bullet item subordinate to the active bullet.
Text Pane Displays or hides the text pane that appears when a SmartArt graphic is selected.
Right To Left Flips the horizontal orientation of applicable graphics.
Layout Controls the horizontal orientation of an organization chart. Menu commands include Standard, Left Hanging, Right Hanging, and Both (left and right hanging). This is available only when an organization chart graphic is selected.
Reorder Up and Down Moves the selected item up or down in the bullet list.
Promote and Demote Changes the hierarchical position of a selected bullet. Promoting to the highest level creates a new shape in the SmartArt graphic. Similarly, demoting a top-level bullet removes the corresponding shape in the graphic and adds its text as subordinate to the previous bullet. In organization chart graphics only, these buttons move the selected shape up or down the hierarchy and do not add or remove shapes from the graphic.
Note
We discuss the controls available on the Format tab under SmartArt Tools in Formatting Graphics on page 400.